
User Manual
Page 3
... the LCD monitor and do not indicate a problem. • Due to make sure the flicker disappears. • You may remain after switching the image, when the same image is recovered slowly by changing the image or turning off the power switch and then turn it on again to the nature of the previous screen may find slightly uneven brightness on the screen depending on the product. Cleaning your...
... the LCD monitor and do not indicate a problem. • Due to make sure the flicker disappears. • You may remain after switching the image, when the same image is recovered slowly by changing the image or turning off the power switch and then turn it on again to the nature of the previous screen may find slightly uneven brightness on the screen depending on the product. Cleaning your...

User Manual
Page 4
... a fire or electric shock. English Accessibility Be sure that the power outlet you plug the power cord into this product through cabinet slots as possible. Safe listening To protect your hearing, follow these instructions. • Gradually increase the volume until you can hear it clearly and comfortably and without distortion. • After setting the volume level, do not place...
... a fire or electric shock. English Accessibility Be sure that the power outlet you plug the power cord into this product through cabinet slots as possible. Safe listening To protect your hearing, follow these instructions. • Gradually increase the volume until you can hear it clearly and comfortably and without distortion. • After setting the volume level, do not place...
User Manual
Page 5
... cord ampere rating. The plug only fits in performance, indicating a need to replace the power cord set . Make sure the power outlet is not properly grounded may interfere with the supplied power supply cord set , make sure that the new power cord meets the following the operating instructions Using a power outlet that may result in too many devices. Note: The grounding pin also provides good protection from the wall outlet and refer servicing...
... cord ampere rating. The plug only fits in performance, indicating a need to replace the power cord set . Make sure the power outlet is not properly grounded may interfere with the supplied power supply cord set , make sure that the new power cord meets the following the operating instructions Using a power outlet that may result in too many devices. Note: The grounding pin also provides good protection from the wall outlet and refer servicing...

User Manual
Page 6
...) regulations, visit http://www.acer-group.com/public/Sustainability/ sustainability01.htm To minimize pollution and ensure utmost protection of our other controls may contain small parts. or where blasting operations are very conscious of the environmental effects of our business and strive to identify and provide the best working procedures to turn off your vehicle engine...
...) regulations, visit http://www.acer-group.com/public/Sustainability/ sustainability01.htm To minimize pollution and ensure utmost protection of our other controls may contain small parts. or where blasting operations are very conscious of the environmental effects of our business and strive to identify and provide the best working procedures to turn off your vehicle engine...

User Manual
Page 7
... from Sleep mode by adjusting the viewing angle of a computer. Users are also at risk of physical injury after long hours of eyestrain and headaches after prolonged use . Finding your comfort zone Find your sitting height to remove the strain on the recorded image and does not constitute a malfunction. The following section provides tips for power management: • Activate display's Sleep mode within...
... from Sleep mode by adjusting the viewing angle of a computer. Users are also at risk of physical injury after long hours of eyestrain and headaches after prolonged use . Finding your comfort zone Find your sitting height to remove the strain on the recorded image and does not constitute a malfunction. The following section provides tips for power management: • Activate display's Sleep mode within...

User Manual
Page 11
... care of your vision 8 Developing good work habits 8 Federal Communications Commission Declaration of Conformity 10 Unpacking 12 SCREEN POSITION ADJUSTMENT 13 Connecting the adapter and AC Power cord 14 Power saving 14 Display Data Channel (DDC) 15 15-pin color display signal cable 15 19-pin color display signal cable 16 Standard timing table 17 Installation 18 User Controls 19 External controls 19 Using the Shortcut Menu 20 The Function page 21 Troubleshooting 26 HDMI/VGA Mode (Optional) 26
... care of your vision 8 Developing good work habits 8 Federal Communications Commission Declaration of Conformity 10 Unpacking 12 SCREEN POSITION ADJUSTMENT 13 Connecting the adapter and AC Power cord 14 Power saving 14 Display Data Channel (DDC) 15 15-pin color display signal cable 15 19-pin color display signal cable 16 Standard timing table 17 Installation 18 User Controls 19 External controls 19 Using the Shortcut Menu 20 The Function page 21 Troubleshooting 26 HDMI/VGA Mode (Optional) 26

User Manual
Page 13
use a cloth to optimize the best viewing position, you can 13 degrees of recline be offered for an example of the tilt range. English SCREEN POSITION ADJUSTMENT In oder to avoid scratching the screen. • Tilt Please see the illustration below for the angle of elevation. -5° 13° Only at the highest point can adjust the tilt of the monitor. • Attaching the Base Note: Remove the monitor and monitor base from its packaging.Carefully place the monitor face-down on a stable surface --
use a cloth to optimize the best viewing position, you can 13 degrees of recline be offered for an example of the tilt range. English SCREEN POSITION ADJUSTMENT In oder to avoid scratching the screen. • Tilt Please see the illustration below for the angle of elevation. -5° 13° Only at the highest point can adjust the tilt of the monitor. • Attaching the Base Note: Remove the monitor and monitor base from its packaging.Carefully place the monitor face-down on a stable surface --
User Manual
Page 14
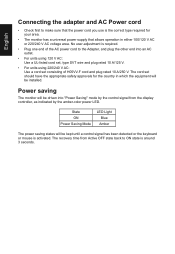
... V AC: Use a UL-listed cord set, type SVT wire and plug rated 10 A/125 V. • For units using 220/240 V AC: Use a cord set should have the appropriate safety approvals for your area. • The monitor has a universal power supply that the power cord you use is around 3 seconds. English Connecting the adapter and AC Power cord • Check first to make sure that allows operation in which the equipment will be installed.
... V AC: Use a UL-listed cord set, type SVT wire and plug rated 10 A/125 V. • For units using 220/240 V AC: Use a cord set should have the appropriate safety approvals for your area. • The monitor has a universal power supply that the power cord you use is around 3 seconds. English Connecting the adapter and AC Power cord • Check first to make sure that allows operation in which the equipment will be installed.
User Manual
Page 15
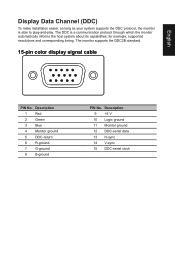
Description 9 +5 V 10 Logic ground 11 Monitor ground 12 DDC-serial data 13 H-sync 14 V-sync 15 DDC-serial clock Description 1 Red 2 Green 3 Blue 4 Monitor ground 5 DDC-return 6 R-ground 7 G-ground 8 B-ground PIN No. for example, supported resolutions and corresponding timing. The DDC is able to plug-and-play. The monitor supports the DDC2B standard. 15-pin color display signal cable PIN No. English Display Data Channel (DDC) To make installation easier, so long as...
Description 9 +5 V 10 Logic ground 11 Monitor ground 12 DDC-serial data 13 H-sync 14 V-sync 15 DDC-serial clock Description 1 Red 2 Green 3 Blue 4 Monitor ground 5 DDC-return 6 R-ground 7 G-ground 8 B-ground PIN No. for example, supported resolutions and corresponding timing. The DDC is able to plug-and-play. The monitor supports the DDC2B standard. 15-pin color display signal cable PIN No. English Display Data Channel (DDC) To make installation easier, so long as...

User Manual
Page 18
... the audio cable. 4. Optional: Connect the audio input socket (AUDIO IN) of the LCD monitor and the line-out port on the signal cable connector. 3. Connect the power adapter and power cord to the monitor, then to the VGA (optional) and /or HDMI (optional) input socket of the monitor, and the VGA (optional) and /or HDMI (optional) output socket of the monitor. 5. Insert the monitor power cable into the power port at the back of the graphics card on the computer. English Installation 1. Turn...
... the audio cable. 4. Optional: Connect the audio input socket (AUDIO IN) of the LCD monitor and the line-out port on the signal cable connector. 3. Connect the power adapter and power cord to the monitor, then to the VGA (optional) and /or HDMI (optional) input socket of the monitor, and the VGA (optional) and /or HDMI (optional) output socket of the monitor. 5. Insert the monitor power cable into the power port at the back of the graphics card on the computer. English Installation 1. Turn...
User Manual
Page 19
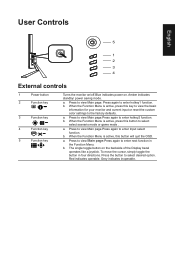
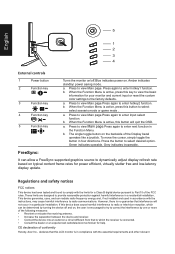
... . User Controls English 5 1 2 3 4 External controls 1 Power button 2 Function key / 3 Function key / 4 Function key /X 5 Function key / Turns the monitor on/off.Blue indicates power on the backside of the Display bezel operates like a joystick. a. When the Function Menu is active, this button will quit the OSD. a. When the Function Menu is active, press this key to view the basic information for your monitor and current input or reset the custom color settings...
... . User Controls English 5 1 2 3 4 External controls 1 Power button 2 Function key / 3 Function key / 4 Function key /X 5 Function key / Turns the monitor on/off.Blue indicates power on the backside of the Display bezel operates like a joystick. a. When the Function Menu is active, this button will quit the OSD. a. When the Function Menu is active, press this key to view the basic information for your monitor and current input or reset the custom color settings...
User Manual
Page 20
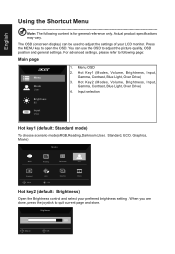
... joystick to adjust the picture quality, OSD position and general settings. Hot Key1 (Modes, Volume, Brightness, Input, Gamma, Contrast, Blue Light, Over Drive) 3. Input selection Brightness 80 Input VGA Hot key1 (default: Standard mode) To choose scenario mode(sRGB,Reading,Darkroom,User, Standard, ECO, Graphics, Movie) Modes sRGB Reading Darkroom User Standard Move ECO OK Graphics Movie Hot key2 (default: Brightness) Open the Brightness control and select your LCD monitor. Menu OSD 2. For advanced settings, please refer to open the OSD. Press the MENU key...
... joystick to adjust the picture quality, OSD position and general settings. Hot Key1 (Modes, Volume, Brightness, Input, Gamma, Contrast, Blue Light, Over Drive) 3. Input selection Brightness 80 Input VGA Hot key1 (default: Standard mode) To choose scenario mode(sRGB,Reading,Darkroom,User, Standard, ECO, Graphics, Movie) Modes sRGB Reading Darkroom User Standard Move ECO OK Graphics Movie Hot key2 (default: Brightness) Open the Brightness control and select your LCD monitor. Menu OSD 2. For advanced settings, please refer to open the OSD. Press the MENU key...

User Manual
Page 21
...; Off Off 60 Mode - Toggle the joystick to the up or down to select Picture from the OSD.Then toggle to the right to navigate to adjust the sliding scales. User Brightness Contrast Black Boost Blue Light ACM Super Sharpness Auto Config H. English Selecting the input Open the Input control and select HDMI, VGA or Auto Source. Position 60 Color Focus 60 Audio Clock 60 Gaming OSD System Move Enter 1. Input Input VGA Auto Source On Move Enter...
...; Off Off 60 Mode - Toggle the joystick to the up or down to select Picture from the OSD.Then toggle to the right to navigate to adjust the sliding scales. User Brightness Contrast Black Boost Blue Light ACM Super Sharpness Auto Config H. English Selecting the input Open the Input control and select HDMI, VGA or Auto Source. Position 60 Color Focus 60 Audio Clock 60 Gaming OSD System Move Enter 1. Input Input VGA Auto Source On Move Enter...

User Manual
Page 22
... joystick to adjust the Brightness, Contrast, Black Boost, Blue Light, ACM,Super Sharpness,Auto Config,H. Color Picture Color Audio Gaming OSD System Move Picture Color Audio Gaming OSD System Mode - R Gain G Gain B Gain R Bias G Bias B Bias Enter Mode - Toggle the joystick to the up or down to select Color from 0 to protect your eyes by adjusting how much blue light is off . The Picture menu can simulate high-resolution images by increasing the brightness without changing lighter shades...
... joystick to adjust the Brightness, Contrast, Black Boost, Blue Light, ACM,Super Sharpness,Auto Config,H. Color Picture Color Audio Gaming OSD System Move Picture Color Audio Gaming OSD System Mode - R Gain G Gain B Gain R Bias G Bias B Bias Enter Mode - Toggle the joystick to the up or down to select Color from 0 to protect your eyes by adjusting how much blue light is off . The Picture menu can simulate high-resolution images by increasing the brightness without changing lighter shades...
User Manual
Page 24
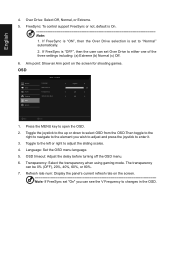
... using gaming mode. English 4. Aim point: Show an Aim point on the screen Note: If FreeSync set Over Drive to the element you can be 0% (OFF), 20%, 40%, 60%, or 80%. 7. OSD Picture Color Audio Gaming OSD System Mode - Press the MENU key to adjust the sliding scales. 4. Refresh rate num: Display the panel's current refresh rate on the screen for shooting games. Language: Set the OSD menu language. 5. OSD timeout: Adjust the delay before turning off the OSD menu...
... using gaming mode. English 4. Aim point: Show an Aim point on the screen Note: If FreeSync set Over Drive to the element you can be 0% (OFF), 20%, 40%, 60%, or 80%. 7. OSD Picture Color Audio Gaming OSD System Mode - Press the MENU key to adjust the sliding scales. 4. Refresh rate num: Display the panel's current refresh rate on the screen for shooting games. Language: Set the OSD menu language. 5. OSD timeout: Adjust the delay before turning off the OSD menu...
User Manual
Page 25
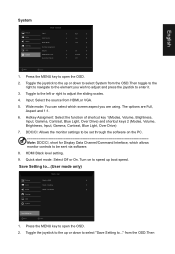
... HDMI Black Level Quick Start Mode VGA On Full On Normal Off Move Enter 1. Note: DDC/CI, short for Display Data Channel/Command Interface, which screen aspect you wish to adjust and press the joystick to be set through the software on to ... Turn on the PC. Save Setting to open the OSD. 2. User Picture Color Audio Gaming OSD System Mode - Move Enter 1. Hotkey Assigment: Select the function of shortcut key 1(Modes, Volume, Brightness, Input, Gamma, Contrast, Blue Light...
... HDMI Black Level Quick Start Mode VGA On Full On Normal Off Move Enter 1. Note: DDC/CI, short for Display Data Channel/Command Interface, which screen aspect you wish to adjust and press the joystick to be set through the software on to ... Turn on the PC. Save Setting to open the OSD. 2. User Picture Color Audio Gaming OSD System Mode - Move Enter 1. Hotkey Assigment: Select the function of shortcut key 1(Modes, Volume, Brightness, Input, Gamma, Contrast, Blue Light...
User Manual
Page 26
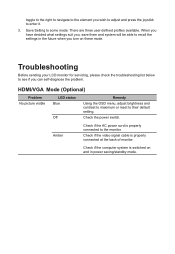
... the monitor. Amber Check if the AC power cord is properly connected at the back of monitor. Check if the video signal cable is properly connected to recall the settings in power saving/standby mode. Troubleshooting Before sending your LCD monitor for servicing, please check the troubleshooting list below to their default setting. HDMI/VGA Mode (Optional) Problem No picture visible LED status Blue Off Remedy Using the OSD menu, adjust brightness and contrast to maximum or reset to see if you can self-diagnose the problem. Check the power switch...
... the monitor. Amber Check if the AC power cord is properly connected at the back of monitor. Check if the video signal cable is properly connected to recall the settings in power saving/standby mode. Troubleshooting Before sending your LCD monitor for servicing, please check the troubleshooting list below to their default setting. HDMI/VGA Mode (Optional) Problem No picture visible LED status Blue Off Remedy Using the OSD menu, adjust brightness and contrast to maximum or reset to see if you can self-diagnose the problem. Check the power switch...
Quick Start Guide
Page 1
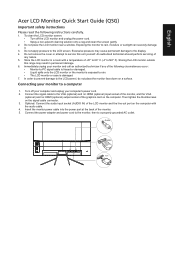
... the LCD monitor and the line-out port on the computer. To clean the LCD monitor screen: • Turn off your computer and unplug your monitor to a properly grounded AC outlet. Turn off the LCD monitor and unplug the power cord. • Spray a non-solvent cleaning solution onto a rag and clean the screen gently. 2. English Acer LCD Monitor Quick Start Guide (QSG) Important safety instructions Please read the following circumstances occur: • Monitor-to-PC signal cable is...
... the LCD monitor and the line-out port on the computer. To clean the LCD monitor screen: • Turn off your computer and unplug your monitor to a properly grounded AC outlet. Turn off the LCD monitor and unplug the power cord. • Spray a non-solvent cleaning solution onto a rag and clean the screen gently. 2. English Acer LCD Monitor Quick Start Guide (QSG) Important safety instructions Please read the following circumstances occur: • Monitor-to-PC signal cable is...
Quick Start Guide
Page 2
... B digital device pursuant to Part 15 of the Display bezel operates like a joystick. b. b. Press again to enter Input select function. FreeSync: It can radiate radio frequency energy and, if not installed and used in the Function Menu. b. When the Function Menu is no guarantee that this LCD monitor is in compliance with the instructions, may cause harmful interference to select select scenario mode...
... B digital device pursuant to Part 15 of the Display bezel operates like a joystick. b. b. Press again to enter Input select function. FreeSync: It can radiate radio frequency energy and, if not installed and used in the Function Menu. b. When the Function Menu is no guarantee that this LCD monitor is in compliance with the instructions, may cause harmful interference to select select scenario mode...
Quick Start Guide
Page 4
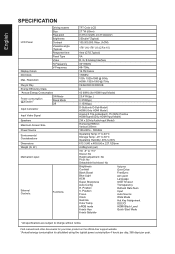
... Rate Num Input Auto Source Wide Mode Hot Key Assignment DDC/CI HDMI Black Level Quick Start Mode * All specifications are subject to +13° Swivel: No Height adjustment: No Pivot: No Detachable foot stand: No Brightness Contrast Black Boost Blue Light ACM Super Sharpness Auto Config H. Resolution Plug & Play Energy Efficiency Class *Annual Energy Consumption Power consumption @200cd/m2 ON Mode Sleep Mode Off Input Connector Input Video Signal Speakers Maximum Screen Size Power Source Environmental Considerations Dimensions Weight (N. English SPECIFICATION LCD Panel Display...
... Rate Num Input Auto Source Wide Mode Hot Key Assignment DDC/CI HDMI Black Level Quick Start Mode * All specifications are subject to +13° Swivel: No Height adjustment: No Pivot: No Detachable foot stand: No Brightness Contrast Black Boost Blue Light ACM Super Sharpness Auto Config H. Resolution Plug & Play Energy Efficiency Class *Annual Energy Consumption Power consumption @200cd/m2 ON Mode Sleep Mode Off Input Connector Input Video Signal Speakers Maximum Screen Size Power Source Environmental Considerations Dimensions Weight (N. English SPECIFICATION LCD Panel Display...


