Acer EK240YC Support and Manuals
Get Help and Manuals for this Acer Computers item

View All Support Options Below
Free Acer EK240YC manuals!
Problems with Acer EK240YC?
Ask a Question
Free Acer EK240YC manuals!
Problems with Acer EK240YC?
Ask a Question
Popular Acer EK240YC Manual Pages
User Manual - Page 2
... a particular purpose. No part of Acer Incorporated. Acer LCD Monitor User Guide Original Issue: 10/2017
Changes may be incorporated in the space provided below. Record the model number, serial number, purchase date and place of merchantability or fitness for identification purposes only and belong to the contents hereof and specifically disclaims the implied...
User Manual - Page 3

.... • Acer monitor is recovered slowly by unplugging all warnings and instructions marked on LCD monitors
The following are turned off before connecting aMnaykceabsulereorbuontphluthggeinLgCDthme poonwiteorr... aadnadpttehre.
computer are normal with the LCD monitor and do not indicate a problem.
• Due to
tchoerdACtoptohweeAr oCuptloewt. In this document for video and visual...
User Manual - Page 4
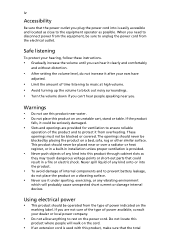
... comfortably
and without distortion.
• After setting the volume level, do not place the ...power available, consult your hearing, follow these instructions.
• Gradually increase the volume until you... dangerous voltage points or short-out parts that the total Never spill liquid ... close to protect it could result in installation unless proper ventilation is provided.
• Never...
User Manual - Page 5
...
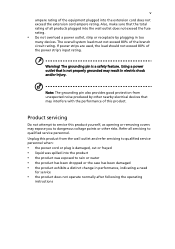
qualitfoierdespelarvciecethpeerpsoownneer lc.ord set, make sure that... tthhee pprroodduucctt wdoaessenxoptosoepdertaotreaninoromr awllaytearfter following the operating
instructions The grounding pin is properly grounded before...valent, 4.5
•
meters (15 feet) maximum length. fIfroymou need
for service
• the product does not operate normally after following the operating •...
User Manual - Page 18
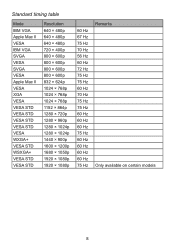
... 75 Hz 60 Hz 60 Hz 60 Hz 75 Hz 60 Hz 60 Hz 60 Hz 60 Hz 75 Hz
Remarks Only available on certain models
8
User Manual - Page 21
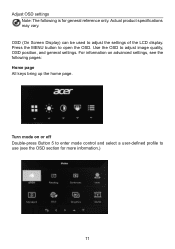
... Screen Display) can be used to adjust image quality, OSD position, and general settings. For information on or off Double-press Button 5 to enter mode control and select a user-defined profile to open the OSD. Actual product specifications may vary. Press the MENU button to use (see the following is for more...
User Manual - Page 22

.... 3. Brightness: Brightness can be adjusted from the OSD.
Then double-press
Button 3 to navigate to the setting you need. Use Buttons 1/2 to 100. Note: Adjusts the balance between light and dark areas. 12 Note: Sets the degree of difference between light and dark. 5. Contrast: Contrast can be adjusted from 0 to select the...
User Manual - Page 23
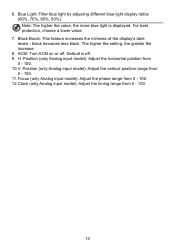
black becomes less black. The higher the setting, the greater the increase.
8. H. Position (only Analog input model): Adjust the horizontal position from 0 - 100.
13 For best protection, choose a lower value.
7. ACM: Turn ACM on or off . 9. Default is displayed. Focus (only Analog input model): Adjust the phase range from 0 - 100. 12.Clock (only Analog...
User Manual - Page 24

... blue, yellow, magenta, and cyan
saturation. 14 Then double-press Button 3 to
navigate to the setting you to select Color from the OSD. Gamma Mode allows you want to adjust the slider. 4. ... adjust the brightness and hue. You can choose Cool, Warm, Normal,
Blue Light or custom User Settings. 6. sRGB Mode is used to open the OSD. 2. Double-click Button 1 to improve the color matching...
User Manual - Page 25

Use Buttons 1/2 to select Performance from the OSD. Use Buttons 1/2 to adjust the slider.
15 Then double-press
Button 3 to navigate to the setting you want to open the OSD. 2. Double-click Button 1 to adjust. 3. Performance adjustment
1.
User Manual - Page 26

... Lock: The OSD lock function is used to adjust. 3. Use Buttons 1/2 to open the OSD. 2. Transparency can
be 0% (off), 20%, 40%, 60%, or 80%. 7. Language: Set the OSD menu language. 5. Then double-press Button 3 to
navigate to the setting you want to prevent the OSD button from the OSD. OSD adjustment
1.
User Manual - Page 27
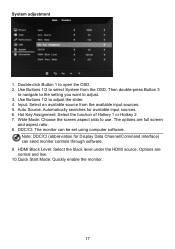
.... 8. Double-click Button 1 to use. Then double-press Button 3
to navigate to the setting you want to select System from the available input sources. 5. Input: Select an available source... from the OSD. Auto Source: Automatically searches for Display Data Channel/Command Interface) can be set using computer software. DDC/CI: The monitor can send monitor controls through software. 9. HDMI...
User Manual - Page 28
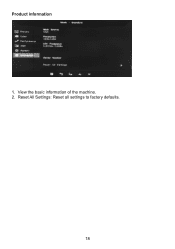
Reset All Settings: Reset all settings to factory defaults.
18 View the basic information of the machine. 2. Product information 1.
User Manual - Page 29
...set to minimum, and try to increase the volume.
19 Position, and V. If they do not, the input signal frequency may not match.
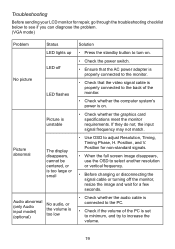
• Use OSD to adjust Resolution, Timing, Timing Phase, H. Troubleshooting
Before sending your LCD monitor for repair, go through the troubleshooting checklist below to see if you can diagnose the problem...input model) ...specifications meet the monitor requirements.
User Manual - Page 30
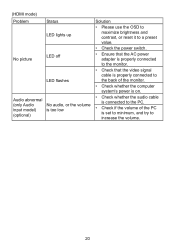
(HDMI mode) Problem
Status
LED lights up
No picture
LED off
LED flashes
Audio abnormal (only Audio input model) (optional)
No audio, or the volume is too low
Solution
• Please use the OSD to maximize brightness and contrast, or ...on.
• Check whether the audio cable is connected to the PC.
• Check if the volume of the PC is set to minimum, and try to increase the volume.
20
Acer EK240YC Reviews
We have not received any reviews for Acer yet.