User Manual
Page 3
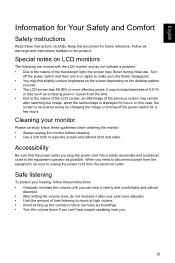
... flicker during initial use . • The LCD screen has 99.99% or more effective pixels. Safe listening To protect your monitor Please carefully follow these instructions. • Gradually increase the volume until you can 't hear people speaking near you plug the power cord into is recovered slowly by changing the image or turning off the power switch and then turn it after switching the image, when the same image is displayed...
... flicker during initial use . • The LCD screen has 99.99% or more effective pixels. Safe listening To protect your monitor Please carefully follow these instructions. • Gradually increase the volume until you can 't hear people speaking near you plug the power cord into is recovered slowly by changing the image or turning off the power switch and then turn it after switching the image, when the same image is displayed...

User Manual
Page 4
... used , the load should not exceed 80% of the power strip's input rating. Also, make sure that may expose you are provided for service • the product does not operate normally after following the operating instructions iv Note: The grounding pin also provides good protection from the wall outlet and refer servicing to qualified service personnel when: • the power cord or plug...
... used , the load should not exceed 80% of the power strip's input rating. Also, make sure that may expose you are provided for service • the product does not operate normally after following the operating instructions iv Note: The grounding pin also provides good protection from the wall outlet and refer servicing to qualified service personnel when: • the power cord or plug...

User Manual
Page 6
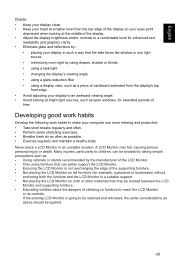
... section provides tips for power management: • Activate display's Sleep mode within 5 minutes of user inactivity. • Wake the monitor when it is produced with high-precision manufacturing techniques. Eyes • Rest your eyes frequently. • Give your eyes regular breaks by adjusting the viewing angle of the monitor, using a footrest, or raising your eyes. English LCD pixel statement The LCD unit is in...
... section provides tips for power management: • Activate display's Sleep mode within 5 minutes of user inactivity. • Wake the monitor when it is produced with high-precision manufacturing techniques. Eyes • Rest your eyes frequently. • Give your eyes regular breaks by adjusting the viewing angle of the monitor, using a footrest, or raising your eyes. English LCD pixel statement The LCD unit is in...
User Manual
Page 7
...; Adjust the display brightness and/or contrast to a comfortable level for enhanced text readability and graphics clarity. • Eliminate glare and reflections by: • placing your display in an unstable location. Never place a LCD Monitor in such a way that the side faces the window or any light source • minimizing room light by using drapes, shades or blinds • using a task light • changing the display's viewing...
...; Adjust the display brightness and/or contrast to a comfortable level for enhanced text readability and graphics clarity. • Eliminate glare and reflections by: • placing your display in an unstable location. Never place a LCD Monitor in such a way that the side faces the window or any light source • minimizing room light by using drapes, shades or blinds • using a task light • changing the display's viewing...

User Manual
Page 10
... instructions v LCD pixel statement vi Tips and information for comfortable use vi Finding your comfort zone vi Taking care of your vision vi Developing good work habits vii PACKAGE CONTENTS 1 Attaching the monitor to the base 2 SCREEN POSITION ADJUSTMENT 3 CONNECTING THE POWER CORD 3 Connecting the adapter and AC Power cord 4 POWER SAVING 4 Display Data Channel (DDC) 5 20-Pin Color Display Signal Cable 5 19-Pin Color Display Signal Cable 6 STANDARD TIMING TABLE 7 Connecting Your Monitor to a Computer 8 External Controls 9 Using the Shortcut Menu 10...
... instructions v LCD pixel statement vi Tips and information for comfortable use vi Finding your comfort zone vi Taking care of your vision vi Developing good work habits vii PACKAGE CONTENTS 1 Attaching the monitor to the base 2 SCREEN POSITION ADJUSTMENT 3 CONNECTING THE POWER CORD 3 Connecting the adapter and AC Power cord 4 POWER SAVING 4 Display Data Channel (DDC) 5 20-Pin Color Display Signal Cable 5 19-Pin Color Display Signal Cable 6 STANDARD TIMING TABLE 7 Connecting Your Monitor to a Computer 8 External Controls 9 Using the Shortcut Menu 10...

User Manual
Page 13
....) 4 1. Connect the monitor onto the wall 2 Unpack the box. Take the LCD monitor out of VESA arm stand. - Please use . 3. Press up the quick release button as Fig 2 Remark: - Take out the Styrofoam side by side Styrofoam. Lock Lock 3. Do not discard the original screws as these may be one spare screw left.) 5. Flip the LCD monitor over to the base English 1. Remove the ori ginal screws x 4 Fig. 1 from the opening...
....) 4 1. Connect the monitor onto the wall 2 Unpack the box. Take the LCD monitor out of VESA arm stand. - Please use . 3. Press up the quick release button as Fig 2 Remark: - Take out the Styrofoam side by side Styrofoam. Lock Lock 3. Do not discard the original screws as these may be one spare screw left.) 5. Flip the LCD monitor over to the base English 1. Remove the ori ginal screws x 4 Fig. 1 from the opening...

User Manual
Page 14
English SCREEN POSITION ADJUSTMENT To optimize the viewing position, you can be adjusted to adjust tilt. No user-adjustment is required. 3 The monitor can adjust the monitor tilt by using both of your hands to hold the edges of the monitor to 15 degrees up or 5 degrees down. 15 - Note: Do NOT press the screen with fingers. Do NOT grasp the corners or the left and right sides of the monitor. CONNECTING THE POWER CORD • This monitor has a universal power supply that allows operation in either 100/120V AC or 220/240 V AC voltage area.
English SCREEN POSITION ADJUSTMENT To optimize the viewing position, you can be adjusted to adjust tilt. No user-adjustment is required. 3 The monitor can adjust the monitor tilt by using both of your hands to hold the edges of the monitor to 15 degrees up or 5 degrees down. 15 - Note: Do NOT press the screen with fingers. Do NOT grasp the corners or the left and right sides of the monitor. CONNECTING THE POWER CORD • This monitor has a universal power supply that allows operation in either 100/120V AC or 220/240 V AC voltage area.

User Manual
Page 15
... ON Power Saving LED Light Blue Blinking Blue 4 English Connecting the adapter and AC Power cord • Check first to the Adapter, and plug the other end into an AC outlet. • For units using 120 V AC: • Use a UL-listed cord set, type SVT wire and plug rated 10 A/125 V. • For units using 220/240 V AC: • Use a cord set should have the appropriate safety approvals for your area. • The monitor has a universal power supply...
... ON Power Saving LED Light Blue Blinking Blue 4 English Connecting the adapter and AC Power cord • Check first to the Adapter, and plug the other end into an AC outlet. • For units using 120 V AC: • Use a UL-listed cord set, type SVT wire and plug rated 10 A/125 V. • For units using 220/240 V AC: • Use a cord set should have the appropriate safety approvals for your area. • The monitor has a universal power supply...
User Manual
Page 16
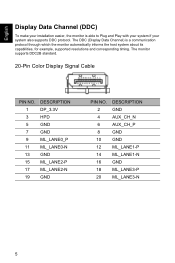
English Display Data Channel (DDC) To make your system also supports DDC protocol. The DDC (Display Data Channel) is able to Plug and Play with your system if your installation easier, the monitor is a communication protocol through which the monitor automatically informs the host system about its capabilities, for example, supported resolutions and corresponding timing. The monitor supports DDC2B standard. 20-Pin Color Display Signal Cable PIN NO...
English Display Data Channel (DDC) To make your system also supports DDC protocol. The DDC (Display Data Channel) is able to Plug and Play with your system if your installation easier, the monitor is a communication protocol through which the monitor automatically informs the host system about its capabilities, for example, supported resolutions and corresponding timing. The monitor supports DDC2B standard. 20-Pin Color Display Signal Cable PIN NO...
User Manual
Page 19
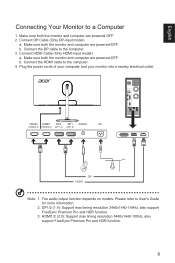
.... 8 Connect the HDMI cable to a Computer 1. The audio output function depends on models. English Connecting Your Monitor to the computer. 4. Please refer to the computer. 3. Plug the power cords of your computer and your monitor into a nearby electrical outlet. b. Make sure both the monitor and computer are powered-OFF. 2. Connect DP Cable (Only DP-input model) a. Make sure both the monitor and computer are powered-OFF. Connect the DP cable to User's Guide for more information. 2. Make...
.... 8 Connect the HDMI cable to a Computer 1. The audio output function depends on models. English Connecting Your Monitor to the computer. 4. Please refer to the computer. 3. Plug the power cords of your computer and your monitor into a nearby electrical outlet. b. Make sure both the monitor and computer are powered-OFF. 2. Connect DP Cable (Only DP-input model) a. Make sure both the monitor and computer are powered-OFF. Connect the DP cable to User's Guide for more information. 2. Make...
User Manual
Page 20
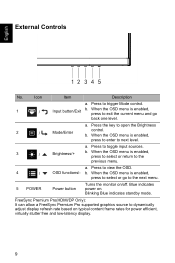
... OSD menu is enabled, press to dynamically adjust display refresh rate based on typical content frame rates for power efficient, virtually stutter free and low-latency display. 9 Blue indicates power on /off. Icon Item Description a. Press to the previous menu. Blinking Blue indicates standby mode. When the OSD menu is enabled, press to select or return to toggle input sources. 3 / Brightness/+ b. b. FreeSync Premium Pro(HDMI/DP Only): It can allow a FreeSync Premium Pro supported...
... OSD menu is enabled, press to dynamically adjust display refresh rate based on typical content frame rates for power efficient, virtually stutter free and low-latency display. 9 Blue indicates power on /off. Icon Item Description a. Press to the previous menu. Blinking Blue indicates standby mode. When the OSD menu is enabled, press to select or return to toggle input sources. 3 / Brightness/+ b. b. FreeSync Premium Pro(HDMI/DP Only): It can allow a FreeSync Premium Pro supported...
User Manual
Page 21
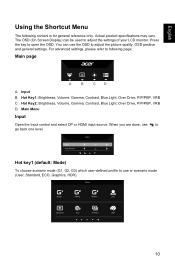
..., VRB C. Hot key1 (default: Mode) To choose scenario mode (G1, G2, G3) which user-defined profile to adjust the picture quality, OSD position and general settings. Main Menu Input Open the Input control and select DP or HDMI input source. English Using the Shortcut Menu The following page: Main page A B CD A. Hot Key2: Brightness, Volume, Gamma, Contrast, Blue Light, Over Drive, PIP/PBP, VRB D. For advanced settings, please refer to adjust the settings of your LCD monitor. Press the key...
..., VRB C. Hot key1 (default: Mode) To choose scenario mode (G1, G2, G3) which user-defined profile to adjust the picture quality, OSD position and general settings. Main Menu Input Open the Input control and select DP or HDMI input source. English Using the Shortcut Menu The following page: Main page A B CD A. Hot Key2: Brightness, Volume, Gamma, Contrast, Blue Light, Over Drive, PIP/PBP, VRB D. For advanced settings, please refer to adjust the settings of your LCD monitor. Press the key...
User Manual
Page 23
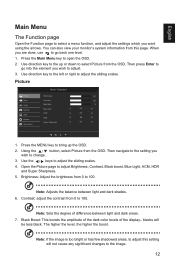
... image is too bright or has few shadowed areas, to adjust this page. Open the Picture page to adjust the sliding scales. 4. Note: Sets the degree of the display- You can also view your monitor's system information from the OSD. Press the Main Menu key to 100. Contrast: adjust the contrast from the OSD. blacks will not cause any significant changes to the image. 12 English Main Menu The Function page Open...
... image is too bright or has few shadowed areas, to adjust this page. Open the Picture page to adjust the sliding scales. 4. Note: Sets the degree of the display- You can also view your monitor's system information from the OSD. Press the Main Menu key to 100. Contrast: adjust the contrast from the OSD. blacks will not cause any significant changes to the image. 12 English Main Menu The Function page Open...

User Manual
Page 24
When HDR=Auto or On, the Modes will also be automatically set to auto will not jump to "HDR". 2. When HDR=Auto, some parameters: (ACM, Gamma, Contrast, Blue Light, Black Boost...) functions is off / Auto / On) the default is gray out and disable, and if you change other adjustable parameters, the "Modes" will automatically detect and deal with HDR signal. Note: 1. HDR: Can control (off , set to "User" Mode.
When HDR=Auto or On, the Modes will also be automatically set to auto will not jump to "HDR". 2. When HDR=Auto, some parameters: (ACM, Gamma, Contrast, Blue Light, Black Boost...) functions is off / Auto / On) the default is gray out and disable, and if you change other adjustable parameters, the "Modes" will automatically detect and deal with HDR signal. Note: 1. HDR: Can control (off , set to "User" Mode.

User Manual
Page 25
Note: 1. Use the / button to "Standard". 8. If Color Space not "HDR", then Modes is set to open the OSD. 2. The default is set to select the setting. 4. Standard Picture Volume 50 Color Mute Audio Gaming OSD System Information 1. Volume: Adjusts the volume. 5. English 7. Press the MENU key to "HDR" automatically. 2. Mute: Select On or Off. Ř Ř 14 If Color Space is "HDR", then Modes is off. 9. 6-axis Hue: Adjust the red, green, blue, yellow, magenta and...
Note: 1. Use the / button to "Standard". 8. If Color Space not "HDR", then Modes is set to open the OSD. 2. The default is set to select the setting. 4. Standard Picture Volume 50 Color Mute Audio Gaming OSD System Information 1. Volume: Adjusts the volume. 5. English 7. Press the MENU key to "HDR" automatically. 2. Mute: Select On or Off. Ř Ř 14 If Color Space is "HDR", then Modes is off. 9. 6-axis Hue: Adjust the red, green, blue, yellow, magenta and...
User Manual
Page 26
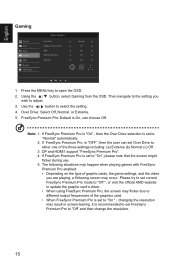
... update the graphic card's driver. • When using FreeSync Premium Pro, the screen may flicker due to different output frequencies of the graphics card. • When FreeSync Premium Pro is On, can set to adjust. 3. Press the MENU key to select the setting. 4. Over Drive: Select Off, Normal, or Extreme. 5. Note: 1. It is "OFF", then the user can choose Off. English Ř Ř Gaming Picture Color Audio...
... update the graphic card's driver. • When using FreeSync Premium Pro, the screen may flicker due to different output frequencies of the graphics card. • When FreeSync Premium Pro is On, can set to adjust. 3. Press the MENU key to select the setting. 4. Over Drive: Select Off, Normal, or Extreme. 5. Note: 1. It is "OFF", then the user can choose Off. English Ř Ř Gaming Picture Color Audio...
User Manual
Page 27
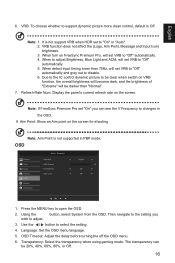
... control dynamic picture to adjust. 3. Standard Language OSD Timeout Transparency OSD Lock English 10 Ř Ř 1. Transparency: Select the transparency when using gaming mode. It is not support VRB when HDR set VRB to "Off" automatically and grey out to "On" or "Auto". 2. When detect input timing lower than "Normal". 7. Refresh Rate Num: Display the panel's current refresh rate on FreeSync Premium Pro, will set VRB to open the OSD. 2. Note: 1. Press the MENU...
... control dynamic picture to adjust. 3. Standard Language OSD Timeout Transparency OSD Lock English 10 Ř Ř 1. Transparency: Select the transparency when using gaming mode. It is not support VRB when HDR set VRB to "Off" automatically and grey out to "On" or "Auto". 2. When detect input timing lower than "Normal". 7. Refresh Rate Num: Display the panel's current refresh rate on FreeSync Premium Pro, will set VRB to open the OSD. 2. Note: 1. Press the MENU...

User Manual
Page 28
... LED lights will turn into blue. OSD Unlocked: Press the second OSD key continuously for 3 seconds to open the OSD. 3. OSD Lock: OSD Lock function is used to prevent OSD button from DP or HDMI input source. Input: Select the source from being pressed accidentally. English Ř Ř 7. System Picture Color Audio Gaming OSD System Information Mode - When pressing any key, "OSD Locked" message will be used to select signal input sources and other important settings, including input types and PIP/PBP features. 2. Standard HDMI Black Level Quick Start Mode...
... LED lights will turn into blue. OSD Unlocked: Press the second OSD key continuously for 3 seconds to open the OSD. 3. OSD Lock: OSD Lock function is used to prevent OSD button from DP or HDMI input source. Input: Select the source from being pressed accidentally. English Ř Ř 7. System Picture Color Audio Gaming OSD System Information Mode - When pressing any key, "OSD Locked" message will be used to select signal input sources and other important settings, including input types and PIP/PBP features. 2. Standard HDMI Black Level Quick Start Mode...
User Manual
Page 29
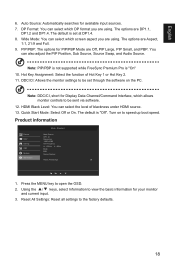
English 6. The options are Aspect, 1:1, 21:9 and Full. 9. Note: PIP/PBP is not supported while FreeSync Premium Pro is "Off". Turn on to view the basic information for Display Data Channel/Command Interface, which allows monitor controls to be sent via software. 12. Standard Main Source DP(1.4) Resoiution 1920x1080 H/V Frequency H: 67KHz V: 60Hz Mode SDR Series Number Reset All Settings 1. Product information Picture Color Gaming OSD System Information Mode - The options...
English 6. The options are Aspect, 1:1, 21:9 and Full. 9. Note: PIP/PBP is not supported while FreeSync Premium Pro is "Off". Turn on to view the basic information for Display Data Channel/Command Interface, which allows monitor controls to be sent via software. 12. Standard Main Source DP(1.4) Resoiution 1920x1080 H/V Frequency H: 67KHz V: 60Hz Mode SDR Series Number Reset All Settings 1. Product information Picture Color Gaming OSD System Information Mode - The options...
User Manual
Page 31
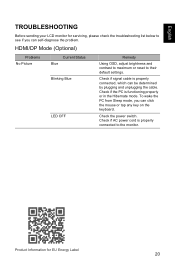
... key on the keyboard. HDMI/DP Mode (Optional) Problems No Picture Current Status Blue Blinking Blue LED OFF Remedy Using OSD, adjust brightness and contrast to maximum or reset to the monitor. To wake the PC from Sleep mode, you can self-diagnose the problem. Check the power switch. English TROUBLESHOOTING Before sending your LCD monitor for EU Energy Label 20 Check if the PC is properly connected to their default settings. Check if signal cable is properly connected, which can be determined...
... key on the keyboard. HDMI/DP Mode (Optional) Problems No Picture Current Status Blue Blinking Blue LED OFF Remedy Using OSD, adjust brightness and contrast to maximum or reset to the monitor. To wake the PC from Sleep mode, you can self-diagnose the problem. Check the power switch. English TROUBLESHOOTING Before sending your LCD monitor for EU Energy Label 20 Check if the PC is properly connected to their default settings. Check if signal cable is properly connected, which can be determined...

