User Manual
Page 3
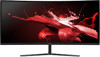
... volume. • Avoid turning up the volume to set the maximum refresh rate. Turn off the power switch for future reference. Safe listening To protect your monitor Please carefully follow these instructions. • Gradually increase the volume until you use the system control panel to block out noisy surroundings. • Turn the volume down if you . Keep this case, the screen is recovered slowly by changing the image or turning off the power switch...
... volume. • Avoid turning up the volume to set the maximum refresh rate. Turn off the power switch for future reference. Safe listening To protect your monitor Please carefully follow these instructions. • Gradually increase the volume until you use the system control panel to block out noisy surroundings. • Turn the volume down if you . Keep this case, the screen is recovered slowly by changing the image or turning off the power switch...

User Manual
Page 4
... the wall outlet does not exceed the fuse rating. • Do not overload a power outlet, strip or receptacle by plugging in installation unless proper ventilation is damaged, cut or frayed • liquid was spilled into this product through cabinet slots as opening or removing covers may interfere with this product on a bed, sofa, rug or other risks. Using electrical power...
... the wall outlet does not exceed the fuse rating. • Do not overload a power outlet, strip or receptacle by plugging in installation unless proper ventilation is damaged, cut or frayed • liquid was spilled into this product through cabinet slots as opening or removing covers may interfere with this product on a bed, sofa, rug or other risks. Using electrical power...
User Manual
Page 5
... device near gas pumps at Acer are covered by the operating instructions, since improper adjustment of other products. chemical plants; They include below deck on the use of radio equipment in damage and will often require extensive work by a qualified technician to restore the product to normal condition. English Note: Adjust only those controls that are very conscious of...
... device near gas pumps at Acer are covered by the operating instructions, since improper adjustment of other products. chemical plants; They include below deck on the use of radio equipment in damage and will often require extensive work by a qualified technician to restore the product to normal condition. English Note: Adjust only those controls that are very conscious of...

User Manual
Page 6
... as black or red dots. vi English LCD pixel statement The LCD unit is in one fixed posture • avoid slouching forward and/or leaning backward • stand up and walk around regularly to remove the strain on the recorded image and does not constitute a malfunction. Nevertheless, some pixels may lead to keep your eyes regular breaks by adjusting the viewing angle of working conditions...
... as black or red dots. vi English LCD pixel statement The LCD unit is in one fixed posture • avoid slouching forward and/or leaning backward • stand up and walk around regularly to remove the strain on the recorded image and does not constitute a malfunction. Nevertheless, some pixels may lead to keep your eyes regular breaks by adjusting the viewing angle of working conditions...

User Manual
Page 7
... unstable location. English Display • Keep your display clean. • Keep your head at a higher level than the top edge of the display so your eyes point downward when looking at bright light sources, such as possible. • Exercise regularly and maintain a healthy body. Developing good work habits Develop the following work habits to a suitable support. • Not placing the LCD Monitor on tall furniture...
... unstable location. English Display • Keep your display clean. • Keep your head at a higher level than the top edge of the display so your eyes point downward when looking at bright light sources, such as possible. • Exercise regularly and maintain a healthy body. Developing good work habits Develop the following work habits to a suitable support. • Not placing the LCD Monitor on tall furniture...

User Manual
Page 10
... instructions v LCD pixel statement vi Tips and information for comfortable use vi Finding your comfort zone vi Taking care of your vision vi Developing good work habits vii PACKAGE CONTENTS 1 Attaching the monitor to the base 2 SCREEN POSITION ADJUSTMENT 3 CONNECTING THE POWER CORD 3 Connecting the adapter and AC Power cord 4 POWER SAVING 4 Display Data Channel (DDC) 5 20-Pin Color Display Signal Cable 5 19-Pin Color Display Signal Cable 6 STANDARD TIMING TABLE 7 Connecting Your Monitor to a Computer 8 External Controls 9 Using the Shortcut Menu 10...
... instructions v LCD pixel statement vi Tips and information for comfortable use vi Finding your comfort zone vi Taking care of your vision vi Developing good work habits vii PACKAGE CONTENTS 1 Attaching the monitor to the base 2 SCREEN POSITION ADJUSTMENT 3 CONNECTING THE POWER CORD 3 Connecting the adapter and AC Power cord 4 POWER SAVING 4 Display Data Channel (DDC) 5 20-Pin Color Display Signal Cable 5 19-Pin Color Display Signal Cable 6 STANDARD TIMING TABLE 7 Connecting Your Monitor to a Computer 8 External Controls 9 Using the Shortcut Menu 10...

User Manual
Page 13
... installation. - Remove upper styrofoam and monitor's protected bag. 3. Please check monitor weight in the cover rubber. 5. Take out the styrofoam and accessories. 2. English Attaching the monitor to avoid damage any time.) Attaching the monitor on the desk where it will be used. (Note: Do NOT press the screen to the base 1. Flip the LCD monitor over to make it stand upright on the wall Use th28e 28mm NO.1 Screws x 2 1 Mount...
... installation. - Remove upper styrofoam and monitor's protected bag. 3. Please check monitor weight in the cover rubber. 5. Take out the styrofoam and accessories. 2. English Attaching the monitor to avoid damage any time.) Attaching the monitor on the desk where it will be used. (Note: Do NOT press the screen to the base 1. Flip the LCD monitor over to make it stand upright on the wall Use th28e 28mm NO.1 Screws x 2 1 Mount...

User Manual
Page 14
The monitor can adjust the monitor tilt by using both of your hands to hold the edges of the monitor to 15 degrees up or 5 degrees down. 15 - CONNECTING THE POWER CORD • This monitor has a universal power supply that allows operation in either 100/120V AC or 220/240 V AC voltage area. Do NOT grasp the corners or the left and right sides of the monitor. English SCREEN POSITION ADJUSTMENT To optimize the viewing position, you can be adjusted to adjust tilt. No user-adjustment is required. 3 Note: Do NOT press the screen with fingers.
The monitor can adjust the monitor tilt by using both of your hands to hold the edges of the monitor to 15 degrees up or 5 degrees down. 15 - CONNECTING THE POWER CORD • This monitor has a universal power supply that allows operation in either 100/120V AC or 220/240 V AC voltage area. Do NOT grasp the corners or the left and right sides of the monitor. English SCREEN POSITION ADJUSTMENT To optimize the viewing position, you can be adjusted to adjust tilt. No user-adjustment is required. 3 Note: Do NOT press the screen with fingers.

User Manual
Page 15
... your area. • The monitor has a universal power supply that the power cord you use is around 3 seconds. POWER SAVING The power saving states will be kept until a control signal has been detected or the keyboard or mouse is activated. No user-adjustment is required. • Plug one end of H05VV-F cord and plug rated 10 A/250 V. English Connecting the adapter and AC Power cord • Check first to make sure that allows operation in...
... your area. • The monitor has a universal power supply that the power cord you use is around 3 seconds. POWER SAVING The power saving states will be kept until a control signal has been detected or the keyboard or mouse is activated. No user-adjustment is required. • Plug one end of H05VV-F cord and plug rated 10 A/250 V. English Connecting the adapter and AC Power cord • Check first to make sure that allows operation in...
User Manual
Page 16
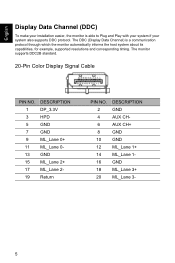
... GND ML_Lane 1+ ML_Lane 1GND ML_Lane 3+ ML_Lane 3- 5 The DDC (Display Data Channel) is able to Plug and Play with your system if your system also supports DDC protocol. English Display Data Channel (DDC) To make your installation easier, the monitor is a communication protocol through which the monitor automatically informs the host system about its capabilities, for example, supported resolutions and corresponding timing.
... GND ML_Lane 1+ ML_Lane 1GND ML_Lane 3+ ML_Lane 3- 5 The DDC (Display Data Channel) is able to Plug and Play with your system if your system also supports DDC protocol. English Display Data Channel (DDC) To make your installation easier, the monitor is a communication protocol through which the monitor automatically informs the host system about its capabilities, for example, supported resolutions and corresponding timing.
User Manual
Page 20
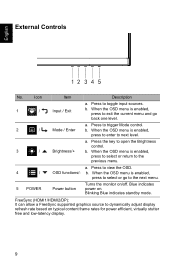
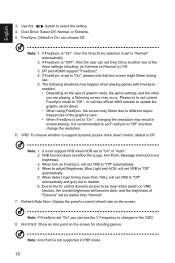
Press to trigger Mode control. 2 / Mode / Enter b. a. When the OSD menu is enabled, press to exit the current menu and go to dynamically adjust display refresh rate based on /off. Blinking Blue indicates standby mode. FreeSync (HDMI1/HDMI2/DP): It can allow a FreeSync supported graphics source to the next menu. 5 POWER Power button Turns the monitor on typical content frame rates for power efficient, virtually stutter free and low-latency display. 9 Press to toggle input sources. 1 / Input / Exit b. a. Press the...
Press to trigger Mode control. 2 / Mode / Enter b. a. When the OSD menu is enabled, press to exit the current menu and go to dynamically adjust display refresh rate based on /off. Blinking Blue indicates standby mode. FreeSync (HDMI1/HDMI2/DP): It can allow a FreeSync supported graphics source to the next menu. 5 POWER Power button Turns the monitor on typical content frame rates for power efficient, virtually stutter free and low-latency display. 9 Press to toggle input sources. 1 / Input / Exit b. a. Press the...
User Manual
Page 21
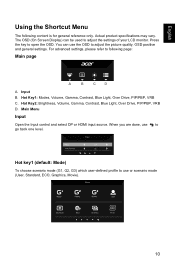
...). Actual product specifications may vary. Press the key to go back one level. Hot key1 (default: Mode) To choose scenario mode (G1, G2, G3) which user-defined profile to following content is for general reference only. Movie 10 For advanced settings, please refer to use to open the OSD. Main Menu Input Open the Input control and select DP or HDMI input source. Hot Key2: Brightness, Volume, Gamma, Contrast, Blue Light, Over...
...). Actual product specifications may vary. Press the key to go back one level. Hot key1 (default: Mode) To choose scenario mode (G1, G2, G3) which user-defined profile to following content is for general reference only. Movie 10 For advanced settings, please refer to use to open the OSD. Main Menu Input Open the Input control and select DP or HDMI input source. Hot Key2: Brightness, Volume, Gamma, Contrast, Blue Light, Over...
User Manual
Page 23
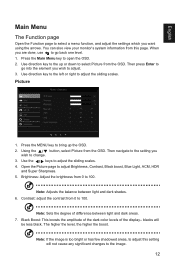
... display- The higher the level, the higher the boost. Brightness: Adjust the brightness from 0 to adjust the sliding scales. Note: Adjusts the balance between light and dark areas. 7. Use direction key to the up the OSD. 2. Picture Picture Color Audio Gaming OSD System Information Mode - Using the !Ř 0 Ř button, select Picture from this setting will be less black. Open the Picture page to select Picture from 0 to bring up or down to adjust Brightness, Contrast, Black...
... display- The higher the level, the higher the boost. Brightness: Adjust the brightness from 0 to adjust the sliding scales. Note: Adjusts the balance between light and dark areas. 7. Use direction key to the up the OSD. 2. Picture Picture Color Audio Gaming OSD System Information Mode - Using the !Ř 0 Ř button, select Picture from this setting will be less black. Open the Picture page to select Picture from 0 to bring up or down to adjust Brightness, Contrast, Black...
User Manual
Page 24
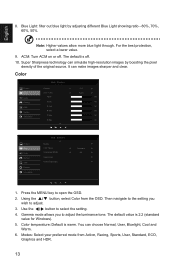
ACM: Turn ACM on or off . 10. Use the / button to adjust the luminance tone. The default value is warm. Modes: Select your preferred mode from the OSD. Color temperature: Default is 2.2 (standard value for Windows). 5. You can simulate high-resolution images by adjusting different Blue Light showing ratio - 80%, 70%, 60%, 50%. Blue Light: filter out blue light by boosting the pixel density of the original source. For the best protection, select a lower...
ACM: Turn ACM on or off . 10. Use the / button to adjust the luminance tone. The default value is warm. Modes: Select your preferred mode from the OSD. Color temperature: Default is 2.2 (standard value for Windows). 5. You can simulate high-resolution images by adjusting different Blue Light showing ratio - 80%, 70%, 60%, 50%. Blue Light: filter out blue light by boosting the pixel density of the original source. For the best protection, select a lower...

User Manual
Page 25
... Drive FreeSync VRB Refresh Rate Num AimPoint Normal On Off Off Off 1. If Color Space is "HDR", then Modes is set to "HDR" automatically. 2. Audio Mode - Using the !Ř 0 Ř button, select Gaming from the OSD. English 7. Volume: Adjusts the volume. 5. Gaming Picture Color Audio Gaming OSD System Information Mode - If Color Space not "HDR", then Modes is set to adjust. 3. Use the / button to open the OSD. 2. Grayscale Mode: Turn grayscale mode On or Off. Press the MENU key to...
... Drive FreeSync VRB Refresh Rate Num AimPoint Normal On Off Off Off 1. If Color Space is "HDR", then Modes is set to "HDR" automatically. 2. Audio Mode - Using the !Ř 0 Ř button, select Gaming from the OSD. English 7. Volume: Adjusts the volume. 5. Gaming Picture Color Audio Gaming OSD System Information Mode - If Color Space not "HDR", then Modes is set to adjust. 3. Use the / button to open the OSD. 2. Grayscale Mode: Turn grayscale mode On or Off. Press the MENU key to...
User Manual
Page 26
... to "On " , changing the resolution may result in screen-tearing. Please try to set to update the graphic card's driver. • When using FreeSync, the screen may occur. Note: 1. VRB function does not affect the (Logo, Aim Point, Message and Input Icon) brightness. 3. When turn on the screen. Refresh Rate Num: Display the panel's current refresh rate on FreeSync, will set VRB to "Off" automatically. 4. DP and HDMI1 support "FreeSync". 4. Due...
... to "On " , changing the resolution may result in screen-tearing. Please try to set to update the graphic card's driver. • When using FreeSync, the screen may occur. Note: 1. VRB function does not affect the (Logo, Aim Point, Message and Input Icon) brightness. 3. When turn on the screen. Refresh Rate Num: Display the panel's current refresh rate on FreeSync, will set VRB to "Off" automatically. 4. DP and HDMI1 support "FreeSync". 4. Due...

User Manual
Page 27
.... 7. English OSD Picture Color Audio Gaming OSD System Information Mode - Then navigate to the setting you wish to select the setting. 4. Use the / button to adjust. 3. Note: 1. OSD Unlocked: Press the second OSD key continuously for 3 seconds to open the OSD. 2. Language: Set the OSD menu language. 5. Transparency: Select the transparency when using gaming mode. The "OSD Unlocked" message will appear in the middle of the screen, and LED lights will turn into blue. 16 The transparency can be prompted. 2. Standard Language OSD...
.... 7. English OSD Picture Color Audio Gaming OSD System Information Mode - Then navigate to the setting you wish to select the setting. 4. Use the / button to adjust. 3. Note: 1. OSD Unlocked: Press the second OSD key continuously for 3 seconds to open the OSD. 2. Language: Set the OSD menu language. 5. Transparency: Select the transparency when using gaming mode. The "OSD Unlocked" message will appear in the middle of the screen, and LED lights will turn into blue. 16 The transparency can be prompted. 2. Standard Language OSD...
User Manual
Page 28
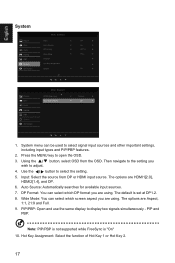
... the setting you are using . Using the !Ř 0 Ř button, select OSD from DP or HDMI input source. Use the / button to select signal input sources and other important settings, including input types and PIP/PBP features. 2. DP Format: You can be used to select the setting. 5. The options are HDMI1[2.0], HDMI2[1.4], and DP. 6. English Ř Ř System Picture Color Audio Gaming OSD System Information Mode - Standard HDMI Black Level Quick Start Mode Normal Off 1. Standard Input Auto Source DP Format Wide Mode...
... the setting you are using . Using the !Ř 0 Ř button, select OSD from DP or HDMI input source. Use the / button to select signal input sources and other important settings, including input types and PIP/PBP features. 2. DP Format: You can be used to select the setting. 5. The options are HDMI1[2.0], HDMI2[1.4], and DP. 6. English Ř Ř System Picture Color Audio Gaming OSD System Information Mode - Standard HDMI Black Level Quick Start Mode Normal Off 1. Standard Input Auto Source DP Format Wide Mode...

User Manual
Page 29
... Settings: Reset all settings to ..." Using the !Ř 0 Ř button, select "Save Setting to the factory defaults. Save your monitor and current input. 3. Turn on the PC. Using the !Ř 0 Ř keys, select Information to view the basic information for Display Data Channel/Command Interface, which allows monitor controls to be set through the software on to open the OSD. 2. User Game Mode: Action Game Mode: Racing Game Mode: Sports 1. Quick Start Mode: Select Off or On. Save Setting to...(User mode only) Picture Color...
... Settings: Reset all settings to ..." Using the !Ř 0 Ř button, select "Save Setting to the factory defaults. Save your monitor and current input. 3. Turn on the PC. Using the !Ř 0 Ř keys, select Information to view the basic information for Display Data Channel/Command Interface, which allows monitor controls to be set through the software on to open the OSD. 2. User Game Mode: Action Game Mode: Racing Game Mode: Sports 1. Quick Start Mode: Select Off or On. Save Setting to...(User mode only) Picture Color...
User Manual
Page 30
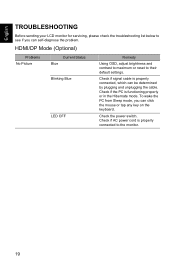
Check if signal cable is properly connected, which can self-diagnose the problem. Check if the PC is properly connected to their default settings. English TROUBLESHOOTING Before sending your LCD monitor for servicing, please check the troubleshooting list below to see if you can click the mouse or tap any key on the keyboard. HDMI/DP Mode (Optional) Problems No Picture Current Status Blue Blinking Blue LED OFF Remedy Using OSD, adjust brightness and contrast to maximum or reset to the...
Check if signal cable is properly connected, which can self-diagnose the problem. Check if the PC is properly connected to their default settings. English TROUBLESHOOTING Before sending your LCD monitor for servicing, please check the troubleshooting list below to see if you can click the mouse or tap any key on the keyboard. HDMI/DP Mode (Optional) Problems No Picture Current Status Blue Blinking Blue LED OFF Remedy Using OSD, adjust brightness and contrast to maximum or reset to the...

