User Manual
Page 2
..., in this manual or supplementary documents and publications. The serial number and model number are registered trademarks of this publication without the prior written permission of merchantability or fitness for identification purposes only and belong to your unit should include the serial number, model number and purchase information. Acer Incorporated. English Copyright © 2017. Acer LCD Monitor User Guide Original Issue: 10/2017 Changes may be incorporated...
..., in this manual or supplementary documents and publications. The serial number and model number are registered trademarks of this publication without the prior written permission of merchantability or fitness for identification purposes only and belong to your unit should include the serial number, model number and purchase information. Acer Incorporated. English Copyright © 2017. Acer LCD Monitor User Guide Original Issue: 10/2017 Changes may be incorporated...

User Manual
Page 3
... as a missing pixel or a pixel lit all power adapters from the power supplies. Keep this case, the screen is recovered slowly by changing the image or turning off the power switch and then turn it on again to make sure the flicker disappears. • You may find slightly uneven brightness on the screen depending on the desktop pattern you use . If the system has multiple sources of power, disconnect power from the...
... as a missing pixel or a pixel lit all power adapters from the power supplies. Keep this case, the screen is recovered slowly by changing the image or turning off the power switch and then turn it on again to make sure the flicker disappears. • You may find slightly uneven brightness on the screen depending on the desktop pattern you use . If the system has multiple sources of power, disconnect power from the...
User Manual
Page 4
... result in installation unless proper ventilation is used with this product, make sure that the total The openings should be seriously damaged. • Slots and openings are not sure of the type of the product and to block out noisy surroundings. • Turn the volume down if you can hear it after your hearing, follow these instructions. •...
... result in installation unless proper ventilation is used with this product, make sure that the total The openings should be seriously damaged. • Slots and openings are not sure of the type of the product and to block out noisy surroundings. • Turn the volume down if you can hear it after your hearing, follow these instructions. •...
User Manual
Page 5
.... rplyowgreoruonudteledt.mCaoynrteascutlytoinureelelectcrtircicsihanocfkor • Tdheitsapilsr.oanddu/cot'rsipnojuwrye.r cord is equipped with a three-wire grounded plug. the wall outlet does not exceed the fusev This product's power cord is equipped with a three-wire grounded plug. Make sure the power outlet is a safety feature. Using a power • Use theouptrloedtutchtaot nislynwotitphrothpeersluypgprloieudndpeodwmerasyurpepsluyltcoinrdelseectt.rIifcysohuocnkeed ttoherefpollaluNaocnnowedetiex/tnohp:greTeihcrnpetejoequdgwurryienor.roeumcinsoederindpntrgssoe:dptd...
.... rplyowgreoruonudteledt.mCaoynrteascutlytoinureelelectcrtircicsihanocfkor • Tdheitsapilsr.oanddu/cot'rsipnojuwrye.r cord is equipped with a three-wire grounded plug. the wall outlet does not exceed the fusev This product's power cord is equipped with a three-wire grounded plug. Make sure the power outlet is a safety feature. Using a power • Use theouptrloedtutchtaot nislynwotitphrothpeersluypgprloieudndpeodwmerasyurpepsluyltcoinrdelseectt.rIifcysohuocnkeed ttoherefpollaluNaocnnowedetiex/tnohp:greTeihcrnpetejoequdgwurryienor.roeumcinsoederindpntrgssoe:dptd...

User Manual
Page 6
... the features and benefits of our other controls may contain small parts. vi Note: Adjust only those controls that are covered by the operating instructions, since improper adjustment of other products. acer-group .com for further information on the use of radio equipment in fuel depots, storage and distribution areas; Potentially explosive environments Switch off the device near gas pumps...
... the features and benefits of our other controls may contain small parts. vi Note: Adjust only those controls that are covered by the operating instructions, since improper adjustment of other products. acer-group .com for further information on the use of radio equipment in fuel depots, storage and distribution areas; Potentially explosive environments Switch off the device near gas pumps...
User Manual
Page 8
...; indraievnforgiadiynsolforuuorcmhcisontgamyfifonorgwrttaorzodolaonnnedg/oinr one fixed posture • avoid slouching forward and/or leaning backward • stand up and walk around regularly to carpal tunnel syndrome, tendonitis, t•enossytinfofnveitsiss oorr toigthhetrnemsus sculoskeletal disorders. CInocmorpreucttercoumseprsumtear yuscaogmepmlaainy olefaedyteostcraarinpaalntdunhneealdsaycnhdersoamftee,rtpenrodloonnigtiesd, use. This product has been shipped enabled for power management: • Activate display's Sleep mode within 30 minutes of user inactivity. IaFfniyndod...
...; indraievnforgiadiynsolforuuorcmhcisontgamyfifonorgwrttaorzodolaonnnedg/oinr one fixed posture • avoid slouching forward and/or leaning backward • stand up and walk around regularly to carpal tunnel syndrome, tendonitis, t•enossytinfofnveitsiss oorr toigthhetrnemsus sculoskeletal disorders. CInocmorpreucttercoumseprsumtear yuscaogmepmlaainy olefaedyteostcraarinpaalntdunhneealdsaycnhdersoamftee,rtpenrodloonnigtiesd, use. This product has been shipped enabled for power management: • Activate display's Sleep mode within 30 minutes of user inactivity. IaFfniyndod...

User Manual
Page 9
... at bright light sources, such as possible. • Exercise regularly and maintain a healthy body. The following work habits to reduce eyestrain. Display • Keep your display clean. • Keep your head at a higher level than the top edge of your vision Long viewing hours, wearing incorrect glasses or contact lenses, glare, excessive room lighting, poorly focused screens, very small typefaces and low-contrast displays...
... at bright light sources, such as possible. • Exercise regularly and maintain a healthy body. The following work habits to reduce eyestrain. Display • Keep your display clean. • Keep your head at a higher level than the top edge of your vision Long viewing hours, wearing incorrect glasses or contact lenses, glare, excessive room lighting, poorly focused screens, very small typefaces and low-contrast displays...
User Manual
Page 10
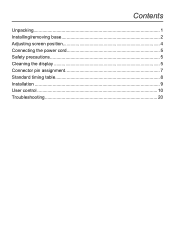
Contents Unpacking 1 Installing/removing base 2 Adjusting screen position 4 Connecting the power cord 5 Safety precautions 5 Cleaning the display 5 Connector pin assignment 7 Standard timing table 8 Installation 9 User control 10 Troubleshooting 20
Contents Unpacking 1 Installing/removing base 2 Adjusting screen position 4 Connecting the power cord 5 Safety precautions 5 Cleaning the display 5 Connector pin assignment 7 Standard timing table 8 Installation 9 User control 10 Troubleshooting 20

User Manual
Page 12
Secure the monitor to the wall. 2 Note: If using a wall-mounting kit for mounting, we recommend using a VESA mounting kit (100 mm × 100 mm) and M4 × 10 (L) mm screws to secure the monitor to the arm of the monitor. Installing/removing base Note: Unpack the monitor and base first. Carefully place the monitor face down on a flat surface - Close the base cover. use a cloth pad to the base. 2. Attach the monitor stand arm to prevent scratching the screen. 1.
Secure the monitor to the wall. 2 Note: If using a wall-mounting kit for mounting, we recommend using a VESA mounting kit (100 mm × 100 mm) and M4 × 10 (L) mm screws to secure the monitor to the arm of the monitor. Installing/removing base Note: Unpack the monitor and base first. Carefully place the monitor face down on a flat surface - Close the base cover. use a cloth pad to the base. 2. Attach the monitor stand arm to prevent scratching the screen. 1.
User Manual
Page 15
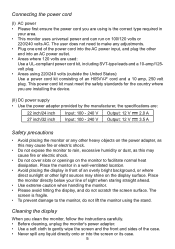
.../240 volts AC. The user does not need to make any adjustments. • Plug one end of the power cord into the AC power input, and plug the other end into the screen or its case. 5 This power cord kit must meet the safety standards for the country where you clean the monitor, follow the instructions carefully. • Before cleaning, unplug the monitor's power adapter. • Use a soft cloth to rain...
.../240 volts AC. The user does not need to make any adjustments. • Plug one end of the power cord into the AC power input, and plug the other end into the screen or its case. 5 This power cord kit must meet the safety standards for the country where you clean the monitor, follow the instructions carefully. • Before cleaning, unplug the monitor's power adapter. • Use a soft cloth to rain...
User Manual
Page 17
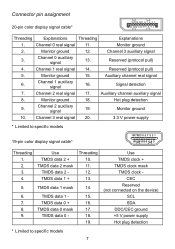
...Reserved (not connected on the device) SCL SDA DDC/CEC ground +5 V power supply Hot plug detection * Limited to specific models 19-pin color display signal cable* Threading 1. 2. 3. 4. 5. 6. 7. 8. 9. Reserved (protocol pull) 4. Monitor ground 2. Reserved (protocol pull) 5. Signal detection 7. Monitor ground 18. Channel 1 auxiliary signal 16. Monitor ground 12. Channel 2 auxiliary signal 19. Auxiliary channel auxiliary signal 8. Auxiliary channel real signal 6. Hot plug detection 9. Connector pin assignment 20-pin color display signal cable* 19 17...
...Reserved (not connected on the device) SCL SDA DDC/CEC ground +5 V power supply Hot plug detection * Limited to specific models 19-pin color display signal cable* Threading 1. 2. 3. 4. 5. 6. 7. 8. 9. Reserved (protocol pull) 4. Monitor ground 2. Reserved (protocol pull) 5. Signal detection 7. Monitor ground 18. Channel 1 auxiliary signal 16. Monitor ground 12. Channel 2 auxiliary signal 19. Auxiliary channel auxiliary signal 8. Auxiliary channel real signal 6. Hot plug detection 9. Connector pin assignment 20-pin color display signal cable* 19 17...
User Manual
Page 19
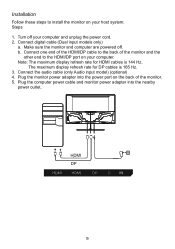
... display refresh rate for DP cables is 144 Hz. Connect the audio cable (only Audio input model) (optional) 4. Connect digital cable (Dual input models only) a. The maximum display refresh rate for HDMI cables is 165 Hz. 3. Make sure the monitor and computer are powered off your computer and unplug the power cord. 2. Plug the computer power cable and monitor power adapter into the power port on the back of the monitor and the other end to install the monitor on your host system: Steps 1. HHDDMMI I DDPP 9 b. Turn...
... display refresh rate for DP cables is 144 Hz. Connect the audio cable (only Audio input model) (optional) 4. Connect digital cable (Dual input models only) a. The maximum display refresh rate for HDMI cables is 165 Hz. 3. Make sure the monitor and computer are powered off your computer and unplug the power cord. 2. Plug the computer power cable and monitor power adapter into the power port on the back of the monitor and the other end to install the monitor on your host system: Steps 1. HHDDMMI I DDPP 9 b. Turn...
User Manual
Page 21
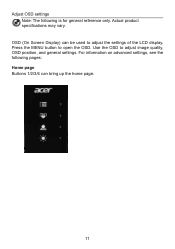
For information on advanced settings, see the following is for general reference only. Adjust OSD settings Note: The following pages: Home page Buttons 1/2/3/4 can be used to adjust the settings of the LCD display. Press the MENU button to adjust image quality, OSD position, and general settings. Use the OSD to open the OSD. OSD (On Screen Display) can bring up the home page. 11 Actual product specifications may vary.
For information on advanced settings, see the following is for general reference only. Adjust OSD settings Note: The following pages: Home page Buttons 1/2/3/4 can be used to adjust the settings of the LCD display. Press the MENU button to adjust image quality, OSD position, and general settings. Use the OSD to open the OSD. OSD (On Screen Display) can bring up the home page. 11 Actual product specifications may vary.

User Manual
Page 23
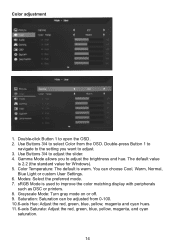
The higher the setting, the greater the increase. 7. Black Boost: This feature increases the richness of the display's dark levels black becomes less black. For best protection, choose a lower value. 8. Note: The higher the value, the more blue light is off . ACM: Turn ACM on or off . 13 Blue Light: Filter blue light by adjusting different blue light display ratios (80%, 70%, 60%, 50%). Default is displayed. 6.
The higher the setting, the greater the increase. 7. Black Boost: This feature increases the richness of the display's dark levels black becomes less black. For best protection, choose a lower value. 8. Note: The higher the value, the more blue light is off . ACM: Turn ACM on or off . 13 Blue Light: Filter blue light by adjusting different blue light display ratios (80%, 70%, 60%, 50%). Default is displayed. 6.
User Manual
Page 24
.... 14 Use Buttons 3/4 to adjust the brightness and hue. The default value is warm. You can be adjusted from the OSD. Use Buttons 3/4 to adjust. 3. Grayscale Mode: Turn gray mode on or off. 9. Saturation: Saturation can choose Cool, Warm, Normal, Blue Light or custom User Settings. 6. Double-press Button 1 to navigate to the setting you to adjust the slider. 4. Color Temperature: The default is 2.2 (the standard value for Windows). 5. sRGB Mode is used to open the OSD. 2. Color adjustment 1. Modes...
.... 14 Use Buttons 3/4 to adjust the brightness and hue. The default value is warm. You can be adjusted from the OSD. Use Buttons 3/4 to adjust. 3. Grayscale Mode: Turn gray mode on or off. 9. Saturation: Saturation can choose Cool, Warm, Normal, Blue Light or custom User Settings. 6. Double-press Button 1 to navigate to the setting you to adjust the slider. 4. Color Temperature: The default is 2.2 (the standard value for Windows). 5. sRGB Mode is used to open the OSD. 2. Color adjustment 1. Modes...
User Manual
Page 25
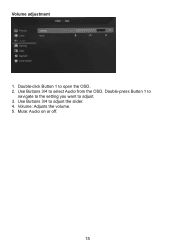
Use Buttons 3/4 to adjust. 3. Double-press Button 1 to navigate to the setting you want to select Audio from the OSD. Volume: Adjusts the volume. 5. Double-click Button 1 to adjust the slider. 4. Mute: Audio on or off. 15 Volume adjustment 1. Use Buttons 3/4 to open the OSD. 2.
Use Buttons 3/4 to adjust. 3. Double-press Button 1 to navigate to the setting you want to select Audio from the OSD. Volume: Adjusts the volume. 5. Double-click Button 1 to adjust the slider. 4. Mute: Audio on or off. 15 Volume adjustment 1. Use Buttons 3/4 to open the OSD. 2.
User Manual
Page 27
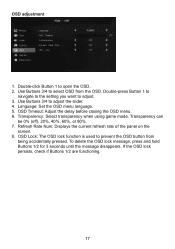
...-press Button 1 to navigate to the setting you want to adjust the slider. 4. OSD Lock: The OSD lock function is used to prevent the OSD button from the OSD. Use Buttons 3/4 to open the OSD. 2. Language: Set the OSD menu language. 5. Use Buttons 3/4 to adjust. 3. Transparency can be 0% (off), 20%, 40%, 60%, or 80%. 7. If the OSD lock persists, check if Buttons 1/2 are functioning. 17 Refresh Rate Num: Displays the current refresh rate of the panel on the screen. 8. OSD adjustment 1. Double-click Button 1 to select OSD from...
...-press Button 1 to navigate to the setting you want to adjust the slider. 4. OSD Lock: The OSD lock function is used to prevent the OSD button from the OSD. Use Buttons 3/4 to open the OSD. 2. Language: Set the OSD menu language. 5. Use Buttons 3/4 to adjust. 3. Transparency can be 0% (off), 20%, 40%, 60%, or 80%. 7. If the OSD lock persists, check if Buttons 1/2 are functioning. 17 Refresh Rate Num: Displays the current refresh rate of the panel on the screen. 8. OSD adjustment 1. Double-click Button 1 to select OSD from...
User Manual
Page 28
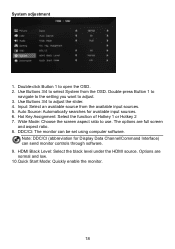
... Button 1 to adjust the slider. 4. Use Buttons 3/4 to select System from the available input sources. 5. Use Buttons 3/4 to open the OSD. 2. HDMI Black Level: Select the black level under the HDMI source. Wide Mode: Choose the screen aspect ratio to adjust. 3. Input: Select an available source from the OSD. Auto Source: Automatically searches for Display Data Channel/Command Interface) can be set using computer software. DDC/CI: The monitor can send monitor controls through software. 9. The options are normal and low. 10.Quick Start Mode: Quickly...
... Button 1 to adjust the slider. 4. Use Buttons 3/4 to select System from the available input sources. 5. Use Buttons 3/4 to open the OSD. 2. HDMI Black Level: Select the black level under the HDMI source. Wide Mode: Choose the screen aspect ratio to adjust. 3. Input: Select an available source from the OSD. Auto Source: Automatically searches for Display Data Channel/Command Interface) can be set using computer software. DDC/CI: The monitor can send monitor controls through software. 9. The options are normal and low. 10.Quick Start Mode: Quickly...
User Manual
Page 30
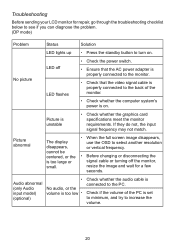
... Audio input model) (optional) • No audio, or the volume is too low • Check whether the audio cable is set to minimum, and try to turn on . Picture is too large or signal cable or turning off LED flashes • Check the power switch. • Ensure that the AC power adapter is properly connected to the monitor. • Check that the video signal cable is properly connected to select another resolution disappears, or vertical frequency. If they do not, the input signal frequency...
... Audio input model) (optional) • No audio, or the volume is too low • Check whether the audio cable is set to minimum, and try to turn on . Picture is too large or signal cable or turning off LED flashes • Check the power switch. • Ensure that the AC power adapter is properly connected to the monitor. • Check that the video signal cable is properly connected to select another resolution disappears, or vertical frequency. If they do not, the input signal frequency...
User Manual
Page 31
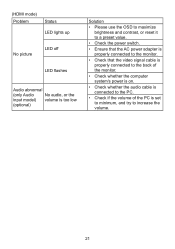
(HDMI mode) Problem Status LED lights up No picture LED off LED flashes Audio abnormal (only Audio No audio, or the input model) volume is too low (optional) Solution • Please use the OSD to maximize brightness and contrast, or reset it to a preset value. • Check the power switch. • Ensure that the AC power adapter is properly connected to the monitor. • Check that the video signal cable is properly connected to the back of the monitor. • Check whether the computer system...
(HDMI mode) Problem Status LED lights up No picture LED off LED flashes Audio abnormal (only Audio No audio, or the input model) volume is too low (optional) Solution • Please use the OSD to maximize brightness and contrast, or reset it to a preset value. • Check the power switch. • Ensure that the AC power adapter is properly connected to the monitor. • Check that the video signal cable is properly connected to the back of the monitor. • Check whether the computer system...

