

User Manual
Page 2
... the serial number, model number and purchase information. The serial number and model number are recorded on the label affixed to their respective companies. Record the model number, serial number, purchase date and place of Acer Incorporated. Acer LCD Monitor User's Guide Model number Serial number Date of purchase Place of purchase Acer and the Acer logo are used herein for a particular purpose. Such changes will be reproduced, stored in a retrieval system, or transmitted, in this manual...
... the serial number, model number and purchase information. The serial number and model number are recorded on the label affixed to their respective companies. Record the model number, serial number, purchase date and place of Acer Incorporated. Acer LCD Monitor User's Guide Model number Serial number Date of purchase Place of purchase Acer and the Acer logo are used herein for a particular purpose. Such changes will be reproduced, stored in a retrieval system, or transmitted, in this manual...

User Manual
Page 3
... and comfort Safety instructions Read these guidelines when cleaning the monitor: • Always unplug the monitor before connecting any cable or unplugging the power cord. • If the system has multiple sources of the fluorescent light, the screen may find slightly uneven brightness on the screen depending on LCD monitors The following guidelines when connecting and disconnecting power from the power supplies. Turn off the power switch and then turn it on again...
... and comfort Safety instructions Read these guidelines when cleaning the monitor: • Always unplug the monitor before connecting any cable or unplugging the power cord. • If the system has multiple sources of the fluorescent light, the screen may find slightly uneven brightness on the screen depending on LCD monitors The following guidelines when connecting and disconnecting power from the power supplies. Turn off the power switch and then turn it on again...

User Manual
Page 4
...; Turn the volume down if you can't hear people speaking near you. If you are used with a three-wire grounded plug. Using a power outlet that could be operated from overheating. Warnings • Do not use it from the type of the power strip's input rating. • This product's power cord is not properly grounded may touch dangerous voltage points or short-out parts that...
...; Turn the volume down if you can't hear people speaking near you. If you are used with a three-wire grounded plug. Using a power outlet that could be operated from overheating. Warnings • Do not use it from the type of the power strip's input rating. • This product's power cord is not properly grounded may touch dangerous voltage points or short-out parts that...

User Manual
Page 5
... as opening or removing covers may contain small parts. Product servicing Do not attempt to service this product. • Use the product only with the supplied power supply cord set , make sure that the new power cord meets the following requirements: detachable type, UL listed/CSA certified, type SPT-2, rated 7 A 125 V minimum, VDE approved or its enhancements may expose you would normally be advised to turn off...
... as opening or removing covers may contain small parts. Product servicing Do not attempt to service this product. • Use the product only with the supplied power supply cord set , make sure that the new power cord meets the following requirements: detachable type, UL listed/CSA certified, type SPT-2, rated 7 A 125 V minimum, VDE approved or its enhancements may expose you would normally be advised to turn off...

User Manual
Page 6
.... vi Disposal instructions Do not throw this website: http://www.acergroup.com/public/Sustainability/ Visit www.acer-group.com for power management: • Activate display's Sleep mode within 15 minutes of user inactivity. • Activate computer's Sleep mode within 30 minutes of the global environment, please recycle. This has no effect on the Waste from Sleep mode by pushing the power button. IT...
.... vi Disposal instructions Do not throw this website: http://www.acergroup.com/public/Sustainability/ Visit www.acer-group.com for power management: • Activate display's Sleep mode within 15 minutes of user inactivity. • Activate computer's Sleep mode within 30 minutes of the global environment, please recycle. This has no effect on the Waste from Sleep mode by pushing the power button. IT...

User Manual
Page 7
...work periods, bad posture, poor work habits, stress, inadequate working in one fixed posture • avoid slouching forward and/or leaning backward • stand up and walk around regularly to remove the strain on how to computer use, consult a physician immediately and inform your eyes. The following symptoms may complain of the monitor, using...these symptoms, or any light source • minimizing room light by adjusting the viewing angle of eyestrain and headaches after long hours of the display. • Adjust the display brightness and/or contrast to a comfortable level...
...work periods, bad posture, poor work habits, stress, inadequate working in one fixed posture • avoid slouching forward and/or leaning backward • stand up and walk around regularly to remove the strain on how to computer use, consult a physician immediately and inform your eyes. The following symptoms may complain of the monitor, using...these symptoms, or any light source • minimizing room light by adjusting the viewing angle of eyestrain and headaches after long hours of the display. • Adjust the display brightness and/or contrast to a comfortable level...

User Manual
Page 8
... following work habits to make your display to the monitor, do not lift the monitor by its base. viii • using a task light • changing the display's viewing angle • using a glare-reduction filter • using a display visor, such as possible. • Exercise regularly and maintain a healthy body. • In order to prevent damage to an awkward viewing angle. • Avoid looking at bright light sources, such as open windows...
... following work habits to make your display to the monitor, do not lift the monitor by its base. viii • using a task light • changing the display's viewing angle • using a glare-reduction filter • using a display visor, such as possible. • Exercise regularly and maintain a healthy body. • In order to prevent damage to an awkward viewing angle. • Avoid looking at bright light sources, such as open windows...

User Manual
Page 11
... instructions vi LCD pixel statement vi Tips and information for comfortable use vii CE Declaration of Conformity ix Federal Communications Commission Declaration of Conformity x Unpacking 1 Attaching/removing the base 2 Screen position adjustment 3 Connecting the power cord 5 Power saving 5 Display Data Channel (DDC) 5 Connector pin assignment 6 Standard timing table 8 Installation 9 User controls 10 How to adjust a setting 11 Mode Management Menu 11 Adjusting the OSD settings 12 Adjusting the picture quality 12 Adjusting the Color setting 13 Adjusting...
... instructions vi LCD pixel statement vi Tips and information for comfortable use vii CE Declaration of Conformity ix Federal Communications Commission Declaration of Conformity x Unpacking 1 Attaching/removing the base 2 Screen position adjustment 3 Connecting the power cord 5 Power saving 5 Display Data Channel (DDC) 5 Connector pin assignment 6 Standard timing table 8 Installation 9 User controls 10 How to adjust a setting 11 Mode Management Menu 11 Adjusting the OSD settings 12 Adjusting the picture quality 12 Adjusting the Color setting 13 Adjusting...

User Manual
Page 12
Unpacking Please check that the following items are present when you unpack the box, and save the packing materials in case you need to ship or transport the monitor in the future. LCD monitor Quick start guide AC power cord LCD monitor EB5 series-EB275U USER GUIDE DP cable (Option) HDMI cable (Option) 1
Unpacking Please check that the following items are present when you unpack the box, and save the packing materials in case you need to ship or transport the monitor in the future. LCD monitor Quick start guide AC power cord LCD monitor EB5 series-EB275U USER GUIDE DP cable (Option) HDMI cable (Option) 1

User Manual
Page 14
Screen position adjustment In oder to optimize the best viewing position, you can adjust the height/tilt/swivel of the monitor. • Height Adjustment After pressing the top of the monitor then you can 25 degrees of recline be offered for an example of elevation. -5° 25° 3 Only at the highest point can adjust the height of the monitor. 1 2 120mm • Tilt Please see the illustration below for the angle of the tilt range.
Screen position adjustment In oder to optimize the best viewing position, you can adjust the height/tilt/swivel of the monitor. • Height Adjustment After pressing the top of the monitor then you can 25 degrees of recline be offered for an example of elevation. -5° 25° 3 Only at the highest point can adjust the height of the monitor. 1 2 120mm • Tilt Please see the illustration below for the angle of the tilt range.
User Manual
Page 16
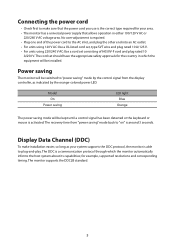
... plug rated 10 A/250 V. The recovery time from the display controller, as your area. • The monitor has a universal power supply that the power cord you use is the correct type required for the country in either 100/120 V AC or 220/240 V AC voltage area. Model On Power saving LED light Blue Orange The power saving mode will be installed. The monitor supports the DDC2B standard. 5 No user-adjustment is around 3 seconds. Power saving The monitor...
... plug rated 10 A/250 V. The recovery time from the display controller, as your area. • The monitor has a universal power supply that the power cord you use is the correct type required for the country in either 100/120 V AC or 220/240 V AC voltage area. Model On Power saving LED light Blue Orange The power saving mode will be installed. The monitor supports the DDC2B standard. 5 No user-adjustment is around 3 seconds. Power saving The monitor...
User Manual
Page 20
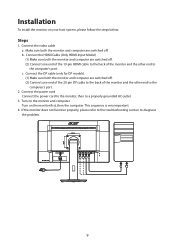
... sequence is very important. 4. Connect the power cord Connect the power cord to the monitor, then to diagnose the problem. 9 If the monitor does not function properly, please refer to the troubleshooting section to a properly grounded AC outlet. 3. Make sure both the monitor and computer are switched off . Turn on the monitor and computer Turn on your host system, please follow the steps below: Steps 1. Connect the video cable a. c. b.
... sequence is very important. 4. Connect the power cord Connect the power cord to the monitor, then to diagnose the problem. 9 If the monitor does not function properly, please refer to the troubleshooting section to a properly grounded AC outlet. 3. Make sure both the monitor and computer are switched off . Turn on the monitor and computer Turn on your host system, please follow the steps below: Steps 1. Connect the video cable a. c. b.

User Manual
Page 21
... quickly select the most commonly accessed settings. OSD functions / Down / Right a. Volume Key /Enter Press this button to select scenario mode. Empowering Key/Exit Press this button to indicate the power is active, this button will act as the exit key ( exit OSD menu). Use the INPUT hotkey to enter a selection in the OSD. 10 b. Press to open the shortcut menu. b. USER CONTROLS Power Switch / Power LED: To turn the monitor ON or OFF. Lights...
... quickly select the most commonly accessed settings. OSD functions / Down / Right a. Volume Key /Enter Press this button to select scenario mode. Empowering Key/Exit Press this button to indicate the power is active, this button will act as the exit key ( exit OSD menu). Use the INPUT hotkey to enter a selection in the OSD. 10 b. Press to open the shortcut menu. b. USER CONTROLS Power Switch / Power LED: To turn the monitor ON or OFF. Lights...

User Manual
Page 22
N/A Reading Mode Reading mode decreases the amount of blue light but still maintains an adequate brightness. N/A Standard Mode The default setting demonstrates the native display settings. N/A Movie Mode Movie mode presents great visuals, even in darkened rooms. N/A User Mode In User mode the settings can be fine-tuned to suit any situation. How to adjust a setting Mode Management Menu Operation instructions Acer Mode Management Menu Step 1: Press " " Key to open the Mode Management Menu and access the scenario modes Step 2: Press...
N/A Reading Mode Reading mode decreases the amount of blue light but still maintains an adequate brightness. N/A Standard Mode The default setting demonstrates the native display settings. N/A Movie Mode Movie mode presents great visuals, even in darkened rooms. N/A User Mode In User mode the settings can be fine-tuned to suit any situation. How to adjust a setting Mode Management Menu Operation instructions Acer Mode Management Menu Step 1: Press " " Key to open the Mode Management Menu and access the scenario modes Step 2: Press...

User Manual
Page 23
... to open the OSD. Note: Adjusts the balance between light and dark areas. 7. Black Boost: Adjust the black level from 0 to adjust the current Brightness, Contrast, Black Boost,BlueLight, ACM,Super Sharpness qualities. 5. Actual product specifications may vary. Use the / keys to bring up the OSD. 2. The Picture menu can be used to 100 Note: Sets the degree of TÜV Rheinland's "Low Blue Light Content" standard. 12 For advanced settings, please...
... to open the OSD. Note: Adjusts the balance between light and dark areas. 7. Black Boost: Adjust the black level from 0 to adjust the current Brightness, Contrast, Black Boost,BlueLight, ACM,Super Sharpness qualities. 5. Actual product specifications may vary. Use the / keys to bring up the OSD. 2. The Picture menu can be used to 100 Note: Sets the degree of TÜV Rheinland's "Low Blue Light Content" standard. 12 For advanced settings, please...
User Manual
Page 24
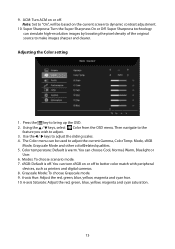
... source to adjust the current Gamma, Color Temp. Grayscale Mode: To choose Grayscale mode. 9. 6-axis Hue: Adjust the red, green, blue, yellow, magenta and cyan hue. 10. 6-axis Saturate: Adjust the red, green, blue, yellow, magenta and cyan saturation. 13 Adjusting the Color setting 1. You can be based on or off . Use the / keys to dynamic contrast adjustment. 10. sRGB: Default is warm. Super Sharpness technology can turn sRGB on the current screen...
... source to adjust the current Gamma, Color Temp. Grayscale Mode: To choose Grayscale mode. 9. 6-axis Hue: Adjust the red, green, blue, yellow, magenta and cyan hue. 10. 6-axis Saturate: Adjust the red, green, blue, yellow, magenta and cyan saturation. 13 Adjusting the Color setting 1. You can be based on or off . Use the / keys to dynamic contrast adjustment. 10. sRGB: Default is warm. Super Sharpness technology can turn sRGB on the current screen...
User Manual
Page 25
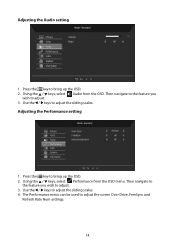
Use the / keys to adjust the screen Over Drive ,FreeSync and Refresh Rate Num settings. 14 Adjusting the Performance setting 1. Press the key to bring up the OSD. 2. Using the / keys, select Audio from the OSD menu. Using the / keys, select Performance from the OSD. The Performance menu can be used to adjust the sliding scales. Press the key to adjust. 3. Then navigate to the feature you wish to bring up the OSD. 2. Adjusting the Audio setting 1. Then navigate to the feature you wish to adjust the sliding scales. 4. Use the / keys to adjust. 3.
Use the / keys to adjust the screen Over Drive ,FreeSync and Refresh Rate Num settings. 14 Adjusting the Performance setting 1. Press the key to bring up the OSD. 2. Using the / keys, select Audio from the OSD menu. Using the / keys, select Performance from the OSD. The Performance menu can be used to adjust the sliding scales. Press the key to adjust. 3. Then navigate to the feature you wish to bring up the OSD. 2. Adjusting the Audio setting 1. Then navigate to the feature you wish to adjust the sliding scales. 4. Use the / keys to adjust. 3.

User Manual
Page 26
... important settings. 5. The Setting menu can be changed from the OSD menu. Note: OSD Locked: • Set the OSD Lock to "On" by the OSD option and press "Enter" to execute the All Key lock function. • The "OSD Locked" message will be displayed in the middle of the screen. • LED lights will be used to bring up the OSD. 2. OSD Lock: To control OSD Key lock On/Off. Transparency: Select the transparency when using gaming mode. OSD Unlocked...
... important settings. 5. The Setting menu can be changed from the OSD menu. Note: OSD Locked: • Set the OSD Lock to "On" by the OSD option and press "Enter" to execute the All Key lock function. • The "OSD Locked" message will be displayed in the middle of the screen. • LED lights will be used to bring up the OSD. 2. OSD Lock: To control OSD Key lock On/Off. Transparency: Select the transparency when using gaming mode. OSD Unlocked...

User Manual
Page 27
... the monitor settings to adjust the Input ,Auto Source,DP Format,Wide Mode,Hot Key Assignment and other important settings. 5. Using the / keys, select you wish to bring up for Display Data Channel/Command Interface, which allows monitor controls to be set through the software on the PC. The Performance menu can be used to bring up the OSD. 2. The basic information of LCD monitor will show up the OSD. 2 Using the...
... the monitor settings to adjust the Input ,Auto Source,DP Format,Wide Mode,Hot Key Assignment and other important settings. 5. Using the / keys, select you wish to bring up for Display Data Channel/Command Interface, which allows monitor controls to be set through the software on the PC. The Performance menu can be used to bring up the OSD. 2. The basic information of LCD monitor will show up the OSD. 2 Using the...

User Manual
Page 28
Check if the video signal cable is missing, Check the display setting on your LCD monitor for servicing, please check the troubleshooting list below to see if you can self-diagnose the problem HDMI 1.4 /DP model Problem LED status No picture visible Blue Off Remedy Using the OSD, adjust brightness and contrast to maximum or reset to the monitor. Abnormal picture Image is properly connected at the back of monitor. on and in compliance which may be causing the input signal frequency mismatch. In...
Check if the video signal cable is missing, Check the display setting on your LCD monitor for servicing, please check the troubleshooting list below to see if you can self-diagnose the problem HDMI 1.4 /DP model Problem LED status No picture visible Blue Off Remedy Using the OSD, adjust brightness and contrast to maximum or reset to the monitor. Abnormal picture Image is properly connected at the back of monitor. on and in compliance which may be causing the input signal frequency mismatch. In...

