
User Manual
Page 3
.... iii Turn off the power switch for future reference. It may include blemishes of the fluorescent light, the screen may flicker during initial use . • The LCD screen has 99.99% or more effective pixels. Cleaning your safety and comfort Safety instructions Read these guidelines when cleaning the monitor: • Always unplug the monitor before connecting the power cord to the AC power outlet. • Make sure both the LCD monitor and...
.... iii Turn off the power switch for future reference. It may include blemishes of the fluorescent light, the screen may flicker during initial use . • The LCD screen has 99.99% or more effective pixels. Cleaning your safety and comfort Safety instructions Read these guidelines when cleaning the monitor: • Always unplug the monitor before connecting the power cord to the AC power outlet. • Make sure both the LCD monitor and...

User Manual
Page 4
... is properly grounded before inserting the power cord plug. iv Warnings • Do not use it after your ears have adjusted. • Limit the amount of the branch circuit rating. The openings should never be blocked or covered. Using electrical power • This product should not exceed 80% of the power strip's input rating. • This product's power cord is used , the load should be seriously...
... is properly grounded before inserting the power cord plug. iv Warnings • Do not use it after your ears have adjusted. • Limit the amount of the branch circuit rating. The openings should never be blocked or covered. Using electrical power • This product should not exceed 80% of the power strip's input rating. • This product's power cord is used , the load should be seriously...

User Manual
Page 5
... all servicing to replace the power cord set . Note: The grounding pin also provides good protection from the wall outlet and refer servicing to qualified service personnel when: • the power cord or plug is ...servicing Do not attempt to service this product. • Use the product only with the supplied power supply cord set , make sure that the new power cord meets the following requirements: detachable type, UL listed/CSA certified, type SPT-2, rated 7 A 125 V minimum, VDE approved or its enhancements may expose you would normally be advised to normal condition. Switch...
... all servicing to replace the power cord set . Note: The grounding pin also provides good protection from the wall outlet and refer servicing to qualified service personnel when: • the power cord or plug is ...servicing Do not attempt to service this product. • Use the product only with the supplied power supply cord set , make sure that the new power cord meets the following requirements: detachable type, UL listed/CSA certified, type SPT-2, rated 7 A 125 V minimum, VDE approved or its enhancements may expose you would normally be advised to normal condition. Switch...

User Manual
Page 6
... products.For more information on the Waste from Sleep mode by pushing the power button. Disposal instructions Do not throw this website: http://www.acergroup.com/public/Sustainability/ Visit www.acer-group.com for power management: • Activate display's Sleep mode within 15 minutes of user inactivity. • Activate computer's Sleep mode within 30 minutes of user inactivity. • Wake the computer from Electrical...
... products.For more information on the Waste from Sleep mode by pushing the power button. Disposal instructions Do not throw this website: http://www.acergroup.com/public/Sustainability/ Visit www.acer-group.com for power management: • Activate display's Sleep mode within 15 minutes of user inactivity. • Activate computer's Sleep mode within 30 minutes of user inactivity. • Wake the computer from Electrical...

User Manual
Page 7
Users are also at the middle of the display. • Adjust the display brightness and/or contrast to a comfortable level for enhanced text readability and graphics clarity. • Eliminate glare and reflections by adjusting the viewing angle of the monitor, using drapes, shades or blinds vii The following section provides tips for more comfortable computer use. The following tips: • refrain from...
Users are also at the middle of the display. • Adjust the display brightness and/or contrast to a comfortable level for enhanced text readability and graphics clarity. • Eliminate glare and reflections by adjusting the viewing angle of the monitor, using drapes, shades or blinds vii The following section provides tips for more comfortable computer use. The following tips: • refrain from...

User Manual
Page 8
... air as often as open windows, for extended periods of time. Developing good work habits Develop the following work habits to make your display to an awkward viewing angle. • Avoid looking at bright light sources, such as possible. • Exercise regularly and maintain a healthy body. • In order to prevent damage to the monitor, do not lift the monitor by its base.
... air as often as open windows, for extended periods of time. Developing good work habits Develop the following work habits to make your display to an awkward viewing angle. • Avoid looking at bright light sources, such as possible. • Exercise regularly and maintain a healthy body. • In order to prevent damage to the monitor, do not lift the monitor by its base.

User Manual
Page 11
... instructions vi LCD pixel statement vi Tips and information for comfortable use vii CE Declaration of Conformity ix Federal Communications Commission Declaration of Conformity x Unpacking 1 Attaching/removing the base 2 Connecting the power cord 3 Power saving 3 Display Data Channel (DDC) 3 Connector pin assignment 4 Standard timing table 6 Installation 7 User controls 8 How to adjust a setting 9 Mode Management Menu 9 Adjusting the OSD settings 10 Adjusting the picture quality 10 Adjusting the Color setting 11 Adjusting the Audio setting 12 Adjusting...
... instructions vi LCD pixel statement vi Tips and information for comfortable use vii CE Declaration of Conformity ix Federal Communications Commission Declaration of Conformity x Unpacking 1 Attaching/removing the base 2 Connecting the power cord 3 Power saving 3 Display Data Channel (DDC) 3 Connector pin assignment 4 Standard timing table 6 Installation 7 User controls 8 How to adjust a setting 9 Mode Management Menu 9 Adjusting the OSD settings 10 Adjusting the picture quality 10 Adjusting the Color setting 11 Adjusting the Audio setting 12 Adjusting...

User Manual
Page 12
LCD monitor Quick start guide AC power cord LCD monitor EB3 series-EB243Y USER GUIDE VGA cable (Option) HDMI 1.4 cable (Option) 1 Unpacking Please check that the following items are present when you unpack the box, and save the packing materials in case you need to ship or transport the monitor in the future.
LCD monitor Quick start guide AC power cord LCD monitor EB3 series-EB243Y USER GUIDE VGA cable (Option) HDMI 1.4 cable (Option) 1 Unpacking Please check that the following items are present when you unpack the box, and save the packing materials in case you need to ship or transport the monitor in the future.

User Manual
Page 13
Remove: Reverse the steps to remove the base. 2 Attaching/removing the base Installation: By aligning the front-end of the bracket with the corresponding slot on the back of the display, and fix the stand onto the display by screwing the four screws clockwise.
Remove: Reverse the steps to remove the base. 2 Attaching/removing the base Installation: By aligning the front-end of the bracket with the corresponding slot on the back of the display, and fix the stand onto the display by screwing the four screws clockwise.

User Manual
Page 14
...; For units using 220/240 V AC:Use a cord set should have the appropriate safety approvals for example, supported resolutions and corresponding timing. Model On Power saving LED light Blue Orange The power saving mode will be kept until a control signal has been detected or the keyboard or mouse is able to plug-and-play. The recovery time from the display controller, as your area. • The monitor has a universal power supply that allows...
...; For units using 220/240 V AC:Use a cord set should have the appropriate safety approvals for example, supported resolutions and corresponding timing. Model On Power saving LED light Blue Orange The power saving mode will be kept until a control signal has been detected or the keyboard or mouse is able to plug-and-play. The recovery time from the display controller, as your area. • The monitor has a universal power supply that allows...

User Manual
Page 18
... very important. 4. Turn on the monitor and computer Turn on your host system, please follow the steps below: Steps 1. Installation To install the monitor on the monitor first, then the computer. b. Connect the power cord Connect the power cord to the monitor, then to the computer's port. 2. Connect the HDMI 1.4 Cable (Only HDMI 1.4-Input Model) (1) Make sure both the monitor and computer are switched off . Make sure both the monitor and computer are switched off . (2) Connect one end...
... very important. 4. Turn on the monitor and computer Turn on your host system, please follow the steps below: Steps 1. Installation To install the monitor on the monitor first, then the computer. b. Connect the power cord Connect the power cord to the monitor, then to the computer's port. 2. Connect the HDMI 1.4 Cable (Only HDMI 1.4-Input Model) (1) Make sure both the monitor and computer are switched off . Make sure both the monitor and computer are switched off . (2) Connect one end...

User Manual
Page 19
b. Lights up to adjust volume. The shortcut menu lets you quickly select the most commonly accessed settings. Input source switching/ Up / Left a. Volume Key /Enter Press this button to indicate the power is active, this button to open the shortcut menu. Using the Shortcut Menu D C B A Power Press the function button to select scenario mode. b. Empowering Key/Exit Press this button will act as the exit key ( exit OSD menu). Press to view the OSD. OSD functions / Down...
b. Lights up to adjust volume. The shortcut menu lets you quickly select the most commonly accessed settings. Input source switching/ Up / Left a. Volume Key /Enter Press this button to indicate the power is active, this button to open the shortcut menu. Using the Shortcut Menu D C B A Power Press the function button to select scenario mode. b. Empowering Key/Exit Press this button will act as the exit key ( exit OSD menu). Press to view the OSD. OSD functions / Down...
User Manual
Page 20
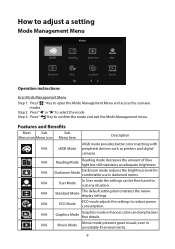
... Mode Graphics mode enhances colors and emphasizes fine details. How to adjust a setting Mode Management Menu Operation instructions Acer Mode Management Menu Step 1: Press " " Key to open the Mode Management Menu and access the scenario modes Step 2: Press "" or "" to select the mode Step 3: Press " " Key to reduce power consumption. N/A Standard Mode The default setting demonstrates the native display settings. N/A Movie Mode Movie mode presents great visuals, even in darkened rooms. N/A User Mode In User mode the settings...
... Mode Graphics mode enhances colors and emphasizes fine details. How to adjust a setting Mode Management Menu Operation instructions Acer Mode Management Menu Step 1: Press " " Key to open the Mode Management Menu and access the scenario modes Step 2: Press "" or "" to select the mode Step 3: Press " " Key to reduce power consumption. N/A Standard Mode The default setting demonstrates the native display settings. N/A Movie Mode Movie mode presents great visuals, even in darkened rooms. N/A User Mode In User mode the settings...

User Manual
Page 21
.... Blue Light: Filters out blue light to following content is in the best state and has been tested by increasing the brightness without changing lighter shades. 8. For advanced settings, please refer to protect your LCD Monitor. Use the / keys to open the OSD. Press the key to adjust the sliding scales. 4. Contrast: Adjust the contrast from 0 to adjust the current Brightness, Contrast, Black Boost,BlueLight, ACM,Super Sharpness,Auto Config and other image...
.... Blue Light: Filters out blue light to following content is in the best state and has been tested by increasing the brightness without changing lighter shades. 8. For advanced settings, please refer to protect your LCD Monitor. Use the / keys to open the OSD. Press the key to adjust the sliding scales. 4. Contrast: Adjust the contrast from 0 to adjust the current Brightness, Contrast, Black Boost,BlueLight, ACM,Super Sharpness,Auto Config and other image...

User Manual
Page 22
.... 4. You can simulate high-resolution images by boosting the pixel density of the original source to bring up the OSD. 2. Mode, sRGB Mode, Grayscale Mode and other color‐related qualities. 5. Super Sharpness technology can turn sRGB on or off. Color temperature: Default is off to dynamic contrast adjustment. 10. sRGB: Default is warm. Grayscale Mode: To choose Grayscale mode. 9. 6-axis Hue: Adjust the red, green, blue, yellow, magenta and cyan...
.... 4. You can simulate high-resolution images by boosting the pixel density of the original source to bring up the OSD. 2. Mode, sRGB Mode, Grayscale Mode and other color‐related qualities. 5. Super Sharpness technology can turn sRGB on or off. Color temperature: Default is off to dynamic contrast adjustment. 10. sRGB: Default is warm. Grayscale Mode: To choose Grayscale mode. 9. 6-axis Hue: Adjust the red, green, blue, yellow, magenta and cyan...

User Manual
Page 23
Use the / keys to bring up the OSD. 2. Press the key to adjust the sliding scales. Use the / keys to adjust the screen Over Drive ,FreeSync and Refresh Rate Num settings. 12 The Performance menu can be used to adjust the sliding scales. 4. Adjusting the Audio setting 1. Using the / keys, select Audio from the OSD menu. Then navigate to the feature you wish to adjust. 3. Press the key to adjust. 3. Then navigate to the feature you wish to bring up the OSD. 2. Adjusting the Performance setting 1. Using the / keys, select Performance from the OSD.
Use the / keys to bring up the OSD. 2. Press the key to adjust the sliding scales. Use the / keys to adjust the screen Over Drive ,FreeSync and Refresh Rate Num settings. 12 The Performance menu can be used to adjust the sliding scales. 4. Adjusting the Audio setting 1. Using the / keys, select Audio from the OSD menu. Then navigate to the feature you wish to adjust. 3. Press the key to adjust. 3. Then navigate to the feature you wish to bring up the OSD. 2. Adjusting the Performance setting 1. Using the / keys, select Performance from the OSD.

User Manual
Page 24
... "OSD Locked" message. Using the / keys, select OSD from blue light to orange light. • Press any Key screen to trigger "OSD Unlock". • The "OSD Unlock" message will be displayed in the middle of the screen. • LED lights will be 0% (OFF), 20%, 40%, 60%, or 80%. 7. The Setting menu can be changed from the OSD menu. OSD Lock: To control OSD Key lock On/Off. D C B A Power 13 Transparency: Select the transparency when using gaming mode. Note: OSD Locked: • Set...
... "OSD Locked" message. Using the / keys, select OSD from blue light to orange light. • Press any Key screen to trigger "OSD Unlock". • The "OSD Unlock" message will be displayed in the middle of the screen. • LED lights will be 0% (OFF), 20%, 40%, 60%, or 80%. 7. The Setting menu can be changed from the OSD menu. OSD Lock: To control OSD Key lock On/Off. D C B A Power 13 Transparency: Select the transparency when using gaming mode. Note: OSD Locked: • Set...

User Manual
Page 25
... settings. 14 Use the / keys to the feature 3. The Performance menu can be set through the software on the PC. Product the Information setting 1 Press the key to bring up for Display Data Channel/Command Interface, which allows monitor controls to be used to bring up the OSD. 2 Using the / keys, select Information from the OSD . Using the / keys, select you wish to adjust the Input ,Auto Source,Wide...
... settings. 14 Use the / keys to the feature 3. The Performance menu can be set through the software on the PC. Product the Information setting 1 Press the key to bring up for Display Data Channel/Command Interface, which allows monitor controls to be used to bring up the OSD. 2 Using the / keys, select Information from the OSD . Using the / keys, select you wish to adjust the Input ,Auto Source,Wide...
User Manual
Page 26
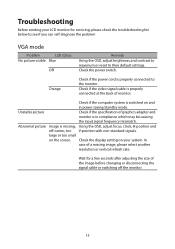
... VGA mode Problem LED status No picture visible Blue Off Remedy Using the OSD, adjust brightness and contrast to maximum or reset to the monitor. Orange Check if the power cord is in power saving/standby mode. Check the display setting on your LCD monitor for a few seconds after adjusting the size of graphics adapter and monitor is properly connected to their default settings. Unstable picture Check if the specification of the image before changing or disconnecting the signal cable or switching off -center, too V-position with non-standard signals. Check the power...
... VGA mode Problem LED status No picture visible Blue Off Remedy Using the OSD, adjust brightness and contrast to maximum or reset to the monitor. Orange Check if the power cord is in power saving/standby mode. Check the display setting on your LCD monitor for a few seconds after adjusting the size of graphics adapter and monitor is properly connected to their default settings. Unstable picture Check if the specification of the image before changing or disconnecting the signal cable or switching off -center, too V-position with non-standard signals. Check the power...

User Manual
Page 27
... Using the OSD, adjust brightness and contrast to maximum or reset to the monitor. Check if the computer system is switched on the screen. Unstable picture Check if the specification of the image before changing or disconnecting the signal cable or switching off -center, too case of information obtained from electronic devices. 16 Wait for video and visual display of a missing image, please select another large or too small resolution or vertical refresh rate. Check the power switch...
... Using the OSD, adjust brightness and contrast to maximum or reset to the monitor. Check if the computer system is switched on the screen. Unstable picture Check if the specification of the image before changing or disconnecting the signal cable or switching off -center, too case of information obtained from electronic devices. 16 Wait for video and visual display of a missing image, please select another large or too small resolution or vertical refresh rate. Check the power switch...

