
User Manual
Page 2
... should include the serial number, model number and purchase information. The serial number and model number are recorded on the label affixed to their respective companies. Acer LCD Monitor User's Guide Original Issue: 09/2017 Changes may be made periodically to the contents hereof and specifically disclaims the implied warranties of this manual or supplementary documents and publications. All Rights Reserved. This company makes no representations or...
... should include the serial number, model number and purchase information. The serial number and model number are recorded on the label affixed to their respective companies. Acer LCD Monitor User's Guide Original Issue: 09/2017 Changes may be made periodically to the contents hereof and specifically disclaims the implied warranties of this manual or supplementary documents and publications. All Rights Reserved. This company makes no representations or...

User Manual
Page 3
... effective pixels. It may include blemishes of the fluorescent light, the screen may remain after switching the image, when the same image is recovered slowly by unplugging all power cords from the electrical outlet. Accessibility Be sure that the power outlet you use . Keep this case, the screen is displayed for future reference. Connecting/disconnecting the device Observe the following are turned off before cleaning. • Use...
... effective pixels. It may include blemishes of the fluorescent light, the screen may remain after switching the image, when the same image is recovered slowly by unplugging all power cords from the electrical outlet. Accessibility Be sure that the power outlet you use . Keep this case, the screen is displayed for future reference. Connecting/disconnecting the device Observe the following are turned off before cleaning. • Use...

User Manual
Page 4
... openings should not exceed 80% of the power strip's input rating. • This product's power cord is not properly grounded may touch dangerous voltage points or short-out parts that the total ampere rating of the branch circuit rating. If power strips are provided for details. Warning! Using a power outlet that is equipped with this product, make sure that the total rating of all products plugged...
... openings should not exceed 80% of the power strip's input rating. • This product's power cord is not properly grounded may touch dangerous voltage points or short-out parts that the total ampere rating of the branch circuit rating. If power strips are provided for details. Warning! Using a power outlet that is equipped with this product, make sure that the total rating of all products plugged...
User Manual
Page 5
... SPT-2, rated 7 A 125 V minimum, VDE approved or its enhancements may result in damage and will often require extensive work by the operating instructions, since improper adjustment of other risks. v If you would normally be advised to normal condition. Potentially explosive environments Switch off your vehicle engine. Areas with the supplied power supply cord set , make sure that the new power cord meets the...
... SPT-2, rated 7 A 125 V minimum, VDE approved or its enhancements may result in damage and will often require extensive work by the operating instructions, since improper adjustment of other risks. v If you would normally be advised to normal condition. Potentially explosive environments Switch off your vehicle engine. Areas with the supplied power supply cord set , make sure that the new power cord meets the...
User Manual
Page 6
... identify and provide the best working procedures to reduce the environmental impact of our products.For more information on the Waste from Sleep mode by pushing the power button. IT Equipment Recycling Information Acer is produced with high-precision manufacturing techniques. This has no effect on the features and benefits of used equipment, as black or red dots. This product...
... identify and provide the best working procedures to reduce the environmental impact of our products.For more information on the Waste from Sleep mode by pushing the power button. IT Equipment Recycling Information Acer is produced with high-precision manufacturing techniques. This has no effect on the features and benefits of used equipment, as black or red dots. This product...

User Manual
Page 7
... regular breaks by adjusting the viewing angle of the monitor, using drapes, shades or blinds vii Tips and information for comfortable use Computer users may complain of your vision Long viewing hours, wearing incorrect glasses or contact lenses, glare, excessive room lighting, poorly focused screens, very small typefaces and low-contrast displays could stress your eyes. Display • Keep your display clean. • Keep your head...
... regular breaks by adjusting the viewing angle of the monitor, using drapes, shades or blinds vii Tips and information for comfortable use Computer users may complain of your vision Long viewing hours, wearing incorrect glasses or contact lenses, glare, excessive room lighting, poorly focused screens, very small typefaces and low-contrast displays could stress your eyes. Display • Keep your display clean. • Keep your head...

User Manual
Page 8
viii • using a task light • changing the display's viewing angle • using a glare-reduction filter • using a display visor, such as a piece of cardboard extended from the display's top front edge • Avoid adjusting your computer use more relaxing and productive: • Take short ...to prevent damage to an awkward viewing angle. • Avoid looking at bright light sources, such as open windows, for extended periods of time. Developing good work habits Develop the following work habits to make your display to the monitor, do not lift the monitor by its base.
viii • using a task light • changing the display's viewing angle • using a glare-reduction filter • using a display visor, such as a piece of cardboard extended from the display's top front edge • Avoid adjusting your computer use more relaxing and productive: • Take short ...to prevent damage to an awkward viewing angle. • Avoid looking at bright light sources, such as open windows, for extended periods of time. Developing good work habits Develop the following work habits to make your display to the monitor, do not lift the monitor by its base.
User Manual
Page 11
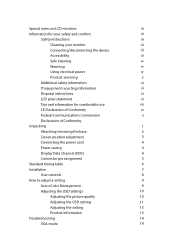
...comfortable use vii CE Declaration of Conformity ix Federal Communications Commission x Declaration of Conformity Unpacking 1 Attaching/removing the base 2 Screen position adjustment 3 Connecting the power cord 4 Power saving 4 Display Data Channel (DDC) 4 Connector pin assignment 5 Standard timing table 6 Installation 7 User controls 8 How to adjust a setting 9 Acer eColor Management 9 Adjusting the OSD settings 10 Adjusting the picture quality 10 Adjusting the OSD setting 11 Adjusting the setting 12 Product information 13 Troubleshooting 14 VGA mode...
...comfortable use vii CE Declaration of Conformity ix Federal Communications Commission x Declaration of Conformity Unpacking 1 Attaching/removing the base 2 Screen position adjustment 3 Connecting the power cord 4 Power saving 4 Display Data Channel (DDC) 4 Connector pin assignment 5 Standard timing table 6 Installation 7 User controls 8 How to adjust a setting 9 Acer eColor Management 9 Adjusting the OSD settings 10 Adjusting the picture quality 10 Adjusting the OSD setting 11 Adjusting the setting 12 Product information 13 Troubleshooting 14 VGA mode...
User Manual
Page 12
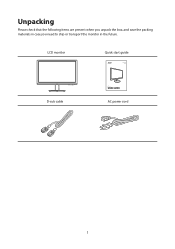
LCD monitor Quick start guide LCD MONITOR EB162Q D-sub cable EB2 Series USER GUIDE AC power cord 1 Unpacking Please check that the following items are present when you unpack the box, and save the packing materials in case you need to ship or transport the monitor in the future.
LCD monitor Quick start guide LCD MONITOR EB162Q D-sub cable EB2 Series USER GUIDE AC power cord 1 Unpacking Please check that the following items are present when you unpack the box, and save the packing materials in case you need to ship or transport the monitor in the future.

User Manual
Page 13
Then, install the base onto the bracket. You should hear a click sound when the base is correctly and firmly fixed to release it form the bracket, and then just pull out the base. 1 2 2 Attaching/removing the base Installation: By aligning the front-end of the bracket with the corresponding slot on the back of the display, push the bracket into the slot until you hear a click sound. Remove: Press down the two latches in the base to the bracket.
Then, install the base onto the bracket. You should hear a click sound when the base is correctly and firmly fixed to release it form the bracket, and then just pull out the base. 1 2 2 Attaching/removing the base Installation: By aligning the front-end of the bracket with the corresponding slot on the back of the display, push the bracket into the slot until you hear a click sound. Remove: Press down the two latches in the base to the bracket.

User Manual
Page 14
Screen position adjustment To optimize the viewing position, you can be adjusted to hold the edges of the monitor as shown below. The monitor can adjust the monitor tilt by using both of your hands to 15 degrees up or 5 degrees down. 5° 15° 3
Screen position adjustment To optimize the viewing position, you can be adjusted to hold the edges of the monitor as shown below. The monitor can adjust the monitor tilt by using both of your hands to 15 degrees up or 5 degrees down. 5° 15° 3
User Manual
Page 15
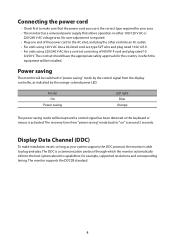
... the control signal from "power saving" mode back to "on" is around 3 seconds. for your system supports the DDC protocol, the monitor is able to plug-and-play. Model On Power saving LED light Blue Orange The power saving mode will be installed. The recovery time from the display controller, as your area. • The monitor has a universal power supply that the power cord you use is a communication protocol through which the equipment will be switched to...
... the control signal from "power saving" mode back to "on" is around 3 seconds. for your system supports the DDC protocol, the monitor is able to plug-and-play. Model On Power saving LED light Blue Orange The power saving mode will be installed. The recovery time from the display controller, as your area. • The monitor has a universal power supply that the power cord you use is a communication protocol through which the equipment will be switched to...

User Manual
Page 16
Connector pin assignment 15-pin color display signal cable PIN No. 1 2 3 4 5 6 7 8 Description Red Green Blue Monitor ground DDC-return R-ground G-ground B-ground PIN No. 9 10 11 12 13 14 15 Description +5V Logic ground Monitor ground DDC-serial data H-sync V-sync DDC-serial clock 5
Connector pin assignment 15-pin color display signal cable PIN No. 1 2 3 4 5 6 7 8 Description Red Green Blue Monitor ground DDC-return R-ground G-ground B-ground PIN No. 9 10 11 12 13 14 15 Description +5V Logic ground Monitor ground DDC-serial data H-sync V-sync DDC-serial clock 5
User Manual
Page 18
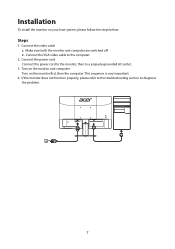
Installation To install the monitor on the monitor first, then the computer. Turn on the monitor and computer Turn on your host system, please follow the steps below: Steps 1. b. This sequence is very important. 4. If the monitor does not function properly, please refer to the troubleshooting section to the computer. 2. Connect the VGA video cable to diagnose the problem. 7 Make sure both the monitor and computer are switched off. Connect the power cord Connect the power cord to the monitor, then to a properly grounded AC outlet. 3. Connect the video cable a.
Installation To install the monitor on the monitor first, then the computer. Turn on the monitor and computer Turn on your host system, please follow the steps below: Steps 1. b. This sequence is very important. 4. If the monitor does not function properly, please refer to the troubleshooting section to the computer. 2. Connect the VGA video cable to diagnose the problem. 7 Make sure both the monitor and computer are switched off. Connect the power cord Connect the power cord to the monitor, then to a properly grounded AC outlet. 3. Connect the video cable a.
User Manual
Page 19
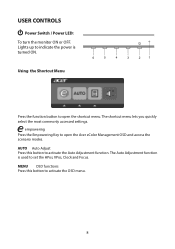
The shortcut menu lets you quickly select the most commonly accessed settings. AUTO Auto Adjust Press this botton to activate the OSD menu. 8 USER CONTROLS Power Switch / Power LED: To turn the monitor ON or OFF. Using the Shortcut Menu 6 5 4 3 2 1 Press the function button to open the shortcut menu. The Auto Adjustment function is turned ON. empowering Press the Empowering Key to open the Acer eColor Management OSD and access the scenario modes. MENU OSD functions Press this button to set the HPos...
The shortcut menu lets you quickly select the most commonly accessed settings. AUTO Auto Adjust Press this botton to activate the OSD menu. 8 USER CONTROLS Power Switch / Power LED: To turn the monitor ON or OFF. Using the Shortcut Menu 6 5 4 3 2 1 Press the function button to open the shortcut menu. The Auto Adjustment function is turned ON. empowering Press the Empowering Key to open the Acer eColor Management OSD and access the scenario modes. MENU OSD functions Press this button to set the HPos...
User Manual
Page 20
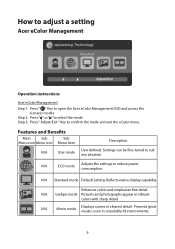
... colors with sharp detail. Reflects native display capability Enhances colors and emphasize fine detail. Settings can be fine-tuned to suit any situation N/A ECO mode Adjusts the settings to confirm the mode and exit the eColor menu. N/A Standard mode Default Setting. Presents great visuals, even in unsuitably-lit environments. 9 How to adjust a setting Acer eColor Management Operation instructions Acer eColor Management Step 1: Press " " Key to open the Acer eColor Management OSD...
... colors with sharp detail. Reflects native display capability Enhances colors and emphasize fine detail. Settings can be fine-tuned to suit any situation N/A ECO mode Adjusts the settings to confirm the mode and exit the eColor menu. N/A Standard mode Default Setting. Presents great visuals, even in unsuitably-lit environments. 9 How to adjust a setting Acer eColor Management Operation instructions Acer eColor Management Step 1: Press " " Key to open the Acer eColor Management OSD...
User Manual
Page 21
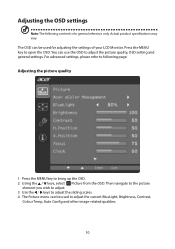
... LCD Monitor. The OSD can be used to adjust the current BlueLight, Brightness, Contrast, Colour Temp, Auto Config and other image-related qualities. 10 Then navigate to the picture element you wish to adjust. 3 Use the / keys to adjust the sliding scales. 4 The Picture menu can be used for general reference only. You can use the OSD to open the OSD. Actual product specifications may vary. Press the MENU key to adjust the picture...
... LCD Monitor. The OSD can be used to adjust the current BlueLight, Brightness, Contrast, Colour Temp, Auto Config and other image-related qualities. 10 Then navigate to the picture element you wish to adjust. 3 Use the / keys to adjust the sliding scales. 4 The Picture menu can be used for general reference only. You can use the OSD to open the OSD. Actual product specifications may vary. Press the MENU key to adjust the picture...

User Manual
Page 22
Then navigate to the feature you wish to bring up the OSD. 2 Using the directional keys, select OSD from the on screen display. Adjusting the OSD setting 1 Press the MENU key to adjust. 11
Then navigate to the feature you wish to bring up the OSD. 2 Using the directional keys, select OSD from the on screen display. Adjusting the OSD setting 1 Press the MENU key to adjust. 11

User Manual
Page 23
Adjusting the setting 1 Press the MENU key to adjust the screen Wide Mode and other important settings. 12 Then navigate to the feature you wish to adjust. 3 The Setting menu can be used to bring up the OSD. 2 Using the / keys, select Setting from the OSD.
Adjusting the setting 1 Press the MENU key to adjust the screen Wide Mode and other important settings. 12 Then navigate to the feature you wish to adjust. 3 The Setting menu can be used to bring up the OSD. 2 Using the / keys, select Setting from the OSD.
User Manual
Page 25
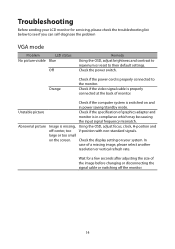
... a few seconds after adjusting the size of monitor. Check the power switch. Wait for servicing, please check the troubleshooting list below to see if you can self-diagnose the problem VGA mode Problem LED status No picture visible Blue Off Remedy Using the OSD, adjust brightness and contrast to maximum or reset to the monitor. Unstable picture Check if the specification of a missing image, please select another resolution or vertical refresh rate. In case of graphics adapter and monitor is properly connected to their default settings.
... a few seconds after adjusting the size of monitor. Check the power switch. Wait for servicing, please check the troubleshooting list below to see if you can self-diagnose the problem VGA mode Problem LED status No picture visible Blue Off Remedy Using the OSD, adjust brightness and contrast to maximum or reset to the monitor. Unstable picture Check if the specification of a missing image, please select another resolution or vertical refresh rate. In case of graphics adapter and monitor is properly connected to their default settings.

