User Manual
Page 2
... label affixed to the information in this manual or supplementary documents and publications. Acer LCD Monitor User Guide Model number Serial number Date of purchase Place of such revisions or changes. Such changes will be made periodically to your unit should include the serial number, model number and purchase information. The serial number and model number are registered trademarks of Acer Incorporated. Acer Incorporated. This company makes no representations or warranties, either expressed...
... label affixed to the information in this manual or supplementary documents and publications. Acer LCD Monitor User Guide Model number Serial number Date of purchase Place of such revisions or changes. Such changes will be made periodically to your unit should include the serial number, model number and purchase information. The serial number and model number are registered trademarks of Acer Incorporated. Acer Incorporated. This company makes no representations or warranties, either expressed...
User Manual
Page 3
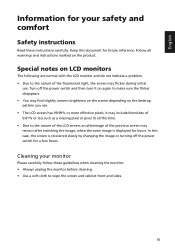
... by changing the image or turning off the power switch and then turn it on the desktop pattern you use . Cleaning your safety and comfort Safety instructions Read these guidelines when cleaning the monitor: • Always unplug the monitor before cleaning. • Use a soft cloth to the nature of the LCD screen, an afterimage of the fluorescent light, the screen may remain after switching the image, when the same image is displayed...
... by changing the image or turning off the power switch and then turn it on the desktop pattern you use . Cleaning your safety and comfort Safety instructions Read these guidelines when cleaning the monitor: • Always unplug the monitor before cleaning. • Use a soft cloth to the nature of the LCD screen, an afterimage of the fluorescent light, the screen may remain after switching the image, when the same image is displayed...

User Manual
Page 4
... • Turn the volume down if you can't hear people speaking near you need to unplug the power cord from the electrical outlet. Using electrical power • This product should be seriously damaged. • Slots and openings are not ...stand or table. The openings should never be blocked or covered. Warnings • Do not use it could result in installation unless proper ventilation is easily accessible and located as possible. This product should never be sure to disconnect power from the equipment, be blocked by placing the product on the marking label. English...
... • Turn the volume down if you can't hear people speaking near you need to unplug the power cord from the electrical outlet. Using electrical power • This product should be seriously damaged. • Slots and openings are not ...stand or table. The openings should never be blocked or covered. Warnings • Do not use it could result in installation unless proper ventilation is easily accessible and located as possible. This product should never be sure to disconnect power from the equipment, be blocked by placing the product on the marking label. English...
User Manual
Page 5
... cord is equipped with this product, make sure that the new power cord meets the following the operating instructions v If power strips are used with a three-wire grounded plug. The plug only fits in too many devices. Make sure the power outlet is a safety feature. The grounding pin is properly grounded before inserting the power cord plug. Also, make sure that may interfere with the supplied power supply cord set , make...
... cord is equipped with this product, make sure that the new power cord meets the following the operating instructions v If power strips are used with a three-wire grounded plug. The plug only fits in too many devices. Make sure the power outlet is a safety feature. The grounding pin is properly grounded before inserting the power cord plug. Also, make sure that may interfere with the supplied power supply cord set , make...
User Manual
Page 6
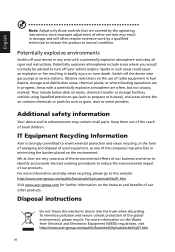
... and help when recycling, please go to normal condition. Observe restrictions on the environment. They include below deck on the features and benefits of other products. or where blasting operations are covered by the operating instructions, since improper adjustment of our other controls may contain small parts. Disposal instructions Do not throw this website: http://www.acer-group...
... and help when recycling, please go to normal condition. Observe restrictions on the environment. They include below deck on the features and benefits of other products. or where blasting operations are covered by the operating instructions, since improper adjustment of our other controls may contain small parts. Disposal instructions Do not throw this website: http://www.acer-group...

User Manual
Page 7
... tips: • refrain from Sleep mode by adjusting the viewing angle of a computer. Nevertheless, some pixels may appear in front of the monitor, using a footrest, or raising your comfort zone by pushing the power button. This has no effect on your company's health and safety department. Long work periods, bad posture, poor work habits, stress, inadequate working in the hands, wrists, arms...
... tips: • refrain from Sleep mode by adjusting the viewing angle of a computer. Nevertheless, some pixels may appear in front of the monitor, using a footrest, or raising your comfort zone by pushing the power button. This has no effect on your company's health and safety department. Long work periods, bad posture, poor work habits, stress, inadequate working in the hands, wrists, arms...

User Manual
Page 8
... adjusting your display to an awkward viewing angle. • Avoid looking at the middle of the display. • Adjust the display brightness and/or contrast to reduce eyestrain. Eyes • Rest your eyes frequently. • Give your eyes regular breaks by using drapes, shades or blinds • using a task light • changing the display's viewing angle • using a glare-reduction filter • using a display visor, such as open windows...
... adjusting your display to an awkward viewing angle. • Avoid looking at the middle of the display. • Adjust the display brightness and/or contrast to reduce eyestrain. Eyes • Rest your eyes frequently. • Give your eyes regular breaks by using drapes, shades or blinds • using a task light • changing the display's viewing angle • using a glare-reduction filter • using a display visor, such as open windows...
User Manual
Page 9
... zone vii Taking care of your vision viii Developing good work habits viii Unpacking 1 Attaching the base (for selected models) 2 Screen position adjustment 3 Connecting Power cord 3 Power saving 3 Display Data Channel (DDC) 4 Connector pin assignment 4 15-pin color display signal cable 4 24-pin color display signal cable 4 Standard timing table 5 Installation 6 Users controls 7 Panel controls 7 Using the Shortcut Menu 8 Acer eColor Management 9 Operation instructions 9 Features and benefits 9 Using the OSD Menus 10 Picture Menu 10 OSD Menu 11
... zone vii Taking care of your vision viii Developing good work habits viii Unpacking 1 Attaching the base (for selected models) 2 Screen position adjustment 3 Connecting Power cord 3 Power saving 3 Display Data Channel (DDC) 4 Connector pin assignment 4 15-pin color display signal cable 4 24-pin color display signal cable 4 Standard timing table 5 Installation 6 Users controls 7 Panel controls 7 Using the Shortcut Menu 8 Acer eColor Management 9 Operation instructions 9 Features and benefits 9 Using the OSD Menus 10 Picture Menu 10 OSD Menu 11

User Manual
Page 11
English Unpacking Please check that the following items are present when you unpack the box, and save the packing materials in case you need to ship or transport the monitor in the future. LCD monitor Quick start guide AC Power cord D-sub cable DVI cable (Optional) 1
English Unpacking Please check that the following items are present when you unpack the box, and save the packing materials in case you need to ship or transport the monitor in the future. LCD monitor Quick start guide AC Power cord D-sub cable DVI cable (Optional) 1

User Manual
Page 13
... be installed. No user-adjustment is required. • Plug one end of the AC power cord to the Adapter, and plug the other end into an AC outlet. • For units using 120 V AC: Use a UL-listed cord set, type SVT wire and plug rated 10 A/125 V. • For units using both of the monitor. Power saving The monitor will be adjusted to "power saving" mode by the Amber light. Screen position adjustment To optimize the viewing position, you use is...
... be installed. No user-adjustment is required. • Plug one end of the AC power cord to the Adapter, and plug the other end into an AC outlet. • For units using 120 V AC: Use a UL-listed cord set, type SVT wire and plug rated 10 A/125 V. • For units using both of the monitor. Power saving The monitor will be adjusted to "power saving" mode by the Amber light. Screen position adjustment To optimize the viewing position, you use is...

User Manual
Page 14
... system about its capabilities; Connector pin assignment 15-pin color display signal cable 1 5 6 10 11 15 PIN No. Description 1 Red 9 +5 V 2 Green 10 Logic ground 3 Blue 11 Monitor ground 4 Monitor ground 5 DDC-return 6 R-ground 7 G-ground 8 B-ground 12 DDC-serial data 13 H-sync 14 V-sync 15 DDC-serial clock 24-pin color display signal cable * PIN No. Description * 13 NC 14 +5 V power 15 DVI detect 16 Hot-plug detection 17 TMDS data 018...
... system about its capabilities; Connector pin assignment 15-pin color display signal cable 1 5 6 10 11 15 PIN No. Description 1 Red 9 +5 V 2 Green 10 Logic ground 3 Blue 11 Monitor ground 4 Monitor ground 5 DDC-return 6 R-ground 7 G-ground 8 B-ground 12 DDC-serial data 13 H-sync 14 V-sync 15 DDC-serial clock 24-pin color display signal cable * PIN No. Description * 13 NC 14 +5 V power 15 DVI detect 16 Hot-plug detection 17 TMDS data 018...
User Manual
Page 16
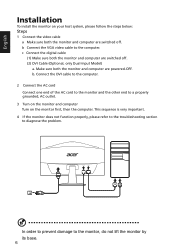
b Connect the VGA video cable to the monitor, do not lift the monitor by its base. 6 In order to prevent damage to the computer. c Connect the digital cable (1) Make sure both the monitor and computer are powered-OFF. Make sure both the monitor and computer are switched off . (2) DVI Cable (Optional, only Dual-Input Model) a. English Installation To install the monitor on the monitor first, then the computer. Connect the DVI cable to the computer. 2 Connect the AC cord Connect one end...
b Connect the VGA video cable to the monitor, do not lift the monitor by its base. 6 In order to prevent damage to the computer. c Connect the digital cable (1) Make sure both the monitor and computer are powered-OFF. Make sure both the monitor and computer are switched off . (2) DVI Cable (Optional, only Dual-Input Model) a. English Installation To install the monitor on the monitor first, then the computer. Connect the DVI cable to the computer. 2 Connect the AC cord Connect one end...
User Manual
Page 17
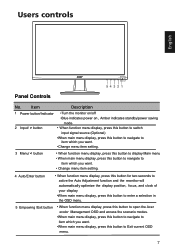
Users controls English Panel Controls 54 321 No. Item Description 1 Power button/Indicator •Turn the monitor on/off •Blue indicates power on , Amber indicates standby/power saving mode 2 Input/ > button • When function menu display, press this button to switch input signal source (Optional) •When main menu display, press this button to navigate to item which you want. •Change menu item setting. 3 Menu/ < button • When function menu display, press this button to display Main menu • When main menu display, press this button to navigate...
Users controls English Panel Controls 54 321 No. Item Description 1 Power button/Indicator •Turn the monitor on/off •Blue indicates power on , Amber indicates standby/power saving mode 2 Input/ > button • When function menu display, press this button to switch input signal source (Optional) •When main menu display, press this button to navigate to item which you want. •Change menu item setting. 3 Menu/ < button • When function menu display, press this button to display Main menu • When main menu display, press this button to navigate...
User Manual
Page 18
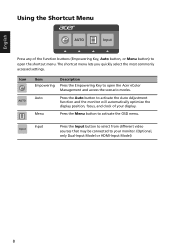
... video sources that may be connected to activate the OSD menu. Menu Press the Menu button to your display. The shortcut menu lets you quickly select the most commonly accessed settings. Auto Press the Auto button to open the Acer eColor Management and access the scenario modes. English Using the Shortcut Menu AUT nput Press any of the function buttons (Empowering Key, Auto button, or Menu button) to activate the Auto Adjustment function and the monitor will automatically optimize the display position...
... video sources that may be connected to activate the OSD menu. Menu Press the Menu button to your display. The shortcut menu lets you quickly select the most commonly accessed settings. Auto Press the Auto button to open the Acer eColor Management and access the scenario modes. English Using the Shortcut Menu AUT nput Press any of the function buttons (Empowering Key, Auto button, or Menu button) to activate the Auto Adjustment function and the monitor will automatically optimize the display position...
User Manual
Page 19
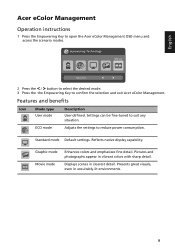
... User mode Description User-defined. Settings can be fine-tuned to open the Acer eColor Management OSD menu and access the scenario modes. Reflects native display capability. English Acer eColor Management Operation instructions 1 Press the Empowering Key to suit any situation. mpowering Technology User ECO Standard Graphics Movie Adjust/Exit 2 Press the < / > button to select the desired mode. 3 Press the the Empowering Key to reduce power consumption. ECO mode Adjusts the settings...
... User mode Description User-defined. Settings can be fine-tuned to open the Acer eColor Management OSD menu and access the scenario modes. Reflects native display capability. English Acer eColor Management Operation instructions 1 Press the Empowering Key to suit any situation. mpowering Technology User ECO Standard Graphics Movie Adjust/Exit 2 Press the < / > button to select the desired mode. 3 Press the the Empowering Key to reduce power consumption. ECO mode Adjusts the settings...
User Manual
Page 20
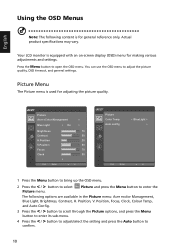
... general settings. English Using the OSD Menus Note: The following options are available in the Picture menu: Acer ecolor Management, Blue Light, Brightness, Contrast, H. You can use the OSD menu to confirm. 10 Position, V. The following content is used for making various adjustments and settings. Actual product specifications may vary. Press the Menu button to enter the Picture menu. Picture Acer eColor Management Blue Light On Brightness 70 Contrast 50 H.Position 20 V.Position 50 Focus 70 Clock 50 Exit Enter Picture Color Temp Auto config...
... general settings. English Using the OSD Menus Note: The following options are available in the Picture menu: Acer ecolor Management, Blue Light, Brightness, Contrast, H. You can use the OSD menu to confirm. 10 Position, V. The following content is used for making various adjustments and settings. Actual product specifications may vary. Press the Menu button to enter the Picture menu. Picture Acer eColor Management Blue Light On Brightness 70 Contrast 50 H.Position 20 V.Position 50 Focus 70 Clock 50 Exit Enter Picture Color Temp Auto config...
User Manual
Page 21
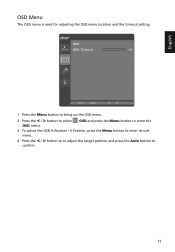
OSD OSD Timeout 10 Exit Enter 1 Press the Menu button to bring up the OSD menu. 2 Press the < / > button to select OSD and press the Menu button to enter the OSD menu. 3 To adjust the OSD H.Position / V.Position, press the Menu button to enter its submenu. 4 Press the < / > button to to adjust the target position and press the Auto button to confirm. 11 English OSD Menu The OSD menu is used for adjusting the OSD menu location and the timeout setting.
OSD OSD Timeout 10 Exit Enter 1 Press the Menu button to bring up the OSD menu. 2 Press the < / > button to select OSD and press the Menu button to enter the OSD menu. 3 To adjust the OSD H.Position / V.Position, press the Menu button to enter its submenu. 4 Press the < / > button to to adjust the target position and press the Auto button to confirm. 11 English OSD Menu The OSD menu is used for adjusting the OSD menu location and the timeout setting.
User Manual
Page 22
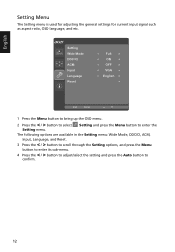
English Setting Menu The Setting menu is used for adjusting the general settings for current input signal such as aspect ratio, OSD language, and etc. Setting Wide Mode DDC/CI ACM Input Language Reset Full ON OFF VGA English Exit Enter 1 Press the Menu button to bring up the OSD menu. 2 Press the < / > button to select Setting and press the Menu button to confirm. 12 The following options are available in the Setting menu: Wide Mode, DDC/CI, ACM, Input, Language, and Reset. 3 Press the < / > button to...
English Setting Menu The Setting menu is used for adjusting the general settings for current input signal such as aspect ratio, OSD language, and etc. Setting Wide Mode DDC/CI ACM Input Language Reset Full ON OFF VGA English Exit Enter 1 Press the Menu button to bring up the OSD menu. 2 Press the < / > button to select Setting and press the Menu button to confirm. 12 The following options are available in the Setting menu: Wide Mode, DDC/CI, ACM, Input, Language, and Reset. 3 Press the < / > button to...
User Manual
Page 24
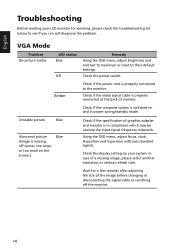
English Troubleshooting Before sending your system. VGA Mode Problem No picture visible LED status Blue Off Remedy Using the OSD menu, adjust brightness and contrast to maximum or reset to see if you can self-diagnose the problem. Check the display setting on the screen.) Blue Check if the specification of a missing image, please select another resolution or vertical refresh rate. Check if the video signal cable is properly connected at the back of the image before changing or disconnecting the signal cable or switching off -center, too large...
English Troubleshooting Before sending your system. VGA Mode Problem No picture visible LED status Blue Off Remedy Using the OSD menu, adjust brightness and contrast to maximum or reset to see if you can self-diagnose the problem. Check the display setting on the screen.) Blue Check if the specification of a missing image, please select another resolution or vertical refresh rate. Check if the video signal cable is properly connected at the back of the image before changing or disconnecting the signal cable or switching off -center, too large...
User Manual
Page 25
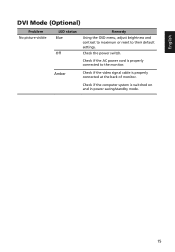
Check if the computer system is properly connected at the back of monitor. Amber Check if the video signal cable is switched on and in power saving/standby mode. 15 Check if the AC power cord is properly connected to their default settings. Check the power switch. English DVI Mode (Optional) Problem No picture visible LED status Blue Off Remedy Using the OSD menu, adjust brightness and contrast to maximum or reset to the monitor.
Check if the computer system is properly connected at the back of monitor. Amber Check if the video signal cable is switched on and in power saving/standby mode. 15 Check if the AC power cord is properly connected to their default settings. Check the power switch. English DVI Mode (Optional) Problem No picture visible LED status Blue Off Remedy Using the OSD menu, adjust brightness and contrast to maximum or reset to the monitor.

