
User Manual
Page 2
... Rights Reserved. Acer LCD Monitor User Guide Model number Serial number Date of purchase Place of Acer Incorporated. Acer LCD Monitor User Guide Original Issue: 12/2013 Changes may be incorporated in new editions of this publication may be reproduced, stored in a retrieval system, or transmitted, in the space provided below. The serial number and model number are recorded on the label affixed to the contents hereof and specifically disclaims the...
... Rights Reserved. Acer LCD Monitor User Guide Model number Serial number Date of purchase Place of Acer Incorporated. Acer LCD Monitor User Guide Original Issue: 12/2013 Changes may be incorporated in new editions of this publication may be reproduced, stored in a retrieval system, or transmitted, in the space provided below. The serial number and model number are recorded on the label affixed to the contents hereof and specifically disclaims the...

User Manual
Page 3
... changing the image or turning off the power switch for your monitor Please carefully follow these instructions carefully. Follow all the time. • Due to the nature of the previous screen may flicker during initial use . • The LCD screen has 99.99% or more effective pixels. Special notes on again to wipe the screen and cabinet front and sides. Keep this case, the screen is displayed...
... changing the image or turning off the power switch for your monitor Please carefully follow these instructions carefully. Follow all the time. • Due to the nature of the previous screen may flicker during initial use . • The LCD screen has 99.99% or more effective pixels. Special notes on again to wipe the screen and cabinet front and sides. Keep this case, the screen is displayed...
User Manual
Page 4
...; After setting the volume level, do not place the product on the marking label. If you are provided for other similar surface. English Accessibility Be sure that the power outlet you plug the power cord into is easily accessible and located as close to the equipment operator as they may touch dangerous voltage points or short-out parts that...
...; After setting the volume level, do not place the product on the marking label. If you are provided for other similar surface. English Accessibility Be sure that the power outlet you plug the power cord into is easily accessible and located as close to the equipment operator as they may touch dangerous voltage points or short-out parts that...
User Manual
Page 5
...) maximum length. Using a power outlet that is equipped with the supplied power supply cord set , make sure that may expose you need for details. If power strips are used with this product. • Use the product only with a three-wire grounded plug. Note: The grounding pin also provides good protection from the wall outlet and refer servicing to service this product yourself, as opening or removing covers may interfere...
...) maximum length. Using a power outlet that is equipped with the supplied power supply cord set , make sure that may expose you need for details. If power strips are used with this product. • Use the product only with a three-wire grounded plug. Note: The grounding pin also provides good protection from the wall outlet and refer servicing to service this product yourself, as opening or removing covers may interfere...
User Manual
Page 6
... to turn off the device near gas pumps at Acer are very conscious of the environmental effects of our business and strive to identify and provide the best working procedures to reduce the environmental impact of small children. Keep them ...help when recycling, please go to this electronic device into the trash when discarding. Disposal instructions Do not throw this website: http://www.acer-group.com/public/Sustainability/sustainability01.htm Visit www.acer-group.com for further information on the environment. chemical plants; English Note: Adjust only those controls that are covered...
... to turn off the device near gas pumps at Acer are very conscious of the environmental effects of our business and strive to identify and provide the best working procedures to reduce the environmental impact of small children. Keep them ...help when recycling, please go to this electronic device into the trash when discarding. Disposal instructions Do not throw this website: http://www.acer-group.com/public/Sustainability/sustainability01.htm Visit www.acer-group.com for further information on the environment. chemical plants; English Note: Adjust only those controls that are covered...
User Manual
Page 7
... your sitting height to computer use . English LCD pixel statement The LCD unit is produced with high-precision manufacturing techniques. The following symptoms may occasionally misfire or appear as black or red dots. Observe the following section provides tips for power management: • Activate display's Sleep mode within 15 minutes of user inactivity. • Activate computer's Sleep mode within 30 minutes of the monitor, using a footrest, or...
... your sitting height to computer use . English LCD pixel statement The LCD unit is produced with high-precision manufacturing techniques. The following symptoms may occasionally misfire or appear as black or red dots. Observe the following section provides tips for power management: • Activate display's Sleep mode within 15 minutes of user inactivity. • Activate computer's Sleep mode within 30 minutes of the monitor, using a footrest, or...
User Manual
Page 8
.... English Taking care of your vision Long viewing hours, wearing incorrect glasses or contact lenses, glare, excessive room lighting, poorly focused screens, very small typefaces and low-contrast displays could stress your display in such a way that the side faces the window or any light source • minimizing room light by using drapes, shades or blinds • using a task light • changing the display's viewing angle • using...
.... English Taking care of your vision Long viewing hours, wearing incorrect glasses or contact lenses, glare, excessive room lighting, poorly focused screens, very small typefaces and low-contrast displays could stress your display in such a way that the side faces the window or any light source • minimizing room light by using drapes, shades or blinds • using a task light • changing the display's viewing angle • using...
User Manual
Page 9
Dec. 26, 2013 Date ix Year to establishing a framework for the setting of ecodesign requirements for energy-related product. RU Jan / Sr. Manager Regulation, Acer Inc. EN55024:2010 EN 61000-3-2:2006+A1:2009+A2:2009, Class....acer.it Declare under our own responsibility that the product: Product: LCD Monitor Trade Name: Acer Model Number: E2200HQ SKU Number: E2200HQ xxxxxx; ("x" = 0~9, a ~ z, A ~ Z, or blank) To which this declaration refers conforms to the relevant standard or other standardizing documents: EN55022:2006/A1:2007 Class B; English Acer ...
Dec. 26, 2013 Date ix Year to establishing a framework for the setting of ecodesign requirements for energy-related product. RU Jan / Sr. Manager Regulation, Acer Inc. EN55024:2010 EN 61000-3-2:2006+A1:2009+A2:2009, Class....acer.it Declare under our own responsibility that the product: Product: LCD Monitor Trade Name: Acer Model Number: E2200HQ SKU Number: E2200HQ xxxxxx; ("x" = 0~9, a ~ z, A ~ Z, or blank) To which this declaration refers conforms to the relevant standard or other standardizing documents: EN55022:2006/A1:2007 Class B; English Acer ...

User Manual
Page 13
... of Conformity ix Federal Communications Commission Declaration of Conformity xi Unpacking 1 Attaching the base (for selected models) 2 Screen position adjustment 3 Connecting Power cord 3 Power saving 3 Display Data Channel (DDC) 4 Connector pin assignment 4 15-pin color display signal cable 4 24-pin color display signal cable 4 Standard timing table 5 Installation 6 Users controls 7 Panel controls 7 Using the Shortcut Menu 8 Acer eColor Management 9 Operation instructions 9 Features and benefits 9 Using the OSD Menus 10 Picture Menu 10 OSD Menu 11
... of Conformity ix Federal Communications Commission Declaration of Conformity xi Unpacking 1 Attaching the base (for selected models) 2 Screen position adjustment 3 Connecting Power cord 3 Power saving 3 Display Data Channel (DDC) 4 Connector pin assignment 4 15-pin color display signal cable 4 24-pin color display signal cable 4 Standard timing table 5 Installation 6 Users controls 7 Panel controls 7 Using the Shortcut Menu 8 Acer eColor Management 9 Operation instructions 9 Features and benefits 9 Using the OSD Menus 10 Picture Menu 10 OSD Menu 11
User Manual
Page 15
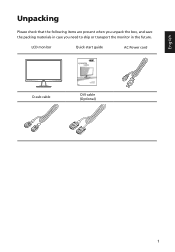
English Unpacking Please check that the following items are present when you unpack the box, and save the packing materials in case you need to ship or transport the monitor in the future. LCD monitor Quick start guide AC Power cord D-sub cable DVI cable (Optional) 1
English Unpacking Please check that the following items are present when you unpack the box, and save the packing materials in case you need to ship or transport the monitor in the future. LCD monitor Quick start guide AC Power cord D-sub cable DVI cable (Optional) 1
User Manual
Page 17
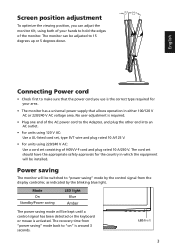
... switched to "power saving" mode by the control signal from "power saving" mode back to "on" is activated. The monitor can adjust the monitor tilt, using 220/240 V AC: Use a cord set should have the appropriate safety approvals for your hands to hold the edges of H05VV-F cord and plug rated 10 A/250 V. The recovery time from the display controller, as indicated by the blinking blue light. Mode On Standby/Power saving LED light Blue Amber The power saving mode will be kept until a control signal...
... switched to "power saving" mode by the control signal from "power saving" mode back to "on" is activated. The monitor can adjust the monitor tilt, using 220/240 V AC: Use a cord set should have the appropriate safety approvals for your hands to hold the edges of H05VV-F cord and plug rated 10 A/250 V. The recovery time from the display controller, as indicated by the blinking blue light. Mode On Standby/Power saving LED light Blue Amber The power saving mode will be kept until a control signal...

User Manual
Page 18
... 14 +5 V power 15 DVI detect 16 Hot-plug detection 17 TMDS data 018 TMDS data 0+ 19 TMDS data 0/5 shield 20 NC 21 NC 22 TMDS clock shield 23 TMDS clock+ 24 DDC TMDS clock- The monitor supports the DDC2B standard. Connector pin assignment 15-pin color display signal cable 1 5 6 10 11 15 PIN No. English Display Data Channel (DDC) To make installation easier, so...
... 14 +5 V power 15 DVI detect 16 Hot-plug detection 17 TMDS data 018 TMDS data 0+ 19 TMDS data 0/5 shield 20 NC 21 NC 22 TMDS clock shield 23 TMDS clock+ 24 DDC TMDS clock- The monitor supports the DDC2B standard. Connector pin assignment 15-pin color display signal cable 1 5 6 10 11 15 PIN No. English Display Data Channel (DDC) To make installation easier, so...
User Manual
Page 20
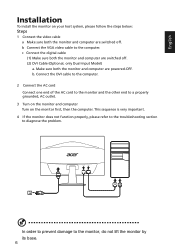
b. b Connect the VGA video cable to the monitor, do not lift the monitor by its base. 6 In order to prevent damage to the computer. English Installation To install the monitor on the monitor first, then the computer. Connect the DVI cable to the computer. 2 Connect the AC cord Connect one end of the AC cord to the monitor and the other end to diagnose the problem. c Connect the digital cable (1) Make sure both the monitor and computer...
b. b Connect the VGA video cable to the monitor, do not lift the monitor by its base. 6 In order to prevent damage to the computer. English Installation To install the monitor on the monitor first, then the computer. Connect the DVI cable to the computer. 2 Connect the AC cord Connect one end of the AC cord to the monitor and the other end to diagnose the problem. c Connect the digital cable (1) Make sure both the monitor and computer...
User Manual
Page 21
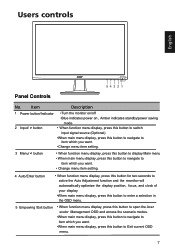
Users controls English Panel Controls 54 321 No. Item Description 1 Power button/Indicator •Turn the monitor on/off •Blue indicates power on , Amber indicates standby/power saving mode 2 Input/ > button • When function menu display, press this button to switch input signal source (Optional) •When main menu display, press this button to navigate to item which you want. •Change menu item setting. 3 Menu/ < button • When function menu display, press this button to display Main menu • When main menu display, press this button to navigate...
Users controls English Panel Controls 54 321 No. Item Description 1 Power button/Indicator •Turn the monitor on/off •Blue indicates power on , Amber indicates standby/power saving mode 2 Input/ > button • When function menu display, press this button to switch input signal source (Optional) •When main menu display, press this button to navigate to item which you want. •Change menu item setting. 3 Menu/ < button • When function menu display, press this button to display Main menu • When main menu display, press this button to navigate...
User Manual
Page 22
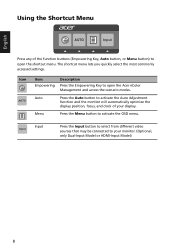
... Dual-Input Model or HDMI-Input Model) 8 Auto Press the Auto button to activate the Auto Adjustment function and the monitor will automatically optimize the display position, focus, and clock of the function buttons (Empowering Key, Auto button, or Menu button) to open the shortcut menu. Menu Press the Menu button to your display. Icon AUTO Item Empowering Description Press the Empowering Key to open the Acer eColor Management and access the scenario modes. The shortcut menu lets you quickly select...
... Dual-Input Model or HDMI-Input Model) 8 Auto Press the Auto button to activate the Auto Adjustment function and the monitor will automatically optimize the display position, focus, and clock of the function buttons (Empowering Key, Auto button, or Menu button) to open the shortcut menu. Menu Press the Menu button to your display. Icon AUTO Item Empowering Description Press the Empowering Key to open the Acer eColor Management and access the scenario modes. The shortcut menu lets you quickly select...
User Manual
Page 23
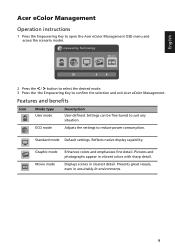
English Acer eColor Management Operation instructions 1 Press the Empowering Key to reduce power consumption. ECO mode Adjusts the settings to open the Acer eColor Management OSD menu and access the scenario modes. Pictures and photographs appear in unsuitably-lit environments. 9 Presents great visuals, even in vibrant colors with sharp detail. Settings can be fine-tuned to confirm the selection and exit Acer eColor Management. mpowering Technology User ECO...
English Acer eColor Management Operation instructions 1 Press the Empowering Key to reduce power consumption. ECO mode Adjusts the settings to open the Acer eColor Management OSD menu and access the scenario modes. Pictures and photographs appear in unsuitably-lit environments. 9 Presents great visuals, even in vibrant colors with sharp detail. Settings can be fine-tuned to confirm the selection and exit Acer eColor Management. mpowering Technology User ECO...

User Manual
Page 24
Picture Acer eColor Management Blue Light On Brightness 70 Contrast 50 H.Position 20 V.Position 50 Focus 70 Clock 50 Picture Color Temp Auto config BlueLight 1 Press the Menu button to bring up the OSD menu. 2 Press the < / > button to select Picture and press the Menu button to confirm. 10 Position, V. English Using the OSD Menus Note: The following options are available in the Picture menu: Acer ecolor Management, Blue Light, Brightness, Contrast, H. Your LCD monitor is equipped with an on-screen display (OSD) menu for adjusting the picture quality...
Picture Acer eColor Management Blue Light On Brightness 70 Contrast 50 H.Position 20 V.Position 50 Focus 70 Clock 50 Picture Color Temp Auto config BlueLight 1 Press the Menu button to bring up the OSD menu. 2 Press the < / > button to select Picture and press the Menu button to confirm. 10 Position, V. English Using the OSD Menus Note: The following options are available in the Picture menu: Acer ecolor Management, Blue Light, Brightness, Contrast, H. Your LCD monitor is equipped with an on-screen display (OSD) menu for adjusting the picture quality...

User Manual
Page 26
Setting Wide Mode DDC/CI ACM Input Language Reset Full ON OFF VGA English 1 Press the Menu button to bring up the OSD menu. 2 Press the < / > button to select Setting and press the Menu button to confirm. 12 English Setting Menu The Setting menu is used for adjusting the general settings for current input signal such as aspect ratio, OSD language, and etc. The following options are available in the Setting menu: Wide Mode, DDC/CI, ACM, Input, Language, and Reset. 3 Press the < / > button to scroll through...
Setting Wide Mode DDC/CI ACM Input Language Reset Full ON OFF VGA English 1 Press the Menu button to bring up the OSD menu. 2 Press the < / > button to select Setting and press the Menu button to confirm. 12 English Setting Menu The Setting menu is used for adjusting the general settings for current input signal such as aspect ratio, OSD language, and etc. The following options are available in the Setting menu: Wide Mode, DDC/CI, ACM, Input, Language, and Reset. 3 Press the < / > button to scroll through...
User Manual
Page 28
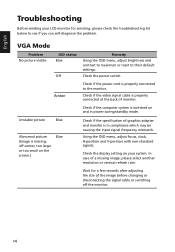
... image, please select another resolution or vertical refresh rate. Check the display setting on your LCD monitor for a few seconds after adjusting the size of the image before changing or disconnecting the signal cable or switching off -center, too large or too small on and in compliance which may be causing the input signal frequency mismatch. English Troubleshooting Before sending your system. VGA Mode Problem No picture visible LED status Blue Off Remedy Using the OSD menu, adjust brightness and contrast to maximum or reset...
... image, please select another resolution or vertical refresh rate. Check the display setting on your LCD monitor for a few seconds after adjusting the size of the image before changing or disconnecting the signal cable or switching off -center, too large or too small on and in compliance which may be causing the input signal frequency mismatch. English Troubleshooting Before sending your system. VGA Mode Problem No picture visible LED status Blue Off Remedy Using the OSD menu, adjust brightness and contrast to maximum or reset...
User Manual
Page 29
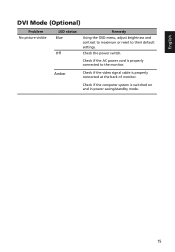
Check if the AC power cord is switched on and in power saving/standby mode. 15 Check if the computer system is properly connected to their default settings. Amber Check if the video signal cable is properly connected at the back of monitor. Check the power switch. English DVI Mode (Optional) Problem No picture visible LED status Blue Off Remedy Using the OSD menu, adjust brightness and contrast to maximum or reset to the monitor.
Check if the AC power cord is switched on and in power saving/standby mode. 15 Check if the computer system is properly connected to their default settings. Amber Check if the video signal cable is properly connected at the back of monitor. Check the power switch. English DVI Mode (Optional) Problem No picture visible LED status Blue Off Remedy Using the OSD menu, adjust brightness and contrast to maximum or reset to the monitor.

