
User Manual
Page 2
All Rights Reserved. Acer DW271HL LCD Monitor User Guide Model number Serial number Date of purchase Place of purchase © 2012.
All Rights Reserved. Acer DW271HL LCD Monitor User Guide Model number Serial number Date of purchase Place of purchase © 2012.

User Manual
Page 3
Contents Information for your safety and comfort 4 Safety instructions 4 Special notes on LCD monitors 4 Disposal instructions 6 Tips and information for comfortable use 6 Unpacking 9 Attaching / Removing the base 10 Adjusting the screen position 10 Setting up 12 Overview 13 Shortcut menu 14 Hardware Requirements 17 WiView Management 18 WiView Web Management 21 Connector pin assignment 25 15-pin color display signal cable 25 19-pin color display signal cable* 25 Standard timing table 26 Troubleshooting 27 VGA / HDMI mode 27 WiView mode 28
Contents Information for your safety and comfort 4 Safety instructions 4 Special notes on LCD monitors 4 Disposal instructions 6 Tips and information for comfortable use 6 Unpacking 9 Attaching / Removing the base 10 Adjusting the screen position 10 Setting up 12 Overview 13 Shortcut menu 14 Hardware Requirements 17 WiView Management 18 WiView Web Management 21 Connector pin assignment 25 15-pin color display signal cable 25 19-pin color display signal cable* 25 Standard timing table 26 Troubleshooting 27 VGA / HDMI mode 27 WiView mode 28

User Manual
Page 4
...; Do not use . • The LCD screen has effective pixels of any kind into is recovered slowly by placing the product on LCD monitors The following are provided for accessibility Be sure that the power outlet you plug the power cord into this product through cabinet slots as This... falls, it on an unstable cart, stand or table. The openings should never be seriously damaged. • Slots and openings are normal with LCD monitors and do not indicate a problem. • Due to make sure the flicker disappears. • You may include blemishes of the fluorescent light, the...
...; Do not use . • The LCD screen has effective pixels of any kind into is recovered slowly by placing the product on LCD monitors The following are provided for accessibility Be sure that the power outlet you plug the power cord into this product through cabinet slots as This... falls, it on an unstable cart, stand or table. The openings should never be seriously damaged. • Slots and openings are normal with LCD monitors and do not indicate a problem. • Due to make sure the flicker disappears. • You may include blemishes of the fluorescent light, the...

User Manual
Page 7
... muscles or shrugging your shoulders. • Install the external display, keyboard and mouse properly and within comfortable reach. • If you view your monitor more than the top edge of your eyes. Eyes • Rest your eyes frequently. • Give your eyes regular breaks by looking at the... center of the display so your eyes point downward when looking away from the monitor and focusing on how to minimize neck strain. English 7 Finding your comfort zone Find your comfort zone by using drapes, shades or blinds &#...
... muscles or shrugging your shoulders. • Install the external display, keyboard and mouse properly and within comfortable reach. • If you view your monitor more than the top edge of your eyes. Eyes • Rest your eyes frequently. • Give your eyes regular breaks by looking at the... center of the display so your eyes point downward when looking away from the monitor and focusing on how to minimize neck strain. English 7 Finding your comfort zone Find your comfort zone by using drapes, shades or blinds &#...
User Manual
Page 9
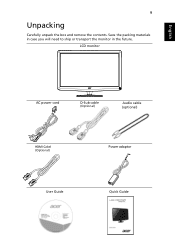
LCD monitor AC power cord D-Sub cable (Optional) Audio cable (optional) HDMI Cabel (Optional) Power adaptor User Guide Quick Guide Save the packing materials in case you will need to ship or transport the monitor in the future. English 9 Unpacking Carefully unpack the box and remove the contents.
LCD monitor AC power cord D-Sub cable (Optional) Audio cable (optional) HDMI Cabel (Optional) Power adaptor User Guide Quick Guide Save the packing materials in case you will need to ship or transport the monitor in the future. English 9 Unpacking Carefully unpack the box and remove the contents.
User Manual
Page 10
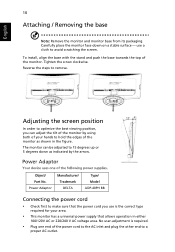
... base towards the top of the power cord to the AC inlet and plug the other end to avoid scratching the screen. Carefully place the monitor face-down as shown in either 100/120V AC or 220/240 V AC voltage area. Adjusting the screen position In order to remove. English 10... Attaching / Removing the base Note: Remove the monitor and monitor base from its packaging. Reverse the steps to optimize the best viewing position, you use a cloth to a proper AC outlet.
... base towards the top of the power cord to the AC inlet and plug the other end to avoid scratching the screen. Carefully place the monitor face-down as shown in either 100/120V AC or 220/240 V AC voltage area. Adjusting the screen position In order to remove. English 10... Attaching / Removing the base Note: Remove the monitor and monitor base from its packaging. Reverse the steps to optimize the best viewing position, you use a cloth to a proper AC outlet.

User Manual
Page 11
...and hold the power button to the screen, as indicated by the control signal from giving shock or scratch to turn off. Place the monitor just below eye level. • Handle with your system if your system supports DDC protocol - a communication protocol through which the equipment will...not cover the ventilation slots or openings of H05VV-F cord and plug rated 10 A / 250 V. The cord set consisting of the monitor. Cleaning your installation easier, the monitor is activated. 11 English • For units using 120 V AC: Use a UL-listed cord set, Type SVT wire and plug ...
...and hold the power button to the screen, as indicated by the control signal from giving shock or scratch to turn off. Place the monitor just below eye level. • Handle with your system if your system supports DDC protocol - a communication protocol through which the equipment will...not cover the ventilation slots or openings of H05VV-F cord and plug rated 10 A / 250 V. The cord set consisting of the monitor. Cleaning your installation easier, the monitor is activated. 11 English • For units using 120 V AC: Use a UL-listed cord set, Type SVT wire and plug ...

User Manual
Page 12
...speaker.* 3 Connect external speakers.** 4 Connect the power adaptor and power cord to the monitor, then to diagnose the problem. To install Acer DW271HL on your Wi-Fi settings. 6 If the monitor does not function properly, please refer to the troubleshooting section to diagnose the problem. a... Make sure both the monitor and computer are optional. English 12 Setting up To set up Acer DW271HL as an independent display, please follow the steps below: 1 Attach the base. 2 Connect external speakers...
...speaker.* 3 Connect external speakers.** 4 Connect the power adaptor and power cord to the monitor, then to diagnose the problem. To install Acer DW271HL on your Wi-Fi settings. 6 If the monitor does not function properly, please refer to the troubleshooting section to diagnose the problem. a... Make sure both the monitor and computer are optional. English 12 Setting up To set up Acer DW271HL as an independent display, please follow the steps below: 1 Attach the base. 2 Connect external speakers...

User Manual
Page 14
...Item Name Empowering key Auto adjust Menu Description Press to adjust the volume. Position, V. Volume up/down Press to open the Acer eColor Management OSD and access the scenario modes. • Press or to display the shortcut menu. Input Mode key Select from different video ...sources that may be connected to your monitor (VGA or HDMI). * A "Cable Not Connected" message will appear if the video cable is no active signal input. Acer eColor Management • Press to open the Acer eColor Management OSD and access the scenario modes. English ...
...Item Name Empowering key Auto adjust Menu Description Press to adjust the volume. Position, V. Volume up/down Press to open the Acer eColor Management OSD and access the scenario modes. • Press or to display the shortcut menu. Input Mode key Select from different video ...sources that may be connected to your monitor (VGA or HDMI). * A "Cable Not Connected" message will appear if the video cable is no active signal input. Acer eColor Management • Press to open the Acer eColor Management OSD and access the scenario modes. English ...
User Manual
Page 17
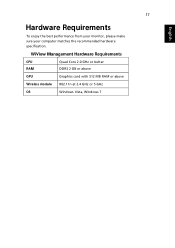
17 English Hardware Requirements To enjoy the best performance from your monitor, please make sure your computer matches the recommended hardware specification. WiView Management Hardware Requirements CPU RAM Quad Core 2.0 GHz or better DDR3 2 GB or above GPU Graphics card with 512 MB RAM or above Wireless module 802.11n at 2.4 GHz or 5 GHz OS Windows Vista, Windows 7
17 English Hardware Requirements To enjoy the best performance from your monitor, please make sure your computer matches the recommended hardware specification. WiView Management Hardware Requirements CPU RAM Quad Core 2.0 GHz or better DDR3 2 GB or above GPU Graphics card with 512 MB RAM or above Wireless module 802.11n at 2.4 GHz or 5 GHz OS Windows Vista, Windows 7
User Manual
Page 18
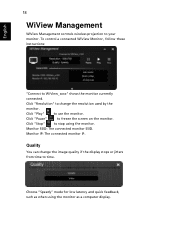
... stops or jitters from time to use the monitor. English 18 WiView Management WiView Management controls wireless projection to WiView_xxxx" shows the monitor currently connected. To control a connected WiView Monitor, follow these instructions: "Connect to your monitor. Quality You can change the resolution used by the monitor. Monitor SSID: The connected monitor SSID. Click "Play" to time...
... stops or jitters from time to use the monitor. English 18 WiView Management WiView Management controls wireless projection to WiView_xxxx" shows the monitor currently connected. To control a connected WiView Monitor, follow these instructions: "Connect to your monitor. Quality You can change the resolution used by the monitor. Monitor SSID: The connected monitor SSID. Click "Play" to time...
User Manual
Page 19
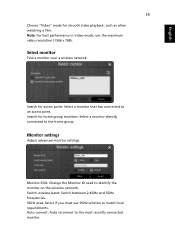
... has connected to an access point. Search for home group monitors: Select a monitor directly connected to match local requirements. Monitor SSID: Change the Monitor ID used to the most recently connected monitor. Auto connect: Auto reconnect to identify the monitor on the wireless network. Switch wireless band: Switch between 2.4GHz and 5GHz frequencies. 5GHz area: Select...
... has connected to an access point. Search for home group monitors: Select a monitor directly connected to match local requirements. Monitor SSID: Change the Monitor ID used to the most recently connected monitor. Auto connect: Auto reconnect to identify the monitor on the wireless network. Switch wireless band: Switch between 2.4GHz and 5GHz frequencies. 5GHz area: Select...
User Manual
Page 20
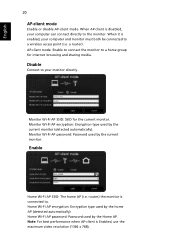
...password: Password used by the current monitor (detected automatically). AP-client mode: Enable to connect the monitor to a wireless access point (i.e. router) the monitor is enabled, your monitor directly. Monitor Wi-Fi AP encryption: Encryption type used by the Home AP. Monitor Wi-Fi AP SSID: SSID for ...: For best performance when AP-client is disabled, your computer can connect directly to your computer and monitor must both be connected to a home group for the current monitor. Home Wi-Fi AP encryption: Encryption type used by the home AP (detected automatically) Home Wi...
...password: Password used by the current monitor (detected automatically). AP-client mode: Enable to connect the monitor to a wireless access point (i.e. router) the monitor is enabled, your monitor directly. Monitor Wi-Fi AP encryption: Encryption type used by the Home AP. Monitor Wi-Fi AP SSID: SSID for ...: For best performance when AP-client is disabled, your computer can connect directly to your computer and monitor must both be connected to a home group for the current monitor. Home Wi-Fi AP encryption: Encryption type used by the home AP (detected automatically) Home Wi...
User Manual
Page 21
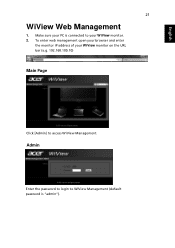
English 21 WiView Web Management 1. Make sure your WiView monitor. 2. To enter web management open your browser and enter the monitor IP address of your WiView monitor on the URL bar (e.g. 192.168.100.10) Main Page Click [Admin] to your PC is "admin"). Admin Enter the password to login to WiView Management (default password is connected to access WiView Management.
English 21 WiView Web Management 1. Make sure your WiView monitor. 2. To enter web management open your browser and enter the monitor IP address of your WiView monitor on the URL bar (e.g. 192.168.100.10) Main Page Click [Admin] to your PC is "admin"). Admin Enter the password to login to WiView Management (default password is connected to access WiView Management.

User Manual
Page 22
Network Setup Click "Network Setup" to show current network settings. Network Status: • IP Address: IP address of WiView Monitor. • Subnet Mask: subnet mask • Default Gateway: default gateway • Wireless MAC Address: Network MAC address. Model Name: Product model name. Connection Status: • Projecting Status: Current display status • Total Users: How many users have connected. English 22 System Status Click "System Status" to show current system status. Versions: • Firmware Version: Product firmware version number.
Network Setup Click "Network Setup" to show current network settings. Network Status: • IP Address: IP address of WiView Monitor. • Subnet Mask: subnet mask • Default Gateway: default gateway • Wireless MAC Address: Network MAC address. Model Name: Product model name. Connection Status: • Projecting Status: Current display status • Total Users: How many users have connected. English 22 System Status Click "System Status" to show current system status. Versions: • Firmware Version: Product firmware version number.

User Manual
Page 24
...update process. Download the latest firmware image file from the Acer download website. 2. Click [Update] to main page. The update process takes about five minutes. This may damage your WiView monitor while the firmware update is completed. acer.display-xxxx.awi or similar). 3. Warning: Do not power... off your WiView monitor so that it must be returned for repair. Click [Browse...] to find the ...
...update process. Download the latest firmware image file from the Acer download website. 2. Click [Update] to main page. The update process takes about five minutes. This may damage your WiView monitor while the firmware update is completed. acer.display-xxxx.awi or similar). 3. Warning: Do not power... off your WiView monitor so that it must be returned for repair. Click [Browse...] to find the ...

User Manual
Page 25
... 12 5 DDC-Ground 13 6 R-Ground 14 7 G-Ground 15 8 B-Ground 19-pin color display signal cable* Description +5V Sync-Ground Monitor Ground DDC-Serial Data H-Sync V-Sync DDC-Serial Clock Pin Description Pin Description 1 TMDS Data 2+ 10 TDMS Clock+ 2 TMDS Data 2 Shield 11 TDMS Clock Shield 3 ...
... 12 5 DDC-Ground 13 6 R-Ground 14 7 G-Ground 15 8 B-Ground 19-pin color display signal cable* Description +5V Sync-Ground Monitor Ground DDC-Serial Data H-Sync V-Sync DDC-Serial Clock Pin Description Pin Description 1 TMDS Data 2+ 10 TDMS Clock+ 2 TMDS Data 2 Shield 11 TDMS Clock Shield 3 ...

User Manual
Page 27
...if the power cord is connected with non-standard signals. Position with the host PC. Abnormal picture Image is missing, off the monitor. Check the display settings on the screen. Check that the audio cable is properly connected to see if you can self-diagnose the problem.... adjusting the size of the image before changing or disconnecting the signal cable or switching off -center, too large or too small on your monitor for audio-input models only) (optional) No sound, or sound level is properly connected at the back of a missing image, please select...
...if the power cord is connected with non-standard signals. Position with the host PC. Abnormal picture Image is missing, off the monitor. Check the display settings on the screen. Check that the audio cable is properly connected to see if you can self-diagnose the problem.... adjusting the size of the image before changing or disconnecting the signal cable or switching off -center, too large or too small on your monitor for audio-input models only) (optional) No sound, or sound level is properly connected at the back of a missing image, please select...

User Manual
Page 28
.../mouse only work On media streaming or standby screen. Remedy The network must be found by the WiView software. 1. Cannot find WiView monitor via clear.fi or DLNA software Connected to the network. Make sure your computer supports 5GHz wireless. 2. Check the system is using ...wireless display mode. 28 English WiView mode Problem Current status Cannot find WiView monitor access point after switching the wireless band to 5GHz System operates normally, but can't be a "home network", not "work network" or ...
.../mouse only work On media streaming or standby screen. Remedy The network must be found by the WiView software. 1. Cannot find WiView monitor via clear.fi or DLNA software Connected to the network. Make sure your computer supports 5GHz wireless. 2. Check the system is using ...wireless display mode. 28 English WiView mode Problem Current status Cannot find WiView monitor access point after switching the wireless band to 5GHz System operates normally, but can't be a "home network", not "work network" or ...

User Manual
Page 29
... as attested by conformity with the following harmonized standard: -. EN61000-3-2, Class D -. Acer Incorporated 8F, 88, Sec. 1, Xintai 5th Rd., Xizhi New Taipei City 221, Taiwan English Declaration of Conformity We, Acer Incorporated 8F, 88, Sec. 1, Xintai 5th Rd., Xizhi, New Taipei City 221...Lepetit, 40, 20020 Lainate (MI) Italy Tel: +39-02-939-921 ,Fax: +39-02 9399-2913 www.acer.it Hereby declare that: Product: Trade Name: Model Number: SKU Number: LCD Monitor Acer DW271HL DW271HL xxxxxx; ("x" = 0~9, a ~ z, A ~ Z, or blank) Is compliant with the essential requirements and other ...
... as attested by conformity with the following harmonized standard: -. EN61000-3-2, Class D -. Acer Incorporated 8F, 88, Sec. 1, Xintai 5th Rd., Xizhi New Taipei City 221, Taiwan English Declaration of Conformity We, Acer Incorporated 8F, 88, Sec. 1, Xintai 5th Rd., Xizhi, New Taipei City 221...Lepetit, 40, 20020 Lainate (MI) Italy Tel: +39-02-939-921 ,Fax: +39-02 9399-2913 www.acer.it Hereby declare that: Product: Trade Name: Model Number: SKU Number: LCD Monitor Acer DW271HL DW271HL xxxxxx; ("x" = 0~9, a ~ z, A ~ Z, or blank) Is compliant with the essential requirements and other ...


