User Manual
Page 3
... these instructions. • Gradually increase the volume until you . Special notes on LCD monitors The following are provided for future reference. Turn off the power switch for hours. When you use . Accessibility Be sure that the power outlet you plug the power cord into is recovered slowly by changing the image or turning off the power switch and then turn it after switching the image, when the same image is displayed for...
... these instructions. • Gradually increase the volume until you . Special notes on LCD monitors The following are provided for future reference. Turn off the power switch for hours. When you use . Accessibility Be sure that the power outlet you plug the power cord into is recovered slowly by changing the image or turning off the power switch and then turn it after switching the image, when the same image is displayed for...
User Manual
Page 4
... are used with the supplied power supply cord set , make sure that is used , the load should never be blocked or covered. Also, make sure that the total rating of this product. • Use the product only with this product through cabinet slots as opening or removing covers may expose you need to prevent battery leakage, do not be used for this product yourself, as they may touch...
... are used with the supplied power supply cord set , make sure that is used , the load should never be blocked or covered. Also, make sure that the total rating of this product. • Use the product only with this product through cabinet slots as opening or removing covers may expose you need to prevent battery leakage, do not be used for this product yourself, as they may touch...
User Manual
Page 5
... provide the best working procedures to normal condition. Keep them out of the reach of our products. Disposal instructions Do not throw this product from the wall outlet and refer servicing to qualified service personnel when: • the power cord or plug is strongly committed to environmental protection and views recycling, in the form of salvaging and disposal of used equipment, as...
... provide the best working procedures to normal condition. Keep them out of the reach of our products. Disposal instructions Do not throw this product from the wall outlet and refer servicing to qualified service personnel when: • the power cord or plug is strongly committed to environmental protection and views recycling, in the form of salvaging and disposal of used equipment, as...

User Manual
Page 6
... glasses or contact lenses, glare, excessive room lighting, poorly focused screens, very small typefaces and low-contrast displays could stress your company's health and safety department. Users are also at risk of physical injury after prolonged use . Finding your comfort zone Find your comfort zone by adjusting the viewing angle of the monitor, using a footrest, or raising your leg muscles...
... glasses or contact lenses, glare, excessive room lighting, poorly focused screens, very small typefaces and low-contrast displays could stress your company's health and safety department. Users are also at risk of physical injury after prolonged use . Finding your comfort zone Find your comfort zone by adjusting the viewing angle of the monitor, using a footrest, or raising your leg muscles...

User Manual
Page 10
... Disposal instructions iv LCD pixel statement v Tips and information for comfortable use v Finding your comfort zone v Taking care of your vision v Developing good work habits vi Unpacking ...1 Adjusting the monitor...2 Height Adjustment ...2 Tilt...2 Swivel ...3 Monitor Pivot ...3 Monitor shading hood installation 4 Monitor introduction...6 Connecting the cables 7 Connecting the adapter and AC Power cord 8 Power saving ...8 Display Data Channel (DDC 9 Standard timing table 11 Using the Shortcut Menu 12 Main page...12 Hot key1 (default: Modes 12 Hot key2 (default: Brightness...
... Disposal instructions iv LCD pixel statement v Tips and information for comfortable use v Finding your comfort zone v Taking care of your vision v Developing good work habits vi Unpacking ...1 Adjusting the monitor...2 Height Adjustment ...2 Tilt...2 Swivel ...3 Monitor Pivot ...3 Monitor shading hood installation 4 Monitor introduction...6 Connecting the cables 7 Connecting the adapter and AC Power cord 8 Power saving ...8 Display Data Channel (DDC 9 Standard timing table 11 Using the Shortcut Menu 12 Main page...12 Hot key1 (default: Modes 12 Hot key2 (default: Brightness...

User Manual
Page 17
... your monitor and current input or reset the custom color settings to select desired option.Bright gray indicates operable. Press to view Main page.Press again to enter hotkey2 function. / b. CP3271U User Guide English 6 Blinking amber indicates (Standby/ Power Saving mode/ OSD locked). 2 Function key a. Press to view Main page.Press again to enter Input select function. /X b. b. To move the cursor, simply toggle the button in the / Function Menu. Press...
... your monitor and current input or reset the custom color settings to select desired option.Bright gray indicates operable. Press to view Main page.Press again to enter hotkey2 function. / b. CP3271U User Guide English 6 Blinking amber indicates (Standby/ Power Saving mode/ OSD locked). 2 Function key a. Press to view Main page.Press again to enter Input select function. /X b. b. To move the cursor, simply toggle the button in the / Function Menu. Press...
User Manual
Page 18
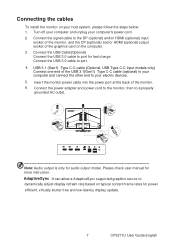
... DP (optional) and/or HDMI (optional) output socket of the monitor. 6. Connect the signal cable to dynamically adjust display refresh rate based on your electric devices. 5. Connecting the cables To install the monitor on typical content frame rates for power efficient, virtually stutter free and low-latency display update. 7 CP3271U User Guide English Connect the USB Cable(Optional) Connect the USB 3.0 cable to your host system, please follow the steps below: 1. Please check user manual for audio output model. Turn off your computer and...
... DP (optional) and/or HDMI (optional) output socket of the monitor. 6. Connect the signal cable to dynamically adjust display refresh rate based on your electric devices. 5. Connecting the cables To install the monitor on typical content frame rates for power efficient, virtually stutter free and low-latency display update. 7 CP3271U User Guide English Connect the USB Cable(Optional) Connect the USB 3.0 cable to your host system, please follow the steps below: 1. Please check user manual for audio output model. Turn off your computer and...

User Manual
Page 19
... Power Saving Mode LED Light Amber Blinking amber The power saving states will be kept until a control signal has been detected or the keyboard or mouse is required. • Plug one end of the AC power cord to the Adapter, and plug the other end into "Power Saving" mode by amber -color power LED. CP3271U User Guide English 8 The cord set consisting of H05VV-F cord and plug rated 10 A/250 V. The recovery time from the display controller, as indicated by the control signal...
... Power Saving Mode LED Light Amber Blinking amber The power saving states will be kept until a control signal has been detected or the keyboard or mouse is required. • Plug one end of the AC power cord to the Adapter, and plug the other end into "Power Saving" mode by amber -color power LED. CP3271U User Guide English 8 The cord set consisting of H05VV-F cord and plug rated 10 A/250 V. The recovery time from the display controller, as indicated by the control signal...
User Manual
Page 20
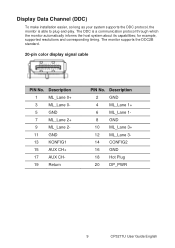
... 2 GND 4 ML_Lane 1+ 6 ML_Lane 1- 8 GND 10 ML_Lane 3+ 12 ML_Lane 3- 14 CONFIG2 16 GND 18 Hot Plug 20 DP_PWR 9 CP3271U User Guide English Description 1 ML_Lane 0+ 3 ML_Lane 0- 5 GND 7 ML_Lane 2+ 9 ML_Lane 2- 11 GND 13 KONFIG1 15 AUX CH+ 17 AUX CH- 19 Return PIN No. The monitor supports the DDC2B standard. 20-pin color display signal cable PIN No. for example, supported resolutions and corresponding timing.
... 2 GND 4 ML_Lane 1+ 6 ML_Lane 1- 8 GND 10 ML_Lane 3+ 12 ML_Lane 3- 14 CONFIG2 16 GND 18 Hot Plug 20 DP_PWR 9 CP3271U User Guide English Description 1 ML_Lane 0+ 3 ML_Lane 0- 5 GND 7 ML_Lane 2+ 9 ML_Lane 2- 11 GND 13 KONFIG1 15 AUX CH+ 17 AUX CH- 19 Return PIN No. The monitor supports the DDC2B standard. 20-pin color display signal cable PIN No. for example, supported resolutions and corresponding timing.
User Manual
Page 22
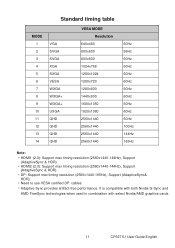
...; HDMI1 (2.0): Support max timing resolution (2560x1440-144Hz), Support (AdaptiveSync & HDR). • HDMI2 (2.0): Support max timing resolution (2560x1440-144Hz), Support (AdaptiveSync & HDR). • DP: Support max timing resolution (2560x1440-165Hz), Support (AdaptiveSync& HDR). • Need to use VESA certified DP cables • Adaptive Sync provides artifact-free performance. It is compatible with both Nvidia G-Sync and AMD FreeSync technologies when used in combination with select Nvidia/AMD graphics cards. 11 CP3271U User Guide English
...; HDMI1 (2.0): Support max timing resolution (2560x1440-144Hz), Support (AdaptiveSync & HDR). • HDMI2 (2.0): Support max timing resolution (2560x1440-144Hz), Support (AdaptiveSync & HDR). • DP: Support max timing resolution (2560x1440-165Hz), Support (AdaptiveSync& HDR). • Need to use VESA certified DP cables • Adaptive Sync provides artifact-free performance. It is compatible with both Nvidia G-Sync and AMD FreeSync technologies when used in combination with select Nvidia/AMD graphics cards. 11 CP3271U User Guide English
User Manual
Page 23
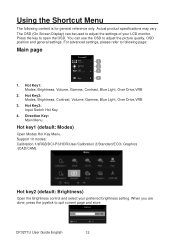
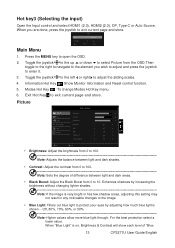
...general reference only. The OSD (On Screen Display) can use the OSD to adjust the settings of your preferred brightness setting. Hot Key1: Modes, Brightness, Volume, Gamma, Contrast, Blue Light, Over Drive,VRB 2. Hot Key3: Input Switch Hot Key 4. You can be used to adjust the picture quality, OSD position and general settings. Hot key2 (default: Brightness) Open the Brightness control and select your LCD monitor. Hot Key2: Modes, Brightness, Contrast, Volume, Gamma, Blue Light, Over Drive,VRB 3. Support 10 modes: Calibration 1/sRGB/DCI-P3/HDR/User/Calibration 2/Standard/ECO...
...general reference only. The OSD (On Screen Display) can use the OSD to adjust the settings of your preferred brightness setting. Hot Key1: Modes, Brightness, Volume, Gamma, Contrast, Blue Light, Over Drive,VRB 2. Hot Key3: Input Switch Hot Key 4. You can be used to adjust the picture quality, OSD position and general settings. Hot key2 (default: Brightness) Open the Brightness control and select your LCD monitor. Hot Key2: Modes, Brightness, Contrast, Volume, Gamma, Blue Light, Over Drive,VRB 3. Support 10 modes: Calibration 1/sRGB/DCI-P3/HDR/User/Calibration 2/Standard/ECO...
User Manual
Page 24
... CP3271U User Guide English Picture • Brightness: Adjust the brightness from 0 to 100 Note: Adjusts the balance between light and dark areas. • Black Boost: Adjust the Black Boost from 0 to adjust the sliding scales. 4. Off, 80%, 70%, 60%, or 50 Note: Higher values allow more blue light through. Auto Source Main Menu 1. Toggle the joystick to the left or right to 10. Modes Hot Key : To change Modes Hot Key menu. 6.
... CP3271U User Guide English Picture • Brightness: Adjust the brightness from 0 to 100 Note: Adjusts the balance between light and dark areas. • Black Boost: Adjust the Black Boost from 0 to adjust the sliding scales. 4. Off, 80%, 70%, 60%, or 50 Note: Higher values allow more blue light through. Auto Source Main Menu 1. Toggle the joystick to the left or right to 10. Modes Hot Key : To change Modes Hot Key menu. 6.

User Manual
Page 25
... high-resolution images by boosting the pixel density of the original source to make images sharper and clearer. Light" value. • ACM: Turn ACM on the current screen to dynamic contrast adjustment. • HDR: Can control (off / Auto / HDR-400) the default is off . When HDR=Auto or HDR-400, the Modes will also be based on or off , set to auto will be automatically set to "HDR". 2. CP3271U User Guide English 14...
... high-resolution images by boosting the pixel density of the original source to make images sharper and clearer. Light" value. • ACM: Turn ACM on the current screen to dynamic contrast adjustment. • HDR: Can control (off / Auto / HDR-400) the default is off . When HDR=Auto or HDR-400, the Modes will also be based on or off , set to auto will be automatically set to "HDR". 2. CP3271U User Guide English 14...
User Manual
Page 26
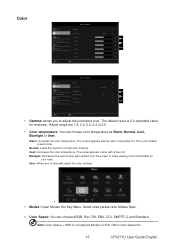
... Note: Color Space = HDR to make viewing more comfortable for windows). Normal: Loads the monitor's normal color settings. Detail rules please refer Modes Spec. • Color Space: You can choose color temperature as Warm, Normal, Cool, Bluelight or User. Cool: Decreases the color temperature. Bluelight: Decreases the level of blue light emitted from the screen to correspond Modes is HDR, Other Color Space the 15 CP3271U User Guide English The screenappears...
... Note: Color Space = HDR to make viewing more comfortable for windows). Normal: Loads the monitor's normal color settings. Detail rules please refer Modes Spec. • Color Space: You can choose color temperature as Warm, Normal, Cool, Bluelight or User. Cool: Decreases the color temperature. Bluelight: Decreases the level of blue light emitted from the screen to correspond Modes is HDR, Other Color Space the 15 CP3271U User Guide English The screenappears...

User Manual
Page 28
... or Reset. The default is off . 3. Standard Audio • Volume: Adjust the volume • Mute: Toggles the monitor sound between on and off . 17 CP3271U User Guide English On: Color only black and white effect. Off: Normal color effect. • 6-axis Hue: Adjust the Red Hue, Green Hue, Blue Hue, Yellow Hue, Magenta Hue , Cyan Hue or Reset. Detail function definition & information, please refer to Acer Widget specification • Grayscale Mode: Select garyscale mode...
... or Reset. The default is off . 3. Standard Audio • Volume: Adjust the volume • Mute: Toggles the monitor sound between on and off . 17 CP3271U User Guide English On: Color only black and white effect. Off: Normal color effect. • 6-axis Hue: Adjust the Red Hue, Green Hue, Blue Hue, Yellow Hue, Magenta Hue , Cyan Hue or Reset. Detail function definition & information, please refer to Acer Widget specification • Grayscale Mode: Select garyscale mode...
User Manual
Page 29
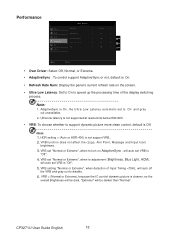
... out unavailable. 2. Standard Picture Color Audio Pertormance OSD System Over Drive AdaptiveSync Refresh Rate Num Ultra-Low Latency VRB Normal On Off On Off X Move Enter • Over Driver: Select Off, Normal, or Extreme. • AdaptiveSync : To control support AdaptiveSync or not, default is On. • Refresh Rate Num: Display the panel's current refresh rate on AdaptiveSync , will auto set to adjustment (Brightness, Blue Light, ACM), will auto set VRB is not support VRB,. 2. Ultra...
... out unavailable. 2. Standard Picture Color Audio Pertormance OSD System Over Drive AdaptiveSync Refresh Rate Num Ultra-Low Latency VRB Normal On Off On Off X Move Enter • Over Driver: Select Off, Normal, or Extreme. • AdaptiveSync : To control support AdaptiveSync or not, default is On. • Refresh Rate Num: Display the panel's current refresh rate on AdaptiveSync , will auto set to adjustment (Brightness, Blue Light, ACM), will auto set VRB is not support VRB,. 2. Ultra...

User Manual
Page 30
... All Key lock function. 2. OSD Unlocked: 1. In normal display condition to trigger "OSD Unlock". 2. The "OSD Unlock" message will be restored to blinking amber. 4. LED lights will be changed from amber light to amber light. 19 CP3271U User Guide English Note: OSD Locked: 1. OSD • Language: Set the OSD menu language. • OSD timeout: Adjust the delay before turning off the OSD menu. • Transparency: Select the transparency when using gaming mode. The "OSD Locked" message will be displayed in the middle of the screen. 3. LED lights will...
... All Key lock function. 2. OSD Unlocked: 1. In normal display condition to trigger "OSD Unlock". 2. The "OSD Unlock" message will be restored to blinking amber. 4. LED lights will be changed from amber light to amber light. 19 CP3271U User Guide English Note: OSD Locked: 1. OSD • Language: Set the OSD menu language. • OSD timeout: Adjust the delay before turning off the OSD menu. • Transparency: Select the transparency when using gaming mode. The "OSD Locked" message will be displayed in the middle of the screen. 3. LED lights will...
User Manual
Page 31
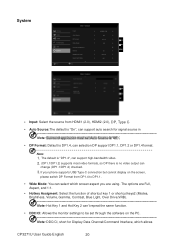
... phone supports USB Type-C connection but cannot display on the screen, please switch DP Format from HDMI1 (2.0), HDMI2 (2.0), DP, Type C. • Auto Source:The default is "On", can support auto search for signal source in order Note: Surround application must set through the software on the PC Note: DDC/CI, short for Display Data Channel/Command Interface, which allows CP3271U User Guide English 20 System • Input: Select the source from...
... phone supports USB Type-C connection but cannot display on the screen, please switch DP Format from HDMI1 (2.0), HDMI2 (2.0), DP, Type C. • Auto Source:The default is "On", can support auto search for signal source in order Note: Surround application must set through the software on the PC Note: DDC/CI, short for Display Data Channel/Command Interface, which allows CP3271U User Guide English 20 System • Input: Select the source from...

User Manual
Page 32
... Mouse. Turn on to speed up boot speed. • LED Control: Controls the brightness of the Key LED. • USB Port Select Function USB Port Select OSD USB Port Select Rules Rules When MNT Input is : (VGA/HDMI/DP/DP ALT), connect to C to C cable or C to control Keyboard and C-Type (Default) Mouse. On: DC off/Saving mode can 't to set HDMI black level. • Quick start mode: Select Off or On. monitor controls to be sent via software. • HDMI Black level...
... Mouse. Turn on to speed up boot speed. • LED Control: Controls the brightness of the Key LED. • USB Port Select Function USB Port Select OSD USB Port Select Rules Rules When MNT Input is : (VGA/HDMI/DP/DP ALT), connect to C to C cable or C to control Keyboard and C-Type (Default) Mouse. On: DC off/Saving mode can 't to set HDMI black level. • Quick start mode: Select Off or On. monitor controls to be sent via software. • HDMI Black level...
User Manual
Page 34
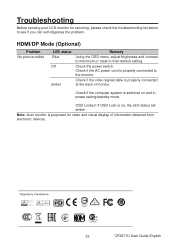
OSD Locked: If OSD Lock is on and in power saving/standby mode. Check if the video signal cable is purposed for servicing, please check the troubleshooting list below to see if you can self-diagnose the problem. Note: Acer monitor is properly connected at the back of information obtained from electronic devices. 23 CP3271U User Guide English HDMI/DP Mode (Optional) Problem No picture visible LED status Blue Off amber Remedy Using the OSD menu, adjust brightness and contrast to maximum or reset to...
OSD Locked: If OSD Lock is on and in power saving/standby mode. Check if the video signal cable is purposed for servicing, please check the troubleshooting list below to see if you can self-diagnose the problem. Note: Acer monitor is properly connected at the back of information obtained from electronic devices. 23 CP3271U User Guide English HDMI/DP Mode (Optional) Problem No picture visible LED status Blue Off amber Remedy Using the OSD menu, adjust brightness and contrast to maximum or reset to...

