User Manual
Page 1
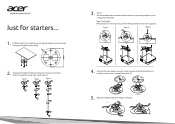
... based on actual environment. (CM-01S doesn't include Type 2 and Type 3.) Type 1 Type 2 Type 3 3 . Connect the main body connector to allow for proper heat distribution. 4 . Just for more supports. Type 2 and Type 3: Alternatively, for the larger size, use three bracket screws to mount the projector to the ceiling. 2 . Type 1: Type 2: Type 3: Note: It is recommended that you keep a reasonable space between...
... based on actual environment. (CM-01S doesn't include Type 2 and Type 3.) Type 1 Type 2 Type 3 3 . Connect the main body connector to allow for proper heat distribution. 4 . Just for more supports. Type 2 and Type 3: Alternatively, for the larger size, use three bracket screws to mount the projector to the ceiling. 2 . Type 1: Type 2: Type 3: Note: It is recommended that you keep a reasonable space between...

User Manual
Page 2
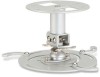
... Attach projector to ceiling mount bracket-use appropriate size for adjustments Basic length unit Basic length unit To connect the short/long rods and ceiling mount base To screw up to 20 kg weight. 4. Item / Type # 1. Small Fat Cap 6. Short Rod 12. Universal Ceiling Mount Screw Type A 2. Screw Type B 3. Heat Buffer Piece 7. Connecting Screw 14. The length of CM-01S from ceiling mount base to bracket X1 4. Projector Bracket...
... Attach projector to ceiling mount bracket-use appropriate size for adjustments Basic length unit Basic length unit To connect the short/long rods and ceiling mount base To screw up to 20 kg weight. 4. Item / Type # 1. Small Fat Cap 6. Short Rod 12. Universal Ceiling Mount Screw Type A 2. Screw Type B 3. Heat Buffer Piece 7. Connecting Screw 14. The length of CM-01S from ceiling mount base to bracket X1 4. Projector Bracket...


