User Manual
Page 2
... of Acer Incorporated. No part of this publication may be made periodically to the information in this manual or supplementary documents and publications. 2015 10/2015 Changes may be incorporated in new editions of this publication without the prior written permission of such revisions or changes. Acer LCD Monitor User's Guide Model number Serial number Date of purchase Place of purchase Acer and the Acer logo...
... of Acer Incorporated. No part of this publication may be made periodically to the information in this manual or supplementary documents and publications. 2015 10/2015 Changes may be incorporated in new editions of this publication without the prior written permission of such revisions or changes. Acer LCD Monitor User's Guide Model number Serial number Date of purchase Place of purchase Acer and the Acer logo...
User Manual
Page 3
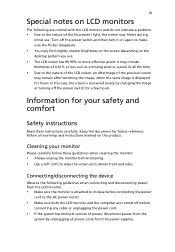
... connecting and disconnecting power from the LCD monitor: • Make sure the monitor is attached to its base before connecting any cable or unplugging the power cord. • If the system has multiple sources of power, disconnect power from the power supplies. Follow all power cords from the system by changing the image or turning off the power switch for a few hours. Information for your monitor Please carefully follow these instructions carefully. Keep this case, the screen...
... connecting and disconnecting power from the LCD monitor: • Make sure the monitor is attached to its base before connecting any cable or unplugging the power cord. • If the system has multiple sources of power, disconnect power from the power supplies. Follow all power cords from the system by changing the image or turning off the power switch for a few hours. Information for your monitor Please carefully follow these instructions carefully. Keep this case, the screen...
User Manual
Page 4
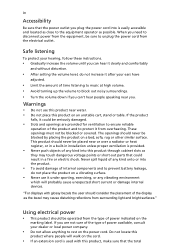
... instructions. • Gradually increase the volume until you can 't hear people speaking near you. The openings should consider the placement of the display as the bezel may touch dangerous voltage points or short-out parts that could be operated from the type of power indicated on the power cord. "For displays with this product, make sure that the total When you need...
... instructions. • Gradually increase the volume until you can 't hear people speaking near you. The openings should consider the placement of the display as the bezel may touch dangerous voltage points or short-out parts that could be operated from the type of power indicated on the power cord. "For displays with this product, make sure that the total When you need...
User Manual
Page 5
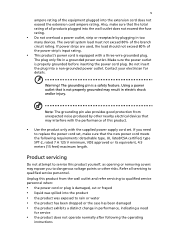
...Use the product only with the supplied power supply cord set , make sure that the total rating of the power strip's input rating. • This product's power cord is equipped with the performance of the equipment plugged into the wall outlet does not exceed the fuse rating. • Do not overload a power... a distinct change in a grounded power outlet. Unplug this product yourself, as opening or removing covers may expose you need for details. Make sure the power outlet is a safety feature. If you to qualified service personnel when: • the power cord or plug is not ...
...Use the product only with the supplied power supply cord set , make sure that the total rating of the power strip's input rating. • This product's power cord is equipped with the performance of the equipment plugged into the wall outlet does not exceed the fuse rating. • Do not overload a power... a distinct change in a grounded power outlet. Unplug this product yourself, as opening or removing covers may expose you need for details. Make sure the power outlet is a safety feature. If you to qualified service personnel when: • the power cord or plug is not ...

User Manual
Page 6
... and will often require extensive work by the operating instructions, since improper adjustment of other products. Potentially explosive environments Switch off the device near gas pumps at Acer are very conscious of the environmental effects of our business and strive to identify and provide the best working procedures to this website: http://www.acer-group.com/public/Sustainability...
... and will often require extensive work by the operating instructions, since improper adjustment of other products. Potentially explosive environments Switch off the device near gas pumps at Acer are very conscious of the environmental effects of our business and strive to identify and provide the best working procedures to this website: http://www.acer-group.com/public/Sustainability...
User Manual
Page 8
... work periods, bad posture, poor work habits, stress, inadequate working in front of a computer. The following tips: • refrain from Sleep mode by adjusting the viewing angle of the monitor, using a footrest, or raising your sitting height to...power management: • Activate display's Sleep mode within 15 minutes of user inactivity. • Activate computer's Sleep mode within 30 minutes of user inactivity. • Wake the computer from staying too long in one fixed posture • avoid slouching forward and/or leaning backward • stand up and walk around regularly to remove...
... work periods, bad posture, poor work habits, stress, inadequate working in front of a computer. The following tips: • refrain from Sleep mode by adjusting the viewing angle of the monitor, using a footrest, or raising your sitting height to...power management: • Activate display's Sleep mode within 15 minutes of user inactivity. • Activate computer's Sleep mode within 30 minutes of user inactivity. • Wake the computer from staying too long in one fixed posture • avoid slouching forward and/or leaning backward • stand up and walk around regularly to remove...
User Manual
Page 9
... faces the window or any light source • minimizing room light by using drapes, shades or blinds • using a task light • changing the display's viewing angle • using a glare-reduction filter • using a display visor, such as possible. • Exercise regularly and maintain a healthy body. Developing good work habits Develop the following sections provide suggestions on a distant point. • Blink frequently to keep your eyes...
... faces the window or any light source • minimizing room light by using drapes, shades or blinds • using a task light • changing the display's viewing angle • using a glare-reduction filter • using a display visor, such as possible. • Exercise regularly and maintain a healthy body. Developing good work habits Develop the following sections provide suggestions on a distant point. • Blink frequently to keep your eyes...
User Manual
Page 12
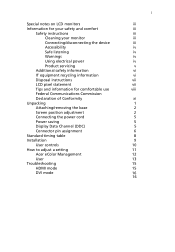
... Accessibility Safe listening Warnings Using electrical power Product servicing Additional safety information IT equipment recycling information Disposal instructions LCD pixel statement Tips and information for comfortable use Federal Communications Commission Declaration of Conformity Unpacking Attaching/removing the base Screen position adjustment Connecting the power cord Power saving Display Data Channel (DDC) Connector pin assignment Standard timing table Installation User controls How to adjust a setting Acer eColor Management User Troubleshooting HDMI mode DVI mode 1 iii iii iii iii...
... Accessibility Safe listening Warnings Using electrical power Product servicing Additional safety information IT equipment recycling information Disposal instructions LCD pixel statement Tips and information for comfortable use Federal Communications Commission Declaration of Conformity Unpacking Attaching/removing the base Screen position adjustment Connecting the power cord Power saving Display Data Channel (DDC) Connector pin assignment Standard timing table Installation User controls How to adjust a setting Acer eColor Management User Troubleshooting HDMI mode DVI mode 1 iii iii iii iii...
User Manual
Page 13
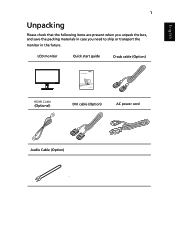
LCD monitor Quick start guide D-sub cable (Option) HDMI Cable (Optional) DVI cable (Option) AC power cord Audio Cable (Option) English 1 Unpacking Please check that the following items are present when you unpack the box, and save the packing materials in case you need to ship or transport the monitor in the future.
LCD monitor Quick start guide D-sub cable (Option) HDMI Cable (Optional) DVI cable (Option) AC power cord Audio Cable (Option) English 1 Unpacking Please check that the following items are present when you unpack the box, and save the packing materials in case you need to ship or transport the monitor in the future.
User Manual
Page 15
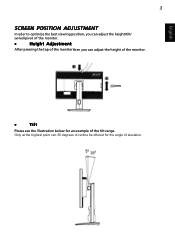
Only at the highest point can adjust the height of the monitor. • Tilt Please see the illustration below for the angle of the tilt range. English 3 SCREEN POSITION ADJUSTMENT In oder to optimize the best viewing position, you can adjust the height/tilt/ swivel/pivot of the monitor. • Height Adjustment After pressing the top of the monitor then you can 35 degrees of recline be offered for an example of elevation.
Only at the highest point can adjust the height of the monitor. • Tilt Please see the illustration below for the angle of the tilt range. English 3 SCREEN POSITION ADJUSTMENT In oder to optimize the best viewing position, you can adjust the height/tilt/ swivel/pivot of the monitor. • Height Adjustment After pressing the top of the monitor then you can 35 degrees of recline be offered for an example of elevation.
User Manual
Page 17
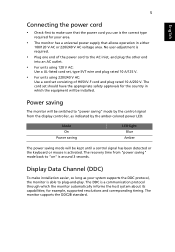
... required. • Plug one end of H05VV-F cord and plug rated 10 A/250 V. Mode On Power saving LED light Blue Amber The power saving mode will be kept until a control signal has been detected or the keyboard or mouse is a communication protocol through which the equipment will be installed. 5 English Connecting the power cord • Check first to make installation easier, so long as your area. • The monitor has a universal power supply that allows operation...
... required. • Plug one end of H05VV-F cord and plug rated 10 A/250 V. Mode On Power saving LED light Blue Amber The power saving mode will be kept until a control signal has been detected or the keyboard or mouse is a communication protocol through which the equipment will be installed. 5 English Connecting the power cord • Check first to make installation easier, so long as your area. • The monitor has a universal power supply that allows operation...
User Manual
Page 18
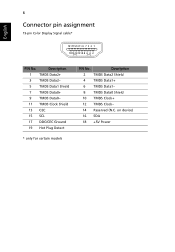
on device) 16 SDA 18 +5V Power Description 1 TMDS Data2+ 3 TMDS Data2- 5 TMDS Data1 Shield 7 TMDS Data0+ 9 TMDS Data0- 11 TMDS Clock Shield 13 CEC 15 SCL 17 DDC/CEC Ground 19 Hot Plug Detect * only for certain models PIN No. Description 2 TMDS Data2 Shield 4 TMDS Data1+ 6 TMDS Data1- 8 TMDS Data0 Shield 10 TMDS Clock+ 12 TMDS Clock- 14 Reserved (N.C. English 6 Connector pin assignment 19-pin Color Display Signal cable* 1917151311 9 7 5 3 1 1816141210 8 6 4 2 PIN No.
on device) 16 SDA 18 +5V Power Description 1 TMDS Data2+ 3 TMDS Data2- 5 TMDS Data1 Shield 7 TMDS Data0+ 9 TMDS Data0- 11 TMDS Clock Shield 13 CEC 15 SCL 17 DDC/CEC Ground 19 Hot Plug Detect * only for certain models PIN No. Description 2 TMDS Data2 Shield 4 TMDS Data1+ 6 TMDS Data1- 8 TMDS Data0 Shield 10 TMDS Clock+ 12 TMDS Clock- 14 Reserved (N.C. English 6 Connector pin assignment 19-pin Color Display Signal cable* 1917151311 9 7 5 3 1 1816141210 8 6 4 2 PIN No.
User Manual
Page 20
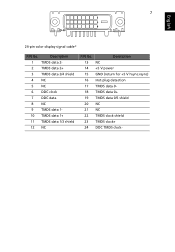
Description 13 NC 14 +5 V power 15 GND (return for +5 V hsync.vsync) 16 Hot-plug detection 17 TMDS data 0- 18 TMDS data 0+ 19 TMDS data 0/5 shield 20 NC 21 NC 22 TMDS clock shield 23 TMDS clock+ 24 DDC TMDS clock- Description 1 TMDS data 2- 2 TMDS data 2+ 3 TMDS data 2/4 shield 4 NC 5 NC 6 DDC clock 7 DDC data 8 NC 9 TMDS data 1- 10 TMDS data 1+ 11 TMDS data 1/3 shield 12 NC PIN No. 7 English 24-pin color display signal cable* PIN No.
Description 13 NC 14 +5 V power 15 GND (return for +5 V hsync.vsync) 16 Hot-plug detection 17 TMDS data 0- 18 TMDS data 0+ 19 TMDS data 0/5 shield 20 NC 21 NC 22 TMDS clock shield 23 TMDS clock+ 24 DDC TMDS clock- Description 1 TMDS data 2- 2 TMDS data 2+ 3 TMDS data 2/4 shield 4 NC 5 NC 6 DDC clock 7 DDC data 8 NC 9 TMDS data 1- 10 TMDS data 1+ 11 TMDS data 1/3 shield 12 NC PIN No. 7 English 24-pin color display signal cable* PIN No.
User Manual
Page 22
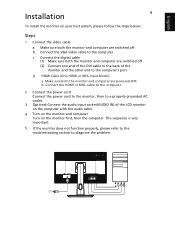
... cable to the computer. 2 Connect the power cord Connect the power cord to the monitor, then to diagnose the problem. 2 Make sure both the monitor and computer are switched off . English Installation 9 To install the monitor on the monitor first, then the computer. c Connect the digital cable (1) Make sure both the monitor and computer are switched off . (2) Connect one end of the DVI cable to the back of the LCD monitor on the computer with the audio cable. 4 Turn on the monitor...
... cable to the computer. 2 Connect the power cord Connect the power cord to the monitor, then to diagnose the problem. 2 Make sure both the monitor and computer are switched off . English Installation 9 To install the monitor on the monitor first, then the computer. c Connect the digital cable (1) Make sure both the monitor and computer are switched off . (2) Connect one end of the DVI cable to the back of the LCD monitor on the computer with the audio cable. 4 Turn on the monitor...
User Manual
Page 23
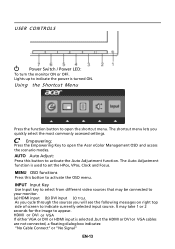
... not connected, a floating dialog box indicates: "No Cable Connect" or "No Signal" EN-13 HDMI or DVI or VGA If either VGA or DVI or HDMI input is used to open the shortcut menu. MENU OSD functions Press this button to activate the OSD menu. USER CONTROLS Power Switch / Power LED: To turn the monitor ON or OFF. Using the Shortcut Menu Press the function button to indicate the power is turned ON. Lights up to open the Acer eColor Management OSD and access the scenario modes.
... not connected, a floating dialog box indicates: "No Cable Connect" or "No Signal" EN-13 HDMI or DVI or VGA If either VGA or DVI or HDMI input is used to open the shortcut menu. MENU OSD functions Press this button to activate the OSD menu. USER CONTROLS Power Switch / Power LED: To turn the monitor ON or OFF. Using the Shortcut Menu Press the function button to indicate the power is turned ON. Lights up to open the Acer eColor Management OSD and access the scenario modes.
User Manual
Page 24
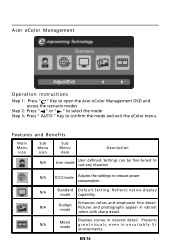
N/A Movie mode Displays scenes in unsuitably-lit environments. Presents great visuals, even in clearest detail. Acer eColor Management Operation instructions Step 1: Press " " Key to open the Acer eColor Management OSD and access the scenario modes Step 2: Press " " or " " to select the mode Step 3: Press " AUTO " Key to reduce power consumption. R eflects n a tive d isp lay mode capability N/A Grahpic mode Enhances colors and emphasize fine detail. Settings can...
N/A Movie mode Displays scenes in unsuitably-lit environments. Presents great visuals, even in clearest detail. Acer eColor Management Operation instructions Step 1: Press " " Key to open the Acer eColor Management OSD and access the scenario modes Step 2: Press " " or " " to select the mode Step 3: Press " AUTO " Key to reduce power consumption. R eflects n a tive d isp lay mode capability N/A Grahpic mode Enhances colors and emphasize fine detail. Settings can...
User Manual
Page 25
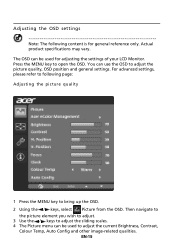
... be used to open the OSD. Adjusting the OSD settings Note: The following page: Adjusting the picture quality 1 Press the MENU key to adjust the picture quality, OSD position and general settings. Then navigate to the picture element you wish to adjust. 3 Use the / keys to adjust the sliding scales. 4 The Picture menu can be used for general reference only. Press the MENU key to adjust the current Brightness, Contrast, Colour Temp, Auto Config and other image...
... be used to open the OSD. Adjusting the OSD settings Note: The following page: Adjusting the picture quality 1 Press the MENU key to adjust the picture quality, OSD position and general settings. Then navigate to the picture element you wish to adjust. 3 Use the / keys to adjust the sliding scales. 4 The Picture menu can be used for general reference only. Press the MENU key to adjust the current Brightness, Contrast, Colour Temp, Auto Config and other image...
User Manual
Page 27
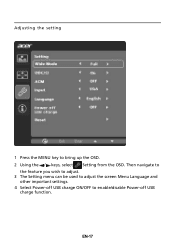
Adjusting the setting 1 Press the MENU key to enable/disable Power-off USB charge function. Then navigate to the feature you wish to adjust. 3 The Setting menu can be used to adjust the screen Menu Language and other important settings. 4 Select Power-off USB charge ON/OFF to bring up the OSD. 2 Using the / keys, select Setting from the OSD. EN-17
Adjusting the setting 1 Press the MENU key to enable/disable Power-off USB charge function. Then navigate to the feature you wish to adjust. 3 The Setting menu can be used to adjust the screen Menu Language and other important settings. 4 Select Power-off USB charge ON/OFF to bring up the OSD. 2 Using the / keys, select Setting from the OSD. EN-17
User Manual
Page 29
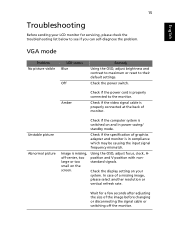
Using the OSD, adjust focus, clock, Hposition and V-position with nonstandard signals. Check the power switch. 15 English Troubleshooting Before sending your system. VGA mode Problem No picture visible LED status Blue Off Remedy Using the OSD, adjust brightness and contrast to maximum or reset to the monitor. Unstable picture Abnormal picture Check if the computer system is switched on your LCD monitor for a few seconds after adjusting the size of the image before changing or disconnecting the signal cable or switching off -center, too large or...
Using the OSD, adjust focus, clock, Hposition and V-position with nonstandard signals. Check the power switch. 15 English Troubleshooting Before sending your system. VGA mode Problem No picture visible LED status Blue Off Remedy Using the OSD, adjust brightness and contrast to maximum or reset to the monitor. Unstable picture Abnormal picture Check if the computer system is switched on your LCD monitor for a few seconds after adjusting the size of the image before changing or disconnecting the signal cable or switching off -center, too large or...
User Manual
Page 30
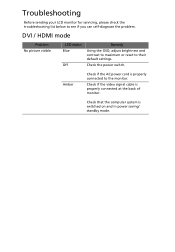
Check the power switch. Check that the computer system is properly connected at the back of monitor. Check if the video signal cable is switched on and in power saving/ standby mode. Troubleshooting Before sending your LCD monitor for servicing, please check the troubleshooting list below to their default settings. DVI / HDMI mode Problem No picture visible LED status Blue Off Remedy Using the OSD, adjust brightness and contrast to maximum or reset to see if you can self-diagnose the problem. Amber Check if the AC power cord is properly connected to the monitor.
Check the power switch. Check that the computer system is properly connected at the back of monitor. Check if the video signal cable is switched on and in power saving/ standby mode. Troubleshooting Before sending your LCD monitor for servicing, please check the troubleshooting list below to their default settings. DVI / HDMI mode Problem No picture visible LED status Blue Off Remedy Using the OSD, adjust brightness and contrast to maximum or reset to see if you can self-diagnose the problem. Amber Check if the AC power cord is properly connected to the monitor.


