User Manual
Page 2
... respect to the contents hereof and specifically disclaims the implied warranties of purchase Acer and the Acer logo are recorded on the label affixed to their respective companies. Record the model number, serial number, purchase date and place of this publication without the prior written permission of such revisions or changes. Acer LCD Monitor User's Guide Model number Serial number Date of purchase Place of merchantability or...
... respect to the contents hereof and specifically disclaims the implied warranties of purchase Acer and the Acer logo are recorded on the label affixed to their respective companies. Record the model number, serial number, purchase date and place of this publication without the prior written permission of such revisions or changes. Acer LCD Monitor User's Guide Model number Serial number Date of purchase Place of merchantability or...

User Manual
Page 3
... are turned off the power switch for a few hours. • Acer monitor is purposed for video and visual display of the fluorescent light, the screen may remain after switching the image, when the same image is recovered slowly by unplugging all warnings and instructions marked on the product. In this document for future reference. Information for hours. Follow all power cords from electronic devices. Cleaning your...
... are turned off the power switch for a few hours. • Acer monitor is purposed for video and visual display of the fluorescent light, the screen may remain after switching the image, when the same image is recovered slowly by unplugging all warnings and instructions marked on the product. In this document for future reference. Information for hours. Follow all power cords from electronic devices. Cleaning your...
User Manual
Page 4
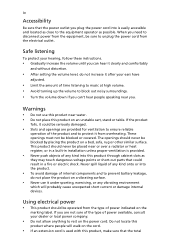
... installation unless proper ventilation is used with this product through cabinet slots as they may touch dangerous voltage points or short-out parts that the power outlet you can hear it clearly and comfortably and without distortion. • After setting the volume level, do not place the product on a vibrating surface. • Never use this product on the power cord...
... installation unless proper ventilation is used with this product through cabinet slots as they may touch dangerous voltage points or short-out parts that the power outlet you can hear it clearly and comfortably and without distortion. • After setting the volume level, do not place the product on a vibrating surface. • Never use this product on the power cord...
User Manual
Page 5
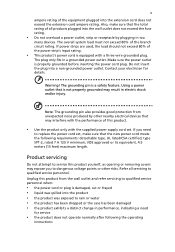
... from the wall outlet and refer servicing to qualified service personnel when: • the power cord or plug is equipped with the supplied power supply cord set , make sure that the total rating of the branch circuit rating. The grounding pin is properly grounded before inserting the power cord plug. Unplug this product yourself, as opening or removing covers may interfere with the performance of this product. • Use the product...
... from the wall outlet and refer servicing to qualified service personnel when: • the power cord or plug is equipped with the supplied power supply cord set , make sure that the total rating of the branch circuit rating. The grounding pin is properly grounded before inserting the power cord plug. Unplug this product yourself, as opening or removing covers may interfere with the performance of this product. • Use the product...

User Manual
Page 6
...: http://www.acer-group.com/public/Sustainability Visit www. Potentially explosive environments Switch off your vehicle engine. For more information and help when recycling, please go to environmental protection and views recycling, in damage and will often require extensive work by the operating instructions, since improper adjustment of other products. vi Note: Adjust only those controls that are covered by...
...: http://www.acer-group.com/public/Sustainability Visit www. Potentially explosive environments Switch off your vehicle engine. For more information and help when recycling, please go to environmental protection and views recycling, in damage and will often require extensive work by the operating instructions, since improper adjustment of other products. vi Note: Adjust only those controls that are covered by...

User Manual
Page 7
... Equipment (WEEE) regulations, visit http://www.acer‐group.com/public/Sustainability LCD pixel statement The LCD unit is too strong. are sensitive to magnetic fields and may occasionally misfire or appear as hard drives, USB devices, tablet computers, laptops, cellphones, watches, earphones, speakers, credit cards, magnetic ID cards, etc. vii Disposal instructions Do not throw this electronic device...
... Equipment (WEEE) regulations, visit http://www.acer‐group.com/public/Sustainability LCD pixel statement The LCD unit is too strong. are sensitive to magnetic fields and may occasionally misfire or appear as hard drives, USB devices, tablet computers, laptops, cellphones, watches, earphones, speakers, credit cards, magnetic ID cards, etc. vii Disposal instructions Do not throw this electronic device...

User Manual
Page 8
.... Users are also at risk of physical injury after prolonged use . Observe the following section provides tips for comfortable use , consult a physician immediately and inform your company's health and safety department. viii This product has been shipped enabled for power management: • Activate the Display Sleep mode within 5 minutes of the monitor, using a footrest, or raising your sitting height to...
.... Users are also at risk of physical injury after prolonged use . Observe the following section provides tips for comfortable use , consult a physician immediately and inform your company's health and safety department. viii This product has been shipped enabled for power management: • Activate the Display Sleep mode within 5 minutes of the monitor, using a footrest, or raising your sitting height to...

User Manual
Page 9
... the window or any light source • minimizing room light by looking away from the monitor and focusing on how to keep your eyes from the display's top front edge • Avoid adjusting your eyes. The following work habits to make your eyes regular breaks by using drapes, shades or blinds • using a task light • changing the display's viewing angle • using a glare-reduction filter • using a display...
... the window or any light source • minimizing room light by looking away from the monitor and focusing on how to keep your eyes from the display's top front edge • Avoid adjusting your eyes. The following work habits to make your eyes regular breaks by using drapes, shades or blinds • using a task light • changing the display's viewing angle • using a glare-reduction filter • using a display...
User Manual
Page 10
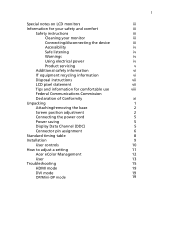
... Safe listening Warnings Using electrical power Product servicing Additional safety information IT equipment recycling information Disposal instructions LCD pixel statement Tips and information for comfortable use Federal Communications Commission Declaration of Conformity Unpacking Attaching/removing the base Screen position adjustment Connecting the power cord Power saving Display Data Channel (DDC) Connector pin assignment Standard timing table Installation User controls How to adjust a setting Acer eColor Management User Troubleshooting HDMI mode DVI mode DP/Mini-DP mode 1 iii iii iii...
... Safe listening Warnings Using electrical power Product servicing Additional safety information IT equipment recycling information Disposal instructions LCD pixel statement Tips and information for comfortable use Federal Communications Commission Declaration of Conformity Unpacking Attaching/removing the base Screen position adjustment Connecting the power cord Power saving Display Data Channel (DDC) Connector pin assignment Standard timing table Installation User controls How to adjust a setting Acer eColor Management User Troubleshooting HDMI mode DVI mode DP/Mini-DP mode 1 iii iii iii...

User Manual
Page 11
LCD monitor Quick start guide DP cable (Optional) LCD monitor HDMI Cable (Optional) DVI cable (Optional) AC power cord Audio Cable (Optional) USB cable (Optional) MHL cable (Optional) MiniDP-DP cable (Optional) MHL English 1 Unpacking Please check that the following items are present when you unpack the box, and save the packing materials in case you need to ship or transport the monitor in the future.
LCD monitor Quick start guide DP cable (Optional) LCD monitor HDMI Cable (Optional) DVI cable (Optional) AC power cord Audio Cable (Optional) USB cable (Optional) MHL cable (Optional) MiniDP-DP cable (Optional) MHL English 1 Unpacking Please check that the following items are present when you unpack the box, and save the packing materials in case you need to ship or transport the monitor in the future.

User Manual
Page 12
English 2 ATTACHING/REMOVING THE BASE Install: Align the base with the stand and push the base towards the top of the monitor, and then rotate the base clockwise. Tighten the screw clockwise. Remove: Reverse the steps to remove the base.
English 2 ATTACHING/REMOVING THE BASE Install: Align the base with the stand and push the base towards the top of the monitor, and then rotate the base clockwise. Tighten the screw clockwise. Remove: Reverse the steps to remove the base.

User Manual
Page 13
Only at the highest point can adjust the height of the monitor. 1 2 POWER AUDIO IN DVI-D IN HDMI (MHL) DP MIni DP 150mm • Tilt Please see the illustration below for the angle of the tilt range. English 3 SCREEN POSITION ADJUSTMENT In order to optimize the best viewing position, you can adjust the height/tilt/ swivel/pivot of the monitor. • Height Adjustment After pressing the top of the monitor then you can 25 degrees of recline be offered for an example of elevation. 5o 25 o
Only at the highest point can adjust the height of the monitor. 1 2 POWER AUDIO IN DVI-D IN HDMI (MHL) DP MIni DP 150mm • Tilt Please see the illustration below for the angle of the tilt range. English 3 SCREEN POSITION ADJUSTMENT In order to optimize the best viewing position, you can adjust the height/tilt/ swivel/pivot of the monitor. • Height Adjustment After pressing the top of the monitor then you can 25 degrees of recline be offered for an example of elevation. 5o 25 o
User Manual
Page 15
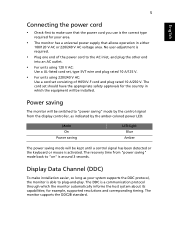
... be installed. No user-adjustment is required. • Plug one end of H05VV-F cord and plug rated 10 A/250 V. 5 English Connecting the power cord • Check first to "on" is around 3 seconds. Display Data Channel (DDC) To make installation easier, so long as indicated by the control signal from "power saving" mode back to make sure that the power cord you use is the correct type required for your system supports the DDC protocol, the monitor...
... be installed. No user-adjustment is required. • Plug one end of H05VV-F cord and plug rated 10 A/250 V. 5 English Connecting the power cord • Check first to "on" is around 3 seconds. Display Data Channel (DDC) To make installation easier, so long as indicated by the control signal from "power saving" mode back to make sure that the power cord you use is the correct type required for your system supports the DDC protocol, the monitor...
User Manual
Page 16
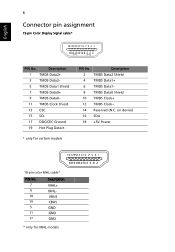
on device) 16 SDA 18 +5V Power 19-pin color MHL cable* Description 2 TMDS Data2 Shield 4 TMDS Data1+ 6 TMDS Data1- 8 TMDS Data0 Shield 10 TMDS Clock+ 12 TMDS Clock- 14 Reserved (N.C. Description 1 TMDS Data2+ 3 TMDS Data2- 5 TMDS Data1 Shield 7 TMDS Data0+ 9 TMDS Data0- 11 TMDS Clock Shield 13 CEC 15 SCL 17 DDC/CEC Ground 19 Hot Plug Detect * only for certain models PIN No. English 6 Connector pin assignment 19-pin Color Display Signal cable* 1917151311 9 7 5 3 1 1816141210 8 6 4 2 PIN No.
on device) 16 SDA 18 +5V Power 19-pin color MHL cable* Description 2 TMDS Data2 Shield 4 TMDS Data1+ 6 TMDS Data1- 8 TMDS Data0 Shield 10 TMDS Clock+ 12 TMDS Clock- 14 Reserved (N.C. Description 1 TMDS Data2+ 3 TMDS Data2- 5 TMDS Data1 Shield 7 TMDS Data0+ 9 TMDS Data0- 11 TMDS Clock Shield 13 CEC 15 SCL 17 DDC/CEC Ground 19 Hot Plug Detect * only for certain models PIN No. English 6 Connector pin assignment 19-pin Color Display Signal cable* 1917151311 9 7 5 3 1 1816141210 8 6 4 2 PIN No.
User Manual
Page 20
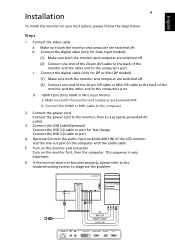
... computer are switched off. (2) Connect one end of the 24-pin DVI cable to the back of the monitor and the other end to the computer's port. POWER DVI-D IN HDMI (MHL) Mini DP DP POWER DP Mini DP HDMI / MHL DVI-D IN DVI-D IN HDMI (MHL) Mini DP DP English Installation 9 To install the monitor on the monitor first, then the computer. b Connect the digital cable (only for dual-input models). (1) Make sure both...
... computer are switched off. (2) Connect one end of the 24-pin DVI cable to the back of the monitor and the other end to the computer's port. POWER DVI-D IN HDMI (MHL) Mini DP DP POWER DP Mini DP HDMI / MHL DVI-D IN DVI-D IN HDMI (MHL) Mini DP DP English Installation 9 To install the monitor on the monitor first, then the computer. b Connect the digital cable (only for dual-input models). (1) Make sure both...
User Manual
Page 21
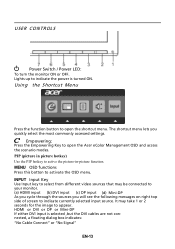
... see the following messages on right top side of screen to your monitor. (a) HDMI input (b) DVI input (c) DP input (d) Mini-DP As you cycle through the sources you quickly select the most commonly accessed settings. Using the Shortcut Menu Press the function button to activate the OSD menu. MENU OSD functions Press this botton to open the Acer eColor Management OSD and access the scenario modes. USER CONTROLS Power Switch / Power LED: To turn the monitor ON or OFF.
... see the following messages on right top side of screen to your monitor. (a) HDMI input (b) DVI input (c) DP input (d) Mini-DP As you cycle through the sources you quickly select the most commonly accessed settings. Using the Shortcut Menu Press the function button to activate the OSD menu. MENU OSD functions Press this botton to open the Acer eColor Management OSD and access the scenario modes. USER CONTROLS Power Switch / Power LED: To turn the monitor ON or OFF.
User Manual
Page 22
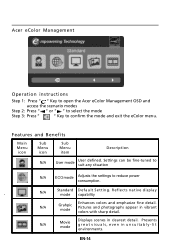
..., even in vibrant colors with sharp detail. EN-14 Acer eColor Management Operation instructions Step 1: Press " " Key to open the Acer eColor Management OSD and access the scenario modes Step 2: Press " " or " " to select the mode Step 3: Press " " Key to reduce power consumption. Features and Benefits Main Menu icon Sub Menu icon Sub Menu item Description N/A User mode User defined. N/A Movie mode Displays scenes in clearest detail...
..., even in vibrant colors with sharp detail. EN-14 Acer eColor Management Operation instructions Step 1: Press " " Key to open the Acer eColor Management OSD and access the scenario modes Step 2: Press " " or " " to select the mode Step 3: Press " " Key to reduce power consumption. Features and Benefits Main Menu icon Sub Menu icon Sub Menu item Description N/A User mode User defined. N/A Movie mode Displays scenes in clearest detail...
User Manual
Page 26
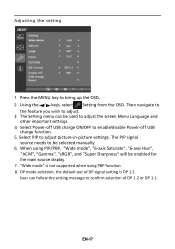
... up the OSD. 2 Using the / keys, select Setting from the OSD. User can be selected manually. 6. "Wide mode" is DP 1.2. Adjusting the setting 1 Press the MENU key to confirm selection of DP signal setting is not supported when using PIP/PBP, "Wide mode", "6-axis Saturate", "6-axis Hue", "ACM", "Gamma", "sRGB", and "Super Sharpness" will be enabled for the main source display. 7. When using PBP function. 8. DP mode selection, the default out of...
... up the OSD. 2 Using the / keys, select Setting from the OSD. User can be selected manually. 6. "Wide mode" is DP 1.2. Adjusting the setting 1 Press the MENU key to confirm selection of DP signal setting is not supported when using PIP/PBP, "Wide mode", "6-axis Saturate", "6-axis Hue", "ACM", "Gamma", "sRGB", and "Super Sharpness" will be enabled for the main source display. 7. When using PBP function. 8. DP mode selection, the default out of...
User Manual
Page 28
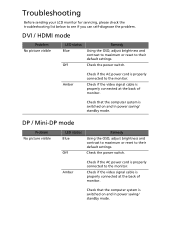
... check the troubleshooting list below to the monitor. Check the power switch. DVI / HDMI mode Problem No picture visible LED status Blue Off Remedy Using the OSD, adjust brightness and contrast to maximum or reset to their default settings. Check if the video signal cable is properly connected to see if you can self-diagnose the problem. Check the power switch. Amber Check if the AC power cord is properly connected at the back of monitor. Check that the computer system is switched on and in power saving/ standby mode. Check...
... check the troubleshooting list below to the monitor. Check the power switch. DVI / HDMI mode Problem No picture visible LED status Blue Off Remedy Using the OSD, adjust brightness and contrast to maximum or reset to their default settings. Check if the video signal cable is properly connected to see if you can self-diagnose the problem. Check the power switch. Amber Check if the AC power cord is properly connected at the back of monitor. Check that the computer system is switched on and in power saving/ standby mode. Check...

User Manual
Page 31
... energy efficiency guidelines set by reducing energy costs and helps protect the environment without sacrificing features or performance. Environmental Protection Agency. Acer ENERGY STAR qualified products: • Produce less heat and reduce cooling loads, and warmer climates. • Automatically go into "display sleep" within 5 minutes of our environment. The more energy we can save money, conserve...
... energy efficiency guidelines set by reducing energy costs and helps protect the environment without sacrificing features or performance. Environmental Protection Agency. Acer ENERGY STAR qualified products: • Produce less heat and reduce cooling loads, and warmer climates. • Automatically go into "display sleep" within 5 minutes of our environment. The more energy we can save money, conserve...

