User Manual
Page 2
... revisions or changes. Acer LCD Monitor User's Guide Model number Serial number Date of purchase Place of purchase Acer and the Acer logo are used herein for a particular purpose. Record the model number, serial number, purchase date and place of purchase information in new editions of this manual or supplementary documents and publications. All correspondence concerning your computer. Copyright © 2013 . All Rights Reserved. This company makes no representations...
... revisions or changes. Acer LCD Monitor User's Guide Model number Serial number Date of purchase Place of purchase Acer and the Acer logo are used herein for a particular purpose. Record the model number, serial number, purchase date and place of purchase information in new editions of this manual or supplementary documents and publications. All correspondence concerning your computer. Copyright © 2013 . All Rights Reserved. This company makes no representations...
User Manual
Page 3
... by changing the image or turning off the power switch and then turn it on again to make sure the flicker disappears. • You may find slightly uneven brightness on the screen depending on the desktop pattern you use . iii Special notes on LCD monitors The following guidelines when connecting and disconnecting power from the LCD monitor: • Make sure the monitor is attached to its base before connecting the power cord to...
... by changing the image or turning off the power switch and then turn it on again to make sure the flicker disappears. • You may find slightly uneven brightness on the screen depending on the desktop pattern you use . iii Special notes on LCD monitors The following guidelines when connecting and disconnecting power from the LCD monitor: • Make sure the monitor is attached to its base before connecting the power cord to...
User Manual
Page 4
.... • Never use this product near water. • Do not place this product, make sure that the power outlet you are provided for ventilation to ensure reliable operation of time listening to music at high volume. • Avoid turning up the volume to rest on the power cord. Safe listening To protect your hearing, follow these instructions. • Gradually...
.... • Never use this product near water. • Do not place this product, make sure that the power outlet you are provided for ventilation to ensure reliable operation of time listening to music at high volume. • Avoid turning up the volume to rest on the power cord. Safe listening To protect your hearing, follow these instructions. • Gradually...
User Manual
Page 5
.... Warning! If power strips are used, the load should not exceed 80% of the power strip's input rating. • This product's power cord is equipped with the supplied power supply cord set , make sure that the total rating of all servicing to rain or water • the product has been dropped or the case has been damaged • the product exhibits a distinct change in electric shock...
.... Warning! If power strips are used, the load should not exceed 80% of the power strip's input rating. • This product's power cord is equipped with the supplied power supply cord set , make sure that the total rating of all servicing to rain or water • the product has been dropped or the case has been damaged • the product exhibits a distinct change in electric shock...

User Manual
Page 6
...information and help when recycling, please go to environmental protection and views recycling, in the form of salvaging and disposal of used equipment, as grain, dust or metal powders. Switch off the device near gas pumps at Acer are covered by ...work by the operating instructions, since improper adjustment of other products. Potentially explosive environments Switch off your vehicle engine. or where blasting operations are often, but not always, marked. chemical plants; Observe restrictions on the features and benefits of our other controls may contain small parts. We at service...
...information and help when recycling, please go to environmental protection and views recycling, in the form of salvaging and disposal of used equipment, as grain, dust or metal powders. Switch off the device near gas pumps at Acer are covered by ...work by the operating instructions, since improper adjustment of other products. Potentially explosive environments Switch off your vehicle engine. or where blasting operations are often, but not always, marked. chemical plants; Observe restrictions on the features and benefits of our other controls may contain small parts. We at service...

User Manual
Page 7
...Disposal instructions Do not throw this electronic device into the trash when discarding. Warning Message for Magnet Certain electronic devices such as black or red dots. Nevertheless, some pixels may...cards, magnetic ID cards, etc. This has no effect on the Waste from Electrical and Electronics Equipment (WEEE) regulations, visit http://www.acer‐group.com/public/Sustainability LCD pixel statement The LCD unit is too strong. For more information on the recorded image and does not constitute a malfunction. To minimize pollution and ensure utmost protection of monitor base...
...Disposal instructions Do not throw this electronic device into the trash when discarding. Warning Message for Magnet Certain electronic devices such as black or red dots. Nevertheless, some pixels may...cards, magnetic ID cards, etc. This has no effect on the Waste from Electrical and Electronics Equipment (WEEE) regulations, visit http://www.acer‐group.com/public/Sustainability LCD pixel statement The LCD unit is too strong. For more information on the recorded image and does not constitute a malfunction. To minimize pollution and ensure utmost protection of monitor base...
User Manual
Page 8
.... Finding your comfort zone Find your comfort zone by pushing the power button. The following tips: • refrain from Sleep mode by adjusting the viewing angle of the monitor, using a footrest, or raising your sitting height to achieve maximum comfort. Long work periods, bad posture, poor work habits, stress, inadequate working in the hands, wrists, arms, shoulders, neck or back: • numbness...
.... Finding your comfort zone Find your comfort zone by pushing the power button. The following tips: • refrain from Sleep mode by adjusting the viewing angle of the monitor, using a footrest, or raising your sitting height to achieve maximum comfort. Long work periods, bad posture, poor work habits, stress, inadequate working in the hands, wrists, arms, shoulders, neck or back: • numbness...
User Manual
Page 9
... window or any light source • minimizing room light by looking at bright light sources, such as possible. • Exercise regularly and maintain a healthy body. Developing good work habits Develop the following sections provide suggestions on a distant point. • Blink frequently to reduce eyestrain. The following work habits to make your eyes from the monitor and focusing on how to keep your computer use...
... window or any light source • minimizing room light by looking at bright light sources, such as possible. • Exercise regularly and maintain a healthy body. Developing good work habits Develop the following sections provide suggestions on a distant point. • Blink frequently to reduce eyestrain. The following work habits to make your eyes from the monitor and focusing on how to keep your computer use...

User Manual
Page 12
... Safe listening Warnings Using electrical power Product servicing Additional safety information IT equipment recycling information Disposal instructions LCD pixel statement Tips and information for comfortable use Federal Communications Commission Declaration of Conformity Unpacking Attaching/removing the base Screen position adjustment Connecting the power cord Power saving Display Data Channel (DDC) Connector pin assignment Standard timing table Installation User controls How to adjust a setting Acer eColor Management User Troubleshooting HDMI mode DVI mode DP mode 1 iii iii iii...
... Safe listening Warnings Using electrical power Product servicing Additional safety information IT equipment recycling information Disposal instructions LCD pixel statement Tips and information for comfortable use Federal Communications Commission Declaration of Conformity Unpacking Attaching/removing the base Screen position adjustment Connecting the power cord Power saving Display Data Channel (DDC) Connector pin assignment Standard timing table Installation User controls How to adjust a setting Acer eColor Management User Troubleshooting HDMI mode DVI mode DP mode 1 iii iii iii...
User Manual
Page 13
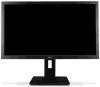
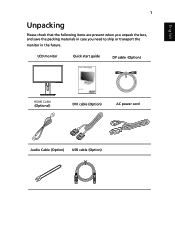
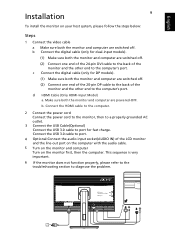
LCD monitor Quick start guide DP cable (Option) HDMI Cable (Optional) DVI cable (Option) AC power cord Audio Cable (Option) USB cable (Option) English 1 Unpacking Please check that the following items are present when you unpack the box, and save the packing materials in case you need to ship or transport the monitor in the future.
LCD monitor Quick start guide DP cable (Option) HDMI Cable (Optional) DVI cable (Option) AC power cord Audio Cable (Option) USB cable (Option) English 1 Unpacking Please check that the following items are present when you unpack the box, and save the packing materials in case you need to ship or transport the monitor in the future.
User Manual
Page 14
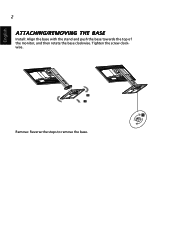
Tighten the screw clockwise. Remove: Reverse the steps to remove the base. English 2 ATTACHING/REMOVING THE BASE Install: Align the base with the stand and push the base towards the top of the monitor, and then rotate the base clockwise.
Tighten the screw clockwise. Remove: Reverse the steps to remove the base. English 2 ATTACHING/REMOVING THE BASE Install: Align the base with the stand and push the base towards the top of the monitor, and then rotate the base clockwise.
User Manual
Page 15
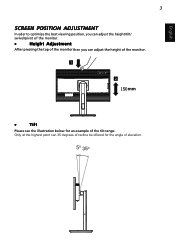
Only at the highest point can adjust the height of the monitor. 1 2 150mm • Tilt Please see the illustration below for the angle of the tilt range. English 3 SCREEN POSITION ADJUSTMENT In oder to optimize the best viewing position, you can adjust the height/tilt/ swivel/pivot of the monitor. • Height Adjustment After pressing the top of the monitor then you can 35 degrees of recline be offered for an example of elevation. 5o 35o
Only at the highest point can adjust the height of the monitor. 1 2 150mm • Tilt Please see the illustration below for the angle of the tilt range. English 3 SCREEN POSITION ADJUSTMENT In oder to optimize the best viewing position, you can adjust the height/tilt/ swivel/pivot of the monitor. • Height Adjustment After pressing the top of the monitor then you can 35 degrees of recline be offered for an example of elevation. 5o 35o
User Manual
Page 17
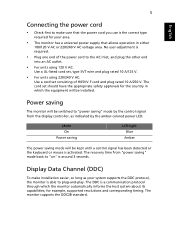
... switched to "power saving" mode by the amber-colored power LED. Mode On Power saving LED light Blue Amber The power saving mode will be kept until a control signal has been detected or the keyboard or mouse is activated. Display Data Channel (DDC) To make sure that the power cord you use is the correct type required for your system supports the DDC protocol, the monitor is able to plug-and-play. 5 English Connecting the power cord • Check first to make installation...
... switched to "power saving" mode by the amber-colored power LED. Mode On Power saving LED light Blue Amber The power saving mode will be kept until a control signal has been detected or the keyboard or mouse is activated. Display Data Channel (DDC) To make sure that the power cord you use is the correct type required for your system supports the DDC protocol, the monitor is able to plug-and-play. 5 English Connecting the power cord • Check first to make installation...
User Manual
Page 18
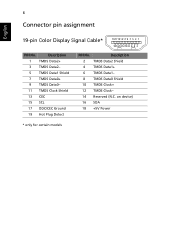
Description 1 TMDS Data2+ 3 TMDS Data2- 5 TMDS Data1 Shield 7 TMDS Data0+ 9 TMDS Data0- 11 TMDS Clock Shield 13 CEC 15 SCL 17 DDC/CEC Ground 19 Hot Plug Detect PIN No. Description 2 TMDS Data2 Shield 4 TMDS Data1+ 6 TMDS Data1- 8 TMDS Data0 Shield 10 TMDS Clock+ 12 TMDS Clock- 14 Reserved (N.C. on device) 16 SDA 18 +5V Power * only for certain models 6 Connector pin assignment English 19-pin Color Display Signal Cable* 1917151311 9 7 5 3 1 1816141210 8 6 4 2 PIN No.
Description 1 TMDS Data2+ 3 TMDS Data2- 5 TMDS Data1 Shield 7 TMDS Data0+ 9 TMDS Data0- 11 TMDS Clock Shield 13 CEC 15 SCL 17 DDC/CEC Ground 19 Hot Plug Detect PIN No. Description 2 TMDS Data2 Shield 4 TMDS Data1+ 6 TMDS Data1- 8 TMDS Data0 Shield 10 TMDS Clock+ 12 TMDS Clock- 14 Reserved (N.C. on device) 16 SDA 18 +5V Power * only for certain models 6 Connector pin assignment English 19-pin Color Display Signal Cable* 1917151311 9 7 5 3 1 1816141210 8 6 4 2 PIN No.
User Manual
Page 21
... models). (1) Make sure both the monitor and computer are switched off . (2) Connect one end of the 24-pin DVI cable to the back of the LCD monitor and the line-out port on the computer with the audio cable. 5 Turn on the monitor and computer Turn on your host system, please follow the steps below: Steps 1 Connect the video cable a Make sure both the monitor and computer are switched off. c Connect the digital cable...
... models). (1) Make sure both the monitor and computer are switched off . (2) Connect one end of the 24-pin DVI cable to the back of the LCD monitor and the line-out port on the computer with the audio cable. 5 Turn on the monitor and computer Turn on your host system, please follow the steps below: Steps 1 Connect the video cable a Make sure both the monitor and computer are switched off. c Connect the digital cable...

User Manual
Page 22
... shortcut menu. PIP (picture in -picture function. USER CONTROLS Power Switch / Power LED: To turn the monitor ON or OFF. INPUT Input Key Use Input key to select from different video sources that may take 1 or 2 seconds for the image to open the Acer eColor Management OSD and access the scenario modes. Using the Shortcut Menu Press the function button to appear. HDMI or DVI or DP If either DVI input is turned ON. It may be connected to your monitor. (a) HDMI input (b) DVI input (c) DP input...
... shortcut menu. PIP (picture in -picture function. USER CONTROLS Power Switch / Power LED: To turn the monitor ON or OFF. INPUT Input Key Use Input key to select from different video sources that may take 1 or 2 seconds for the image to open the Acer eColor Management OSD and access the scenario modes. Using the Shortcut Menu Press the function button to appear. HDMI or DVI or DP If either DVI input is turned ON. It may be connected to your monitor. (a) HDMI input (b) DVI input (c) DP input...
User Manual
Page 23
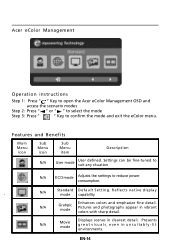
Acer eColor Management Operation instructions Step 1: Press " " Key to open the Acer eColor Management OSD and access the scenario modes Step 2: Press " " or " " to select the mode Step 3: Press " " Key to reduce power consumption. R eflects n a tive d isp lay mode capability N/A Grahpic mode Enhances colors and emphasize fine detail. N/A Movie mode Displays scenes in unsuitably-lit environments. EN-14 Settings can be fine-tuned to suit...
Acer eColor Management Operation instructions Step 1: Press " " Key to open the Acer eColor Management OSD and access the scenario modes Step 2: Press " " or " " to select the mode Step 3: Press " " Key to reduce power consumption. R eflects n a tive d isp lay mode capability N/A Grahpic mode Enhances colors and emphasize fine detail. N/A Movie mode Displays scenes in unsuitably-lit environments. EN-14 Settings can be fine-tuned to suit...
User Manual
Page 24
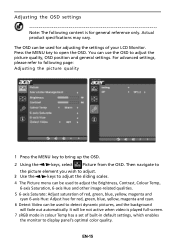
... has a set of red, green, blue, yellow, magenta and cyan 6‐axis Hue: Adjust hue for general reference only. For advanced settings, please refer to following content is played full‐screen. 7 sRGB mode in default settings, which enables the monitor to open the OSD. It will fade out automatically. Press the MENU key to display panel's optimal color quality. EN-15 Actual product specifications may vary. Adjusting the OSD settings Note...
... has a set of red, green, blue, yellow, magenta and cyan 6‐axis Hue: Adjust hue for general reference only. For advanced settings, please refer to following content is played full‐screen. 7 sRGB mode in default settings, which enables the monitor to open the OSD. It will fade out automatically. Press the MENU key to display panel's optimal color quality. EN-15 Actual product specifications may vary. Adjusting the OSD settings Note...
User Manual
Page 26
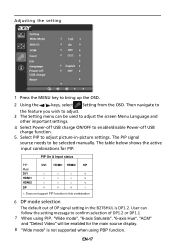
... active input combinations for the main source display. 8 "Wide mode" is DP1.2. The PIP signal source needs to be used to adjust the screen Menu Language and other important settings. 4 Select Power-off USB charge ON/OFF to adjust. 3 The Setting menu can follow the setting message to bring up the OSD. 2 Using the / keys, select Setting from the OSD. User can be selected manually. Adjusting the setting 1 Press the MENU key to confirm selection of DP signal setting in ‐picture settings.
... active input combinations for the main source display. 8 "Wide mode" is DP1.2. The PIP signal source needs to be used to adjust the screen Menu Language and other important settings. 4 Select Power-off USB charge ON/OFF to adjust. 3 The Setting menu can follow the setting message to bring up the OSD. 2 Using the / keys, select Setting from the OSD. User can be selected manually. Adjusting the setting 1 Press the MENU key to confirm selection of DP signal setting in ‐picture settings.
User Manual
Page 28
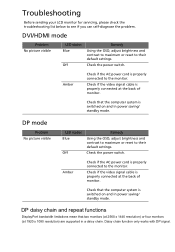
... and repeat functions DisplayPort bandwidth limitations mean that two monitors (at 2560 x 1440 resolution) or four monitors (at 1920 x 1080 resolution) are supported in power saving/ standby mode. Troubleshooting Before sending your LCD monitor for servicing, please check the troubleshooting list below to the monitor. Check the power switch. Check the power switch. Daisy chain function only works with DP signal. DVI/HDMI mode Problem No picture visible LED status Blue Off Remedy Using the OSD, adjust brightness and contrast to maximum or reset to their default settings.
... and repeat functions DisplayPort bandwidth limitations mean that two monitors (at 2560 x 1440 resolution) or four monitors (at 1920 x 1080 resolution) are supported in power saving/ standby mode. Troubleshooting Before sending your LCD monitor for servicing, please check the troubleshooting list below to the monitor. Check the power switch. Check the power switch. Daisy chain function only works with DP signal. DVI/HDMI mode Problem No picture visible LED status Blue Off Remedy Using the OSD, adjust brightness and contrast to maximum or reset to their default settings.


