User Manual
Page 3
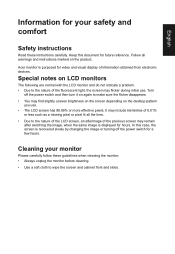
... to the nature of the LCD screen, an afterimage of the fluorescent light, the screen may find slightly uneven brightness on the screen depending on the desktop pattern you use . Special notes on the product. English Information for your monitor Please carefully follow these instructions carefully. Acer monitor is recovered slowly by changing the image or turning off the power switch and then turn it on again to...
... to the nature of the LCD screen, an afterimage of the fluorescent light, the screen may find slightly uneven brightness on the screen depending on the desktop pattern you use . Special notes on the product. English Information for your monitor Please carefully follow these instructions carefully. Acer monitor is recovered slowly by changing the image or turning off the power switch and then turn it on again to...
User Manual
Page 4
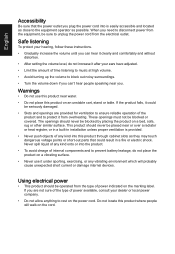
... distortion. • After setting the volume level, do not place the product on a vibrating surface. • Never use this product near water. • Do not place this product on an unstable cart, stand or table. Safe listening To protect your hearing, follow these instructions. • Gradually increase the volume until you plug the power cord into the product. •...
... distortion. • After setting the volume level, do not place the product on a vibrating surface. • Never use this product near water. • Do not place this product on an unstable cart, stand or table. Safe listening To protect your hearing, follow these instructions. • Gradually increase the volume until you plug the power cord into the product. •...
User Manual
Page 5
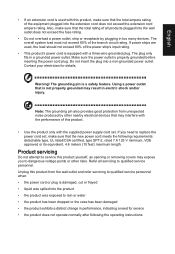
... • the product exhibits a distinct change in too many devices. If you to service this product. • Use the product only with the supplied power supply cord set , make sure that the total rating of all servicing to qualified service personnel. The plug only fits in electric shock and/or injury. Do not insert the plug into the wall outlet does not exceed the fuse...
... • the product exhibits a distinct change in too many devices. If you to service this product. • Use the product only with the supplied power supply cord set , make sure that the total rating of all servicing to qualified service personnel. The plug only fits in electric shock and/or injury. Do not insert the plug into the wall outlet does not exceed the fuse...

User Manual
Page 6
... business and strive to identify and provide the best working procedures to turn off the device near depots, storage and distribution areas; To minimize pollution and ensure utmost protection of the company's top priorities in damage and will often require extensive work by the operating instructions, since improper adjustment of our products. Potentially explosive atmospheres include...
... business and strive to identify and provide the best working procedures to turn off the device near depots, storage and distribution areas; To minimize pollution and ensure utmost protection of the company's top priorities in damage and will often require extensive work by the operating instructions, since improper adjustment of our products. Potentially explosive atmospheres include...

User Manual
Page 7
... adjusting the viewing angle of the monitor, using a footrest, or raising your leg muscles Tips and information for power management: • Activate display's Sleep mode within 5 minutes of physical injury. Users are also at risk of physical injury after long hours of working conditions, personal health and other musculoskeletal disorders. Nevertheless, some pixels may lead to achieve maximum comfort. English LCD pixel statement The LCD...
... adjusting the viewing angle of the monitor, using a footrest, or raising your leg muscles Tips and information for power management: • Activate display's Sleep mode within 5 minutes of physical injury. Users are also at risk of physical injury after long hours of working conditions, personal health and other musculoskeletal disorders. Nevertheless, some pixels may lead to achieve maximum comfort. English LCD pixel statement The LCD...

User Manual
Page 8
... the side faces the window or any light source • minimizing room light by looking at bright light sources, such as open windows, for extended periods of time. English Taking care of your vision Long viewing hours, wearing incorrect glasses or contact lenses, glare, excessive room lighting, poorly focused screens, very small typefaces and low-contrast displays could stress your computer use more relaxing and productive...
... the side faces the window or any light source • minimizing room light by looking at bright light sources, such as open windows, for extended periods of time. English Taking care of your vision Long viewing hours, wearing incorrect glasses or contact lenses, glare, excessive room lighting, poorly focused screens, very small typefaces and low-contrast displays could stress your computer use more relaxing and productive...
User Manual
Page 11
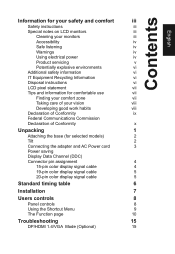
... good work habits viii Declaration of Conformity ix Federal Communications Commission Declaration of Conformity x Unpacking 1 Attaching the base (for selected models) 2 Tilt 2 Connecting the adapter and AC Power cord 3 Power saving Display Data Channel (DDC) Connector pin assignment 4 15-pin color display signal cable 4 19-pin color display signal cable 5 20-pin color display signal cable 5 Standard timing table 6 Installation 7 Users controls 8 Panel controls 8 Using the Shortcut Menu 9 The Function page 10 Troubleshooting 15 DP/HDMI 1.4/VGA Mode...
... good work habits viii Declaration of Conformity ix Federal Communications Commission Declaration of Conformity x Unpacking 1 Attaching the base (for selected models) 2 Tilt 2 Connecting the adapter and AC Power cord 3 Power saving Display Data Channel (DDC) Connector pin assignment 4 15-pin color display signal cable 4 19-pin color display signal cable 5 20-pin color display signal cable 5 Standard timing table 6 Installation 7 Users controls 8 Panel controls 8 Using the Shortcut Menu 9 The Function page 10 Troubleshooting 15 DP/HDMI 1.4/VGA Mode...

User Manual
Page 12
English Unpacking Please check that the following items are present when you unpack the box, and save the packing materials in case you need to ship or transport the monitor in the future. LCD monitor Quick start guide AC Power cord HDMI 1.4 Cable (Optional) LCD Monitor B7 series-B257Q USER GUIDE VGA cable (Optional) DP Cable (Optional) Audio Cable (Optional) USB cable (Optional)
English Unpacking Please check that the following items are present when you unpack the box, and save the packing materials in case you need to ship or transport the monitor in the future. LCD monitor Quick start guide AC Power cord HDMI 1.4 Cable (Optional) LCD Monitor B7 series-B257Q USER GUIDE VGA cable (Optional) DP Cable (Optional) Audio Cable (Optional) USB cable (Optional)

User Manual
Page 13
Only at the highest point can adjust the height/tilt of the monitor. • Attaching the Base Note: Remove the monitor and monitor base from its packaging.Carefully place the monitor face-down on a stable surface -- use a cloth to optimize the best viewing position, you can 25 degrees of recline be offered for an example of elevation. -5° 25° English SCREEN POSITION ADJUSTMENT In oder to avoid scratching the screen. • Tilt Please see the illustration below for the angle of the tilt range.
Only at the highest point can adjust the height/tilt of the monitor. • Attaching the Base Note: Remove the monitor and monitor base from its packaging.Carefully place the monitor face-down on a stable surface -- use a cloth to optimize the best viewing position, you can 25 degrees of recline be offered for an example of elevation. -5° 25° English SCREEN POSITION ADJUSTMENT In oder to avoid scratching the screen. • Tilt Please see the illustration below for the angle of the tilt range.
User Manual
Page 15
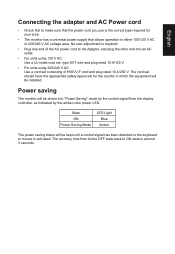
... monitor has a universal power supply that the power cord you use is the correct type required for the country in either 100/120 V AC or 220/240 V AC voltage area. State ON Power Saving Mode LED Light Blue Amber The power saving states will be kept until a control signal has been detected or the keyboard or mouse is activated. English Connecting the adapter and AC Power cord • Check first to make sure...
... monitor has a universal power supply that the power cord you use is the correct type required for the country in either 100/120 V AC or 220/240 V AC voltage area. State ON Power Saving Mode LED Light Blue Amber The power saving states will be kept until a control signal has been detected or the keyboard or mouse is activated. English Connecting the adapter and AC Power cord • Check first to make sure...

User Manual
Page 16
... DDC-serial data 13 H-sync 14 V-sync 15 DDC-serial clock Description 1 Red 2 Green 3 Blue 4 Monitor ground 5 DDC-return 6 R-ground 7 G-ground 8 B-ground PIN No. English Display Data Channel (DDC) To make installation easier, so long as your system supports the DDC protocol, the monitor is a communication protocol through which the monitor automatically informs the host system about its capabilities; The monitor supports the DDC2B standard. 15-pin color display signal cable...
... DDC-serial data 13 H-sync 14 V-sync 15 DDC-serial clock Description 1 Red 2 Green 3 Blue 4 Monitor ground 5 DDC-return 6 R-ground 7 G-ground 8 B-ground PIN No. English Display Data Channel (DDC) To make installation easier, so long as your system supports the DDC protocol, the monitor is a communication protocol through which the monitor automatically informs the host system about its capabilities; The monitor supports the DDC2B standard. 15-pin color display signal cable...
User Manual
Page 19
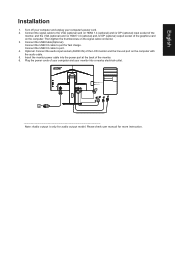
... check user manual for audio output model. English Installation 1. Plug the power cords of the LCD monitor and the line-out port on the signal cable connector. 3. Optional: Connect the audio input socket (AUDIO IN) of your computer and your computer's power cord. 2. Then tighten the thumbscrews on the computer with the audio cable. 5. Connect the USB 3.0 cable to port for fast charge. Turn off your computer and unplug your monitor into the power port at the back of the graphics card on...
... check user manual for audio output model. English Installation 1. Plug the power cords of the LCD monitor and the line-out port on the signal cable connector. 3. Optional: Connect the audio input socket (AUDIO IN) of your computer and your computer's power cord. 2. Then tighten the thumbscrews on the computer with the audio cable. 5. Connect the USB 3.0 cable to port for fast charge. Turn off your computer and unplug your monitor into the power port at the back of the graphics card on...
User Manual
Page 20
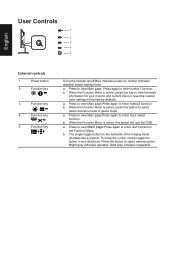
... function in four directions. English User Controls 1 2 3 4 5 External controls 1 Power button 2 Function key / 3 Function key / 4 Function key /X 5 Function key / Turns the monitor on/off.Blue indicates power on the backside of the Display bezel operates like a joystick. b. When the Function Menu is active, this key to view the basic information for your monitor and current input or reset the custom color settings to select select scenario mode or game...
... function in four directions. English User Controls 1 2 3 4 5 External controls 1 Power button 2 Function key / 3 Function key / 4 Function key /X 5 Function key / Turns the monitor on/off.Blue indicates power on the backside of the Display bezel operates like a joystick. b. When the Function Menu is active, this key to view the basic information for your monitor and current input or reset the custom color settings to select select scenario mode or game...

User Manual
Page 21
... (Modes, Volume, Brightness,Gamma, Contrast, Blue Light) 4. Brightness 80 Adjust OK Actual product specifications may vary. When you are done, press the joystick to open the OSD. The OSD (onscreen display) can use the OSD to following content is for general reference only. Hot Key1 (Modes, Volume, Brightness,Gamma, Contrast, Blue Light) 3. For advanced settings, please refer to adjust the picture quality and general settings. Input selection Menu Hot key1 (default: Standard mode) To choose scenario mode(sRGB,Reading,Darkroom,User...
... (Modes, Volume, Brightness,Gamma, Contrast, Blue Light) 4. Brightness 80 Adjust OK Actual product specifications may vary. When you are done, press the joystick to open the OSD. The OSD (onscreen display) can use the OSD to following content is for general reference only. Hot Key1 (Modes, Volume, Brightness,Gamma, Contrast, Blue Light) 3. For advanced settings, please refer to adjust the picture quality and general settings. Input selection Menu Hot key1 (default: Standard mode) To choose scenario mode(sRGB,Reading,Darkroom,User...
User Manual
Page 22
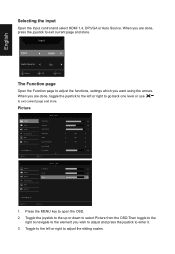
... OSD. 2. Selecting the input Open the Input control and select HDMI 1.4, DP,VGA or Auto Source. Input English Input HDMI Auto Source On Move OK Exit The Function page Open the Function page to ... Press the MENU key to adjust the sliding scales. User Picture V. Toggle to the left or right to go back one level or use X to enter it. 3. User Brightness Contrast Black Boost Blue Light ACM Super Sharpness Auto Config H. Move Enter 1. Picture Picture Color Audio Pertormance OSD System Save Settings...
... OSD. 2. Selecting the input Open the Input control and select HDMI 1.4, DP,VGA or Auto Source. Input English Input HDMI Auto Source On Move OK Exit The Function page Open the Function page to ... Press the MENU key to adjust the sliding scales. User Picture V. Toggle to the left or right to go back one level or use X to enter it. 3. User Brightness Contrast Black Boost Blue Light ACM Super Sharpness Auto Config H. Move Enter 1. Picture Picture Color Audio Pertormance OSD System Save Settings...
User Manual
Page 23
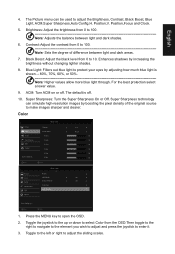
... make images sharper and clearer. ACM: Turn ACM on or off . 10. Color Picture Color Audio Pertormance OSD System Save Settings to adjust the sliding scales. User Gamma Colour Temp. Position,V. Press the MENU key to ... Position,Focus and Clock. 5. For the best protection select a lower value. 9. English 4. The Picture menu can simulate high-resolution images by increasing the brightness without changing lighter shades. 8. Enhances shadows by boosting the pixel density of difference between light...
... make images sharper and clearer. ACM: Turn ACM on or off . 10. Color Picture Color Audio Pertormance OSD System Save Settings to adjust the sliding scales. User Gamma Colour Temp. Position,V. Press the MENU key to ... Position,Focus and Clock. 5. For the best protection select a lower value. 9. English 4. The Picture menu can simulate high-resolution images by increasing the brightness without changing lighter shades. 8. Enhances shadows by boosting the pixel density of difference between light...
User Manual
Page 24
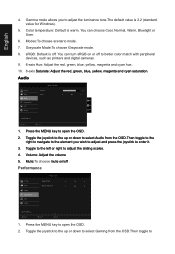
You can turn sRGB on /off . You can choose Cool, Normal, Warm, Bluelight or User. 6. Press the MENU key to open the OSD. 2. Mute:To choose mute on or off . User Picture Adaptive Sync On Color Refresh Rate Num Off Audio Pertormance OSD System Save Settings to ... Modes:To choose scenario mode. 7. Grayscale Mode:To choose Grayscale mode. 8. Audio Picture Color Audio Pertormance OSD System Mode - Stardard Volume Mute 70 Off X Save Settings to ... Toggle the joystick to the up...
You can turn sRGB on /off . You can choose Cool, Normal, Warm, Bluelight or User. 6. Press the MENU key to open the OSD. 2. Mute:To choose mute on or off . User Picture Adaptive Sync On Color Refresh Rate Num Off Audio Pertormance OSD System Save Settings to ... Modes:To choose scenario mode. 7. Grayscale Mode:To choose Grayscale mode. 8. Audio Picture Color Audio Pertormance OSD System Mode - Stardard Volume Mute 70 Off X Save Settings to ... Toggle the joystick to the up...
User Manual
Page 25
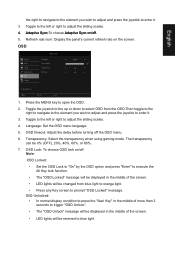
... turning off . 5. Refresh rate num: Display the panel's current refresh rate on /off. Transparency: Select the transparency when using gaming mode. Note: OSD Locked: • Set the OSD Lock to "On" by the OSD option and press "Enter" to execute the All Key lock function. • The "OSD Locked" message will be displayed in the middle of the screen. • LED lights will be restored to prompt "OSD Locked" message. Press the MENU key to ... Adaptive Sync...
... turning off . 5. Refresh rate num: Display the panel's current refresh rate on /off. Transparency: Select the transparency when using gaming mode. Note: OSD Locked: • Set the OSD Lock to "On" by the OSD option and press "Enter" to execute the All Key lock function. • The "OSD Locked" message will be displayed in the middle of the screen. • LED lights will be restored to prompt "OSD Locked" message. Press the MENU key to ... Adaptive Sync...
User Manual
Page 26
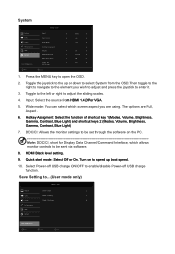
... . 6. Wide mode: You can select which allows monitor controls to speed up or down to select System from HDMI 1.4,DPor VGA. 5. HDMI Black level setting. 9. User Picture Color Audio Pertormance OSD System Save Settings to open the OSD. 2. Input Auto Source Wide Mode Hot Key Assignment DDC/CI HDMI Black Level Quick Start Mode Power -off USB Charge HDMI On Full On Normal Off Off Move Enter 1. Press the MENU key to ... Toggle to the left or right to ...(User mode only) Picture Color Audio Pertormance OSD System Mode - Save Setting...
... . 6. Wide mode: You can select which allows monitor controls to speed up or down to select System from HDMI 1.4,DPor VGA. 5. HDMI Black level setting. 9. User Picture Color Audio Pertormance OSD System Save Settings to open the OSD. 2. Input Auto Source Wide Mode Hot Key Assignment DDC/CI HDMI Black Level Quick Start Mode Power -off USB Charge HDMI On Full On Normal Off Off Move Enter 1. Press the MENU key to ... Toggle to the left or right to ...(User mode only) Picture Color Audio Pertormance OSD System Mode - Save Setting...
User Manual
Page 27
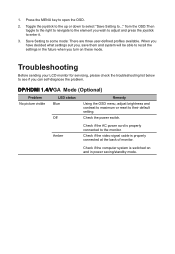
... to their default setting. DP/HDMI 1.4/VGA Mode (Optional) Problem No picture visible LED status Blue Off Remedy Using the OSD menu, adjust brightness and contrast to maximum or reset to recall the settings in power saving/standby mode. Check the power switch. Save Setting to ..." Check if the computer system is switched on these mode. Toggle the joystick to the up or down to select "Save Setting to some mode: There are three user-defined profiles available. from the OSD.Then toggle...
... to their default setting. DP/HDMI 1.4/VGA Mode (Optional) Problem No picture visible LED status Blue Off Remedy Using the OSD menu, adjust brightness and contrast to maximum or reset to recall the settings in power saving/standby mode. Check the power switch. Save Setting to ..." Check if the computer system is switched on these mode. Toggle the joystick to the up or down to select "Save Setting to some mode: There are three user-defined profiles available. from the OSD.Then toggle...

