
User Manual
Page 2
...Acer LCD Monitor User's Guide Model number Serial number Date of purchase Place of such revisions or changes. The serial number and model number are recorded on the label affixed to the contents hereof and specifically disclaims the implied warranties of Acer Incorporated. All Rights Reserved. Copyright © 2011. This company makes...below. Acer Incorporated. Record the model number, serial number, purchase date and place of Acer Incorporated. Other companies' product names or trademarks are registered trademarks of purchase information in this manual or ...
...Acer LCD Monitor User's Guide Model number Serial number Date of purchase Place of such revisions or changes. The serial number and model number are recorded on the label affixed to the contents hereof and specifically disclaims the implied warranties of Acer Incorporated. All Rights Reserved. Copyright © 2011. This company makes...below. Acer Incorporated. Record the model number, serial number, purchase date and place of Acer Incorporated. Other companies' product names or trademarks are registered trademarks of purchase information in this manual or ...
User Manual
Page 3
... are turned off before connecting any cable or unplugging the power cord. • If the system has multiple sources of power, disconnect power from the power supplies. Turn off the power switch and then turn it on again to the nature of the fluorescent light, the screen may flicker during initial use . • The LCD screen has 99.99% or more effective pixels. Information for your monitor Please carefully follow these instructions carefully...
... are turned off before connecting any cable or unplugging the power cord. • If the system has multiple sources of power, disconnect power from the power supplies. Turn off the power switch and then turn it on again to the nature of the fluorescent light, the screen may flicker during initial use . • The LCD screen has 99.99% or more effective pixels. Information for your monitor Please carefully follow these instructions carefully...
User Manual
Page 4
... short-out parts that could be blocked by placing the product on the power cord. Using electrical power • This product should never be operated from the type of power indicated on an unstable cart, stand or table. Safe listening To protect your hearing, follow these instructions. • Gradually increase the volume until you . If you plug the power cord into this...
... short-out parts that could be blocked by placing the product on the power cord. Using electrical power • This product should never be operated from the type of power indicated on an unstable cart, stand or table. Safe listening To protect your hearing, follow these instructions. • Gradually increase the volume until you . If you plug the power cord into this...
User Manual
Page 5
... rating. Using a power outlet that the total rating of all servicing to replace the power cord set, make sure that is damaged, cut or frayed • liquid was exposed to dangerous voltage points or other nearby electrical devices that the new power cord meets the following the operating instructions Warning! Refer all products plugged into the product • the product was spilled into the wall...
... rating. Using a power outlet that the total rating of all servicing to replace the power cord set, make sure that is damaged, cut or frayed • liquid was exposed to dangerous voltage points or other nearby electrical devices that the new power cord meets the following the operating instructions Warning! Refer all products plugged into the product • the product was spilled into the wall...

User Manual
Page 6
...controls that are covered by a qualified technician to restore the product to normal condition. or where blasting operations are often, but not always, marked. Keep them out of the reach of the company's top priorities in damage and will often require extensive work by the operating instructions, since improper adjustment of our other controls may contain small parts. Switch... turn off the device near gas pumps at Acer are very conscious of the environmental effects of our business and strive to identify and provide the best working procedures to environmental protection and views ...
...controls that are covered by a qualified technician to restore the product to normal condition. or where blasting operations are often, but not always, marked. Keep them out of the reach of the company's top priorities in damage and will often require extensive work by the operating instructions, since improper adjustment of our other controls may contain small parts. Switch... turn off the device near gas pumps at Acer are very conscious of the environmental effects of our business and strive to identify and provide the best working procedures to environmental protection and views ...
User Manual
Page 8
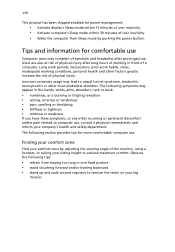
viii This product has been shipped enabled for power management: • Activate display's Sleep mode within 15 minutes of user inactivity. • Activate computer's Sleep mode within 30 minutes of the monitor, using a footrest, or raising your sitting height to achieve maximum comfort. Finding your comfort zone Find your comfort zone by adjusting the viewing angle of user inactivity. • Wake the computer from...
viii This product has been shipped enabled for power management: • Activate display's Sleep mode within 15 minutes of user inactivity. • Activate computer's Sleep mode within 30 minutes of the monitor, using a footrest, or raising your sitting height to achieve maximum comfort. Finding your comfort zone Find your comfort zone by adjusting the viewing angle of user inactivity. • Wake the computer from...
User Manual
Page 9
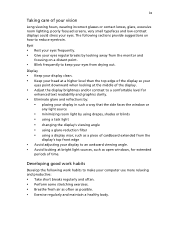
... blinds • using a task light • changing the display's viewing angle • using a glare-reduction filter • using a display visor, such as open windows, for extended periods of time. The following work habits Develop the following sections provide suggestions on a distant point. • Blink frequently to make your eyes from the display's top front edge • Avoid adjusting your eyes. Display • Keep your display clean. • Keep your head...
... blinds • using a task light • changing the display's viewing angle • using a glare-reduction filter • using a display visor, such as open windows, for extended periods of time. The following work habits Develop the following sections provide suggestions on a distant point. • Blink frequently to make your eyes from the display's top front edge • Avoid adjusting your eyes. Display • Keep your display clean. • Keep your head...
User Manual
Page 12
... Accessibility Safe listening Warnings Using electrical power Product servicing Additional safety information IT equipment recycling information Disposal instructions LCD pixel statement Tips and information for comfortable use Federal Communications Commission Declaration of Conformity Unpacking Attaching/removing the base Screen position adjustment Connecting the power cord Power saving Display Data Channel (DDC) Connector pin assignment Standard timing table Installation User controls How to adjust a setting Acer eColor Management User Troubleshooting VGA mode DVI mode 1 iii iii iii iii...
... Accessibility Safe listening Warnings Using electrical power Product servicing Additional safety information IT equipment recycling information Disposal instructions LCD pixel statement Tips and information for comfortable use Federal Communications Commission Declaration of Conformity Unpacking Attaching/removing the base Screen position adjustment Connecting the power cord Power saving Display Data Channel (DDC) Connector pin assignment Standard timing table Installation User controls How to adjust a setting Acer eColor Management User Troubleshooting VGA mode DVI mode 1 iii iii iii iii...
User Manual
Page 13
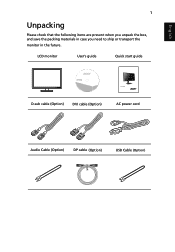
LCD monitor User's guide Quick start guide LCD Monitor D-sub cable (Option) DVI cable (Option) AC power cord Audio Cable (Option) DP cable (Option) USB Cable (Option) English 1 Unpacking Please check that the following items are present when you unpack the box, and save the packing materials in case you need to ship or transport the monitor in the future.
LCD monitor User's guide Quick start guide LCD Monitor D-sub cable (Option) DVI cable (Option) AC power cord Audio Cable (Option) DP cable (Option) USB Cable (Option) English 1 Unpacking Please check that the following items are present when you unpack the box, and save the packing materials in case you need to ship or transport the monitor in the future.
User Manual
Page 14
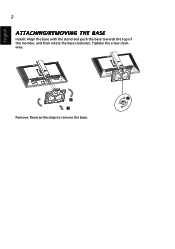
Remove: Reverse the steps to remove the base. Tighten the screw clockwise. English 2 ATTACHING/REMOVING THE BASE Install: Align the base with the stand and push the base towards the top of the monitor, and then rotate the base clockwise.
Remove: Reverse the steps to remove the base. Tighten the screw clockwise. English 2 ATTACHING/REMOVING THE BASE Install: Align the base with the stand and push the base towards the top of the monitor, and then rotate the base clockwise.
User Manual
Page 15
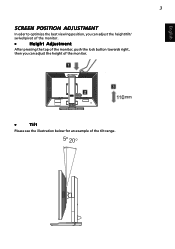
English 3 SCREEN POSITION ADJUSTMENT In oder to optimize the best viewing position, you can adjust the height/tilt/ swivel/pivot of the monitor. • Height Adjustment After pressing the top of the monitor, push the lock button towards right, then you can adjust the height of the monitor. • Tilt Please see the illustration below for an example of the tilt range. 5o 20o
English 3 SCREEN POSITION ADJUSTMENT In oder to optimize the best viewing position, you can adjust the height/tilt/ swivel/pivot of the monitor. • Height Adjustment After pressing the top of the monitor, push the lock button towards right, then you can adjust the height of the monitor. • Tilt Please see the illustration below for an example of the tilt range. 5o 20o
User Manual
Page 17
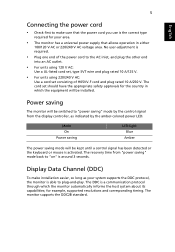
... system about its capabilities; Mode On Power saving LED light Blue Amber The power saving mode will be switched to "power saving" mode by the amber-colored power LED. The recovery time from the display controller, as your area. • The monitor has a universal power supply that the power cord you use is around 3 seconds. The monitor supports the DDC2B standard. 5 English Connecting the power cord • Check first to make installation easier, so long as indicated by the control signal from "power saving" mode back to "on...
... system about its capabilities; Mode On Power saving LED light Blue Amber The power saving mode will be switched to "power saving" mode by the amber-colored power LED. The recovery time from the display controller, as your area. • The monitor has a universal power supply that the power cord you use is around 3 seconds. The monitor supports the DDC2B standard. 5 English Connecting the power cord • Check first to make installation easier, so long as indicated by the control signal from "power saving" mode back to "on...
User Manual
Page 21
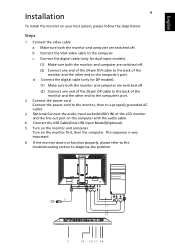
...'s port. English Installation 9 To install the monitor on your host system, please follow the steps below: Steps 1 Connect the video cable a Make sure both the monitor and computer are switched off. (2) Connect one end of the 24-pin DVI cable to the back of the LCD monitor and the line-out port on the computer with the audio cable. 4 Connect the USB Cable(Only USB-Input Model)(Optional). 5 Turn on the monitor and computer Turn on the monitor first...
...'s port. English Installation 9 To install the monitor on your host system, please follow the steps below: Steps 1 Connect the video cable a Make sure both the monitor and computer are switched off. (2) Connect one end of the 24-pin DVI cable to the back of the LCD monitor and the line-out port on the computer with the audio cable. 4 Connect the USB Cable(Only USB-Input Model)(Optional). 5 Turn on the monitor and computer Turn on the monitor first...
User Manual
Page 22
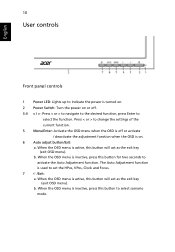
... (exit OSD menu). When the OSD menu is inactive, press this button to select scenario mode. When the OSD menu is inactive, press this button for two seconds to activate the Auto Adjustment function. 10 User controls English Front panel controls 1 Power LED: Lights up to indicate the power is turned on. 2 Power Switch: Turn the power on or off or activate / deactivate the adjustment function when the OSD is on. 6 Auto adjust button/Exit: a. Press < or > to change the settings of...
... (exit OSD menu). When the OSD menu is inactive, press this button to select scenario mode. When the OSD menu is inactive, press this button for two seconds to activate the Auto Adjustment function. 10 User controls English Front panel controls 1 Power LED: Lights up to indicate the power is turned on. 2 Power Switch: Turn the power on or off or activate / deactivate the adjustment function when the OSD is on. 6 Auto adjust button/Exit: a. Press < or > to change the settings of...
User Manual
Page 23
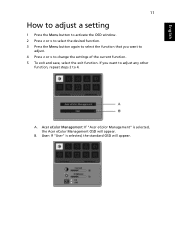
If you want to adjust any other function, repeat steps 2 to change the settings of the current function. 5 To exit and save, select the exit function. Acer eColor Management: If "Acer eColor Management" is selected, the standard OSD will appear. User: If "User" is selected, the Acer eColor Management OSD will appear. English 11 How to adjust a setting 1 Press the Menu button to activate the OSD window. 2 Press < or > to select the desired function. 3 Press the Menu button again to select the function that you want to adjust. 4 Press < or > to 4. A. B.
If you want to adjust any other function, repeat steps 2 to change the settings of the current function. 5 To exit and save, select the exit function. Acer eColor Management: If "Acer eColor Management" is selected, the standard OSD will appear. User: If "User" is selected, the Acer eColor Management OSD will appear. English 11 How to adjust a setting 1 Press the Menu button to activate the OSD window. 2 Press < or > to select the desired function. 3 Press the Menu button again to select the function that you want to adjust. 4 Press < or > to 4. A. B.
User Manual
Page 24
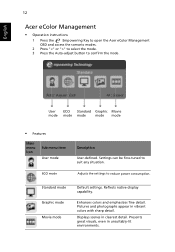
... appear in unsuitably-lit environments. Displays scenes in clearest detail. User ECO Standard Graphic Movie mode mode mode mode mode • Features Main menu icon Sub menu item User mode ECO mode Description User-defined. Reflects native display capability. English 12 Acer eColor Management • Operation instructions 1 Press the Empowering Key to open the Acer eColor Management OSD and access the scenario modes. 2 Press "" to select the mode. 3 Press the Auto-adjust button to confirm the...
... appear in unsuitably-lit environments. Displays scenes in clearest detail. User ECO Standard Graphic Movie mode mode mode mode mode • Features Main menu icon Sub menu item User mode ECO mode Description User-defined. Reflects native display capability. English 12 Acer eColor Management • Operation instructions 1 Press the Empowering Key to open the Acer eColor Management OSD and access the scenario modes. 2 Press "" to select the mode. 3 Press the Auto-adjust button to confirm the...
User Manual
Page 25
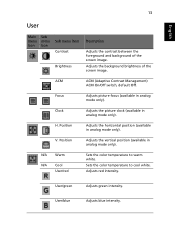
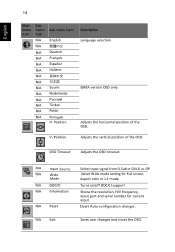
...menu menu icon icon Sub menu item Contrast Brightness Description Adjusts the contrast between the foreground and background of the screen image. H. N/A Warm N/A Cool User/red Sets the color temperature to cool white. ACM ACM (Adaptive Contrast Management) ACM On/Off switch, default Off. Clock Adjusts the picture clock (available in analog mode only). V. User/green Adjusts green intensity. Adjusts the background brightness of the screen image. Adjusts red intensity. Position Adjusts the horizontal position (available in analog mode only). User/blue Adjusts...
...menu menu icon icon Sub menu item Contrast Brightness Description Adjusts the contrast between the foreground and background of the screen image. H. N/A Warm N/A Cool User/red Sets the color temperature to cool white. ACM ACM (Adaptive Contrast Management) ACM On/Off switch, default Off. Clock Adjusts the picture clock (available in analog mode only). V. User/green Adjusts green intensity. Adjusts the background brightness of the screen image. Adjusts red intensity. Position Adjusts the horizontal position (available in analog mode only). User/blue Adjusts...
User Manual
Page 26
... menu item English Deutsch Français Español Italiano Suomi Nederlands Türkçe Polski Português H. EMEA version OSD only. OSD Timeout Adjusts the OSD timeout. N/A Input Source N/A Wide Mode N/A DDC/CI N/A Information N/A Reset Select input signal from D‐Sub or DVI‐D or DP Selcet Wide mode setting for Full screen, Aspect ratio or 1:1 mode Turns on/off DDC/CI support Shows the resolution, H/V frequency, input port and serial number for current input. Position Description Language...
... menu item English Deutsch Français Español Italiano Suomi Nederlands Türkçe Polski Português H. EMEA version OSD only. OSD Timeout Adjusts the OSD timeout. N/A Input Source N/A Wide Mode N/A DDC/CI N/A Information N/A Reset Select input signal from D‐Sub or DVI‐D or DP Selcet Wide mode setting for Full screen, Aspect ratio or 1:1 mode Turns on/off DDC/CI support Shows the resolution, H/V frequency, input port and serial number for current input. Position Description Language...
User Manual
Page 27
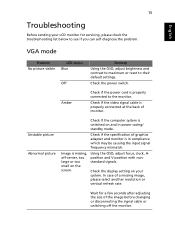
... on the screen. 15 English Troubleshooting Before sending your system. Wait for servicing, please check the troubleshooting list below to their default settings. Using the OSD, adjust focus, clock, Hposition and V-position with nonstandard signals. Unstable picture Abnormal picture Check if the computer system is in power saving/ standby mode. Check the display setting on and in compliance which may be causing the input signal frequency mismatch. VGA mode Problem No picture visible LED status Blue Off Remedy Using the OSD, adjust brightness and contrast to...
... on the screen. 15 English Troubleshooting Before sending your system. Wait for servicing, please check the troubleshooting list below to their default settings. Using the OSD, adjust focus, clock, Hposition and V-position with nonstandard signals. Unstable picture Abnormal picture Check if the computer system is in power saving/ standby mode. Check the display setting on and in compliance which may be causing the input signal frequency mismatch. VGA mode Problem No picture visible LED status Blue Off Remedy Using the OSD, adjust brightness and contrast to...
User Manual
Page 28
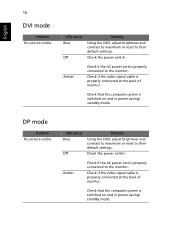
English 16 DVI mode Problem No picture visible LED status Blue Off Remedy Using the OSD, adjust brightness and contrast to maximum or reset to their default settings. Check if the video signal cable is properly connected at the back of monitor. Check if the video signal cable is properly connected at the back of monitor. Amber Check if the AC power cord is properly connected to the monitor. Amber Check if the AC power cord is properly connected to the monitor. DP mode Problem No picture visible LED status Blue Off Remedy...
English 16 DVI mode Problem No picture visible LED status Blue Off Remedy Using the OSD, adjust brightness and contrast to maximum or reset to their default settings. Check if the video signal cable is properly connected at the back of monitor. Check if the video signal cable is properly connected at the back of monitor. Amber Check if the AC power cord is properly connected to the monitor. Amber Check if the AC power cord is properly connected to the monitor. DP mode Problem No picture visible LED status Blue Off Remedy...

