Service Guide
Page 37
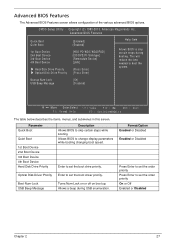
... BIOS Features screen allows configuration of the various advanced BIOS options. This will reduce the time needed to set the boot drive priority. Optical Disk Driver Priority Enter to boot the system. CMOS Setup Utility - Bootup Num-Lock USB Beep Message [On] [Disabled] :Move Enter:Select - / + / Va:lu e F 1 0 : vSea E S C : E x i... F 1 : G e n earl H e l p F 9 : O p t i m i zeedf aDu l t s The table below describes the items, menus, and submenus in this screen. Enter to set the boot driver priority. Boot Num-Lock USB Beep Message Turns Num-Lock on or off on boot up.
... BIOS Features screen allows configuration of the various advanced BIOS options. This will reduce the time needed to set the boot drive priority. Optical Disk Driver Priority Enter to boot the system. CMOS Setup Utility - Bootup Num-Lock USB Beep Message [On] [Disabled] :Move Enter:Select - / + / Va:lu e F 1 0 : vSea E S C : E x i... F 1 : G e n earl H e l p F 9 : O p t i m i zeedf aDu l t s The table below describes the items, menus, and submenus in this screen. Enter to set the boot driver priority. Boot Num-Lock USB Beep Message Turns Num-Lock on or off on boot up.
Service Guide
Page 166
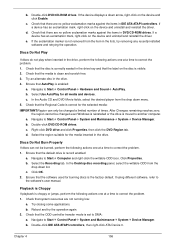
If the device displays a down arrow, right-click on the device and uninstall and reinstall the driver. d. If the exclamation marker is not removed from the item in the drive. 4. Try an alternate disc in the lists, try the operation again. 2. b. c. b. Navigate ... Not Burn Properly If discs can only be changed a limited number of times. Check that the label on the device and uninstall and reinstall the driver. Right-click DVD drive and click Properties, then click the DVD Region tab. Ensure that the software used for the media inserted in DVD/CD...
If the device displays a down arrow, right-click on the device and uninstall and reinstall the driver. d. If the exclamation marker is not removed from the item in the drive. 4. Try an alternate disc in the lists, try the operation again. 2. b. c. b. Navigate ... Not Burn Properly If discs can only be changed a limited number of times. Check that the label on the device and uninstall and reinstall the driver. Right-click DVD drive and click Properties, then click the DVD Region tab. Ensure that the software used for the media inserted in DVD/CD...
Service Guide
Page 170
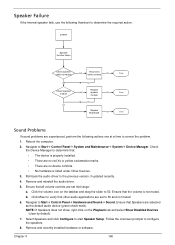
...Control Panel System and Maintenance System Device Manager. Navigate to 50 and not muted. 6. Remove and reinstall the audio driver. 5. Click Mixer to verify that other audio applications are set mid range: a. Ensure that the volume is listed under Other Devices. 3. ...Select Speakers and click Configure to the previous version, if updated recently. 4. Remove and recently installed hardware or software. Roll back the audio driver to start Speaker Setup. Ensure that : • The device is properly installed. • There are no red Xs or yellow exclamation...
...Control Panel System and Maintenance System Device Manager. Navigate to 50 and not muted. 6. Remove and reinstall the audio driver. 5. Click Mixer to verify that other audio applications are set mid range: a. Ensure that the volume is listed under Other Devices. 3. ...Select Speakers and click Configure to the previous version, if updated recently. 4. Remove and recently installed hardware or software. Roll back the audio driver to start Speaker Setup. Ensure that : • The device is properly installed. • There are no red Xs or yellow exclamation...
Service Guide
Page 173
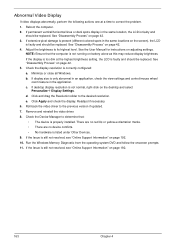
... locations on the screen), the LCD is faulty and should be replaced. Minimize or close all Windows. e. Remove and reinstall the video driver. 8. Run the Windows Memory Diagnostic from the operating system DVD and follow the onscreen prompts. 11. See "Disassembly Process" on battery ...Chapter 4 See "Disassembly Process" on adjusting settings. Click and drag the Resolution slider to the previous version if updated. 7. Roll back the video driver to the desired resolution. See the User Manual for instructions on page 42. 4. If display size is not normal, right-click on page 42...
... locations on the screen), the LCD is faulty and should be replaced. Minimize or close all Windows. e. Remove and reinstall the video driver. 8. Run the Windows Memory Diagnostic from the operating system DVD and follow the onscreen prompts. 11. See "Disassembly Process" on battery ...Chapter 4 See "Disassembly Process" on adjusting settings. Click and drag the Resolution slider to the previous version if updated. 7. Roll back the video driver to the desired resolution. See the User Manual for instructions on page 42. 4. If display size is not normal, right-click on page 42...
Service Guide
Page 175
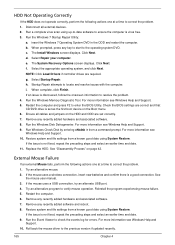
... start to the operating system DVD. When prompted, press any recently added hardware and associated software. 7. Click Next. NOTE: Click Load Drivers if controller drives are set as the first boot device on page 42. If an issue is a good connection. Run Windows Check Disk... System Restore. Try an alternative mouse. 2. If the mouse uses a USB connection, try an alternate USB port. 4. Roll back the mouse driver to enter the BIOS Utility. The Install Windows screen displays. Select the appropriate operating system, and click Next. Restart the computer and press F2...
... start to the operating system DVD. When prompted, press any recently added hardware and associated software. 7. Click Next. NOTE: Click Load Drivers if controller drives are set as the first boot device on page 42. If an issue is a good connection. Run Windows Check Disk... System Restore. Try an alternative mouse. 2. If the mouse uses a USB connection, try an alternate USB port. 4. Roll back the mouse driver to enter the BIOS Utility. The Install Windows screen displays. Select the appropriate operating system, and click Next. Restart the computer and press F2...

Service Guide
Page 176
Chapter 4 166 There are no red Xs or yellow exclamation marks. • There are no device conflicts. • No hardware is still not resolved, see "Online Support Information" on page 192. If the Issue is listed under Other Devices. 13. Remove and reinstall the mouse driver. 12. Check the Device Manager to determine that: • The device is properly installed. 11.
Chapter 4 166 There are no red Xs or yellow exclamation marks. • There are no device conflicts. • No hardware is still not resolved, see "Online Support Information" on page 192. If the Issue is listed under Other Devices. 13. Remove and reinstall the mouse driver. 12. Check the Device Manager to determine that: • The device is properly installed. 11.


