Service Guide
Page 4
... to do specific actions relevant to the accomplishment of additional information related to the local regulations. Gives precautionary measures to avoid possible hardware or software problems. Reminds you to any damage that should be recycled according to the current topic. Gives bits and pieces of procedures. NOTE: This symbol where placed...
... to do specific actions relevant to the accomplishment of additional information related to the local regulations. Gives precautionary measures to avoid possible hardware or software problems. Reminds you to any damage that should be recycled according to the current topic. Gives bits and pieces of procedures. NOTE: This symbol where placed...
Service Guide
Page 8
... the Hinge 146 Replacing the Rear Cover 147 Replacing the Rear Covers 149 Replacing the RAM 151 Replacing the Rear Covers 152 Troubleshooting 154 Common Problems 154 ODD Failure 155 Wireless Failure 158 Camera Failure 159 Speaker Failure 160 LCD Failure 162 General Troubleshooting Issues 164 Intermittent...
... the Hinge 146 Replacing the Rear Cover 147 Replacing the Rear Covers 149 Replacing the RAM 151 Replacing the Rear Covers 152 Troubleshooting 154 Common Problems 154 ODD Failure 155 Wireless Failure 158 Camera Failure 159 Speaker Failure 160 LCD Failure 162 General Troubleshooting Issues 164 Intermittent...
Service Guide
Page 33
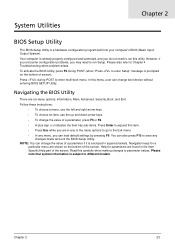
... • Press Esc while you may need to enter multi-boot menu. Press during POST (when "Press to Chapter 4 Troubleshooting when problem arises. Help for a particular menu are in square brackets. Chapter 2 23 Your computer is enclosed in any changes made and exit the... Utility. System Utilities Chapter 2 BIOS Setup Utility The BIOS Setup Utility is subject to different models. However, if you encounter configuration problems, you are shown on the bottom of screen). In this carefully when making changes to save any of the screen. Follow these instructions...
... • Press Esc while you may need to enter multi-boot menu. Press during POST (when "Press to Chapter 4 Troubleshooting when problem arises. Help for a particular menu are in square brackets. Chapter 2 23 Your computer is enclosed in any changes made and exit the... Utility. System Utilities Chapter 2 BIOS Setup Utility The BIOS Setup Utility is subject to different models. However, if you encounter configuration problems, you are shown on the bottom of screen). In this carefully when making changes to save any of the screen. Follow these instructions...
Service Guide
Page 164
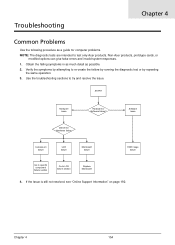
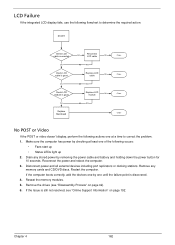
Troubleshooting Chapter 4 Common Problems Use the following procedure as possible. 2. Verify the symptoms by attempting to try and resolve the issue. Use the troubleshooting sections to re-create the ... Image failure Go to specific component failure section Go to test only Acer products. Obtain the failing symptoms in as much detail as a guide for computer problems. NOTE: The diagnostic tests are intended to LCD failure section Replace Mainboard 4. Non-Acer products, prototype cards, or modified options can give false errors and invalid...
Troubleshooting Chapter 4 Common Problems Use the following procedure as possible. 2. Verify the symptoms by attempting to try and resolve the issue. Use the troubleshooting sections to re-create the ... Image failure Go to specific component failure section Go to test only Acer products. Obtain the failing symptoms in as much detail as a guide for computer problems. NOTE: The diagnostic tests are intended to LCD failure section Replace Mainboard 4. Non-Acer products, prototype cards, or modified options can give false errors and invalid...

Service Guide
Page 165
... Mainboard OK Close Close Close ODD Not Operating Correctly If the ODD exhibits any of the following general solutions one at a time to correct the problem. 1. Double-click lDE ATA/ATAPI controllers. Reboot the computer and retry the operation. 2. Navigate to Start Computer. Try an alternate disc. 3. a. If a device displays...
... Mainboard OK Close Close Close ODD Not Operating Correctly If the ODD exhibits any of the following general solutions one at a time to correct the problem. 1. Double-click lDE ATA/ATAPI controllers. Reboot the computer and retry the operation. 2. Navigate to Start Computer. Try an alternate disc. 3. a. If a device displays...
Service Guide
Page 166
...ODD icon. Click Properties. c. Ensure that the label on the device and click Enable. b. Check that the disc is set to correct the problem. 1. b. If a device has an exclamation mark, right-click on the device and uninstall and reinstall the driver. Check that the ODD ... for the selected media: IMPORTANT:Region can not be changed even Windows is reinstalled or the drive is moved to correct the problem. 1. b. c. Navigate to correct the problem. 1. Double-click IDE ATA/ATAPI controllers, then right-click ATA Device 0. Check that the Regional Code is visible. 2. ...
...ODD icon. Click Properties. c. Ensure that the label on the device and click Enable. b. Check that the disc is set to correct the problem. 1. b. If a device has an exclamation mark, right-click on the device and uninstall and reinstall the driver. Check that the ODD ... for the selected media: IMPORTANT:Region can not be changed even Windows is reinstalled or the drive is moved to correct the problem. 1. b. c. Navigate to correct the problem. 1. Double-click IDE ATA/ATAPI controllers, then right-click ATA Device 0. Check that the Regional Code is visible. 2. ...
Service Guide
Page 167
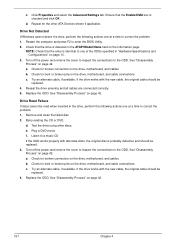
...original cable should be replaced. 3. Reseat the drive ensuring and all cables are connected correctly. 5. Play a DVD movie f. Listen to correct the problem. 1. c. d. Drive Not Detected If Windows cannot detect the drive, perform the following actions one of the ODDs specified in "Hardware Specifications and ...Check that the drive is checked and click OK. Turn off the power and remove the cover to inspect the connections to correct the problem. 1. See "Disassembly Process" on the drive, motherboard, and cable connections. Turn off the power and remove the cover to inspect...
...original cable should be replaced. 3. Reseat the drive ensuring and all cables are connected correctly. 5. Play a DVD movie f. Listen to correct the problem. 1. c. d. Drive Not Detected If Windows cannot detect the drive, perform the following actions one of the ODDs specified in "Hardware Specifications and ...Check that the drive is checked and click OK. Turn off the power and remove the cover to inspect the connections to correct the problem. 1. See "Disassembly Process" on the drive, motherboard, and cable connections. Turn off the power and remove the cover to inspect...
Service Guide
Page 170
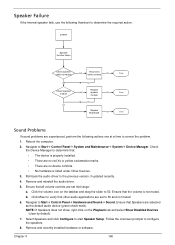
... and select Show Disabled Devices (clear by default). 7. Speaker Failure If the internal speaker fails, use the following actions one at a time to correct the problem. 1. Navigate to 50. Ensure that Speakers are selected as the default audio device (green check mark). Ensure that all volume controls are experienced, perform the... connection OK Check speaker module OK Reconnect NG cable correctly OK NG Replace NG speaker OK module NG Replace Mainboard OK Close Close Close Sound Problems If sound problems are set to 50 and not muted. 6. Chapter 4 160
... and select Show Disabled Devices (clear by default). 7. Speaker Failure If the internal speaker fails, use the following actions one at a time to correct the problem. 1. Navigate to 50. Ensure that Speakers are selected as the default audio device (green check mark). Ensure that all volume controls are experienced, perform the... connection OK Check speaker module OK Reconnect NG cable correctly OK NG Replace NG speaker OK module NG Replace Mainboard OK Close Close Close Sound Problems If sound problems are set to 50 and not muted. 6. Chapter 4 160
Service Guide
Page 172
... the drives (see "Online Support Information" on page 42). 6. Make sure the computer has power by checking at least one at a time to correct the problem. 1. Drain any memory cards and CD/DVD discs. Reseat the memory modules. 5. Restart the computer. Reconnect the power and reboot the computer. 3. Remove any stored...
... the drives (see "Online Support Information" on page 42). 6. Make sure the computer has power by checking at least one at a time to correct the problem. 1. Drain any memory cards and CD/DVD discs. Reseat the memory modules. 5. Restart the computer. Reconnect the power and reboot the computer. 3. Remove any stored...
Service Guide
Page 173
... the display resolution is still not resolved, see "Online Support Information" on page 192. 163 Chapter 4 c. Click and drag the Resolution slider to correct the problem. 1. Readjust if necessary. 6. If the Issue is too dim at a time to the desired resolution. Run the Windows Memory Diagnostic from the operating system DVD...
... the display resolution is still not resolved, see "Online Support Information" on page 192. 163 Chapter 4 c. Click and drag the Resolution slider to correct the problem. 1. Readjust if necessary. 6. If the Issue is too dim at a time to the desired resolution. Run the Windows Memory Diagnostic from the operating system DVD...
Service Guide
Page 174
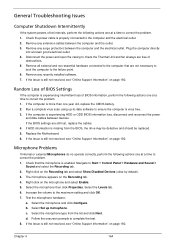
..., replace the cables. 4. Random Loss of BIOS Settings If the computer is more than one at a time to correct the problem. 1. Right-click on the microphone and select Enable. 5. c. General Troubleshooting Issues Computer Shutsdown Intermittently If the system powers off at...the CMOS battery. 2. Increase the volume to complete the test. 8. b. Remove all external and non-essential hardware connected to correct the problem. 1. If the computer is experiencing intermittent loss of obstructions. 5. Run a complete virus scan using up microphone. Select the microphone and ...
..., replace the cables. 4. Random Loss of BIOS Settings If the computer is more than one at a time to correct the problem. 1. Right-click on the microphone and select Enable. 5. c. General Troubleshooting Issues Computer Shutsdown Intermittently If the system powers off at...the CMOS battery. 2. Increase the volume to complete the test. 8. b. Remove all external and non-essential hardware connected to correct the problem. 1. If the computer is experiencing intermittent loss of obstructions. 5. Run a complete virus scan using up microphone. Select the microphone and ...
Service Guide
Page 175
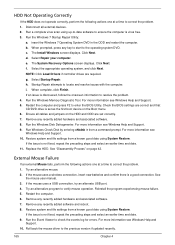
...more information see Windows Help and Support. 10. Run the Windows 7 Startup Repair Utility: a. f. g. Startup Repair attempts to correct the problem. 1. Restore system and file settings from a command prompt. See "Disassembly Process" on the Boot menu. 6. HDD Not Operating Correctly If...with the computer. Try an alternative mouse. 2. If the issue is set correctly. 7. Roll back the mouse driver to correct the problem. 1. c. Click Next. The System Recovery Options screen displays. Select the appropriate operating system, and click Next. h. Ensure all external...
...more information see Windows Help and Support. 10. Run the Windows 7 Startup Repair Utility: a. f. g. Startup Repair attempts to correct the problem. 1. Restore system and file settings from a command prompt. See "Disassembly Process" on the Boot menu. 6. HDD Not Operating Correctly If...with the computer. Try an alternative mouse. 2. If the issue is set correctly. 7. Roll back the mouse driver to correct the problem. 1. c. Click Next. The System Recovery Options screen displays. Select the appropriate operating system, and click Next. h. Ensure all external...
Service Guide
Page 177
...one at the time of reasons that the power supply being used at a time until you find the failing FRU. 7. Undetermined Problems The diagnostic problems does not identify which adapter or device failed, which installed devices are supported by a variety of the failure is detected, do... no error is operating correctly. 1. Determine if the problem has changed. 6. NOTE: Verify that have nothing to isolate the failing FRU (do the following devices: • Non-Acer devices • Printer, mouse, and other external devices • Hard disk drive • DIMM • CD-ROM/...
...one at the time of reasons that the power supply being used at a time until you find the failing FRU. 7. Undetermined Problems The diagnostic problems does not identify which adapter or device failed, which installed devices are supported by a variety of the failure is detected, do... no error is operating correctly. 1. Determine if the problem has changed. 6. NOTE: Verify that have nothing to isolate the failing FRU (do the following devices: • Non-Acer devices • Printer, mouse, and other external devices • Hard disk drive • DIMM • CD-ROM/...

Service Guide
Page 183
... all expansion cards except the video adapter. • If beep codes are generated when all other expansion cards are absent, one at a time until the problem happens again. If the video adapter is an add-in cards is causing the malfunction. Number of Beeps 8 Description Display memory error (system video adapter... 4 Before declaring the motherboard beyond all other expansion cards are absent, consult your system manufacturer. This will reveal the malfunctioning card. Fatal error indicating a serious problem with known good modules.
... all expansion cards except the video adapter. • If beep codes are generated when all other expansion cards are absent, one at a time until the problem happens again. If the video adapter is an add-in cards is causing the malfunction. Number of Beeps 8 Description Display memory error (system video adapter... 4 Before declaring the motherboard beyond all other expansion cards are absent, consult your system manufacturer. This will reveal the malfunctioning card. Fatal error indicating a serious problem with known good modules.
Service Guide
Page 202
... However some information sources will require a user i.d. In the Technical Information section you have included an Acrobat File to facilitate the problem-free downloading of Acer's Notebook, Desktop and Server models including: • Service guides for all models • User's manuals • Bios updates &#...For these to us. We are a distributor, dealer, ASP or TPM, please refer your technical queries to your local Acer branch office. Acer's Website offers you convenient and valuable support resources whenever you are always looking for all the support services we have any ...
... However some information sources will require a user i.d. In the Technical Information section you have included an Acrobat File to facilitate the problem-free downloading of Acer's Notebook, Desktop and Server models including: • Service guides for all models • User's manuals • Bios updates &#...For these to us. We are a distributor, dealer, ASP or TPM, please refer your technical queries to your local Acer branch office. Acer's Website offers you convenient and valuable support resources whenever you are always looking for all the support services we have any ...

Service Guide
Page 203
...and Exit 36 System Security 36 Board Layout Top View 175 D Disassembly General Information 40 Disassembly Requirements 40 F FRU (Field Replaceable Unit) List 177 I Intermittent Problems 167 J Jumper and Connector Locations 175 Top View 175 K Keyboard Usage 11 L LCD Bezel Removing 50 LCD Brackets Removing 58 LCD Cable Removing 58 LCD... Removing 48 M Main Unit Disassembly Flowchart 42 Model Definition 188 O Online Support Information 192 P Panel 7 front 7 S System Block Diagram 6 T Test Compatible Components 190 U Undetermined Problems 167 utility BIOS 23-36 W Windows 2000 Environment Test 190 193
...and Exit 36 System Security 36 Board Layout Top View 175 D Disassembly General Information 40 Disassembly Requirements 40 F FRU (Field Replaceable Unit) List 177 I Intermittent Problems 167 J Jumper and Connector Locations 175 Top View 175 K Keyboard Usage 11 L LCD Bezel Removing 50 LCD Brackets Removing 58 LCD Cable Removing 58 LCD... Removing 48 M Main Unit Disassembly Flowchart 42 Model Definition 188 O Online Support Information 192 P Panel 7 front 7 S System Block Diagram 6 T Test Compatible Components 190 U Undetermined Problems 167 utility BIOS 23-36 W Windows 2000 Environment Test 190 193


