
User Guide
Page 3
... or covered. Turning the product off before cleaning Unplug this product through cabinet slots as disconnecting device Observe the following guidelines when connecting and disconnecting power to the power supply unit: Install the power supply unit before connecting the power cord to protect it could result in installation unless proper ventilation is easily accessible and located as close to unplug the power cord from the power supplies. Do not use...
... or covered. Turning the product off before cleaning Unplug this product through cabinet slots as disconnecting device Observe the following guidelines when connecting and disconnecting power to the power supply unit: Install the power supply unit before connecting the power cord to protect it could result in installation unless proper ventilation is easily accessible and located as close to unplug the power cord from the power supplies. Do not use...
User Guide
Page 4
... damage rotor devices, HDD, Optical drive, and even exposure risk from lithium battery pack. The overall system load must not exceed 80% of the power strip's input rating. • This product's power supply is not properly grounded may result in too many devices. The grounding pin is properly grounded before inserting the power supply plug. If you are used with the supplied power supply cord set , make sure that...
... damage rotor devices, HDD, Optical drive, and even exposure risk from lithium battery pack. The overall system load must not exceed 80% of the power strip's input rating. • This product's power supply is not properly grounded may result in too many devices. The grounding pin is properly grounded before inserting the power supply plug. If you are used with the supplied power supply cord set , make sure that...
User Guide
Page 5
Replace only with the same or equivalent type recommended by the operating instructions, since improper adjustment of used batteries according to dangerous voltage points or other controls may result in performance, indicating a need for service. • The product does not operate normally after following the operating instructions. Additional safety information Your device and its enhancements may expose you to the manufacturer's instructions. Dispose of other...
Replace only with the same or equivalent type recommended by the operating instructions, since improper adjustment of used batteries according to dangerous voltage points or other controls may result in performance, indicating a need for service. • The product does not operate normally after following the operating instructions. Additional safety information Your device and its enhancements may expose you to the manufacturer's instructions. Dispose of other...
User Guide
Page 6
...monitor or display: Lamp(s) inside this electronic device into the trash when discarding. Acer is committed to Acer system with the ENERGY STAR mark. Acer is proud to offer our customers products with an ENERGY STAR sticker. What is applicable only to offer products and services worldwide that are ENERGY STAR qualified use...Electronic Industries Alliance at www.eiae.org. ENERGY STAR Acer's ENERGY STAR qualified products save money, conserve energy and improve the quality of climate change. For lamp-specific disposal information, check www.lamprecycle.org. To minimize ...
...monitor or display: Lamp(s) inside this electronic device into the trash when discarding. Acer is committed to Acer system with the ENERGY STAR mark. Acer is proud to offer our customers products with an ENERGY STAR sticker. What is applicable only to offer products and services worldwide that are ENERGY STAR qualified use...Electronic Industries Alliance at www.eiae.org. ENERGY STAR Acer's ENERGY STAR qualified products save money, conserve energy and improve the quality of climate change. For lamp-specific disposal information, check www.lamprecycle.org. To minimize ...
User Guide
Page 7
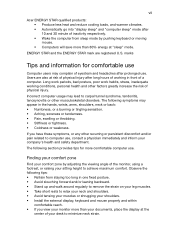
...keyboard or moving mouse. • Computers will save more than your documents, place the display at the center of your desk to minimize neck strain. Observe the following tips: • Refrain from sleep mode by adjusting the viewing angle of the monitor, using...sleep" mode. vii Acer ENERGY STAR qualified products: • Produce less heat and reduce cooling loads, and warmer climates. • Automatically go into "display sleep" and "computer sleep" mode after 10 and 30 minute of inactivity respectively. • Wake... • Install the external display, keyboard and mouse properly and ...
...keyboard or moving mouse. • Computers will save more than your documents, place the display at the center of your desk to minimize neck strain. Observe the following tips: • Refrain from sleep mode by adjusting the viewing angle of the monitor, using...sleep" mode. vii Acer ENERGY STAR qualified products: • Produce less heat and reduce cooling loads, and warmer climates. • Automatically go into "display sleep" and "computer sleep" mode after 10 and 30 minute of inactivity respectively. • Wake... • Install the external display, keyboard and mouse properly and ...
User Guide
Page 8
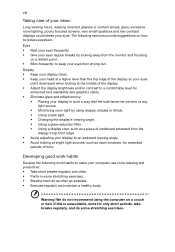
... room lighting, poorly focused screens, very small typefaces and low-contrast displays could stress your eyes regular breaks by using drapes, shades or blinds. • Using a task light. • Changing the display's viewing angle. • Using a glare-reduction filter. • Using a display visor, such as a piece of time. We do some stretching exercises. • Breathe fresh air as often as open windows, for...
... room lighting, poorly focused screens, very small typefaces and low-contrast displays could stress your eyes regular breaks by using drapes, shades or blinds. • Using a task light. • Changing the display's viewing angle. • Using a glare-reduction filter. • Using a display visor, such as a piece of time. We do some stretching exercises. • Breathe fresh air as often as open windows, for...
User Guide
Page 9
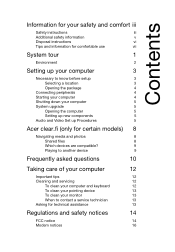
... instructions iii Additional safety information v Disposal instructions vi Tips and information for comfortable use vii System tour 1 Environment 2 Setting up your computer 3 Necessary to know before setup 3 Selecting a location 3 Opening the package 4 Connecting peripherals 4 Starting your computer 4 Shutting down your computer 5 System upgrade 5 Opening the computer 5 Setting up new components 5 Audio and Video Set up Procedures 5 Acer clear.fi (only for certain models) 8 Navigating media and photos 8 Shared files 8 Which devices...
... instructions iii Additional safety information v Disposal instructions vi Tips and information for comfortable use vii System tour 1 Environment 2 Setting up your computer 3 Necessary to know before setup 3 Selecting a location 3 Opening the package 4 Connecting peripherals 4 Starting your computer 4 Shutting down your computer 5 System upgrade 5 Opening the computer 5 Setting up new components 5 Audio and Video Set up Procedures 5 Acer clear.fi (only for certain models) 8 Navigating media and photos 8 Shared files 8 Which devices...
User Guide
Page 11
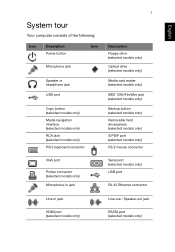
...) RCA jack (selected models only) PS/2 keyboard connector 1 Description Floppy drive (selected models only) Optical drive (selected models only) Media card reader (selected models only) IEEE 1394/FireWire jack (selected models only) Backup button (selected models only) Removable hard drivecarriers (selected models only) S/PDIF port (selected models only) PS/2 mouse connector VGA port Printer connector (selected models only) Microphone-in jack Serial port (selected models only) USB port RJ-45 Ethernet connector Line-in jack HDMI port (selected models only) Line-out / Speaker-out jack ESATA...
...) RCA jack (selected models only) PS/2 keyboard connector 1 Description Floppy drive (selected models only) Optical drive (selected models only) Media card reader (selected models only) IEEE 1394/FireWire jack (selected models only) Backup button (selected models only) Removable hard drivecarriers (selected models only) S/PDIF port (selected models only) PS/2 mouse connector VGA port Printer connector (selected models only) Microphone-in jack Serial port (selected models only) USB port RJ-45 Ethernet connector Line-in jack HDMI port (selected models only) Line-out / Speaker-out jack ESATA...
User Guide
Page 13
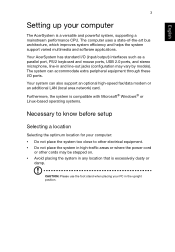
... a parallel port, PS/2 keyboard and mouse ports, USB 2.0 ports, and stereo microphone, line-in and line-out jacks (configuration may be stepped on. • Avoid placing the system in the upright position. Your AcerSystem has standard I /O ports. CAUTION: Please use the foot stand when placing your PC in any location that is a versatile and powerful system, supporting a mainstream performance CPU. The computer uses a state...
... a parallel port, PS/2 keyboard and mouse ports, USB 2.0 ports, and stereo microphone, line-in and line-out jacks (configuration may be stepped on. • Avoid placing the system in the upright position. Your AcerSystem has standard I /O ports. CAUTION: Please use the foot stand when placing your PC in any location that is a versatile and powerful system, supporting a mainstream performance CPU. The computer uses a state...
User Guide
Page 14
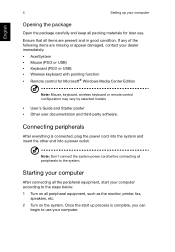
...; Windows Media Center Edition Note: Mouse, keyboard, wireless keyboard or remote control configuration may vary by selected models • User's Guide and Starter poster • Other user documentation and third-party software. Starting your computer After connecting all the peripheral equipment, start up your dealer immediately: • AcerSystem • Mouse (PS/2 or USB) • Keyboard (PS/2 or USB) • Wireless keyboard with pointing function • Remote control for later use your computer. Ensure that all peripherals to use . Connecting...
...; Windows Media Center Edition Note: Mouse, keyboard, wireless keyboard or remote control configuration may vary by selected models • User's Guide and Starter poster • Other user documentation and third-party software. Starting your computer After connecting all the peripheral equipment, start up your dealer immediately: • AcerSystem • Mouse (PS/2 or USB) • Keyboard (PS/2 or USB) • Wireless keyboard with pointing function • Remote control for later use your computer. Ensure that all peripherals to use . Connecting...
User Guide
Page 15
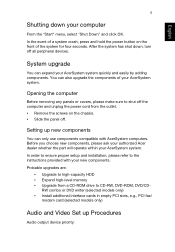
... a CD-ROM drive to high-capacity HDD • Expand high-level memory • Upgrade from the outlet. • Remove the screws on the front of a system crash, press and hold the power button on the chassis. • Slide the panel off. RW combo or DVD writer (selected models only) • Install additional interface cards in empty PCI slots, e.g., PCI fax/ modem card (selected models only) Audio and Video Set up new components...
... a CD-ROM drive to high-capacity HDD • Expand high-level memory • Upgrade from the outlet. • Remove the screws on the front of a system crash, press and hold the power button on the chassis. • Slide the panel off. RW combo or DVD writer (selected models only) • Install additional interface cards in empty PCI slots, e.g., PCI fax/ modem card (selected models only) Audio and Video Set up new components...
User Guide
Page 16
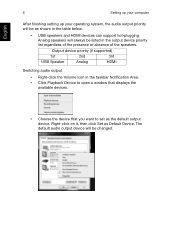
...; Click Playback Device to open a window that displays the available devices. • Choose the device that you want to set as shown in the output device priority list regardless of the presence or absence of the speakers. Right-click on it, then click Set as Default Device. Analog speakers will be listed in the table below. • USB speakers and HDMI devices can support hot-plugging. The default audio output device will always be changed.
...; Click Playback Device to open a window that displays the available devices. • Choose the device that you want to set as shown in the output device priority list regardless of the presence or absence of the speakers. Right-click on it, then click Set as Default Device. Analog speakers will be listed in the table below. • USB speakers and HDMI devices can support hot-plugging. The default audio output device will always be changed.
User Guide
Page 18
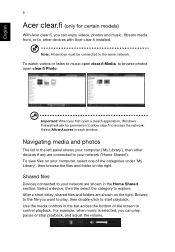
... folders are connected to your computer ('My Library'), then other devices with Acer clear.fi installed. English 8 Acer clear.fi (only for permission to allow clear.fi to control playback. Select Allow Access in the Home Shared section. Use the media controls in the left panel shows your network ('Home Shared'). Important: When you first open a clear.fi application, Windows Firewall will ask for certain models) With Acer clear.fi, you...
... folders are connected to your computer ('My Library'), then other devices with Acer clear.fi installed. English 8 Acer clear.fi (only for permission to allow clear.fi to control playback. Select Allow Access in the Home Shared section. Use the media controls in the left panel shows your network ('Home Shared'). Important: When you first open a clear.fi application, Windows Firewall will ask for certain models) With Acer clear.fi, you...
User Guide
Page 20
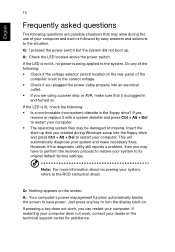
... LED located above the power switch. If yes, remove or replace it is followed by easy answers and solutions to its original default factory settings. However, if the diagnostic utility still reports a problem, then you created during the use of the computer is set to the correct voltage. • Check if you plugged the power cable properly into the floppy drive and press Ctrl + Alt + Del to turn the display...
... LED located above the power switch. If yes, remove or replace it is followed by easy answers and solutions to its original default factory settings. However, if the diagnostic utility still reports a problem, then you created during the use of the computer is set to the correct voltage. • Check if you plugged the power cable properly into the floppy drive and press Ctrl + Alt + Del to turn the display...
User Guide
Page 21
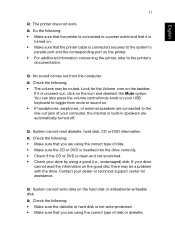
... press the volume control/mute knob on your drive cannot read diskette, hard disk, CD or DVD information. If your USB keyboard to sound on the taskbar. A: Do the following : • Make sure the diskette or hard disk is clean and not scratched. • Check your dealer or technical support center for the Volume icon on . • If headphones, earphones, or external speakers are connected to the...
... press the volume control/mute knob on your drive cannot read diskette, hard disk, CD or DVD information. If your USB keyboard to sound on the taskbar. A: Do the following : • Make sure the diskette or hard disk is clean and not scratched. • Check your dealer or technical support center for the Volume icon on . • If headphones, earphones, or external speakers are connected to the...
User Guide
Page 23
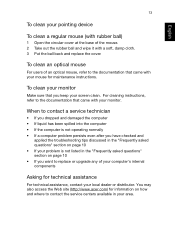
...) 1 Open the circular cover at the base of the mouse. 2 Take out the rubber ball and wipe it with your screen clean. When to contact the service centers available in the "Frequently asked questions" section on page 10 • If you keep your monitor. English 13 To clean your mouse for maintenance instructions. To clean an optical mouse For users of your computer's internal...
...) 1 Open the circular cover at the base of the mouse. 2 Take out the rubber ball and wipe it with your screen clean. When to contact the service centers available in the "Frequently asked questions" section on page 10 • If you keep your monitor. English 13 To clean your mouse for maintenance instructions. To clean an optical mouse For users of your computer's internal...
User Guide
Page 24
.... This device generates, uses, and can be attached to this device may not cause harmful interference, and (2) Notice: Shielded cables All connections to radio and TV reception. These limits are designed to which is no guarantee that to provide reasonable protection against harmful interference in a particular installation. Operation with the instructions, may be determined by turning the device off and...
.... This device generates, uses, and can be attached to this device may not cause harmful interference, and (2) Notice: Shielded cables All connections to radio and TV reception. These limits are designed to which is no guarantee that to provide reasonable protection against harmful interference in a particular installation. Operation with the instructions, may be determined by turning the device off and...

User Guide
Page 26
... fail to operate properly, disconnect the equipment from the phone line to maintain uninterrupted telephone service. TBR 21 This equipment has been approved [Council Decision 98/482/EC - Notice for single terminal connection to the telephone network, the telephone company may make changes in the first instance. But, if advance notice is causing the problem. You will...
... fail to operate properly, disconnect the equipment from the phone line to maintain uninterrupted telephone service. TBR 21 This equipment has been approved [Council Decision 98/482/EC - Notice for single terminal connection to the telephone network, the telephone company may make changes in the first instance. But, if advance notice is causing the problem. You will...

User Guide
Page 27
... operate. The associated equipment shall be set to operate within the following limits for compliance with Telecom's Specifications: a There shall be no more than 10 call attempt and the beginning of another device connected to the same line. 9 Under power failure conditions this equipment is connected to the same line as other equipment, may give rise to support pulse dialing. 7 Use...
... operate. The associated equipment shall be set to operate within the following limits for compliance with Telecom's Specifications: a There shall be no more than 10 call attempt and the beginning of another device connected to the same line. 9 Under power failure conditions this equipment is connected to the same line as other equipment, may give rise to support pulse dialing. 7 Use...
User Guide
Page 28
... the lastest country list. Digital audio output statement The optical connector contains no laser or light emitting diode (LED) more than Class I. This device must be operated indoors and installation outdoors is a laser product. CLASS 1 LASER PRODUCT CAUTION: INVISIBLE LASER RADIATION WHEN OPEN. List of use . Canada - The CD or DVD drive's classification label (shown below) is subject to be used with wireless LAN and/or Bluetooth...
... the lastest country list. Digital audio output statement The optical connector contains no laser or light emitting diode (LED) more than Class I. This device must be operated indoors and installation outdoors is a laser product. CLASS 1 LASER PRODUCT CAUTION: INVISIBLE LASER RADIATION WHEN OPEN. List of use . Canada - The CD or DVD drive's classification label (shown below) is subject to be used with wireless LAN and/or Bluetooth...


