
Acer V5-471 Notebook Service Guide
Page 5
... 1-13 Right View 1-14 Base View 1-15 Touchpad Basics 1-16 Keyboard 1-17 D2D Recovery 1-21 System Block Diagram 1-22 Specification Tables 1-23 CHAPTER 2 System Utilities BIOS Setup Utility 2-3 Navigating the BIOS Utility 2-3 BIOS Menus 2-4 Main 2-6 Security 2-8 Boot 2-11 v
... 1-13 Right View 1-14 Base View 1-15 Touchpad Basics 1-16 Keyboard 1-17 D2D Recovery 1-21 System Block Diagram 1-22 Specification Tables 1-23 CHAPTER 2 System Utilities BIOS Setup Utility 2-3 Navigating the BIOS Utility 2-3 BIOS Menus 2-4 Main 2-6 Security 2-8 Boot 2-11 v
Acer V5-471 Notebook Service Guide
Page 31
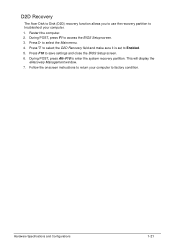
D2D Recovery 0 The Acer Disk to Disk (D2D) recovery function allows you to use the recovery partition to troubleshoot your computer to factory condition. Press to select the ...+F10 to Enabled. 5. Hardware Specifications and Configurations 1-21 During POST, press F1 to save settings and close the BIOS Setup screen. 6. Restart the computer. 2. This will display the eRecovery Management window. 7. Press F10 to access the BIOS Setup screen. 3. Press to return your computer. 1. Follow the onscreen instructions to select the Main menu...
D2D Recovery 0 The Acer Disk to Disk (D2D) recovery function allows you to use the recovery partition to troubleshoot your computer to factory condition. Press to select the ...+F10 to Enabled. 5. Hardware Specifications and Configurations 1-21 During POST, press F1 to save settings and close the BIOS Setup screen. 6. Restart the computer. 2. This will display the eRecovery Management window. 7. Press F10 to access the BIOS Setup screen. 3. Press to return your computer. 1. Follow the onscreen instructions to select the Main menu...
Acer V5-471 Notebook Service Guide
Page 62
BIOS Setup Utility 2-3 Navigating the BIOS Utility 2-3 BIOS Menus 2-4 Main 2-6 Security 2-8 Boot 2-11 Exit 2-12 BIOS Flash Utilities 2-13 WinFlash Utility 2-14 Remove HDD/BIOS Password Utilities 2-15 Removing the HDD Password 2-15 Removing the BIOS Passwords 2-16 Clearing the BIOS Passwords 2-17 Using DMI Tools 2-18 LAN EEPROM Utility 2-18 2-2
BIOS Setup Utility 2-3 Navigating the BIOS Utility 2-3 BIOS Menus 2-4 Main 2-6 Security 2-8 Boot 2-11 Exit 2-12 BIOS Flash Utilities 2-13 WinFlash Utility 2-14 Remove HDD/BIOS Password Utilities 2-15 Removing the HDD Password 2-15 Removing the BIOS Passwords 2-16 Clearing the BIOS Passwords 2-17 Using DMI Tools 2-18 LAN EEPROM Utility 2-18 2-2
Acer V5-471 Notebook Service Guide
Page 63
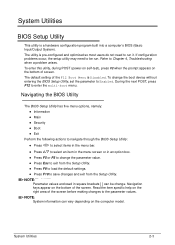
... users do not need to Enabled. During the next POST, press F12 to Chapter 4, Troubleshooting when a problem arises. System Utilities BIOS Setup Utility 0 This utility is Disabled. Navigation keys appear on the bottom of the screen. System Utilities 2-3 To enter this utility, during... POST (power-on self-test), press F2 when the prompt appears on the bottom of screen. Navigating the BIOS Utility 0 The BIOS Setup Utility has five menu options, namely: Information Main Security Boot &#...
... users do not need to Enabled. During the next POST, press F12 to Chapter 4, Troubleshooting when a problem arises. System Utilities BIOS Setup Utility 0 This utility is Disabled. Navigation keys appear on the bottom of the screen. System Utilities 2-3 To enter this utility, during... POST (power-on self-test), press F2 when the prompt appears on the bottom of screen. Navigating the BIOS Utility 0 The BIOS Setup Utility has five menu options, namely: Information Main Security Boot &#...
Acer V5-471 Notebook Service Guide
Page 64
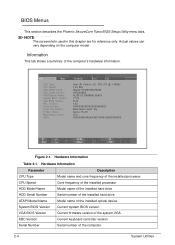
Hardware Information Parameter CPU Type CPU Speed HDD Model Name HDD Serial Number ATAPI Model Name System BIOS Version VGA BIOS Version KBC Version Serial Number Description Model name and core frequency of the installed processor Core frequency of the ... Current firmware version of the system VGA Current keyboard controller version Serial number of the computer's hardware information. BIOS Menus 0 This section describes the Phoenix SecureCore Tiano BIOS Setup Utility menu tabs. Actual values can vary depending on the computer model. Information 0 This tab shows a summary of the ...
Hardware Information Parameter CPU Type CPU Speed HDD Model Name HDD Serial Number ATAPI Model Name System BIOS Version VGA BIOS Version KBC Version Serial Number Description Model name and core frequency of the installed processor Core frequency of the ... Current firmware version of the system VGA Current keyboard controller version Serial number of the computer's hardware information. BIOS Menus 0 This section describes the Phoenix SecureCore Tiano BIOS Setup Utility menu tabs. Actual values can vary depending on the computer model. Information 0 This tab shows a summary of the ...
Acer V5-471 Notebook Service Guide
Page 69
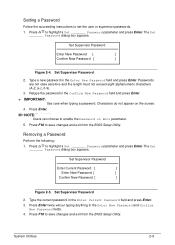
... field and press Enter. 3. Characters do not appear on Boot parameter. 5. Press F10 to save changes and exit from the BIOS Setup Utility. Press F10 to save changes and exit from the BIOS Setup Utility. Set Supervisor Password Enter New Password [ ] Confirm New Password [ ] Figure 2-4. NOTE: NOTE: Users can choose to highlight a Set _______...
... field and press Enter. 3. Characters do not appear on Boot parameter. 5. Press F10 to save changes and exit from the BIOS Setup Utility. Press F10 to save changes and exit from the BIOS Setup Utility. Set Supervisor Password Enter New Password [ ] Confirm New Password [ ] Figure 2-4. NOTE: NOTE: Users can choose to highlight a Set _______...
Acer V5-471 Notebook Service Guide
Page 70
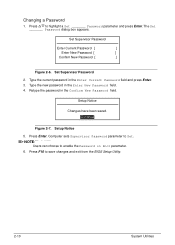
Set Supervisor Password 2. Setup Notice Changes have been saved. [Continue] Figure 2-7. NOTE: NOTE: Users can choose to highlight a Set _______ Password parameter and press Enter. Set Supervisor Password Enter ... Enter. Press to enable the Password on Boot parameter. 6. Computer sets Supervisor Password parameter to save changes and exit from the BIOS Setup Utility. 2-10 System Utilities Press F10 to Set. Setup Notice 5. Changing a Password 0 1. Type the current password in the Confirm New Password field. Retype the password in the Enter Current Password...
Set Supervisor Password 2. Setup Notice Changes have been saved. [Continue] Figure 2-7. NOTE: NOTE: Users can choose to highlight a Set _______ Password parameter and press Enter. Set Supervisor Password Enter ... Enter. Press to enable the Password on Boot parameter. 6. Computer sets Supervisor Password parameter to save changes and exit from the BIOS Setup Utility. 2-10 System Utilities Press F10 to Set. Setup Notice 5. Changing a Password 0 1. Type the current password in the Confirm New Password field. Retype the password in the Enter Current Password...

Acer V5-471 Notebook Service Guide
Page 71
By default, the computer searches for boot devices in which the Setup Utility attempts to boot the operating system. Hard disk drive 2. External USB bootable device Press to select a device and press F5 or F6 to move it up or down the list. Figure 2-8. Boot 0 Use this tab to set the preferred drive sequence in the following order: 1. External USB optical drive 6. Network boot 4. BIOS Boot System Utilities 2-11 Optical disc drive 3. External USB hard drive 5.
By default, the computer searches for boot devices in which the Setup Utility attempts to boot the operating system. Hard disk drive 2. External USB bootable device Press to select a device and press F5 or F6 to move it up or down the list. Figure 2-8. Boot 0 Use this tab to set the preferred drive sequence in the following order: 1. External USB optical drive 6. Network boot 4. BIOS Boot System Utilities 2-11 Optical disc drive 3. External USB hard drive 5.
Acer V5-471 Notebook Service Guide
Page 72
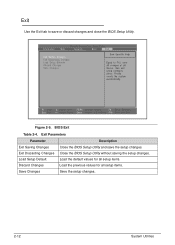
BIOS Exit Table 2-4. Close the BIOS Setup Utility without saving the setup changes. Figure 2-9. Load the default values for all setup items. Load the previous values for all setup items. Save the setup changes. 2-12 System Utilities Exit Parameters Parameter Exit Saving Changes Exit Discarding Changes Load Setup Default Discard Changes Save Changes Description Close the BIOS Setup Utility and save or discard changes and close the BIOS Setup Utility. Exit 0 Use the Exit tab to save the setup changes.
BIOS Exit Table 2-4. Close the BIOS Setup Utility without saving the setup changes. Figure 2-9. Load the default values for all setup items. Load the previous values for all setup items. Save the setup changes. 2-12 System Utilities Exit Parameters Parameter Exit Saving Changes Exit Discarding Changes Load Setup Default Discard Changes Save Changes Description Close the BIOS Setup Utility and save or discard changes and close the BIOS Setup Utility. Exit 0 Use the Exit tab to save the setup changes.
Acer V5-471 Notebook Service Guide
Page 74
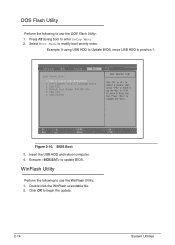
Double click the WinFlash executable file. 2. WinFlash Utility 0 Perform the following to use the WinFlash Utility: 1. Select Boot Menu to begin the update. 2-14 System Utilities Figure 2-10. Insert the USB HDD and reboot computer. 4. Click OK to modify boot priority order. DOS Flash Utility 0 Perform the following to use the DOS Flash Utility: 1. BIOS Boot 3. Example: If using USB HDD to Update BIOS, move USB HDD to enter Setup Menu. 2. Press F2 during boot to position 1. Execute to update BIOS.
Double click the WinFlash executable file. 2. WinFlash Utility 0 Perform the following to use the WinFlash Utility: 1. Select Boot Menu to begin the update. 2-14 System Utilities Figure 2-10. Insert the USB HDD and reboot computer. 4. Click OK to modify boot priority order. DOS Flash Utility 0 Perform the following to use the DOS Flash Utility: 1. BIOS Boot 3. Example: If using USB HDD to Update BIOS, move USB HDD to enter Setup Menu. 2. Press F2 during boot to position 1. Execute to update BIOS.
Acer V5-471 Notebook Service Guide
Page 77
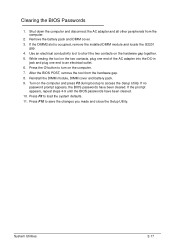
... peripherals from the hardware gap. 8. If the prompt appears, repeat steps 4-9 until the BIOS passwords have been cleared. If the DIMM2 slot is occupied, remove the installed DIMM module and locate the G2201 ...gap. 4. Clearing the BIOS Passwords 0 1. While resting the tool on the hardware gap together. 5. Press F10 to load the... AC adapter into the DC-in jack and plug one end to access the Setup Utility. Reinstall the DIMM module, DIMM cover and battery pack. 9. Press F9 to save the changes...
... peripherals from the hardware gap. 8. If the prompt appears, repeat steps 4-9 until the BIOS passwords have been cleared. If the DIMM2 slot is occupied, remove the installed DIMM module and locate the G2201 ...gap. 4. Clearing the BIOS Passwords 0 1. While resting the tool on the hardware gap together. 5. Press F10 to load the... AC adapter into the DC-in jack and plug one end to access the Setup Utility. Reinstall the DIMM module, DIMM cover and battery pack. 9. Press F9 to save the changes...
Acer V5-471 Notebook Service Guide
Page 78
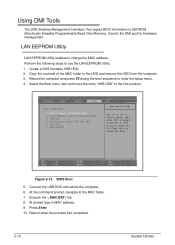
Copy the contents of the MAC folder to enter the setup menu. 4. Figure 2-15. Reboot the computer and press F2 during the boot sequence to the HDD and remove the HDD form the computer. 3. BIOS Boot 5. Connect the USB HDD and reboot the computer. 6. Press Enter. 10. Using DMI Tools 0 The... DMI (Desktop Management Interface) Tool copies BIOS information to change the MAC address. LAN EEPROM Utility 0 LAN EEPROM Utility enables to EEPROM (Electrically Erasable Programmable Read-Only Memory). At prompt ...
Copy the contents of the MAC folder to enter the setup menu. 4. Figure 2-15. Reboot the computer and press F2 during the boot sequence to the HDD and remove the HDD form the computer. 3. BIOS Boot 5. Connect the USB HDD and reboot the computer. 6. Press Enter. 10. Using DMI Tools 0 The... DMI (Desktop Management Interface) Tool copies BIOS information to change the MAC address. LAN EEPROM Utility 0 LAN EEPROM Utility enables to EEPROM (Electrically Erasable Programmable Read-Only Memory). At prompt ...
Acer V5-471 Notebook Service Guide
Page 180
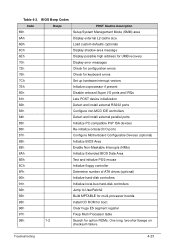
...of memory bus 32h Test CPU bus-clock frequency 33h Initialize Phoenix Dispatch Manager 36h Warm start shut down 38h Shadow system BIOS ROM 3Ah Autosize cache 3Ch Advanced configuration of chipset registers 3Dh Load alternate registers with CMOS values 42h Initialize interrupt vectors ... 4Eh Display BIOS copyright notice 50h Display CPU type and speed 51h Initialize EISA board 52h Test keyboard 54h Set key click if enabled 58h 2-2-3-1 Test for unexpected interrupts 59h Initialize POST display service 5Ah Display prompt "Press F2 to enter SETUP" 5Bh Disable CPU ...
...of memory bus 32h Test CPU bus-clock frequency 33h Initialize Phoenix Dispatch Manager 36h Warm start shut down 38h Shadow system BIOS ROM 3Ah Autosize cache 3Ch Advanced configuration of chipset registers 3Dh Load alternate registers with CMOS values 42h Initialize interrupt vectors ... 4Eh Display BIOS copyright notice 50h Display CPU type and speed 51h Initialize EISA board 52h Test keyboard 54h Set key click if enabled 58h 2-2-3-1 Test for unexpected interrupts 59h Initialize POST display service 5Ah Display prompt "Press F2 to enter SETUP" 5Bh Disable CPU ...
Acer V5-471 Notebook Service Guide
Page 181
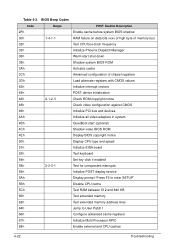
Table 4-3. BIOS Beep Codes Code 69h Beeps POST Routine Description Setup System Management Mode (SMM) area 6Ah Display external L2 cache size 6Bh Load custom defaults (optional) 6Ch Display shadow-area message 6Eh Display... PC-compatible PnP ISA devices 86h Re-initialize onboard I/O ports 87h Configure Motherboard Configurable Devices (optional) 88h Initialize BIOS Area 89h Enable Non-Maskable Interrupts (NMIs) 8Ah Initialize Extended BIOS Data Area 8Bh Test and initialize PS/2 mouse 8Ch Initialize floppy controller 8Fh Determine number of ATA drives (optional)...
Table 4-3. BIOS Beep Codes Code 69h Beeps POST Routine Description Setup System Management Mode (SMM) area 6Ah Display external L2 cache size 6Bh Load custom defaults (optional) 6Ch Display shadow-area message 6Eh Display... PC-compatible PnP ISA devices 86h Re-initialize onboard I/O ports 87h Configure Motherboard Configurable Devices (optional) 88h Initialize BIOS Area 89h Enable Non-Maskable Interrupts (NMIs) 8Ah Initialize Extended BIOS Data Area 8Bh Test and initialize PS/2 mouse 8Ch Initialize floppy controller 8Fh Determine number of ATA drives (optional)...
Acer V5-471 Notebook Service Guide
Page 182
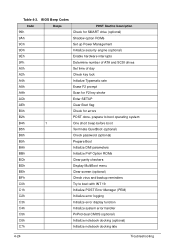
BIOS Beep Codes Code 99h Beeps POST Routine Description Check for SMART drive (optional) 9Ah Shadow option ROMs 9Ch Set up Power Management 9Dh Initialize security ... A0h Set time of day A2h Check key lock A4h Initialize Typematic rate A8h Erase F2 prompt AAh Scan for F2 key stroke ACh Enter SETUP AEh Clear Boot flag B0h Check for errors B2h POST done- prepare to boot operating system B4h 1 One short beep before boot B5h Terminate QuietBoot...
BIOS Beep Codes Code 99h Beeps POST Routine Description Check for SMART drive (optional) 9Ah Shadow option ROMs 9Ch Set up Power Management 9Dh Initialize security ... A0h Set time of day A2h Check key lock A4h Initialize Typematic rate A8h Erase F2 prompt AAh Scan for F2 key stroke ACh Enter SETUP AEh Clear Boot flag B0h Check for errors B2h POST done- prepare to boot operating system B4h 1 One short beep before boot B5h Terminate QuietBoot...
Acer V5-471 Notebook Service Guide
Page 197
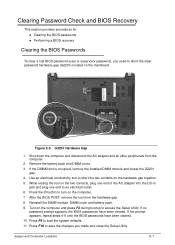
... If the prompt appears, repeat steps 4-9 until the BIOS passwords have been cleared. Jumper and Connector Locations 5-7 After the BIOS POST, remove the tool from the computer. 2. Press F9 to access the Setup Utility. Press F10 to save the changes you need ...1. Clearing Password Check and BIOS Recovery 0 This section provides procedures for: Clearing the BIOS passwords Performing a BIOS recovery Clearing the BIOS Passwords 0 To clear a lost BIOS password (user or supervisor password), you made and close the Setup Utility. Shut down the computer...
... If the prompt appears, repeat steps 4-9 until the BIOS passwords have been cleared. Jumper and Connector Locations 5-7 After the BIOS POST, remove the tool from the computer. 2. Press F9 to access the Setup Utility. Press F10 to save the changes you need ...1. Clearing Password Check and BIOS Recovery 0 This section provides procedures for: Clearing the BIOS passwords Performing a BIOS recovery Clearing the BIOS Passwords 0 To clear a lost BIOS password (user or supervisor password), you made and close the Setup Utility. Shut down the computer...


