Aspire T690 User's Guide EN
Page 5
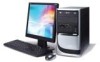
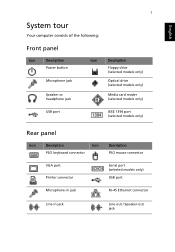
English 1 System tour Your computer consists of the following: Front panel Icon Description Power button Microphone jack Speaker or headphone jack Icon Description Floppy drive (selected models only) Optical drive (selected models only) Media card reader (selected models only) USB port IEEE 1394 port (selected models only) Rear panel Icon Description Icon PS/2 keyboard connector Description PS/2 mouse connector VGA port Printer connector Serial port (selected models only) USB port Microphone-in jack RJ-45 Ethernet connector Line-in jack Line-out / Speaker-out jack
English 1 System tour Your computer consists of the following: Front panel Icon Description Power button Microphone jack Speaker or headphone jack Icon Description Floppy drive (selected models only) Optical drive (selected models only) Media card reader (selected models only) USB port IEEE 1394 port (selected models only) Rear panel Icon Description Icon PS/2 keyboard connector Description PS/2 mouse connector VGA port Printer connector Serial port (selected models only) USB port Microphone-in jack RJ-45 Ethernet connector Line-in jack Line-out / Speaker-out jack
Aspire T690 User's Guide EN
Page 6
...-performance processor • Expandable system memory • Power management functionality • 3.5" inch floppy drive (optional) • Multimedia card reader (optional) • CD-ROM, DVD-ROM, CD-RW (52X/24X), DVD/CD-RW combo or DVD writer (optional) • High-capacity, PATA / SATA HDD (optional) • Supports USB 2.0 high-performance peripherals Multimedia • Stereo-surround audio system via onboard audio controller • Audio-in/line-in, audio-out/line-out, headphone-out and external microphone-in jacks Connectivity...
...-performance processor • Expandable system memory • Power management functionality • 3.5" inch floppy drive (optional) • Multimedia card reader (optional) • CD-ROM, DVD-ROM, CD-RW (52X/24X), DVD/CD-RW combo or DVD writer (optional) • High-capacity, PATA / SATA HDD (optional) • Supports USB 2.0 high-performance peripherals Multimedia • Stereo-surround audio system via onboard audio controller • Audio-in/line-in, audio-out/line-out, headphone-out and external microphone-in jacks Connectivity...
Aspire T690 User's Guide EN
Page 7
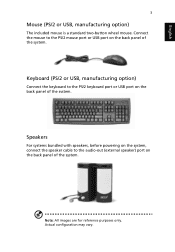
.../2 keyboard port or USB port on the back panel of the system. Note: All images are for reference purposes only. Speakers For systems bundled with speakers, before powering on the system, connect the speaker cable to the PS/2 mouse port or USB port on the back panel of the system. English 3 Mouse (PS/2 or USB, manufacturing option) The included mouse is a standard two-button wheel mouse. Actual configuration may vary. Connect the mouse to the audio-out (external speaker) port...
.../2 keyboard port or USB port on the back panel of the system. Note: All images are for reference purposes only. Speakers For systems bundled with speakers, before powering on the system, connect the speaker cable to the PS/2 mouse port or USB port on the back panel of the system. English 3 Mouse (PS/2 or USB, manufacturing option) The included mouse is a standard two-button wheel mouse. Actual configuration may vary. Connect the mouse to the audio-out (external speaker) port...
Aspire T690 User's Guide EN
Page 11
...'s power management function automatically blanks the screen to save power. If restarting your computer does not work . Q: The printer does not work , contact your dealer or the technical support center for assistance. Press any of the following: • Check if the voltage selector switch located on the rear panel of the computer is set to the correct voltage. • Check if you have properly plugged...
...'s power management function automatically blanks the screen to save power. If restarting your computer does not work . Q: The printer does not work , contact your dealer or the technical support center for assistance. Press any of the following: • Check if the voltage selector switch located on the rear panel of the computer is set to the correct voltage. • Check if you have properly plugged...
Aspire SA60 and Power S260 Service Guide
Page 6
... Diagram 7 Aspire SA60 Front Panel 8 Aspire SA60 Rear Panel 9 AcerPower S260 Front Panel 10 AcerPower S260 Rear Panel 11 System Peripherals 12 Mouse (PS/2 or USB, manufacturing option 12 Keyboard (PS/2 or USB, manufacturing option 12 Speakers 13 Acer eRecovery 14 Create backup 14 Restore from backup 14 Create factory default image CD 14 Re-install bundled software without CD 15 Change Password 15 Acer disc-to-disc recovery 16 Restore without a Recovery CD 16 Multilingual operating system installation 16 Hardware Specifications and Configurations 17 Power Management Function...
... Diagram 7 Aspire SA60 Front Panel 8 Aspire SA60 Rear Panel 9 AcerPower S260 Front Panel 10 AcerPower S260 Rear Panel 11 System Peripherals 12 Mouse (PS/2 or USB, manufacturing option 12 Keyboard (PS/2 or USB, manufacturing option 12 Speakers 13 Acer eRecovery 14 Create backup 14 Restore from backup 14 Create factory default image CD 14 Re-install bundled software without CD 15 Change Password 15 Acer disc-to-disc recovery 16 Restore without a Recovery CD 16 Multilingual operating system installation 16 Hardware Specifications and Configurations 17 Power Management Function...

Aspire SA60 and Power S260 Service Guide
Page 7
... Removing the System Fan 57 Removing the Power Supply 58 Removing the HDD 58 Removing the FDD and Card Reader 58 Removing the ODD 59 Removing the I/O Module 59 Removing the Card Reader 59 Removing the Mainboard 60 Chapter 4 Troubleshooting 61 Power-On Self-Test (POST 62 POST Check Points 63 POST Error Messages List 69 Error Symptoms List 71 Chapter 5 Jumper and Connector Information 76 Rear Panel I/O 76 AUDIO JACK 76 Print Port 77 Serial Port 78 PS2-KBMS 79 Dual USB...
... Removing the System Fan 57 Removing the Power Supply 58 Removing the HDD 58 Removing the FDD and Card Reader 58 Removing the ODD 59 Removing the I/O Module 59 Removing the Card Reader 59 Removing the Mainboard 60 Chapter 4 Troubleshooting 61 Power-On Self-Test (POST 62 POST Check Points 63 POST Error Messages List 69 Error Symptoms List 71 Chapter 5 Jumper and Connector Information 76 Rear Panel I/O 76 AUDIO JACK 76 Print Port 77 Serial Port 78 PS2-KBMS 79 Dual USB...

Aspire SA60 and Power S260 Service Guide
Page 22
... or DVD (only available on screen to hard drive, CD, or DVD. Restore from backup 3. Enter the password to Windows XP. 2. Boot to proceed. The default password is six zeros. 4. Follow the instruction on systems that include an optical disc burner). 7. Press + to complete the restore process. In the Acer eRecovery window, select Recovery settings and click Next. 5. Re-install bundled software without CD 5. The default password is a tool to open the Acer eRecovery utility. 3. Create factory default image CD...
... or DVD (only available on screen to hard drive, CD, or DVD. Restore from backup 3. Enter the password to Windows XP. 2. Boot to proceed. The default password is six zeros. 4. Follow the instruction on systems that include an optical disc burner). 7. Press + to complete the restore process. In the Acer eRecovery window, select Recovery settings and click Next. 5. Re-install bundled software without CD 5. The default password is a tool to open the Acer eRecovery utility. 3. Create factory default image CD...
Aspire SA60 and Power S260 Service Guide
Page 25
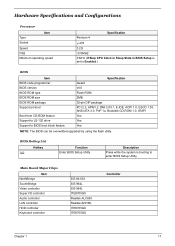
...1.0, ATAPI Yes Yes Yes NOTE: The BIOS can be overwritten/upgraded by using the flash utility. BIOS Hotkey List Hotkey c Function Enter BIOS Setup Utility Description Press while the system is set to Enabled.) BIOS Item BIOS code programmer BIOS version BIOS ROM type BIOS ROM size BIOS ROM package Support protocol Boot from CD-ROM feature Support to LS-120 drive Support to enter BIOS Setup Utility. Main Board Major Chips Item NorthBridge SourthBridge Video controller Super I/O controller Audio controller LAN controller HDD controller Keyboard controller SiS 661GX SiS 964L SiS 964L...
...1.0, ATAPI Yes Yes Yes NOTE: The BIOS can be overwritten/upgraded by using the flash utility. BIOS Hotkey List Hotkey c Function Enter BIOS Setup Utility Description Press while the system is set to Enabled.) BIOS Item BIOS code programmer BIOS version BIOS ROM type BIOS ROM size BIOS ROM package Support protocol Boot from CD-ROM feature Support to LS-120 drive Support to enter BIOS Setup Utility. Main Board Major Chips Item NorthBridge SourthBridge Video controller Super I/O controller Audio controller LAN controller HDD controller Keyboard controller SiS 661GX SiS 964L SiS 964L...
Aspire SA60 and Power S260 Service Guide
Page 28
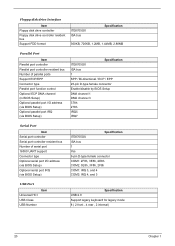
...connector Enable/disable by BIOS Setup DMA channel 1 DMA channel 3 378h 278h IRQ5 IRQ7 Serial Port Item Serial port controller Serial port controller resident bus Number of serial port 16550 UART support Connector type Optional serial port I/O address (via BIOS Setup) Optional serial port IRQ (via BIOS Setup) Specification ITE8705GX ISA bus 1 Yes 9-pin D-type female connector COM1: 2F8h, 3E8h, 2E8h COM2: 3E8h, 3F8h, 2F8h COM1: IRQ 3, and 4 COM2: IRQ 4, and 3 USB Port Universal HCI USB Class USB Number Item Specification USB 2.0 Support legacy keyboard for legacy mode 8 ( 2 front , 4 rear...
...connector Enable/disable by BIOS Setup DMA channel 1 DMA channel 3 378h 278h IRQ5 IRQ7 Serial Port Item Serial port controller Serial port controller resident bus Number of serial port 16550 UART support Connector type Optional serial port I/O address (via BIOS Setup) Optional serial port IRQ (via BIOS Setup) Specification ITE8705GX ISA bus 1 Yes 9-pin D-type female connector COM1: 2F8h, 3E8h, 2E8h COM2: 3E8h, 3F8h, 2F8h COM1: IRQ 3, and 4 COM2: IRQ 4, and 3 USB Port Universal HCI USB Class USB Number Item Specification USB 2.0 Support legacy keyboard for legacy mode 8 ( 2 front , 4 rear...
Aspire SA60 and Power S260 Service Guide
Page 32
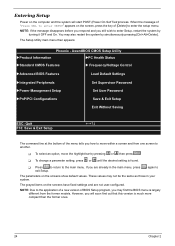
again to The parameters on the screen, press the key of the menu tells you how to enter the setup menu. AwardBIOS CMOS Setup Utility XProduct Information XPC Health Status XStandard CMOS Features X Frequency/Voltage Control XAdvanced BIOS Features Load Default Settings XIntegrated Peripherals XPower Management Setup Set Supervisor Password Set User Password XPnP/PCI Configurations Save & Exit Setup Exit Without Saving ESC: Quit F10: Save & Exit Setup IJKL The command line at the bottom of...
again to The parameters on the screen, press the key of the menu tells you how to enter the setup menu. AwardBIOS CMOS Setup Utility XProduct Information XPC Health Status XStandard CMOS Features X Frequency/Voltage Control XAdvanced BIOS Features Load Default Settings XIntegrated Peripherals XPower Management Setup Set Supervisor Password Set User Password XPnP/PCI Configurations Save & Exit Setup Exit Without Saving ESC: Quit F10: Save & Exit Setup IJKL The command line at the bottom of...
Aspire SA60 and Power S260 Service Guide
Page 36
... use . IDE Device Model Number: None Allows you to configure the hard disk drive connected to the slave port of conventional memory. None 360 KB, 5.25-inch 1.2 MB, 5.25-inch 720 KB, 3.5-inch 1.44M, 3.5 - Everything above and beyond the standard 1MB of video card in PCs with an Intel 80286 or later microprocessor. The default setting is reserved for system use extended memory. All Errors No Errors All, but Keyboard...
... use . IDE Device Model Number: None Allows you to configure the hard disk drive connected to the slave port of conventional memory. None 360 KB, 5.25-inch 1.2 MB, 5.25-inch 720 KB, 3.5-inch 1.44M, 3.5 - Everything above and beyond the standard 1MB of video card in PCs with an Intel 80286 or later microprocessor. The default setting is reserved for system use extended memory. All Errors No Errors All, but Keyboard...

Aspire SA60 and Power S260 Service Guide
Page 38
... run Setup. Gate A20 Option This item is powered on the numeric keypad. Setup means that is controlled by a keyboard controller or chipset hardware. Enabling APIC mode will make BIOS seek floppy Enabled drive a: before booting the system. Enabled Disabled Report No FDD For WIN 95 Whether to set up the version of BIOS password protection that the password prompt appears only when end users try to use the arrow keys on . Setting to Off will turn...
... run Setup. Gate A20 Option This item is powered on the numeric keypad. Setup means that is controlled by a keyboard controller or chipset hardware. Enabling APIC mode will make BIOS seek floppy Enabled drive a: before booting the system. Enabled Disabled Report No FDD For WIN 95 Whether to set up the version of BIOS password protection that the password prompt appears only when end users try to use the arrow keys on . Setting to Off will turn...

Aspire SA60 and Power S260 Service Guide
Page 47
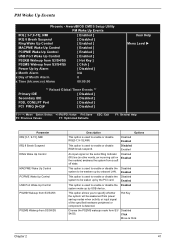
... context (CPU or chipset) is used to restore the PC to the previous state when an wake-up event occurs. In this menu. Saving Max. User Define Min. AwardBIOS CMOS Setup Utility Power Management Setup ACPI Function [ Enabled ] ACPI Suspend Type [ S3 (STR) ] Power Management [ User Define ] Suspend Mode [ Disabled ] Video Off Option [ Susp,Stby --> Off ] Video Off Method [ V/H SYNC+Blank ] MODEM Use IRQ [ Auto ] Hot Key Function As [ Power Off ] HDD Off After [ Disabled ] Power Button Override [ Display 4 Sec...
... context (CPU or chipset) is used to restore the PC to the previous state when an wake-up event occurs. In this menu. Saving Max. User Define Min. AwardBIOS CMOS Setup Utility Power Management Setup ACPI Function [ Enabled ] ACPI Suspend Type [ S3 (STR) ] Power Management [ User Define ] Suspend Mode [ Disabled ] Video Off Option [ Susp,Stby --> Off ] Video Off Method [ V/H SYNC+Blank ] MODEM Use IRQ [ Auto ] Hot Key Function As [ Power Off ] HDD Off After [ Disabled ] Power Button Override [ Display 4 Sec...
Aspire SA60 and Power S260 Service Guide
Page 49
... the specified hardware peripheral or component is used to specify whether the system will be weaken up by the PCI card. Enabled This option is detected. Click Move & Click Chapter 2 41 AwardBIOS CMOS Setup Utility PM Wake Up Events IRQ [ 3-7,9-15], NMI [ Enabled ] IRQ 8 Break Suspend [ Disabled ] Ring Wake Up Control [ Enabled ] MACPME Wake Up Control [ Enabled ] PCIPME Wake Up Control [ Enabled ] USB Port Wake Up Control [ Enabled ] PS2KB Wakeup from S3/S4/S5 [ Hot Key ] PS2MS...
... the specified hardware peripheral or component is used to specify whether the system will be weaken up by the PCI card. Enabled This option is detected. Click Move & Click Chapter 2 41 AwardBIOS CMOS Setup Utility PM Wake Up Events IRQ [ 3-7,9-15], NMI [ Enabled ] IRQ 8 Break Suspend [ Disabled ] Ring Wake Up Control [ Enabled ] MACPME Wake Up Control [ Enabled ] PCIPME Wake Up Control [ Enabled ] USB Port Wake Up Control [ Enabled ] PS2KB Wakeup from S3/S4/S5 [ Hot Key ] PS2MS...

Aspire SA60 and Power S260 Service Guide
Page 70
... programmable timers T ROM subsystem T RAM subsystem T RTC RAM subsystem and real time clock/calendar with battery backup T Onboard serial interface controller T Onboard parallel interface controller T Embedded hard disk interface and one diskette drive interface T Keyboard and auxiliary device controllers T I/O ports T PS/2-compatible mouse port T PS/2-compatible keyboard port T Serial ports T Parallel ports T USB port 62 Chapter 4 The system halts when fatal error occurs. The main components on screen(if available), or LED. Power-On Self-Test (POST) Before...
... programmable timers T ROM subsystem T RAM subsystem T RTC RAM subsystem and real time clock/calendar with battery backup T Onboard serial interface controller T Onboard parallel interface controller T Embedded hard disk interface and one diskette drive interface T Keyboard and auxiliary device controllers T I/O ports T PS/2-compatible mouse port T PS/2-compatible keyboard port T Serial ports T Parallel ports T USB port 62 Chapter 4 The system halts when fatal error occurs. The main components on screen(if available), or LED. Power-On Self-Test (POST) Before...

Aspire SA60 and Power S260 Service Guide
Page 77
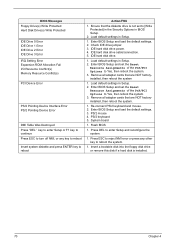
... board 1. PS/2 keyboard 4. PS/2 mouse 5. System board 1. RTC Battery. 3. Conflict(s) Floppy Disk Controller Error Floppy Drive A Error Floppy Drive B Error On Board Parallel Port Conflict(s) On Board Serial Port 1 Conflict(s) On Board Serial Port 2 Conflict(s) Action/FRU 1. System board 1. Remove all power supply voltages, switch, and jumper settings before you have deemed it necessary to replace an FRU, and have a "system no check procedure is indicated, the first Action/FRU listed in BIOS Setup is correct. 2. Diskette drive cable/connection. 2. Insert the memory...
... board 1. PS/2 keyboard 4. PS/2 mouse 5. System board 1. RTC Battery. 3. Conflict(s) Floppy Disk Controller Error Floppy Drive A Error Floppy Drive B Error On Board Parallel Port Conflict(s) On Board Serial Port 1 Conflict(s) On Board Serial Port 2 Conflict(s) Action/FRU 1. System board 1. Remove all power supply voltages, switch, and jumper settings before you have deemed it necessary to replace an FRU, and have a "system no check procedure is indicated, the first Action/FRU listed in BIOS Setup is correct. 2. Diskette drive cable/connection. 2. Insert the memory...
Aspire SA60 and Power S260 Service Guide
Page 78
... continue Press ESC to turn off NMI, or any other key to reboot the system. 1. IDE hard disk drive power. 4. Load default settings in BIOS Setup. 2. Remove all adapter cards that are NOT factoryinstalled, then reboot the system. 1. PS/2 mouse 4. Flash BIOS 1. Ensure that the diskette drive is installed. 70 Chapter 4 Enter BIOS Setup and load the default settings. 2. Enter BIOS Setup and set the Reset Resource Assignments of the PnP/PCI Options to Yes, then reboot the system. 3. PS/2 keyboard 5. Re-connect PS/2 keyboard and mouse. 2.
... continue Press ESC to turn off NMI, or any other key to reboot the system. 1. IDE hard disk drive power. 4. Load default settings in BIOS Setup. 2. Remove all adapter cards that are NOT factoryinstalled, then reboot the system. 1. PS/2 mouse 4. Flash BIOS 1. Ensure that the diskette drive is installed. 70 Chapter 4 Enter BIOS Setup and load the default settings. 2. Enter BIOS Setup and set the Reset Resource Assignments of the PnP/PCI Options to Yes, then reboot the system. 3. PS/2 keyboard 5. Re-connect PS/2 keyboard and mouse. 2.

Aspire SA60 and Power S260 Service Guide
Page 80
... hard disk drive problems. Hard disk drive test failed. 1. Diskette drive cable. 4. Diskette drive connection/cable 4. Diskette drive 3. System board Hard Disk Drive NOTE: Ensure hard disk drive is unable to None in BIOS Setup, cable/jumper are set to access for more than 2 minutes when reading data. 1. System board. Enter BIOS Setup and Load default settings. 2. Hard drive LED cable. CD/DVD-ROM drive 72 Chapter 4 Diskette drive 4. Diskette drive 5. Hard disk drive cannot format completely. 1. With the system power on, measure the voltage of BIOS...
... hard disk drive problems. Hard disk drive test failed. 1. Diskette drive cable. 4. Diskette drive connection/cable 4. Diskette drive 3. System board Hard Disk Drive NOTE: Ensure hard disk drive is unable to None in BIOS Setup, cable/jumper are set to access for more than 2 minutes when reading data. 1. System board. Enter BIOS Setup and Load default settings. 2. Hard drive LED cable. CD/DVD-ROM drive 72 Chapter 4 Diskette drive 4. Diskette drive 5. Hard disk drive cannot format completely. 1. With the system power on, measure the voltage of BIOS...

Aspire SA60 and Power S260 Service Guide
Page 81
... PCI slot firmly or replace the modem card. 3. Video adapter failed. 1. Load default settings (if screen is inaccurate. 1. CD/DVD-ROM may have dirt or foreign material on it . Check with a known good disc. 2. CD/DVD-ROM is not inserted properly. 3. Ensure the headphone jack of BIOS Setup is set to Enabled. 2. RTC battery. 3. Speaker power/connection/cable. Ensure the modem voice-in BIOS Setup or Power Management is set correctly. 2. System board Chapter 4 73 Software asks to system board Video and Monitor Video memory test...
... PCI slot firmly or replace the modem card. 3. Video adapter failed. 1. Load default settings (if screen is inaccurate. 1. CD/DVD-ROM may have dirt or foreign material on it . Check with a known good disc. 2. CD/DVD-ROM is not inserted properly. 3. Ensure the headphone jack of BIOS Setup is set to Enabled. 2. RTC battery. 3. Speaker power/connection/cable. Ensure the modem voice-in BIOS Setup or Power Management is set correctly. 2. System board Chapter 4 73 Software asks to system board Video and Monitor Video memory test...

Aspire SA60 and Power S260 Service Guide
Page 83
... power supply fan is the same as the setting in BIOS Setup. 2. Make sure that the LPT# or COM# you test is 1. Ensure the printer driver is properly installed. Keyboard Power Supply Pressing power switch does not turn off system. (Only unplugging the power cord from Windows98 Start menu does not turn off the system. (Only pressing power switch can turn on keyboard do not work. 1. Power switch cable assembly. Reload software from Recovery CD. System Board Other Problems Any other problems. 1. System board...
... power supply fan is the same as the setting in BIOS Setup. 2. Make sure that the LPT# or COM# you test is 1. Ensure the printer driver is properly installed. Keyboard Power Supply Pressing power switch does not turn off system. (Only unplugging the power cord from Windows98 Start menu does not turn off the system. (Only pressing power switch can turn on keyboard do not work. 1. Power switch cable assembly. Reload software from Recovery CD. System Board Other Problems Any other problems. 1. System board...


