User Manual
Page 8
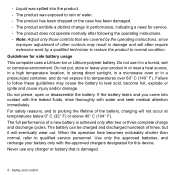
... may cause the battery to temperatures over 60° C (140° F). For safety reasons, and to normal condition. The product has been dropped or the case has been damaged. - The product does not operate normally after two or three complete charge and discharge cycles. Note: Adjust only those controls that is...
... may cause the battery to temperatures over 60° C (140° F). For safety reasons, and to normal condition. The product has been dropped or the case has been damaged. - The product does not operate normally after two or three complete charge and discharge cycles. Note: Adjust only those controls that is...
User Manual
Page 9
... the network. Follow local regulations when disposing of used normally. This device meets RF exposure guidelines when used batteries. In some cases, transmission of data files or messages may be erased. Dispose of batteries in temperatures well below freezing. Batteries may also explode ...WLAN), Bluetooth and/or 3G. Ensure that the above -stated distance from children. Parts of the device are not limited to www.acer.com for battery shipping documents. - A device with hearing aids should position the device the above separation distance instructions are followed until...
... the network. Follow local regulations when disposing of used normally. This device meets RF exposure guidelines when used batteries. In some cases, transmission of data files or messages may be erased. Dispose of batteries in temperatures well below freezing. Batteries may also explode ...WLAN), Bluetooth and/or 3G. Ensure that the above -stated distance from children. Parts of the device are not limited to www.acer.com for battery shipping documents. - A device with hearing aids should position the device the above separation distance instructions are followed until...
User Manual
Page 42
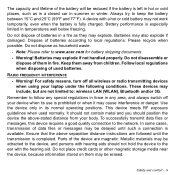
... for the item you want to install, then follow the onscreen prompts to get your system settings and saves them as restore points. In most cases of your system running again. You should see the Contents section of 42 - Windows automatically creates an additional restore point each day, and also each.... Recovery Note: For more information about using Microsoft System Restore, from Start, type 'Help' and then click Help and Support in the list of the Acer Resource Center. 3. Returning to reinstall. 2.
... for the item you want to install, then follow the onscreen prompts to get your system settings and saves them as restore points. In most cases of your system running again. You should see the Contents section of 42 - Windows automatically creates an additional restore point each day, and also each.... Recovery Note: For more information about using Microsoft System Restore, from Start, type 'Help' and then click Help and Support in the list of the Acer Resource Center. 3. Returning to reinstall. 2.
User Manual
Page 49
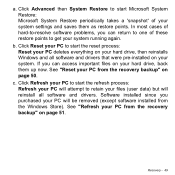
.... See "Reset your PC from the recovery backup" on your system running again. See "Refresh your PC from the Windows Store). b. a. Recovery - 49 In most cases of hard-to-resolve software problems, you can return to retain your PC will attempt to one of your hard drive, back them as restore...
.... See "Reset your PC from the recovery backup" on your system running again. See "Refresh your PC from the Windows Store). b. a. Recovery - 49 In most cases of hard-to-resolve software problems, you can return to retain your PC will attempt to one of your hard drive, back them as restore...
User Manual
Page 65
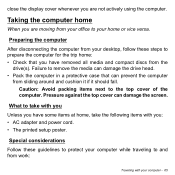
Failure to remove the media can damage the drive head. • Pack the computer in a protective case that you have some items at home, take with you Unless you : • AC adapter and power cord. • The printed setup poster. close the ...
Failure to remove the media can damage the drive head. • Pack the computer in a protective case that you have some items at home, take with you Unless you : • AC adapter and power cord. • The printed setup poster. close the ...
User Manual
Page 68
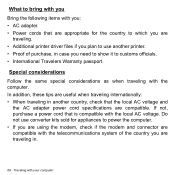
... computer. In addition, these tips are useful when traveling internationally: • When traveling in another printer. • Proof of the country you are traveling in case you need to show it to customs officials. • International Travelers Warranty passport. If not, purchase a power cord that is compatible with the local AC...
... computer. In addition, these tips are useful when traveling internationally: • When traveling in another printer. • Proof of the country you are traveling in case you need to show it to customs officials. • International Travelers Warranty passport. If not, purchase a power cord that is compatible with the local AC...
User Manual
Page 81
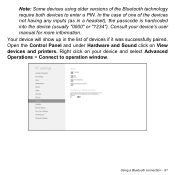
Using a Bluetooth connection - 81 Your device will show up in a headset), the passcode is hardcoded into the device (usually "0000" or "1234"). In the case of one of the devices not having any inputs (as in the list of the Bluetooth technology require both devices to operation window. Open the ...
Using a Bluetooth connection - 81 Your device will show up in a headset), the passcode is hardcoded into the device (usually "0000" or "1234"). In the case of one of the devices not having any inputs (as in the list of the Bluetooth technology require both devices to operation window. Open the ...

User Manual
Page 89
...your support, we can still get in contact with our offices worldwide. If there are required to provide the following information available when you call Acer for online service, and please be at your computer when you can reduce the amount of time a call . You are error messages or beeps ...reported by your computer, write them down as they appear on the screen (or the number and sequence in the case of beeps). If the country you are traveling in does not have the following information: Name: Address: Telephone number: Machine and model type: Serial...
...your support, we can still get in contact with our offices worldwide. If there are required to provide the following information available when you call Acer for online service, and please be at your computer when you can reduce the amount of time a call . You are error messages or beeps ...reported by your computer, write them down as they appear on the screen (or the number and sequence in the case of beeps). If the country you are traveling in does not have the following information: Name: Address: Telephone number: Machine and model type: Serial...
User Manual
Page 101
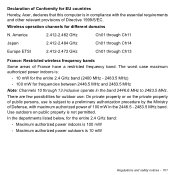
...for outdoor use: On private property or on public property is 100 mW - In the departments listed below, for different domains N. The worst case maximum authorized power indoors is subject to 2483.5 MHz. Use outdoors on the private property of public persons, use is : - 10 mW ... the Ministry of Defense, with the essential requirements and other relevant provisions of Directive 1999/5/EC. Declaration of Conformity for EU countries Hereby, Acer, declares that this computer is 10 mW Regulations and safety notices - 101 America 2.412-2.462 GHz Ch01 through Ch11 Japan 2.412-2.484 ...
...for outdoor use: On private property or on public property is 100 mW - In the departments listed below, for different domains N. The worst case maximum authorized power indoors is subject to 2483.5 MHz. Use outdoors on the private property of public persons, use is : - 10 mW ... the Ministry of Defense, with the essential requirements and other relevant provisions of Directive 1999/5/EC. Declaration of Conformity for EU countries Hereby, Acer, declares that this computer is 10 mW Regulations and safety notices - 101 America 2.412-2.462 GHz Ch01 through Ch11 Japan 2.412-2.484 ...
Acer S7-391 Notebook Service Guide
Page 4
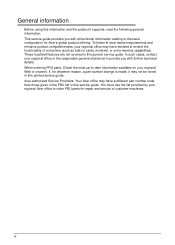
In such cases, contact your regional office may have a different part number code than ... service guide. If, for repair and service of a machine (such as add-on your regional Acer office to the basic configuration for Acer's global product offering. When ordering FRU parts: Check the most up-to-date information available on... cards, modems, or extra memory capabilities). Acer-authorized Service Providers: Your Acer office may not be noted in this generic service guide. General information 0 Before using this information ...
In such cases, contact your regional office may have a different part number code than ... service guide. If, for repair and service of a machine (such as add-on your regional Acer office to the basic configuration for Acer's global product offering. When ordering FRU parts: Check the most up-to-date information available on... cards, modems, or extra memory capabilities). Acer-authorized Service Providers: Your Acer office may not be noted in this generic service guide. General information 0 Before using this information ...
Acer S7-391 Notebook Service Guide
Page 6
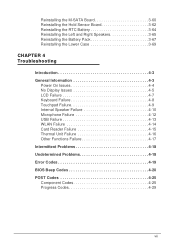
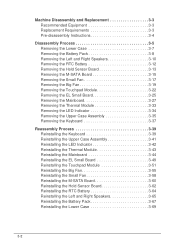
... Maintenance Machine Disassembly and Replacement 3-3 Recommended Equipment 3-3 Replacement Requirements 3-3 Pre-disassembly Instructions 3-4 Disassembly Process 3-5 Removing the Lower Case 3-7 Removing the Battery Pack 3-8 Removing the Left and Right Speakers 3-10 Removing the RTC Battery 3-12 Removing the Hold ...Module 3-33 Removing the LED Indicator 3-34 Removing the Upper Case Assembly 3-35 Removing the Keyboard 3-37 Reassembly Process 3-39 Reinstalling the Keyboard 3-39 Reinstalling the Upper Case Assembly 3-41 Reinstalling the LED Indicator 3-42 Reinstalling the Thermal...
... Maintenance Machine Disassembly and Replacement 3-3 Recommended Equipment 3-3 Replacement Requirements 3-3 Pre-disassembly Instructions 3-4 Disassembly Process 3-5 Removing the Lower Case 3-7 Removing the Battery Pack 3-8 Removing the Left and Right Speakers 3-10 Removing the RTC Battery 3-12 Removing the Hold ...Module 3-33 Removing the LED Indicator 3-34 Removing the Upper Case Assembly 3-35 Removing the Keyboard 3-37 Reassembly Process 3-39 Reinstalling the Keyboard 3-39 Reinstalling the Upper Case Assembly 3-41 Reinstalling the LED Indicator 3-42 Reinstalling the Thermal...
Acer S7-391 Notebook Service Guide
Page 7
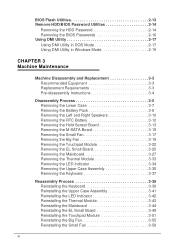
... the Hold Sensor Board 3-62 Reinstalling the RTC Battery 3-64 Reinstalling the Left and Right Speakers 3-65 Reinstalling the Battery Pack 3-67 Reinstalling the Lower Case 3-69 CHAPTER 4 Troubleshooting Introduction 4-3 General Information 4-3 Power On Issues 4-4 No Display Issues 4-5 LCD Failure 4-7 Keyboard Failure 4-8 Touchpad Failure 4-9 Internal Speaker Failure 4-10 Microphone Failure 4-12...
... the Hold Sensor Board 3-62 Reinstalling the RTC Battery 3-64 Reinstalling the Left and Right Speakers 3-65 Reinstalling the Battery Pack 3-67 Reinstalling the Lower Case 3-69 CHAPTER 4 Troubleshooting Introduction 4-3 General Information 4-3 Power On Issues 4-4 No Display Issues 4-5 LCD Failure 4-7 Keyboard Failure 4-8 Touchpad Failure 4-9 Internal Speaker Failure 4-10 Microphone Failure 4-12...
Acer S7-391 Notebook Service Guide
Page 47
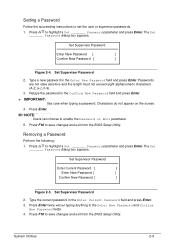
... Set _______ Password dialog box appears. Set Supervisor Password 2. Setting a Password 0 Follow the succeeding instructions to enable the Password on the screen. 4. Passwords are not case sensitive and the length must not exceed eight alphanumeric characters (A-Z, a-z, 0-9). 3.
... Set _______ Password dialog box appears. Set Supervisor Password 2. Setting a Password 0 Follow the succeeding instructions to enable the Password on the screen. 4. Passwords are not case sensitive and the length must not exceed eight alphanumeric characters (A-Z, a-z, 0-9). 3.
Acer S7-391 Notebook Service Guide
Page 53
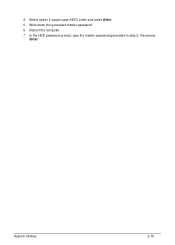
Reboot the computer. 7. In the HDD password prompt, type the master password generated in step 5, then press Enter. Select option 2 (upper case ASCII code) and press Enter. 5. Write down the generated master password. 6. 4. System Utilities 2-15
Reboot the computer. 7. In the HDD password prompt, type the master password generated in step 5, then press Enter. Select option 2 (upper case ASCII code) and press Enter. 5. Write down the generated master password. 6. 4. System Utilities 2-15
Acer S7-391 Notebook Service Guide
Page 54
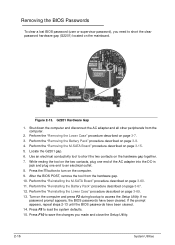
... appears, the BIOS passwords have been cleared. 14. Perform the "Reinstalling the M-SATA Board" procedure described on page 3-69. 13. Perform the "Reinstalling the Lower Case" procedure described on page 3-60. 11. Perform the "Removing the Battery Pack" procedure described on page 3-15. 5. Perform the "Removing the M-SATA Board" procedure described...
... appears, the BIOS passwords have been cleared. 14. Perform the "Reinstalling the M-SATA Board" procedure described on page 3-69. 13. Perform the "Reinstalling the Lower Case" procedure described on page 3-60. 11. Perform the "Removing the Battery Pack" procedure described on page 3-15. 5. Perform the "Removing the M-SATA Board" procedure described...
Acer S7-391 Notebook Service Guide
Page 60
...Disassembly and Replacement 3-3 Recommended Equipment 3-3 Replacement Requirements 3-3 Pre-disassembly Instructions 3-4 Disassembly Process 3-5 Removing the Lower Case 3-7 Removing the Battery Pack 3-8 Removing the Left and Right Speakers 3-10 Removing the RTC Battery 3-12 Removing...Removing the Thermal Module 3-33 Removing the LED Indicator 3-34 Removing the Upper Case Assembly 3-35 Removing the Keyboard 3-37 Reassembly Process 3-39 Reinstalling the Keyboard 3-39 Reinstalling the Upper Case Assembly 3-41 Reinstalling the LED Indicator 3-42 Reinstalling the Thermal Module 3-43 ...
...Disassembly and Replacement 3-3 Recommended Equipment 3-3 Replacement Requirements 3-3 Pre-disassembly Instructions 3-4 Disassembly Process 3-5 Removing the Lower Case 3-7 Removing the Battery Pack 3-8 Removing the Left and Right Speakers 3-10 Removing the RTC Battery 3-12 Removing...Removing the Thermal Module 3-33 Removing the LED Indicator 3-34 Removing the Upper Case Assembly 3-35 Removing the Keyboard 3-37 Reassembly Process 3-39 Reinstalling the Keyboard 3-39 Reinstalling the Upper Case Assembly 3-41 Reinstalling the LED Indicator 3-42 Reinstalling the Thermal Module 3-43 ...

Acer S7-391 Notebook Service Guide
Page 63
... MODULE WLAN ANTENNA HOLDER KEYBOARD Figure 3-2. Disassembly Process 0 The flowchart provided in that order. Disassembly Flowchart Table 3-2. Screw List Step Lower Case Disassembly Battery Pack Disassembly Speaker Module Disassembly Hold Sensor Board Disassembly M-SATA Board Disassembly Small Fan Disassembly Big Fan Disassembly Screw M2 x L3....5 M2 x L5 M2 x L2 M2 x L2 M2 x L2 M2 x L3 M2 x L3 M2 x L3 Quantity 8 3 1 4 1 1 2 2 Acer Part Number 86.9A162.3R5 86.00S66.525 86.9A162.2R0 86.9A162.2R0 86.9A162.2R0 86.9A562.3R0 86.9A562.3R0 86.9A562...
... MODULE WLAN ANTENNA HOLDER KEYBOARD Figure 3-2. Disassembly Process 0 The flowchart provided in that order. Disassembly Flowchart Table 3-2. Screw List Step Lower Case Disassembly Battery Pack Disassembly Speaker Module Disassembly Hold Sensor Board Disassembly M-SATA Board Disassembly Small Fan Disassembly Big Fan Disassembly Screw M2 x L3....5 M2 x L5 M2 x L2 M2 x L2 M2 x L2 M2 x L3 M2 x L3 M2 x L3 Quantity 8 3 1 4 1 1 2 2 Acer Part Number 86.9A162.3R5 86.00S66.525 86.9A162.2R0 86.9A162.2R0 86.9A162.2R0 86.9A562.3R0 86.9A562.3R0 86.9A562...
Acer S7-391 Notebook Service Guide
Page 64
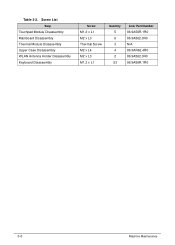
Screw List Step Touchpad Module Disassembly Mainboard Disassembly Thermal Module Disassembly Upper Case Disassembly WLAN Antenna Holder Disassembly Keyboard Disassembly Screw M1.2 x L1 M2 x L3 Thermal Screw M2 x L4 M2 x L3 M1.2 x L1 Quantity 5 6 3 4 2 53 Acer Part Number 86.9A56R.1R0 86.9A562.3R0 N/A 86.9AR62.4R0 86.9A562.3R0 86.9A56R.1R0 3-6 Machine Maintenance Table 3-2.
Screw List Step Touchpad Module Disassembly Mainboard Disassembly Thermal Module Disassembly Upper Case Disassembly WLAN Antenna Holder Disassembly Keyboard Disassembly Screw M1.2 x L1 M2 x L3 Thermal Screw M2 x L4 M2 x L3 M1.2 x L1 Quantity 5 6 3 4 2 53 Acer Part Number 86.9A56R.1R0 86.9A562.3R0 N/A 86.9AR62.4R0 86.9A562.3R0 86.9A56R.1R0 3-6 Machine Maintenance Table 3-2.
Acer S7-391 Notebook Service Guide
Page 65
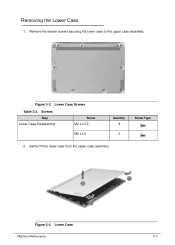
Figure 3-3. Figure 3-4. Lower Case Machine Maintenance 3-7 Screws Step Lower Case Disassembly Screw M2 x L3.5 M2 x L5 Quantity 8 3 Screw Type 2. Gently lift the lower case from the upper case assembly. Remove the eleven screws securing the lower case to the upper case assembly. Lower Case Screws Table 3-3. Removing the Lower Case 0 1.
Figure 3-3. Figure 3-4. Lower Case Machine Maintenance 3-7 Screws Step Lower Case Disassembly Screw M2 x L3.5 M2 x L5 Quantity 8 3 Screw Type 2. Gently lift the lower case from the upper case assembly. Remove the eleven screws securing the lower case to the upper case assembly. Lower Case Screws Table 3-3. Removing the Lower Case 0 1.
Acer S7-391 Notebook Service Guide
Page 66
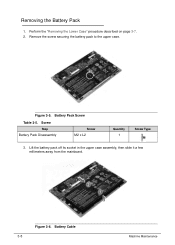
Remove the screw securing the battery pack to the upper case. Battery Cable 3-8 Machine Maintenance Figure 3-5. Removing the Battery Pack 0 1. Perform the "Removing the Lower Case" procedure described on page 3-7. 2. Battery Pack Screw Table 3-5. Lift the battery pack off its socket in the upper case assembly, then slide it a few millimeters away from the mainboard. Screw Step Battery Pack Disassembly Screw M2 x L2 Quantity 1 Screw Type 3. Figure 3-6.
Remove the screw securing the battery pack to the upper case. Battery Cable 3-8 Machine Maintenance Figure 3-5. Removing the Battery Pack 0 1. Perform the "Removing the Lower Case" procedure described on page 3-7. 2. Battery Pack Screw Table 3-5. Lift the battery pack off its socket in the upper case assembly, then slide it a few millimeters away from the mainboard. Screw Step Battery Pack Disassembly Screw M2 x L2 Quantity 1 Screw Type 3. Figure 3-6.


