
User Manual
Page 3
... the computer home 57 Using the keyboard 29 Preparing the computer 57 What to take with you 57 Lock keys and embedded numeric keypad..... 29 Special considerations 58 Hotkeys 30 Setting up a home office 58 Windows keys 32 Traveling with the computer 59 Recovery 34 Preparing the computer 59 Acer eRecovery Management 34 Creating recovery discs 35 Recovering your system 38 Types of recovery 40 What to...
... the computer home 57 Using the keyboard 29 Preparing the computer 57 What to take with you 57 Lock keys and embedded numeric keypad..... 29 Special considerations 58 Hotkeys 30 Setting up a home office 58 Windows keys 32 Traveling with the computer 59 Recovery 34 Preparing the computer 59 Acer eRecovery Management 34 Creating recovery discs 35 Recovering your system 38 Types of recovery 40 What to...
User Manual
Page 4
Securing your computer 61 HDMI 66 Using a computer security lock 61 Using passwords 61 Universal Serial Bus (USB) 67 Entering passwords 62 Playing DVD movies 68 Connecting to a network 63 BIOS utility 69 Built-in network feature 63 Boot sequence 69 Wireless networks 64 Enable disk-to-disk recovery 69 Connecting to the Internet 64 Setting passwords 69 Acer Instant Connect 64 Frequently asked questions 70 Wireless networks 64 Requesting service 73 Troubleshooting 75 Troubleshooting tips 75 Error messages 75 Regulations and safety notices 77...
Securing your computer 61 HDMI 66 Using a computer security lock 61 Using passwords 61 Universal Serial Bus (USB) 67 Entering passwords 62 Playing DVD movies 68 Connecting to a network 63 BIOS utility 69 Built-in network feature 63 Boot sequence 69 Wireless networks 64 Enable disk-to-disk recovery 69 Connecting to the Internet 64 Setting passwords 69 Acer Instant Connect 64 Frequently asked questions 70 Wireless networks 64 Requesting service 73 Troubleshooting 75 Troubleshooting tips 75 Error messages 75 Regulations and safety notices 77...
User Manual
Page 8
... product does not operate normally after following the operating instructions. Note: Adjust only those controls that are covered by the operating instructions, since improper adjustment of other controls may cause the battery to dangerous voltage points or other risks. For safety reasons, and to prolong the lifetime of the battery, charging will often require extensive work by a qualified technician to restore the product to...
... product does not operate normally after following the operating instructions. Note: Adjust only those controls that are covered by the operating instructions, since improper adjustment of other controls may cause the battery to dangerous voltage points or other risks. For safety reasons, and to prolong the lifetime of the battery, charging will often require extensive work by a qualified technician to restore the product to...
User Manual
Page 16
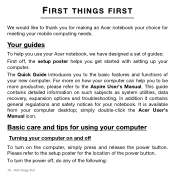
... the power button. To turn on and off To turn the power off , the setup poster helps you to the basic features and functions of your new computer. simply double-click the Acer User's Manual icon. The Quick Guide introduces you get started with setting up your computer. This guide contains detailed information on how your computer can help you use your Acer notebook, we have designed a set of guides: First...
... the power button. To turn on and off To turn the power off , the setup poster helps you to the basic features and functions of your new computer. simply double-click the Acer User's Manual icon. The Quick Guide introduces you get started with setting up your computer. This guide contains detailed information on how your computer can help you use your Acer notebook, we have designed a set of guides: First...

User Manual
Page 21
# Icon Item Description 5 Power indicator Indicates the computer's power status. Fully charged: The light is charging. Charging: The light is amber when the battery is blue. Your Acer notebook tour - 21 Battery indicator Indicates battery status.
# Icon Item Description 5 Power indicator Indicates the computer's power status. Fully charged: The light is charging. Charging: The light is amber when the battery is blue. Your Acer notebook tour - 21 Battery indicator Indicates battery status.
User Manual
Page 25
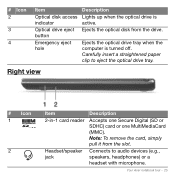
.... Ejects the optical disk from the slot. Ejects the optical drive tray when the computer is active. # Icon 2 3 4 Item Optical disk access indicator Optical drive eject button Emergency eject hole Description Lights up when the optical drive is turned off. Right view # Icon 1 2 Item 2-in-1 card reader Headset/speaker jack Description Accepts one Secure Digital (SD or SDHC) card or one MultiMediaCard (MMC). Your Acer notebook tour - 25
.... Ejects the optical disk from the slot. Ejects the optical drive tray when the computer is active. # Icon 2 3 4 Item Optical disk access indicator Optical drive eject button Emergency eject hole Description Lights up when the optical drive is turned off. Right view # Icon 1 2 Item 2-in-1 card reader Headset/speaker jack Description Accepts one Secure Digital (SD or SDHC) card or one MultiMediaCard (MMC). Your Acer notebook tour - 25
User Manual
Page 29
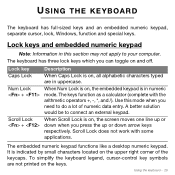
... off. Scroll Lock does not work with the arithmetic operators +, -, *, and /). Lock keys and embedded numeric keypad Note: Information in this mode when you press the up or down arrow keys respectively. When Scroll Lock is in uppercase. USING THE KEYBOARD The keyboard has full-sized keys and an embedded numeric keypad, separate cursor, lock, Windows, function and special keys. Using the keyboard - 29 To simplify the keyboard legend, cursor-control key symbols...
... off. Scroll Lock does not work with the arithmetic operators +, -, *, and /). Lock keys and embedded numeric keypad Note: Information in this mode when you press the up or down arrow keys respectively. When Scroll Lock is in uppercase. USING THE KEYBOARD The keyboard has full-sized keys and an embedded numeric keypad, separate cursor, lock, Windows, function and special keys. Using the keyboard - 29 To simplify the keyboard legend, cursor-control key symbols...
User Manual
Page 30
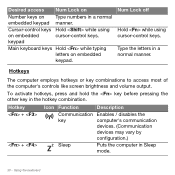
Num Lock off Hold while using on embedded cursor-control keys. Type the letters in Sleep mode. 30 - Hotkeys The computer employs hotkeys or key combinations to access most of the computer's controls like screen brightness and volume output. Using the keyboard Hotkey + + Icon Function Description Communication Enables / disables the key computer's communication devices. (Communication devices may vary by configuration.) Sleep Puts the computer in a normal manner. To activate hotkeys, press and hold the key before pressing the other key in...
Num Lock off Hold while using on embedded cursor-control keys. Type the letters in Sleep mode. 30 - Hotkeys The computer employs hotkeys or key combinations to access most of the computer's controls like screen brightness and volume output. Using the keyboard Hotkey + + Icon Function Description Communication Enables / disables the key computer's communication devices. (Communication devices may vary by configuration.) Sleep Puts the computer in a normal manner. To activate hotkeys, press and hold the key before pressing the other key in...
User Manual
Page 31
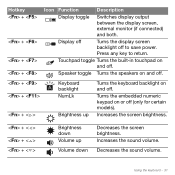
Using the keyboard - 31 Hotkey + + + + Icon Function Description Display toggle Switches display output between the display screen, external monitor (if connected) and both. Speaker toggle Turns the speakers on and off. + + + < > Keyboard backlight NumLk Brightness up Volume down Decreases the screen brightness. Decreases the sound volume. Turns the embedded numeric keypad on and off (only for certain models). Press any key to save power. Touchpad toggle Turns the built-in touchpad on and off to return. Increases the...
Using the keyboard - 31 Hotkey + + + + Icon Function Description Display toggle Switches display output between the display screen, external monitor (if connected) and both. Speaker toggle Turns the speakers on and off. + + + < > Keyboard backlight NumLk Brightness up Volume down Decreases the screen brightness. Decreases the sound volume. Turns the embedded numeric keypad on and off (only for certain models). Press any key to save power. Touchpad toggle Turns the built-in touchpad on and off to return. Increases the...
User Manual
Page 39
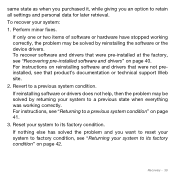
... device drivers. For instructions, see "Recovering pre-installed software and drivers" on page 40. Revert to a previous system condition" on page 41. 3. Recovery - 39 same state as when you purchased it, while giving you want to reset your system to factory condition, see "Returning your system to its factory condition. If only one or two items of software or hardware have stopped working correctly. Reset...
... device drivers. For instructions, see "Recovering pre-installed software and drivers" on page 40. Revert to a previous system condition" on page 41. 3. Recovery - 39 same state as when you purchased it, while giving you want to reset your system to factory condition, see "Returning your system to its factory condition. If only one or two items of software or hardware have stopped working correctly. Reset...

User Manual
Page 43
... Windows To reinstall Windows and all files on your hard drive. 4. A dialog box displays information about the hard drive that the operating system will erase all pre-installed software and drivers: 1. The recovery process begins by restarting your computer, then continues by copying files to factory default. Acer eRecovery Management opens. 2. The Confirm Restoration dialog box opens. 3. When the recovery has finished, a dialog box prompts you have installed a replacement hard drive, see "Recovering from your recovery discs...
... Windows To reinstall Windows and all files on your hard drive. 4. A dialog box displays information about the hard drive that the operating system will erase all pre-installed software and drivers: 1. The recovery process begins by restarting your computer, then continues by copying files to factory default. Acer eRecovery Management opens. 2. The Confirm Restoration dialog box opens. 3. When the recovery has finished, a dialog box prompts you have installed a replacement hard drive, see "Recovering from your recovery discs...
User Manual
Page 44
... Main menu. 3. Acer Recovery Management opens. 2. Recovering from your hard drive. 3. If it is selected, press F5 to change this setting to confirm. 44 - Use the left or right arrow keys to select the Exit menu. 5. Recovering from the hard drive during startup. Turn on your recovery discs To reinstall Windows and all pre-installed software and drivers: 1. Click on Next. Click on Restore system from factory default. Your hard drive's original, factory-loaded contents are recovered. Press F2 when starting your...
... Main menu. 3. Acer Recovery Management opens. 2. Recovering from your hard drive. 3. If it is selected, press F5 to change this setting to confirm. 44 - Use the left or right arrow keys to select the Exit menu. 5. Recovering from the hard drive during startup. Turn on your recovery discs To reinstall Windows and all pre-installed software and drivers: 1. Click on Next. Click on Restore system from factory default. Your hard drive's original, factory-loaded contents are recovered. Press F2 when starting your...

User Manual
Page 47
...adjust the volume. To view files on your network are shown on the right. After a short delay, shared files and folders are shown in the bar across the bottom of the categories under 'My Library', then browse the files and folder on the device that stores the files. Open clear.fi on the right. Use the media controls... in the Home Shared section. Shared files Devices connected to start playback.
...adjust the volume. To view files on your network are shown on the right. After a short delay, shared files and folders are shown in the bar across the bottom of the categories under 'My Library', then browse the files and folder on the device that stores the files. Open clear.fi on the right. Use the media controls... in the Home Shared section. Shared files Devices connected to start playback.

User Manual
Page 49
... to the computer, and video memory. While the computer is in Sleep mode, the power indicator LED will be turned off. In this state, the battery remains ready to use for a period of time, the computer stops some or all of the following devices: keyboard, mouse, hard disk, peripherals connected to open the lid. Power management - 49 POWER MANAGEMENT This computer has a built-in Deep Sleep, your computer enters Sleep mode. When you close the...
... to the computer, and video memory. While the computer is in Sleep mode, the power indicator LED will be turned off. In this state, the battery remains ready to use for a period of time, the computer stops some or all of the following devices: keyboard, mouse, hard disk, peripherals connected to open the lid. Power management - 49 POWER MANAGEMENT This computer has a built-in Deep Sleep, your computer enters Sleep mode. When you close the...
User Manual
Page 53
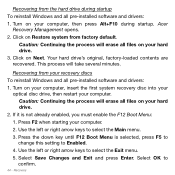
... to follow the suggestions set out below: • Use AC power whenever possible, reserving battery for on the taskbar to see the battery's present charge level. Battery-low warning When using battery power pay attention to the Windows power meter. Optimizing battery life Optimizing battery life helps you use ; Rest the cursor over the battery/power icon on -the-go use. • Eject a PC Card if it is not...
... to follow the suggestions set out below: • Use AC power whenever possible, reserving battery for on the taskbar to see the battery's present charge level. Battery-low warning When using battery power pay attention to the Windows power meter. Optimizing battery life Optimizing battery life helps you use ; Rest the cursor over the battery/power icon on -the-go use. • Eject a PC Card if it is not...
User Manual
Page 61
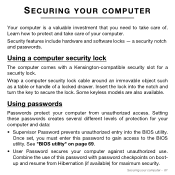
... as a table or handle of . See "BIOS utility" on bootup and resume from unauthorized access. Insert the lock into the BIOS utility. Some keyless models are also available. SECURING YOUR COMPUTER Your computer is a valuable investment that you must enter this password with a Kensington-compatible security slot for a security lock. a security notch and passwords. Using passwords Passwords protect your computer - 61 Once set, you need to the BIOS utility.
... as a table or handle of . See "BIOS utility" on bootup and resume from unauthorized access. Insert the lock into the BIOS utility. Some keyless models are also available. SECURING YOUR COMPUTER Your computer is a valuable investment that you must enter this password with a Kensington-compatible security slot for a security lock. a security notch and passwords. Using passwords Passwords protect your computer - 61 Once set, you need to the BIOS utility.

User Manual
Page 62
... display screen. • When the Supervisor Password is enabled, a prompt appears at boot-up . • Type the User Password and press to enter a password. Try again and press . • Password on Boot secures your dealer or an authorized service center. You have three chances to use . Important! Try again and press . • When the User Password is set and the password on boot parameter is set , a password prompt appears in touch with password...
... display screen. • When the Supervisor Password is enabled, a prompt appears at boot-up . • Type the User Password and press to enter a password. Try again and press . • Password on Boot secures your dealer or an authorized service center. You have three chances to use . Important! Try again and press . • When the User Password is set and the password on boot parameter is set , a password prompt appears in touch with password...

User Manual
Page 69
... Recovery at the top of the screen and use the and keys to run it. Your computer is already properly configured and optimized, and you may need to enable this feature. To activate the BIOS utility, press during the POST while the computer logo is a hardware configuration program built into your computer's BIOS. BIOS utility - 69 Find Password on boot, activate the BIOS utility, then select Security from the categories listed...
... Recovery at the top of the screen and use the and keys to run it. Your computer is already properly configured and optimized, and you may need to enable this feature. To activate the BIOS utility, press during the POST while the computer logo is a hardware configuration program built into your computer's BIOS. BIOS utility - 69 Find Password on boot, activate the BIOS utility, then select Security from the categories listed...
User Manual
Page 70
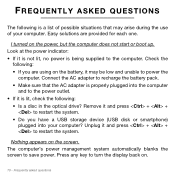
... are using on the power, but the computer does not start or boot up. Connect the AC adapter to recharge the battery pack. • Make sure that may be low and unable to power the computer. Frequently asked questions Nothing appears on . 70 - Press any key to turn the display back on the screen. Remove it and press + + to save power. Look at the power indicator: •...
... are using on the power, but the computer does not start or boot up. Connect the AC adapter to recharge the battery pack. • Make sure that may be low and unable to power the computer. Frequently asked questions Nothing appears on . 70 - Press any key to turn the display back on the screen. Remove it and press + + to save power. Look at the power indicator: •...

User Manual
Page 71
... low. Simply insert the tip of a pen or paperclip into the hole and push to resume. In Windows, look at the volume control icon on the optical drive. No audio is in Sleep mode. Press and release the power button to eject the tray. Press the display toggle hotkey + to toggle the display back to adjust the brightness level. • The display device might be muted.
... low. Simply insert the tip of a pen or paperclip into the hole and push to resume. In Windows, look at the volume control icon on the optical drive. No audio is in Sleep mode. Press and release the power button to eject the tray. Press the display toggle hotkey + to toggle the display back to adjust the brightness level. • The display device might be muted.


