

User Guide
Page 2
... specifically disclaims the implied warranties of merchantability or fitness for identification purposes only and belong to notify any means, electronic, mechanical, photocopy, recording, or otherwise, without the prior written permission of such revision or changes. No part of Acer Incorporated. The serial number and model number are used herein for a particular purpose. Aspire EL Model Number Serial Number Purchase Date Place of Purchase Acer and the Acer...
... specifically disclaims the implied warranties of merchantability or fitness for identification purposes only and belong to notify any means, electronic, mechanical, photocopy, recording, or otherwise, without the prior written permission of such revision or changes. No part of Acer Incorporated. The serial number and model number are used herein for a particular purpose. Aspire EL Model Number Serial Number Purchase Date Place of Purchase Acer and the Acer...

User Guide
Page 5
... Aspire EL computer carries the "Hardware NSTL Tested Year 2000 Compliant" logo, which certifies that this product yourself, as opening or removing covers may result in fire. Refer all servicing to qualified service personnel. 11 Unplug this product from children and dispose of used batteries promptly. 14 Use only the proper type of power supply cord set (provided in a fire or electric shock. Adjust only those controls...
... Aspire EL computer carries the "Hardware NSTL Tested Year 2000 Compliant" logo, which certifies that this product yourself, as opening or removing covers may result in fire. Refer all servicing to qualified service personnel. 11 Unplug this product from children and dispose of used batteries promptly. 14 Use only the proper type of power supply cord set (provided in a fire or electric shock. Adjust only those controls...

User Guide
Page 6
... WHEN OPEN. vi the YMark2000 test, and has been found to meet NSTL's standards for Year 2000 hardware compliance. The requirements of TCO 95 cover a wide range of issues: environment, usability, reduction of Nature Conservation), Statens Energimyndighet (The Swedish National Energy Administration) and SEMKO AB. TCO 95 compliant The Aspire EL computer is located on the drive. The...
... WHEN OPEN. vi the YMark2000 test, and has been found to meet NSTL's standards for Year 2000 hardware compliance. The requirements of TCO 95 cover a wide range of issues: environment, usability, reduction of Nature Conservation), Statens Energimyndighet (The Swedish National Energy Administration) and SEMKO AB. TCO 95 compliant The Aspire EL computer is located on the drive. The...

User Guide
Page 7
... Aspire EL 7 Features 9 The front panel 11 The rear panel 12 The keyboard 14 The mouse 17 Disk drives 18 Hard disk 18 3.5-inch floppy drive 18 CD-ROM/DVD-ROM/CD-RW drive 19 Acer GoTo drive bay 22 3 Setting up your Aspire EL 23 Arranging a comfortable work area 25 Adjusting your chair 25 Positioning your Aspire EL 25 Positioning your monitor 25 Positioning your keyboard 26 Positioning your mouse 26 Connecting peripherals 27 USB mouse 27 USB keyboard 28 Monitor 29 Power cable...
... Aspire EL 7 Features 9 The front panel 11 The rear panel 12 The keyboard 14 The mouse 17 Disk drives 18 Hard disk 18 3.5-inch floppy drive 18 CD-ROM/DVD-ROM/CD-RW drive 19 Acer GoTo drive bay 22 3 Setting up your Aspire EL 23 Arranging a comfortable work area 25 Adjusting your chair 25 Positioning your Aspire EL 25 Positioning your monitor 25 Positioning your keyboard 26 Positioning your mouse 26 Connecting peripherals 27 USB mouse 27 USB keyboard 28 Monitor 29 Power cable...

User Guide
Page 8
4 Adding options to your Aspire EL 31 Connecting options 33 Printer 33 Network 34 Modem (optional) 35 Multimedia devices 36 USB devices 38 Turning on your computer 39 Turning off your computer 41 Configuring your Acer GoTo drive 42 Upgrading your computer 45 Mainboard 46 System utilities 49 5 Need help? 51 Index 57
4 Adding options to your Aspire EL 31 Connecting options 33 Printer 33 Network 34 Modem (optional) 35 Multimedia devices 36 USB devices 38 Turning on your computer 39 Turning off your computer 41 Configuring your Acer GoTo drive 42 Upgrading your computer 45 Mainboard 46 System utilities 49 5 Need help? 51 Index 57

User Guide
Page 12
... computer, make sure that you have enough space to set it up. 4 1 First things first Package contents Before you unpack your dealer immediately: • Aspire EL • Just for Starters... poster • USB keyboard • Items contained in the accessory box • USB mouse • Power cable • User's guide • Acer GoTo swappable drive (optional) • Other user documentation and third-party software • Aspire EL Warranty Guide (in...
... computer, make sure that you have enough space to set it up. 4 1 First things first Package contents Before you unpack your dealer immediately: • Aspire EL • Just for Starters... poster • USB keyboard • Items contained in the accessory box • USB mouse • Power cable • User's guide • Acer GoTo swappable drive (optional) • Other user documentation and third-party software • Aspire EL Warranty Guide (in...
User Guide
Page 14
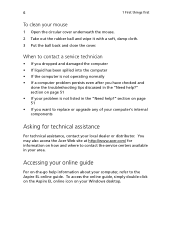
... service centers available in your problem is not operating normally • If a computer problem persists even after you want to replace or upgrade any of your computer's internal components Asking for information on page 51 • If your area. 6 1 First things first To clean your Windows desktop. You may also access the Acer Web site at http://www.acer.com/ for technical assistance For technical...
... service centers available in your problem is not operating normally • If a computer problem persists even after you want to replace or upgrade any of your computer's internal components Asking for information on page 51 • If your area. 6 1 First things first To clean your Windows desktop. You may also access the Acer Web site at http://www.acer.com/ for technical assistance For technical...
User Guide
Page 17
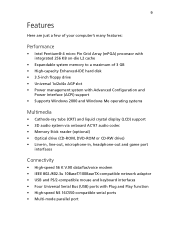
...; Power management system with Advanced Configuration and Power Interface (ACPI) support • Supports Windows 2000 and Windows Me operating systems Multimedia • Cathode-ray tube (CRT) and liquid crystal display (LCD) support • 3D audio system via onboard AC'97 audio codec • Memory Stick reader (optional) • Optical drive (CD-ROM, DVD-ROM or CD-RW drive) • Line-in, line-out, microphone-in, headphone-out and game port interfaces Connectivity • High-speed...
...; Power management system with Advanced Configuration and Power Interface (ACPI) support • Supports Windows 2000 and Windows Me operating systems Multimedia • Cathode-ray tube (CRT) and liquid crystal display (LCD) support • 3D audio system via onboard AC'97 audio codec • Memory Stick reader (optional) • Optical drive (CD-ROM, DVD-ROM or CD-RW drive) • Line-in, line-out, microphone-in, headphone-out and game port interfaces Connectivity • High-speed...

User Guide
Page 18
10 2 Getting to know your Aspire EL Expansion • 3 PCI slots + 3 DIMM slots + 1 AGP slot • Upgradeable memory and hard disk • Acer GoTo swappable drive (optional) Human-centric design and ergonomics • Smooth and stylish design • Low emission and low radiation
10 2 Getting to know your Aspire EL Expansion • 3 PCI slots + 3 DIMM slots + 1 AGP slot • Upgradeable memory and hard disk • Acer GoTo swappable drive (optional) Human-centric design and ergonomics • Smooth and stylish design • Low emission and low radiation

User Guide
Page 19
... 3.5-inch floppy drive emergency eject hole 4 CD-ROM/DVD-ROM/CD-RW drive 14 3.5-inch floppy drive Stop/Eject button activity indicator 5 Acer GoTo drive bay keylock 15 CD/DVD compartment 6 Acer GoTo drive activity indicator 16 Front USB ports 7 Acer GoTo drive (optional) 17 Front microphone-in port 8 Power indicator 18 Speaker/Headphone-out port 9 LAN activity indicator 19 Memory Stick slot (optional) 10 Hard disk activity indicator 20 Multimedia port bay cover 11 The front panel Your computer...
... 3.5-inch floppy drive emergency eject hole 4 CD-ROM/DVD-ROM/CD-RW drive 14 3.5-inch floppy drive Stop/Eject button activity indicator 5 Acer GoTo drive bay keylock 15 CD/DVD compartment 6 Acer GoTo drive activity indicator 16 Front USB ports 7 Acer GoTo drive (optional) 17 Front microphone-in port 8 Power indicator 18 Speaker/Headphone-out port 9 LAN activity indicator 19 Memory Stick slot (optional) 10 Hard disk activity indicator 20 Multimedia port bay cover 11 The front panel Your computer...

User Guide
Page 20
Your computer's rear panel consists of your Aspire EL" on page 31. For information on how to connect the peripherals, refer to "Connecting peripherals" on the rear panel of the following: No. Icon 1 2 3 4 5 Color Purple Description Main power switch Voltage selector switch Power cable socket System fan 1 PS/2 keyboard port 12 2 Getting to know your Aspire EL The rear panel Your computer offers several ports that allow you to your computer. These ports are located on page 27 and "Adding options to connect peripheral devices.
Your computer's rear panel consists of your Aspire EL" on page 31. For information on how to connect the peripherals, refer to "Connecting peripherals" on the rear panel of the following: No. Icon 1 2 3 4 5 Color Purple Description Main power switch Voltage selector switch Power cable socket System fan 1 PS/2 keyboard port 12 2 Getting to know your Aspire EL The rear panel Your computer offers several ports that allow you to your computer. These ports are located on page 27 and "Adding options to connect peripheral devices.
User Guide
Page 21
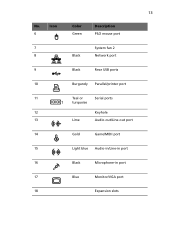
13 No. Icon 6 Color Green Description PS/2 mouse port 7 System fan 2 8 Black Network port 9 Black Rear USB ports 10 Burgundy Parallel/printer port 11 Teal or Serial ports turquoise 12 Keyhole 13 Lime Audio-out/Line-out port 14 Gold Game/MIDI port 15 Light blue Audio-in/Line-in port 16 Black Microphone-in port 17 Blue Monitor/VGA port 18 Expansion slots
13 No. Icon 6 Color Green Description PS/2 mouse port 7 System fan 2 8 Black Network port 9 Black Rear USB ports 10 Burgundy Parallel/printer port 11 Teal or Serial ports turquoise 12 Keyhole 13 Lime Audio-out/Line-out port 14 Gold Game/MIDI port 15 Light blue Audio-in/Line-in port 16 Black Microphone-in port 17 Blue Monitor/VGA port 18 Expansion slots

User Guide
Page 24
... your current default browser. • Suspend/Resume button puts the system to the next file and start playing the audio or video file. press to skip forward to sleep when pressed. press to the previous file and start playing. 11 Internet/Suspend Consist of each key, rightclick on the Magic Keyboard icon located on your Aspire EL No. The fifth key is set to stop...
... your current default browser. • Suspend/Resume button puts the system to the next file and start playing the audio or video file. press to skip forward to sleep when pressed. press to the previous file and start playing. 11 Internet/Suspend Consist of each key, rightclick on the Magic Keyboard icon located on your Aspire EL No. The fifth key is set to stop...

User Guide
Page 30
... the drive Stop/Eject button. • To eject the CD or DVD tray when the computer is cold-swappable. This modular drive bay allows you control access to the drive bay. Caution! To configure your Acer GoTo drive, see "Configuring your Acer GoTo drive" on the front panel of the drive bay. NEVER attempt to both the swappable hard disk and the computer system. a swappable modular drive bay, located...
... the drive Stop/Eject button. • To eject the CD or DVD tray when the computer is cold-swappable. This modular drive bay allows you control access to the drive bay. Caution! To configure your Acer GoTo drive, see "Configuring your Acer GoTo drive" on the front panel of the drive bay. NEVER attempt to both the swappable hard disk and the computer system. a swappable modular drive bay, located...
User Guide
Page 35
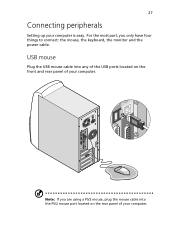
For the most part, you are using a PS/2 mouse, plug the mouse cable into any of the USB ports located on the rear panel of your computer. Note: If you only have four things to connect: the mouse, the keyboard, the monitor and the power cable. USB mouse Plug the USB mouse cable into the PS/2 mouse port located on the front and rear panel of your computer is easy. 27 Connecting peripherals Setting up your computer.
For the most part, you are using a PS/2 mouse, plug the mouse cable into any of the USB ports located on the rear panel of your computer. Note: If you only have four things to connect: the mouse, the keyboard, the monitor and the power cable. USB mouse Plug the USB mouse cable into the PS/2 mouse port located on the front and rear panel of your computer is easy. 27 Connecting peripherals Setting up your computer.
User Guide
Page 42
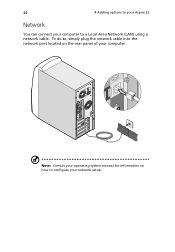
Note: Consult your operating system manual for information on the rear panel of your computer. 34 4 Adding options to your Aspire EL Network You can connect your computer to configure your network setup. To do so, simply plug the network cable into the network port located on how to a Local Area Network (LAN) using a network cable.
Note: Consult your operating system manual for information on the rear panel of your computer. 34 4 Adding options to your Aspire EL Network You can connect your computer to configure your network setup. To do so, simply plug the network cable into the network port located on how to a Local Area Network (LAN) using a network cable.
User Guide
Page 55
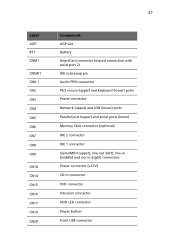
... CN9 CN10 CN14 CN15 CN16 CN17 CN19 CN20 Component AGP slot Battery SmartCard connector (shared connection with serial port 2) IDE cold-swap pin Audio FPIO connector PS/2 mouse (upper) and keyboard (lower) ports Power connector Network (upper) and USB (lower) ports Parallel port (upper) and serial ports (lower) Memory Stick connector (optional) IDE 2 connector IDE 1 connector Game/MIDI (upper), line-out (left), line-in (middle) and mic-in (right) connectors Power connector (+12V) CD-in connector FDD connector Intrusion connector HDD LED connector Power button Front USB connector
... CN9 CN10 CN14 CN15 CN16 CN17 CN19 CN20 Component AGP slot Battery SmartCard connector (shared connection with serial port 2) IDE cold-swap pin Audio FPIO connector PS/2 mouse (upper) and keyboard (lower) ports Power connector Network (upper) and USB (lower) ports Parallel port (upper) and serial ports (lower) Memory Stick connector (optional) IDE 2 connector IDE 1 connector Game/MIDI (upper), line-out (left), line-in (middle) and mic-in (right) connectors Power connector (+12V) CD-in connector FDD connector Intrusion connector HDD LED connector Power button Front USB connector

User Guide
Page 61
... before starting the recovery process. Q: I pressed the power button on . However, if the diagnostic utility still reports a problem, then you are possible questions that it to its original factory default settings. Using the Recovery CD will automatically diagnose your system and make sure to back up . However, we realize that some problems may have to use of your system to restore it is plugged in and turned on...
... before starting the recovery process. Q: I pressed the power button on . However, if the diagnostic utility still reports a problem, then you are possible questions that it to its original factory default settings. Using the Recovery CD will automatically diagnose your system and make sure to back up . However, we realize that some problems may have to use of your system to restore it is plugged in and turned on...

User Guide
Page 62
... in speakers are using the correct type of your USB keyboard to toggle from the computer. 54 5 Need help? Q: System cannot read a diskette, the hard disk, CD or DVD. See "Disk drives" on the taskbar. Under Windows, look for the volume control icon on page 18. • Check if the diskette is connected to a power outlet and that you can restart your dealer or the technical support center...
... in speakers are using the correct type of your USB keyboard to toggle from the computer. 54 5 Need help? Q: System cannot read a diskette, the hard disk, CD or DVD. See "Disk drives" on the taskbar. Under Windows, look for the volume control icon on page 18. • Check if the diskette is connected to a power outlet and that you can restart your dealer or the technical support center...

User Guide
Page 65
... panel 11 K keyboard 14 M mainboard 46 Memory Stick slot 11 mouse 17 O online guide 6 P peripherals 27 external monitor 29 keyboard 28 mouse 27 ports 12 problems troubleshooting 52 R rear panel 12 S setting up computer 25 area 25 chair 25 keyboard 26 monitor 25 mouse 26 PC 25 power cable 30 system utilities 49 T technical assistance 6 troubleshooting 52, 53 turning off computer 41 software shutdown 41 suspend mode 41 turning on computer 39 main power switch 39 power button 39 U upgrade computer 45 USB devices 38 Plug...
... panel 11 K keyboard 14 M mainboard 46 Memory Stick slot 11 mouse 17 O online guide 6 P peripherals 27 external monitor 29 keyboard 28 mouse 27 ports 12 problems troubleshooting 52 R rear panel 12 S setting up computer 25 area 25 chair 25 keyboard 26 monitor 25 mouse 26 PC 25 power cable 30 system utilities 49 T technical assistance 6 troubleshooting 52, 53 turning off computer 41 software shutdown 41 suspend mode 41 turning on computer 39 main power switch 39 power button 39 U upgrade computer 45 USB devices 38 Plug...


