
Aspire 9810 / 9800 User's Guide EN
Page 12
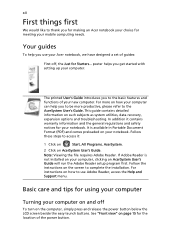
... LCD screen beside the easy-launch buttons. If Adobe Reader is available in Portable Document Format (PDF) and comes preloaded on your new computer. For instructions on how to use your Acer notebook, we have designed a set of the power button. Your guides To help you to be more on how your mobile computing needs. In addition it : 1 Click on Start, All Programs, AcerSystem. 2 Click on AcerSystem User's Guide...
... LCD screen beside the easy-launch buttons. If Adobe Reader is available in Portable Document Format (PDF) and comes preloaded on your new computer. For instructions on how to use your Acer notebook, we have designed a set of the power button. Your guides To help you to be more on how your mobile computing needs. In addition it : 1 Click on Start, All Programs, AcerSystem. 2 Click on AcerSystem User's Guide...

Aspire 9810 / 9800 User's Guide EN
Page 18
... 81 Fast Infrared (FIR) 81 Universal Serial Bus (USB) 82 IEEE 1394 port 82 PC Card slot 83 ExpressCard 84 Installing memory 85 Connecting your TV and AV-in cables 86 BIOS utility 89 Boot sequence 89 Enable disk-to-disk recovery 89 Password 89 Using software 90 Playing DVD movies 90 Power management 91 Acer eRecovery Management 92 Create backup 92 Burn backup disc 93 Restore and recovery 93 Troubleshooting 94 Troubleshooting tips 94 Error messages 94 Regulations and safety notices 96...
... 81 Fast Infrared (FIR) 81 Universal Serial Bus (USB) 82 IEEE 1394 port 82 PC Card slot 83 ExpressCard 84 Installing memory 85 Connecting your TV and AV-in cables 86 BIOS utility 89 Boot sequence 89 Enable disk-to-disk recovery 89 Password 89 Using software 90 Playing DVD movies 90 Power management 91 Acer eRecovery Management 92 Create backup 92 Burn backup disc 93 Restore and recovery 93 Troubleshooting 94 Troubleshooting tips 94 Error messages 94 Regulations and safety notices 96...

Aspire 9810 / 9800 User's Guide EN
Page 45
... (minimum) key travel Touchpad with 4-way scroll button 12 function keys, four cursor keys, two Windows® keys, hotkey controls, embedded numeric keypad, international language support Four easy-launch buttons: Empowering Key, email, Internet, user-programmable button Seven media keys: Acer Arcade, volume up/down, previous, next, play/pause, stop Four front-panel LED indicators: power, battery, WLAN, Bluetooth® Two communication LED switches: WLAN, Bluetooth® Acer remote controls: • Acer Arcade™ (48 keys) • Multi-Media remote controller (uses an external USB CIR...
... (minimum) key travel Touchpad with 4-way scroll button 12 function keys, four cursor keys, two Windows® keys, hotkey controls, embedded numeric keypad, international language support Four easy-launch buttons: Empowering Key, email, Internet, user-programmable button Seven media keys: Acer Arcade, volume up/down, previous, next, play/pause, stop Four front-panel LED indicators: power, battery, WLAN, Bluetooth® Two communication LED switches: WLAN, Bluetooth® Acer remote controls: • Acer Arcade™ (48 keys) • Multi-Media remote controller (uses an external USB CIR...
Aspire 9810 / 9800 User's Guide EN
Page 67
...) disk in Sleep mode. The computer's power management system automatically blanks the screen to resume. Right-click on the battery, it is not lit, no power is in the external USB floppy drive? Remove or replace it is a list of your Windows desktop and select Properties to restart the system. Press any key to the power outlet. • If it with a system disk and press + + to bring up . I turned...
...) disk in Sleep mode. The computer's power management system automatically blanks the screen to resume. Right-click on the battery, it is not lit, no power is in the external USB floppy drive? Remove or replace it is a list of your Windows desktop and select Properties to restart the system. Press any key to the power outlet. • If it with a system disk and press + + to bring up . I turned...

Aspire 9810 / 9800 User's Guide EN
Page 113
English 93 Burn backup disc Using the Burn Disc page of Acer eRecovery Management, you can burn the factory default image, a user backup image, the current system configuration, or an application backup image to CD or DVD. 1 Press + or select Acer eRecovery Management from the Empowering Technology toolbar to start Acer eRecovery Management. 2 Switch to the restore and recovery page by selecting the Burn Disc button. 3 Select the type of backup (factory default, user, current system, application) you would...
English 93 Burn backup disc Using the Burn Disc page of Acer eRecovery Management, you can burn the factory default image, a user backup image, the current system configuration, or an application backup image to CD or DVD. 1 Press + or select Acer eRecovery Management from the Empowering Technology toolbar to start Acer eRecovery Management. 2 Switch to the restore and recovery page by selecting the Burn Disc button. 3 Select the type of backup (factory default, user, current system, application) you would...
Aspire 9800 User's Guide
Page 8
... Acer notebook your choice for meeting your Acer notebook, we have designed a set of the power button. viii First things first We would like to the basic features and functions of your new computer. For more productive, please refer to use your mobile computing needs. poster helps you to be more on such subjects as system utilities, data recovery, expansion options and troubleshooting. The printed User's Guide...
... Acer notebook your choice for meeting your Acer notebook, we have designed a set of the power button. viii First things first We would like to the basic features and functions of your new computer. For more productive, please refer to use your mobile computing needs. poster helps you to be more on such subjects as system utilities, data recovery, expansion options and troubleshooting. The printed User's Guide...
Aspire 9800 User's Guide
Page 14
... 1394 port 75 PC Card slot 76 ExpressCard 77 Installing memory 78 Connecting your TV and AV-in cables 79 Acer Arcade TV set-up wizard (Windows XP Home and Professional) 81 BIOS utility 82 Boot sequence 82 Enable disk-to-disk recovery 82 Password 82 Using software 83 Playing DVD movies 83 Power management 84 Acer eRecovery Management 84 Create backup 85 Restore from backup 85 Create factory default image CD 86 Re-install bundled software without CD 86 Change password 87 Troubleshooting 88 Troubleshooting tips 88 Error...
... 1394 port 75 PC Card slot 76 ExpressCard 77 Installing memory 78 Connecting your TV and AV-in cables 79 Acer Arcade TV set-up wizard (Windows XP Home and Professional) 81 BIOS utility 82 Boot sequence 82 Enable disk-to-disk recovery 82 Password 82 Using software 83 Playing DVD movies 83 Power management 84 Acer eRecovery Management 84 Create backup 85 Restore from backup 85 Create factory default image CD 86 Re-install bundled software without CD 86 Change password 87 Troubleshooting 88 Troubleshooting tips 88 Error...

Aspire 9800 User's Guide
Page 64
... external monitor. Press and release the power button to save power. If you are using on the Settings tab to make sure that may be low and unable to power the computer. Then click on the battery, it with a system disk and press + + to restart the system. I turned on your computer. Nothing appears on the screen. Press + (increase) to adjust the brightness level. • The display device...
... external monitor. Press and release the power button to save power. If you are using on the Settings tab to make sure that may be low and unable to power the computer. Then click on the battery, it with a system disk and press + + to restart the system. I turned on your computer. Nothing appears on the screen. Press + (increase) to adjust the brightness level. • The display device...

Service Guide
Page 19
...-Launch Buttons Located above the keyboard are called easy-launch buttons. Press " " to email and Internet programs, but can be reset by users. These buttons are four buttons. Indicates the status of Bluetooth communication. They are pre-set the Web browser, mail and programmable buttons, run the Acer Empowering Technology. To set to run the Acer Launch Manager. Indicates the status of wireless LAN communication. Charging: The light shows amber when the battery...
...-Launch Buttons Located above the keyboard are called easy-launch buttons. Press " " to email and Internet programs, but can be reset by users. These buttons are four buttons. Indicates the status of Bluetooth communication. They are pre-set the Web browser, mail and programmable buttons, run the Acer Empowering Technology. To set to run the Acer Launch Manager. Indicates the status of wireless LAN communication. Charging: The light shows amber when the battery...

Service Guide
Page 22
it launches the Start menu. Hot Key + Icon Function Hot key help Description Displays help on hot keys. + Acer eSetting Launches the Acer eSettings in Acer eManager. + Acer ePowerManagement Launches the Acer ePowerManagement in the hotkey combination. It can also be used with other key in Acer Empowering Technology. To activate hot keys, press and hold the key before pressing the other keys to access most of function: Description + Activates next taskbar button. + Opens the My Computer window + Opens Help and Support. < > + : + p+enh...
it launches the Start menu. Hot Key + Icon Function Hot key help Description Displays help on hot keys. + Acer eSetting Launches the Acer eSettings in Acer eManager. + Acer ePowerManagement Launches the Acer ePowerManagement in the hotkey combination. It can also be used with other key in Acer Empowering Technology. To activate hot keys, press and hold the key before pressing the other keys to access most of function: Description + Activates next taskbar button. + Opens the My Computer window + Opens Help and Support. < > + : + p+enh...
Service Guide
Page 44
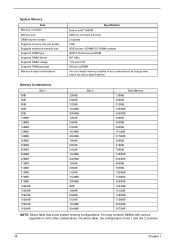
... combinations. System Memory Item Memory controller Memory size DIMM socket number Supports memory size per socket Supports maximum memory size Supports DIMM type Supports DIMM Speed Supports DIMM voltage Supports DIMM package Memory module combinations Specification Built-in Intel® 945PM 0MB (no on-board memory) 2 sockets 2GB 4GB (by two 1024MB SO-DIMM module) DDR 2 Synchronous DRAM 667 MHz 1.8V and 0.9V 200-pin soDIMM You can install memory modules in any...
... combinations. System Memory Item Memory controller Memory size DIMM socket number Supports memory size per socket Supports maximum memory size Supports DIMM type Supports DIMM Speed Supports DIMM voltage Supports DIMM package Memory module combinations Specification Built-in Intel® 945PM 0MB (no on-board memory) 2 sockets 2GB 4GB (by two 1024MB SO-DIMM module) DDR 2 Synchronous DRAM 667 MHz 1.8V and 0.9V 200-pin soDIMM You can install memory modules in any...
Service Guide
Page 60
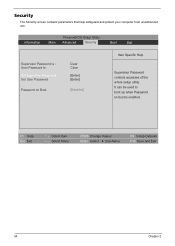
...; Select Item ← → Select Menu F5/F6 Change Values Enter Select 4 Sub-Menu F9 Setup Defaults F10 Save and Exit 54 Chapter 2 PhoenixBIOS Setup Utility Information Main Advanced Security Boot Exit Supervisor Password Is : User Password Is : Set Supervisor Password Set User Password Password on boot is enabled. It can be used to boot up when Password on Boot Clear Clear [Enter] [Enter] [Disabled] Item Specific Help Supervisor Password controls accesses of the whole setup utility. Security The Security screen contains parameters that help safeguard...
...; Select Item ← → Select Menu F5/F6 Change Values Enter Select 4 Sub-Menu F9 Setup Defaults F10 Save and Exit 54 Chapter 2 PhoenixBIOS Setup Utility Information Main Advanced Security Boot Exit Supervisor Password Is : User Password Is : Set Supervisor Password Set User Password Password on boot is enabled. It can be used to boot up when Password on Boot Clear Clear [Enter] [Enter] [Disabled] Item Specific Help Supervisor Password controls accesses of the whole setup utility. Security The Security screen contains parameters that help safeguard...
Service Guide
Page 61
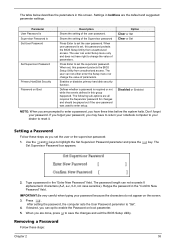
... this screen. Option Clear or Set Clear or Set Disabled or Enabled NOTE: When you have right to change the value of the Supervisor password Press Enter to enter setup. Retype the password in the "Enter New Password" field. The following sub-options are prompted to enter a password, you are all requires the Supervisor password for changes and should be grayed out if the user password was used to set , this password protects the BIOS Setup Utility from unauthorized access. Setting a Password Follow...
... this screen. Option Clear or Set Clear or Set Disabled or Enabled NOTE: When you have right to change the value of the Supervisor password Press Enter to enter setup. Retype the password in the "Enter New Password" field. The following sub-options are prompted to enter a password, you are all requires the Supervisor password for changes and should be grayed out if the user password was used to set , this password protects the BIOS Setup Utility from unauthorized access. Setting a Password Follow...

Service Guide
Page 62
... the BIOS Setup Utility. Type the current password in the Enter New Password field. The password setting is OK, the screen will show you have changed the settings, press u to save the changes and exit the BIOS Setup Utility. Retype the password in the Confirm New Password field. 4. If the current password entered does not match the actual current password, the screen will display as following. The computer then sets the Supervisor Password parameter to "Set". 5. Use the w and y keys...
... the BIOS Setup Utility. Type the current password in the Enter New Password field. The password setting is OK, the screen will show you have changed the settings, press u to save the changes and exit the BIOS Setup Utility. Retype the password in the Confirm New Password field. 4. If the current password entered does not match the actual current password, the screen will display as following. The computer then sets the Supervisor Password parameter to "Set". 5. Use the w and y keys...
Service Guide
Page 65
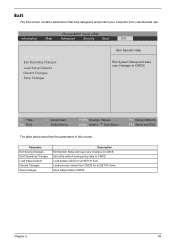
... default values for all SETUP item. Load previous values from unauthorized use. Chapter 2 59 PhoenixBIOS Setup Utility Information Main Advanced Security Boot Exit Exit Saving Changes Exit Disarding Changes Load Setup Defaults Discard Changes Save Changes Item Specific Help Exit System Setup and save your changes to CMOS. Parameter Exit Saving Changes Exit Discarding Changes Load Setup Default Discard Changes Save Changes Description Exit System Setup and save your changes to CMOS. Exit The Exit screen...
... default values for all SETUP item. Load previous values from unauthorized use. Chapter 2 59 PhoenixBIOS Setup Utility Information Main Advanced Security Boot Exit Exit Saving Changes Exit Disarding Changes Load Setup Defaults Discard Changes Save Changes Item Specific Help Exit System Setup and save your changes to CMOS. Parameter Exit Saving Changes Exit Discarding Changes Load Setup Default Discard Changes Save Changes Description Exit System Setup and save your changes to CMOS. Exit The Exit screen...
Service Guide
Page 91
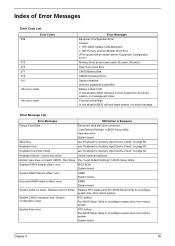
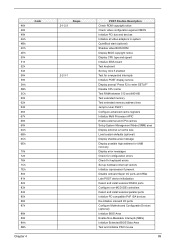
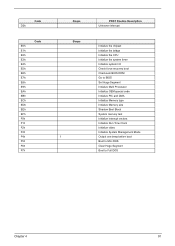
... Device Check" on page 80. "Load Default Settings" in Sequence Failure Fixed Disk Reconnect hard disk drive connector. Run Setup Run "Load Default Settings" in BIOS Setup Utility. IDE Primary Channel Master Drive Error (THe causes will show message. Incorrect password is dead - Battery critical LOW In this situation BIOS will shut down system, no message will be shown before "Equipment Configuration Error") Memory Error at offset: nnnn DIMM System board System battery is specified. Replace...
... Device Check" on page 80. "Load Default Settings" in Sequence Failure Fixed Disk Reconnect hard disk drive connector. Run Setup Run "Load Default Settings" in BIOS Setup Utility. IDE Primary Channel Master Drive Error (THe causes will show message. Incorrect password is dead - Battery critical LOW In this situation BIOS will shut down system, no message will be shown before "Equipment Configuration Error") Memory Error at offset: nnnn DIMM System board System battery is specified. Replace...
Service Guide
Page 95
... devices Initialize all video adapters in system QuietBoot start (optional) Shadow video BIOS ROM Display BIOS copyright notice Display CPU type and speed Initialize EISA board Test keyboard Set key click if enabled Test for unexpected interrupts Initialize POST display service Display prompt "Press F2 to enter SETUP" Disable CPU cache Test RAM between 512 and 640 KB Test extended memory Test extended memory address lines Jump to User Patch1 Configure advanced cache registers Initialize Multi Processor APIC Enable external and CPU caches Setup...
... devices Initialize all video adapters in system QuietBoot start (optional) Shadow video BIOS ROM Display BIOS copyright notice Display CPU type and speed Initialize EISA board Test keyboard Set key click if enabled Test for unexpected interrupts Initialize POST display service Display prompt "Press F2 to enter SETUP" Disable CPU cache Test RAM between 512 and 640 KB Test extended memory Test extended memory address lines Jump to User Patch1 Configure advanced cache registers Initialize Multi Processor APIC Enable external and CPU caches Setup...
Service Guide
Page 97
... the CPU Initialize the system timer Initialize system I/O Check force recovery boot Checksum BIOS ROM Go to BIOS Set Huge Segment Initialize Multi Processor Initialize OEM special code Initialize PIC and DMA Initialize Memory type Initialize Memory size Shadow Boot Block System memory test Initialize interrupt vectors Initialize Run Time Clock Initialize video Initialize System Management Mode Output one beep before boot Boot to Mini DOS Clear Huge Segment Boot...
... the CPU Initialize the system timer Initialize system I/O Check force recovery boot Checksum BIOS ROM Go to BIOS Set Huge Segment Initialize Multi Processor Initialize OEM special code Initialize PIC and DMA Initialize Memory type Initialize Memory size Shadow Boot Block System memory test Initialize interrupt vectors Initialize Run Time Clock Initialize video Initialize System Management Mode Output one beep before boot Boot to Mini DOS Clear Huge Segment Boot...

Service Guide
Page 99
Audio driver Speaker System board Speaker System board Action in Sequence Enter BIOS Setup Utility to execute "Load Default Settings, then reboot system. LCD cover switch System board See "Save to Disk (S4)" on page 45. DIMM System board Speaker-Related Symptoms Symptom / Error In Windows, multimedia programs, no sound. Keyboard (if control is damaged. Internal speakers make noise or emit no sound comes from the computer. The system doesn't enter standby mode after opening the LCD. Touchpad Keyboard Hard disk connection board Hard disk drive System board See "Save...
Audio driver Speaker System board Speaker System board Action in Sequence Enter BIOS Setup Utility to execute "Load Default Settings, then reboot system. LCD cover switch System board See "Save to Disk (S4)" on page 45. DIMM System board Speaker-Related Symptoms Symptom / Error In Windows, multimedia programs, no sound. Keyboard (if control is damaged. Internal speakers make noise or emit no sound comes from the computer. The system doesn't enter standby mode after opening the LCD. Touchpad Keyboard Hard disk connection board Hard disk drive System board See "Save...
Service Guide
Page 101
... diagnostic test for the system board in loop mode at least 10 times. 2. If no more errors. If any FRU. 3. When analyzing an intermittent problem, do not replace any error is detected, do the following: 1. Rerun the test to do with a hardware defect, such as: cosmic radiation, electrostatic discharge, or software errors. Chapter 4 95 FRU replacement should be caused by...
... diagnostic test for the system board in loop mode at least 10 times. 2. If no more errors. If any FRU. 3. When analyzing an intermittent problem, do not replace any error is detected, do the following: 1. Rerun the test to do with a hardware defect, such as: cosmic radiation, electrostatic discharge, or software errors. Chapter 4 95 FRU replacement should be caused by...


