

User Manual
Page 4
... exhibits a distinct change in performance, indicating a need to replace the power cord set . If you to normal condition. The plug only fits in damage and will often require extensive work by other nearby electrical devices that the new power cord meets the following the operating instructions Note: Adjust only those controls that are covered by the operating instructions, since improper adjustment of this product. • Use the product only...
... exhibits a distinct change in performance, indicating a need to replace the power cord set . If you to normal condition. The plug only fits in damage and will often require extensive work by other nearby electrical devices that the new power cord meets the following the operating instructions Note: Adjust only those controls that are covered by the operating instructions, since improper adjustment of this product. • Use the product only...
User Manual
Page 8
... your Acer notebook, we have designed a set of guides: First off To turn on the computer, simply press and release the power button below the LCD screen beside the easy-launch buttons. Your guides To help you to the basic features and functions of the power button. In addition it : 1 Click on Start, All Programs, AcerSystem. 2 Click on such subjects as system utilities, data recovery, expansion options and troubleshooting...
... your Acer notebook, we have designed a set of guides: First off To turn on the computer, simply press and release the power button below the LCD screen beside the easy-launch buttons. Your guides To help you to the basic features and functions of the power button. In addition it : 1 Click on Start, All Programs, AcerSystem. 2 Click on such subjects as system utilities, data recovery, expansion options and troubleshooting...
User Manual
Page 14
... lock 76 Using passwords 76 Entering passwords 77 Setting passwords 77 Expanding through options 78 Connectivity options 78 Fax/data modem 78 Built-in network feature 79 Consumer Infrared (CIR) 80 Fast Infrared (FIR) 80 Universal Serial Bus (USB) 80 IEEE 1394 port 81 Digital Video Interface (DVI-D) 82 High-Definition Multimedia Interface 82 PC Card slot 83 ExpressCard 84 Installing memory 85 BIOS utility 85 Boot sequence 86 Enable disk-to-disk recovery 86 Password 86 Using software...
... lock 76 Using passwords 76 Entering passwords 77 Setting passwords 77 Expanding through options 78 Connectivity options 78 Fax/data modem 78 Built-in network feature 79 Consumer Infrared (CIR) 80 Fast Infrared (FIR) 80 Universal Serial Bus (USB) 80 IEEE 1394 port 81 Digital Video Interface (DVI-D) 82 High-Definition Multimedia Interface 82 PC Card slot 83 ExpressCard 84 Installing memory 85 BIOS utility 85 Boot sequence 86 Enable disk-to-disk recovery 86 Password 86 Using software...

User Manual
Page 17
... and select "Password Setup" to do not initialize the Empowering Technology password, you lose your password, there is no method to reset it features the following handy utilities: • Acer eNet Management hooks up to location-based networks intelligently. • Acer ePower Management extends battery power via versatile usage profiles. • Acer ePresentation Management connects to a projector and adjusts display settings conveniently. • Acer eDataSecurity Management protects data with passwords and advanced encryption...
... and select "Password Setup" to do not initialize the Empowering Technology password, you lose your password, there is no method to reset it features the following handy utilities: • Acer eNet Management hooks up to location-based networks intelligently. • Acer ePower Management extends battery power via versatile usage profiles. • Acer ePresentation Management connects to a projector and adjusts display settings conveniently. • Acer eDataSecurity Management protects data with passwords and advanced encryption...
User Manual
Page 20
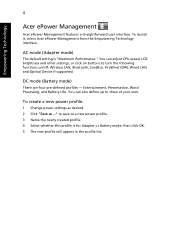
... Battery Life. Empowering Technology 4 Acer ePower Management Acer ePower Management features a straightforward user interface. to save to turn the following functions on buttons to a new power profile. 3 Name the newly created profile. 4 Select whether this profile is "Maximum Performance." To create a new power profile: 1 Change power settings as desired. 2 Click "Save as ..." You can adjust CPU speed, LCD brightness and other settings, or click on /off: Wireless LAN, Bluetooth, CardBus, FireWire(1394), Wired LAN and Optical Device if supported...
... Battery Life. Empowering Technology 4 Acer ePower Management Acer ePower Management features a straightforward user interface. to save to turn the following functions on buttons to a new power profile. 3 Name the newly created profile. 4 Select whether this profile is "Maximum Performance." To create a new power profile: 1 Change power settings as desired. 2 Click "Save as ..." You can adjust CPU speed, LCD brightness and other settings, or click on /off: Wireless LAN, Bluetooth, CardBus, FireWire(1394), Wired LAN and Optical Device if supported...
User Manual
Page 23
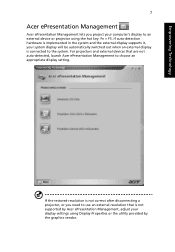
... the external display supports it, your system display will be automatically switched out when an external display is connected to an external device or projector using Display Properties or the utility provided by the graphics vendor. If the restored resolution is not supported by Acer ePresentation Management, adjust your computer's display to the system. For projectors and external devices that is not correct after disconnecting a projector, or you project your display settings using the hot key...
... the external display supports it, your system display will be automatically switched out when an external display is connected to an external device or projector using Display Properties or the utility provided by the graphics vendor. If the restored resolution is not supported by Acer ePresentation Management, adjust your computer's display to the system. For projectors and external devices that is not correct after disconnecting a projector, or you project your display settings using the hot key...
User Manual
Page 25
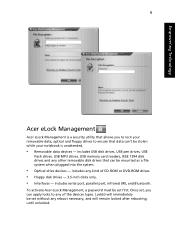
... activate Acer eLock Management, a password must be set without any reboot necessary, and will immediately be set , you to any kind of the devices types. Empowering Technology 9 Acer eLock Management Acer eLock Management is a security utility that allows you can be stolen while your removable data, optical and floppy drives to ensure that can apply locks to lock your notebook is unattended. • Removable data devices - includes USB disk drives, USB pen drives, USB flash drives, USB MP3 drives, USB memory card readers, IEEE 1394 disk drives...
... activate Acer eLock Management, a password must be set without any reboot necessary, and will immediately be set , you to any kind of the devices types. Empowering Technology 9 Acer eLock Management Acer eLock Management is a security utility that allows you can be stolen while your removable data, optical and floppy drives to ensure that can apply locks to lock your notebook is unattended. • Removable data devices - includes USB disk drives, USB pen drives, USB flash drives, USB MP3 drives, USB memory card readers, IEEE 1394 disk drives...
User Manual
Page 27
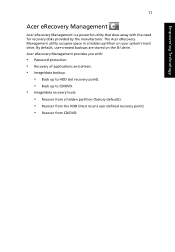
... 11 Acer eRecovery Management Acer eRecovery Management is a powerful utility that does away with : • Password protection. • Recovery of applications and drivers. • Image/data backup: • Back up to HDD (set recovery point). • Back up to CD/DVD. • Image/data recovery tools: • Recover from a hidden partition (factory defaults). • Recover from the HDD (most recent user-defined recovery point). • Recover from CD/DVD. By default, user-created backups are stored on your system's hard drive.
... 11 Acer eRecovery Management Acer eRecovery Management is a powerful utility that does away with : • Password protection. • Recovery of applications and drivers. • Image/data backup: • Back up to HDD (set recovery point). • Back up to CD/DVD. • Image/data recovery tools: • Recover from a hidden partition (factory defaults). • Recover from the HDD (most recent user-defined recovery point). • Recover from CD/DVD. By default, user-created backups are stored on your system's hard drive.
User Manual
Page 32
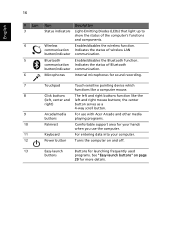
... (LEDs) that light up to show the status of wireless LAN button/indicator communication. 5 Bluetooth Enables/disables the Bluetooth function. communication Indicates the status of the computer's functions and components. 4 Wireless Enables/disables the wireless function. the center right) button serves as a 4-way scroll button. 9 Arcade/media For use with Acer Arcade and other media buttons playing programs. 10 Palmrest Comfortable support area for your hands when you use the computer. 11 Keyboard For entering data into your computer. 12 Power button Turns...
... (LEDs) that light up to show the status of wireless LAN button/indicator communication. 5 Bluetooth Enables/disables the Bluetooth function. communication Indicates the status of the computer's functions and components. 4 Wireless Enables/disables the wireless function. the center right) button serves as a 4-way scroll button. 9 Arcade/media For use with Acer Arcade and other media buttons playing programs. 10 Palmrest Comfortable support area for your hands when you use the computer. 11 Keyboard For entering data into your computer. 12 Power button Turns...

User Manual
Page 45
... set to run the Acer Launch Manager. See "Launch Manager" on page 1. The mail and Web browser buttons are four buttons. These buttons are : mail, Web browser, Empowering Key < one user-programmable button. > and Press < > to email and Internet programs, but can be reset by users. They are called easy-launch buttons. Charging: The light shows amber when the battery is charging. 2. English 29 1. Easy-launch button P Default application Acer Empowering...
... set to run the Acer Launch Manager. See "Launch Manager" on page 1. The mail and Web browser buttons are four buttons. These buttons are : mail, Web browser, Empowering Key < one user-programmable button. > and Press < > to email and Internet programs, but can be reset by users. They are called easy-launch buttons. Charging: The light shows amber when the battery is charging. 2. English 29 1. Easy-launch button P Default application Acer Empowering...
User Manual
Page 49
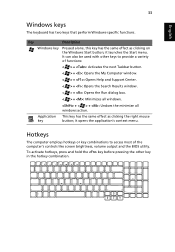
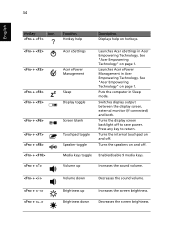
... keys to access most of functions: < > + : Activates the next Taskbar button. < > + : Opens the My Computer window. < > + : Opens Help and Support Center. < > + : Opens the Search Results window. < > + : Opens the Run dialog box. < > + : Minimizes all windows. + < > + : Undoes the minimize all windows action. English 33 Windows keys The keyboard has two keys that perform Windows-specific functions. Hotkeys The computer employs hotkeys or key combinations to provide a variety of the computer's controls like screen brightness, volume output and the BIOS utility. Key...
... keys to access most of functions: < > + : Activates the next Taskbar button. < > + : Opens the My Computer window. < > + : Opens Help and Support Center. < > + : Opens the Search Results window. < > + : Opens the Run dialog box. < > + : Minimizes all windows. + < > + : Undoes the minimize all windows action. English 33 Windows keys The keyboard has two keys that perform Windows-specific functions. Hotkeys The computer employs hotkeys or key combinations to provide a variety of the computer's controls like screen brightness, volume output and the BIOS utility. Key...
User Manual
Page 50
Switches display output between the display screen, external monitor (if connected) and both. Press any key to save power. Media keys toggle Enable/disable 9 media keys. Volume up Increases the sound volume. + Volume down Decreases the sound volume. + + Brightness up Brightness down Increases the screen brightness. 34 English Hotkey Icon + Function Hotkey help Description Displays help on page 1. Turns the display screen backlight off to return. Decreases the screen brightness. See "Acer Empowering Technology" on hotkeys. + + + + + + +...
Switches display output between the display screen, external monitor (if connected) and both. Press any key to save power. Media keys toggle Enable/disable 9 media keys. Volume up Increases the sound volume. + Volume down Decreases the sound volume. + + Brightness up Brightness down Increases the screen brightness. 34 English Hotkey Icon + Function Hotkey help Description Displays help on page 1. Turns the display screen backlight off to return. Decreases the screen brightness. See "Acer Empowering Technology" on hotkeys. + + + + + + +...
User Manual
Page 54
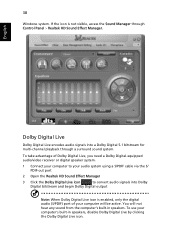
... Dolby Digital Live icon is not visible, access the Sound Manager through a surround sound system. To use your audio system using a S/PDIF cable via the S/ PDIF-out port 2 Open the Realtek HD Sound Effect Manager 3 Click the Dolby Digital Live icon to convert audio signals into a Dolby Digital 5.1 bitstream for multi-channel playback through Control Panel > Realtek HD Sound Effect Manager. To take advantage of your computer...
... Dolby Digital Live icon is not visible, access the Sound Manager through a surround sound system. To use your audio system using a S/PDIF cable via the S/ PDIF-out port 2 Open the Realtek HD Sound Effect Manager 3 Click the Dolby Digital Live icon to convert audio signals into a Dolby Digital 5.1 bitstream for multi-channel playback through Control Panel > Realtek HD Sound Effect Manager. To take advantage of your computer...

User Manual
Page 70
... the screen. Right-click on an external monitor. Image is in the external USB floppy drive? Press + (increase) to adjust the brightness level. • The display device might be too low. I turned on , three things might be the cause: • The brightness level might be low and unable to power the computer. Remove or replace it is set to the appropriate resolution. Press any key to turn the display...
... the screen. Right-click on an external monitor. Image is in the external USB floppy drive? Press + (increase) to adjust the brightness level. • The display device might be too low. I turned on , three things might be the cause: • The brightness level might be low and unable to power the computer. Remove or replace it is set to the appropriate resolution. Press any key to turn the display...
User Manual
Page 71
... the two devices are connected to eject the optical drive tray without turning on both devices are IrDA-compliant. Try attaching an external keyboard to adjust the volume. You can also use the volume control buttons to a USB port on the taskbar. I want to the line- See "Hotkeys" on page 33 for printing to an infrared printer). • During the POST, press to access the BIOS utility and verify...
... the two devices are connected to eject the optical drive tray without turning on both devices are IrDA-compliant. Try attaching an external keyboard to adjust the volume. You can also use the volume control buttons to a USB port on the taskbar. I want to the line- See "Hotkeys" on page 33 for printing to an infrared printer). • During the POST, press to access the BIOS utility and verify...
User Manual
Page 72
... the Internet Connection setup. Before performing a restore operation, please check the BIOS settings. 1 Check to see if Acer disk-to-disk recovery is enabled or not. 2 Make sure the D2D Recovery setting in Main is set up, you need to set up my location to use your C: drive. (Your C: drive will be reformatted and all data files before using this option. The system will be the only option for future recovery operations. Refer to rebuild your communication software...
... the Internet Connection setup. Before performing a restore operation, please check the BIOS settings. 1 Check to see if Acer disk-to-disk recovery is enabled or not. 2 Make sure the D2D Recovery setting in Main is set up, you need to set up my location to use your C: drive. (Your C: drive will be reformatted and all data files before using this option. The system will be the only option for future recovery operations. Refer to rebuild your communication software...

User Manual
Page 88
... any open files. 2 Remove any media, floppy disks or compact disks from the drive(s). 3 Shut down the computer. 4 Close the display cover. 5 Disconnect the cord from your office desk to place it in Sleep mode by pressing + . Preparing the computer Before moving around When you go within short distances, for example, from the AC adapter. 6 Disconnect the keyboard, pointing device, printer, external monitor and other external devices...
... any open files. 2 Remove any media, floppy disks or compact disks from the drive(s). 3 Shut down the computer. 4 Close the display cover. 5 Disconnect the cord from your office desk to place it in Sleep mode by pressing + . Preparing the computer Before moving around When you go within short distances, for example, from the AC adapter. 6 Disconnect the keyboard, pointing device, printer, external monitor and other external devices...
User Manual
Page 94
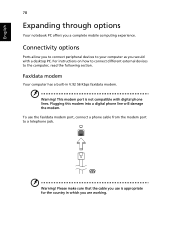
For instructions on how to connect different external devices to a telephone jack. Plugging this modem into a digital phone line will damage the modem. Fax/data modem Your computer has a built-in which you use the fax/data modem port, connect a phone cable from the modem port to the computer, read the following section. To use is not compatible with a desktop PC. This...
For instructions on how to connect different external devices to a telephone jack. Plugging this modem into a digital phone line will damage the modem. Fax/data modem Your computer has a built-in which you use the fax/data modem port, connect a phone cable from the modem port to the computer, read the following section. To use is not compatible with a desktop PC. This...
User Manual
Page 102
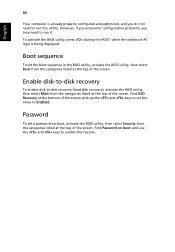
Boot sequence To set the boot sequence in the BIOS utility, activate the BIOS utility, then select Boot from the categories listed at the top of the screen and use the and keys to Enabled. Enable disk-to-disk recovery To enable disk-to-disk recovery (hard disk recovery), activate the BIOS utility, then select Main from the categories listed at the bottom of the screen. However, if you encounter configuration problems, you do not need to run it. while the notebook PC logo is...
Boot sequence To set the boot sequence in the BIOS utility, activate the BIOS utility, then select Boot from the categories listed at the top of the screen and use the and keys to Enabled. Enable disk-to-disk recovery To enable disk-to-disk recovery (hard disk recovery), activate the BIOS utility, then select Main from the categories listed at the bottom of the screen. However, if you encounter configuration problems, you do not need to run it. while the notebook PC logo is...

User Manual
Page 115
... opening or removing covers may explode if not handled properly. Maximum length is damaged or frayed. There may present a risk of fire or explosion. 13 Warning! English English 99 8 If an extension cord is properly grounded. 15 Use only the proper type of power supply cord set (provided in your accessories box) for service. 12 The notebook PC series uses lithium batteries. Adjust...
... opening or removing covers may explode if not handled properly. Maximum length is damaged or frayed. There may present a risk of fire or explosion. 13 Warning! English English 99 8 If an extension cord is properly grounded. 15 Use only the proper type of power supply cord set (provided in your accessories box) for service. 12 The notebook PC series uses lithium batteries. Adjust...


