User Manual
Page 4
... replace the power cord set . Unplug this product from unexpected noise produced by a qualified technician to restore the product to dangerous voltage points or other nearby electrical devices that the new power cord meets the following the operating instructions Note: Adjust only those controls that are covered by the operating instructions, since improper adjustment of other controls may result in damage and will often require extensive work...
... replace the power cord set . Unplug this product from unexpected noise produced by a qualified technician to restore the product to dangerous voltage points or other nearby electrical devices that the new power cord meets the following the operating instructions Note: Adjust only those controls that are covered by the operating instructions, since improper adjustment of other controls may result in damage and will often require extensive work...
User Manual
Page 8
... the power button. For instructions on how to use your Acer notebook, we have designed a set of guides: First off To turn on AcerSystem User's Guide. In addition it : 1 Click on Start, All Programs, AcerSystem. 2 Click on the computer, simply press and release the power button below the LCD screen beside the easy-launch buttons. It is not installed on your notebook. If Adobe Reader is available in Portable Document Format (PDF...
... the power button. For instructions on how to use your Acer notebook, we have designed a set of guides: First off To turn on AcerSystem User's Guide. In addition it : 1 Click on Start, All Programs, AcerSystem. 2 Click on the computer, simply press and release the power button below the LCD screen beside the easy-launch buttons. It is not installed on your notebook. If Adobe Reader is available in Portable Document Format (PDF...
User Manual
Page 11
... Base view 20 Specifications 21 Indicators 27 Easy-launch buttons 28 Touchpad 29 Touchpad basics 29 Using the keyboard 31 Lock keys and embedded numeric keypad 31 Windows keys 32 Hotkeys 32 Special keys 34 Ejecting the optical (CD or DVD) disk 35 Using a computer security lock 35 Audio 36 Adjusting the volume 36 Acer OrbiCam 37 Launching the Acer OrbiCam 38 Changing the Acer OrbiCam settings 38 Capturing photos/videos 40 Using the Acer OrbiCam as webcam 40
... Base view 20 Specifications 21 Indicators 27 Easy-launch buttons 28 Touchpad 29 Touchpad basics 29 Using the keyboard 31 Lock keys and embedded numeric keypad 31 Windows keys 32 Hotkeys 32 Special keys 34 Ejecting the optical (CD or DVD) disk 35 Using a computer security lock 35 Audio 36 Adjusting the volume 36 Acer OrbiCam 37 Launching the Acer OrbiCam 38 Changing the Acer OrbiCam settings 38 Capturing photos/videos 40 Using the Acer OrbiCam as webcam 40
User Manual
Page 13
... 1394 port 73 PC Card slot 74 ExpressCard 75 Installing memory 76 Connecting your TV and AV-in cables 77 Acer Arcade TV set-up wizard (Windows XP Home and Professional) 79 BIOS utility 80 Boot sequence 80 Enable disk-to-disk recovery 80 Password 80 Using software 81 Playing DVD movies 81 Power management 82 Acer eRecovery Management 82 Create backup 83 Restore from backup 83 Create factory default image CD 84 Re-install bundled software without CD 84 Change password 85 Troubleshooting 86 Troubleshooting tips 86 Error...
... 1394 port 73 PC Card slot 74 ExpressCard 75 Installing memory 76 Connecting your TV and AV-in cables 77 Acer Arcade TV set-up wizard (Windows XP Home and Professional) 79 BIOS utility 80 Boot sequence 80 Enable disk-to-disk recovery 80 Password 80 Using software 81 Playing DVD movies 81 Power management 82 Acer eRecovery Management 82 Create backup 83 Restore from backup 83 Create factory default image CD 84 Re-install bundled software without CD 84 Change password 85 Troubleshooting 86 Troubleshooting tips 86 Error...
User Manual
Page 17
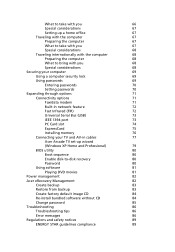
To activate Acer eLock Management, a password must be mounted as a file system when plugged into the system. • Optical drive devices - includes USB disk drives, USB pen drives, USB flash drives, USB MP3 drives, USB memory card readers, IEEE 1394 disk drives and any other removable disk drives that can be set first. Lock(s) will remain locked after rebooting, until unlocked. includes any of CD-ROM or DVD-ROM drives. • Floppy disk drives - 3.5-inch disks only. • Interfaces - Once set without any reboot necessary, and will immediately be stolen...
To activate Acer eLock Management, a password must be mounted as a file system when plugged into the system. • Optical drive devices - includes USB disk drives, USB pen drives, USB flash drives, USB MP3 drives, USB memory card readers, IEEE 1394 disk drives and any other removable disk drives that can be set first. Lock(s) will remain locked after rebooting, until unlocked. includes any of CD-ROM or DVD-ROM drives. • Floppy disk drives - 3.5-inch disks only. • Interfaces - Once set without any reboot necessary, and will immediately be stolen...
User Manual
Page 25
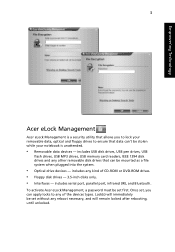
... can adjust CPU speed, LCD brightness and other settings, or click on buttons to turn the following functions on/off: Wireless LAN, Bluetooth, CardBus, FireWire(1394), Wired LAN and Optical Device if supported. DC mode (Battery mode) There are four pre-defined profiles - To create a new power profile: 1 Change power settings as desired. 2 Click "Save as ..." to save to three of your own. You can also define up to a new power profile. 3 Name the newly created...
... can adjust CPU speed, LCD brightness and other settings, or click on buttons to turn the following functions on/off: Wireless LAN, Bluetooth, CardBus, FireWire(1394), Wired LAN and Optical Device if supported. DC mode (Battery mode) There are four pre-defined profiles - To create a new power profile: 1 Change power settings as desired. 2 Click "Save as ..." to save to three of your own. You can also define up to a new power profile. 3 Name the newly created...
User Manual
Page 30
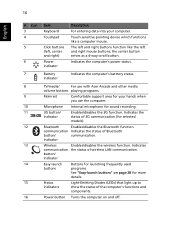
... computer mouse. Indicates the status of the computer's functions and components. Indicates the computer's power status. Power button Turns the computer on page 28 for selected models). Microphone Internal microphone for your computer. communication Indicates the status of wireless LAN communication. TV/media/ For use with Acer Arcade and other media volume buttons playing programs. Palmrest Comfortable support area for sound recording. 3G button/ indicator Enables/disables the 3G function. Bluetooth Enables/disables the Bluetooth function. button/ indicator...
... computer mouse. Indicates the status of the computer's functions and components. Indicates the computer's power status. Power button Turns the computer on page 28 for selected models). Microphone Internal microphone for your computer. communication Indicates the status of wireless LAN communication. TV/media/ For use with Acer Arcade and other media volume buttons playing programs. Palmrest Comfortable support area for sound recording. 3G button/ indicator Enables/disables the 3G function. Bluetooth Enables/disables the Bluetooth function. button/ indicator...
User Manual
Page 33
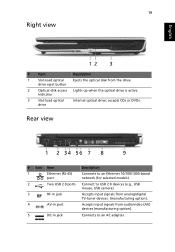
drive eject button 2 Optical disk access Lights up when the optical drive is active. accepts CDs or DVDs. indicator 3 Slot-load optical drive Internal optical drive; Rear view # Icon Item Description 1 Ethernet (RJ-45) Connects to an Ethernet 10/100/1000-based port network (for selected models). 2 Two USB 2.0 ports Connect to USB 2.0 devices (e.g., USB mouse, USB camera). 3 RF-in jack Accepts input signals from analog/digital TV-tuner devices. (manufacturing option). 4 AV-in port Accepts input signals from the drive. 19...
drive eject button 2 Optical disk access Lights up when the optical drive is active. accepts CDs or DVDs. indicator 3 Slot-load optical drive Internal optical drive; Rear view # Icon Item Description 1 Ethernet (RJ-45) Connects to an Ethernet 10/100/1000-based port network (for selected models). 2 Two USB 2.0 ports Connect to USB 2.0 devices (e.g., USB mouse, USB camera). 3 RF-in jack Accepts input signals from analog/digital TV-tuner devices. (manufacturing option). 4 AV-in port Accepts input signals from the drive. 19...

User Manual
Page 34
... # Icon Item 6 S-video/TV-out (NTSC/PAL) port 7 External display (VGA) port 8 DVI-D port 9 Ventilation slots Description Connects to a display device (e.g., external monitor, LCD projector). Note: Do not cover or obstruct the opening of the fan. Base view # Item 1 Hard disk bay 2 Ventilation slots and cooling fan 3 Memory compartment 4 Sub woofer 5 Battery bay 6 Battery lock Description Houses the computer's hard disk (secured with S-video input. Houses the computer's battery pack. Connects to a television or display device with screws). Enable the computer to...
... # Icon Item 6 S-video/TV-out (NTSC/PAL) port 7 External display (VGA) port 8 DVI-D port 9 Ventilation slots Description Connects to a display device (e.g., external monitor, LCD projector). Note: Do not cover or obstruct the opening of the fan. Base view # Item 1 Hard disk bay 2 Ventilation slots and cooling fan 3 Memory compartment 4 Sub woofer 5 Battery bay 6 Battery lock Description Houses the computer's hard disk (secured with S-video input. Houses the computer's battery pack. Connects to a television or display device with screws). Enable the computer to...
User Manual
Page 35
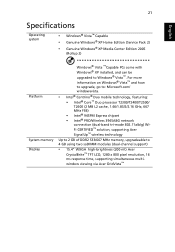
...® PRO/Wireless 3945ABG network connection (dual-band tri-mode 802.11a/b/g) WiFi CERTIFIED™ solution, supporting Acer SignalUp™ wireless technology Up to 2 GB of DDR2 533/667 MHz memory, upgradeable to Windows® Vista™. English 21 Specifications Operating system • Windows® Vista™ Capable • Genuine Windows® XP Home Edition (Service Pack 2) • Genuine Windows® XP Media Center Edition 2005 (Rollup 2) Platform System memory Display Windows® Vista ™...
...® PRO/Wireless 3945ABG network connection (dual-band tri-mode 802.11a/b/g) WiFi CERTIFIED™ solution, supporting Acer SignalUp™ wireless technology Up to 2 GB of DDR2 533/667 MHz memory, upgradeable to Windows® Vista™. English 21 Specifications Operating system • Windows® Vista™ Capable • Genuine Windows® XP Home Edition (Service Pack 2) • Genuine Windows® XP Media Center Edition 2005 (Rollup 2) Platform System memory Display Windows® Vista ™...
User Manual
Page 38
... CPU power management standard: supports Standby and Hibernation power-saving modes 71 W 4800 mAh Li-ion battery pack (8-cell) Acer QuicCharge™ technology: • 80% charge in 1 hour • 2-hour rapid charge system-off • 2.5-hour charge-in-use 3-pin 90 W AC adapter 88-/89-key keyboard, with inverted "T" cursor layout; 2.5 mm (minimum) key travel Touchpad with 4-way scroll button 12 function keys, four cursor keys, two Windows® keys, hotkey controls, standard numeric keypad, international language support...
... CPU power management standard: supports Standby and Hibernation power-saving modes 71 W 4800 mAh Li-ion battery pack (8-cell) Acer QuicCharge™ technology: • 80% charge in 1 hour • 2-hour rapid charge system-off • 2.5-hour charge-in-use 3-pin 90 W AC adapter 88-/89-key keyboard, with inverted "T" cursor layout; 2.5 mm (minimum) key travel Touchpad with 4-way scroll button 12 function keys, four cursor keys, two Windows® keys, hotkey controls, standard numeric keypad, international language support...
User Manual
Page 42
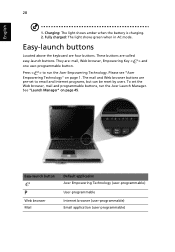
... set to run the Acer Launch Manager. They are called easy-launch buttons. The mail and Web browser buttons are four buttons. Please see "Acer Empowering Technology" on page 45. Easy-launch button P Web browser Mail Default application Acer Empowering Technology (user-programmable) User-programmable Internet browser (user-programmable) Email application (user-programmable) English 28 1. Charging: The light shows amber when the battery is charging. 2. Easy-launch buttons Located above the keyboard...
... set to run the Acer Launch Manager. They are called easy-launch buttons. The mail and Web browser buttons are four buttons. Please see "Acer Empowering Technology" on page 45. Easy-launch button P Web browser Mail Default application Acer Empowering Technology (user-programmable) User-programmable Internet browser (user-programmable) Email application (user-programmable) English 28 1. Charging: The light shows amber when the battery is charging. 2. Easy-launch buttons Located above the keyboard...
User Manual
Page 45
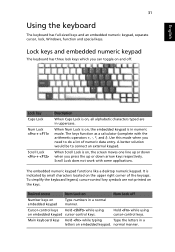
... a lot of the keycaps. Scroll Lock does not work with the arithmetic operators +, -, *, and /). Hold while using on Num Lock off . Main keyboard keys Hold while typing Type the letters in uppercase. Cursor-control keys Hold while using cursor-control keys. Lock key Caps Lock Num Lock + Scroll Lock + Description When Caps Lock is on the keys. The keys function as a calculator (complete with some applications. It is indicated by small characters located on , the embedded keypad...
... a lot of the keycaps. Scroll Lock does not work with the arithmetic operators +, -, *, and /). Hold while using on Num Lock off . Main keyboard keys Hold while typing Type the letters in uppercase. Cursor-control keys Hold while using cursor-control keys. Lock key Caps Lock Num Lock + Scroll Lock + Description When Caps Lock is on the keys. The keys function as a calculator (complete with some applications. It is indicated by small characters located on , the embedded keypad...
User Manual
Page 46
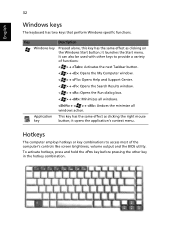
... screen brightness, volume output and the BIOS utility. Application This key has the same effect as clicking on the Windows Start button; English 32 Windows keys The keyboard has two keys that perform Windows-specific functions. It can also be used with other key in the hotkey combination. To activate hotkeys, press and hold the key before pressing the other keys to access most of functions: < > + : Activates the next Taskbar button. < > + : Opens the My Computer window. < > + : Opens Help and Support Center. < > + : Opens...
... screen brightness, volume output and the BIOS utility. Application This key has the same effect as clicking on the Windows Start button; English 32 Windows keys The keyboard has two keys that perform Windows-specific functions. It can also be used with other key in the hotkey combination. To activate hotkeys, press and hold the key before pressing the other keys to access most of functions: < > + : Activates the next Taskbar button. < > + : Opens the My Computer window. < > + : Opens Help and Support Center. < > + : Opens...
User Manual
Page 47
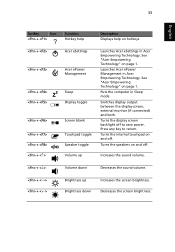
... power. Turns the internal touchpad on and off. Turns the display screen backlight off . Decreases the screen brightness. Turns the speakers on and off to return. 33 English Hotkey Icon + Function Hotkey help Description Displays help on hotkeys. + + + + + + + + Acer eSettings Acer ePower Management Sleep Display toggle Screen blank Touchpad toggle Speaker toggle Volume up Brightness down Decreases the sound volume. + + Brightness up Launches Acer eSettings in Acer Empowering Technology. Puts the computer in Sleep mode. Switches display...
... power. Turns the internal touchpad on and off. Turns the display screen backlight off . Decreases the screen brightness. Turns the speakers on and off to return. 33 English Hotkey Icon + Function Hotkey help Description Displays help on hotkeys. + + + + + + + + Acer eSettings Acer ePower Management Sleep Display toggle Screen blank Touchpad toggle Speaker toggle Volume up Brightness down Decreases the sound volume. + + Brightness up Launches Acer eSettings in Acer Empowering Technology. Puts the computer in Sleep mode. Switches display...
User Manual
Page 61
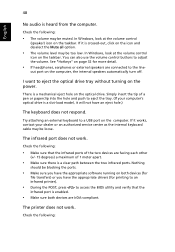
... Sleep mode. Press and release the power button to save power. Look at the power indicator: • If it may arise during the use of possible situations that the AC adapter is in the external USB floppy drive? Right-click on your computer. Easy solutions are not full-screen on the computer or on the power, but the computer does not start or boot up the "Display...
... Sleep mode. Press and release the power button to save power. Look at the power indicator: • If it may arise during the use of possible situations that the AC adapter is in the external USB floppy drive? Right-click on your computer. Easy solutions are not full-screen on the computer or on the power, but the computer does not start or boot up the "Display...
User Manual
Page 62
... the POST, press to access the BIOS utility and verify that the infrared ports of the two devices are connected to adjust the volume. Simply insert the tip of 1 meter apart. • Make sure there is a slot-load model, it works, contact your dealer or an authorized service center as the internal keyboard cable may be blocking the ports. • Make sure you have the appropriate drivers (for file transfers...
... the POST, press to access the BIOS utility and verify that the infrared ports of the two devices are connected to adjust the volume. Simply insert the tip of 1 meter apart. • Make sure there is a slot-load model, it works, contact your dealer or an authorized service center as the internal keyboard cable may be blocking the ports. • Make sure you have the appropriate drivers (for file transfers...

User Manual
Page 63
... Operating System. HyperTerminal), you need to set up my location to use your C: drive. (Your C: drive will be the only option for future recovery operations. English 49 • Make sure that the printer is connected to a power outlet and that it is Enabled. 3 Exit the BIOS utility and save changes. I want to set up , you restore the C: drive with the Internet Connection setup. To properly use the internal modem. Follow the steps below to the Windows manual...
... Operating System. HyperTerminal), you need to set up my location to use your C: drive. (Your C: drive will be the only option for future recovery operations. English 49 • Make sure that the printer is connected to a power outlet and that it is Enabled. 3 Exit the BIOS utility and save changes. I want to set up , you restore the C: drive with the Internet Connection setup. To properly use the internal modem. Follow the steps below to the Windows manual...

User Manual
Page 79
... display cover. 5 Disconnect the cord from the AC adapter. 6 Disconnect the keyboard, pointing device, printer, external monitor and other external devices. 7 Disconnect the Kensington lock if you are using one to use the computer again, unlatch and open the display; then press and release the power button. Preparing the computer Before moving within the building. Disconnecting from the desktop Follow these steps to place it in Sleep mode...
... display cover. 5 Disconnect the cord from the AC adapter. 6 Disconnect the keyboard, pointing device, printer, external monitor and other external devices. 7 Disconnect the Kensington lock if you are using one to use the computer again, unlatch and open the display; then press and release the power button. Preparing the computer Before moving within the building. Disconnecting from the desktop Follow these steps to place it in Sleep mode...

User Manual
Page 94
... the screen. Enable disk-to-disk recovery To enable disk-to run this feature. while the notebook PC logo is a hardware configuration program built into your computer's BIOS. However, if you encounter configuration problems, you do not need to -disk recovery (hard disk recovery), activate the BIOS utility, then select Main from the categories listed at the top of the screen. Find D2D Recovery at the top of the screen and use the and keys to set a password on boot: and use...
... the screen. Enable disk-to-disk recovery To enable disk-to run this feature. while the notebook PC logo is a hardware configuration program built into your computer's BIOS. However, if you encounter configuration problems, you do not need to -disk recovery (hard disk recovery), activate the BIOS utility, then select Main from the categories listed at the top of the screen. Find D2D Recovery at the top of the screen and use the and keys to set a password on boot: and use...


