
Acer Aspire 8940 Service Guide
Page 7
... 10 TouchPad Basics 11 Using the Keyboard 12 Key Types 12 Windows Keys 13 System Hotkeys 14 Using the System Utilities 15 Acer GridVista (dual-display compatible 15 Hardware Specifications and Configurations 16 System Utilities 31 BIOS Setup Utility 31 Navigating the BIOS Utility 31...General Information 50 Pre-disassembly Instructions 50 Disassembly Process 50 External Module Disassembly Process 51 External Modules Disassembly Flowchart 51 Removing the Battery Pack 52 Removing the Express Dummy Card 53 Removing the SD Dummy Card 54 Removing the Lower Door 55 Removing the ...
... 10 TouchPad Basics 11 Using the Keyboard 12 Key Types 12 Windows Keys 13 System Hotkeys 14 Using the System Utilities 15 Acer GridVista (dual-display compatible 15 Hardware Specifications and Configurations 16 System Utilities 31 BIOS Setup Utility 31 Navigating the BIOS Utility 31...General Information 50 Pre-disassembly Instructions 50 Disassembly Process 50 External Module Disassembly Process 51 External Modules Disassembly Flowchart 51 Removing the Battery Pack 52 Removing the Express Dummy Card 53 Removing the SD Dummy Card 54 Removing the Lower Door 55 Removing the ...
Acer Aspire 8940 Service Guide
Page 8
... the Media Board 85 Removing the TouchPad Lock Board 87 Removing the Finger Print Reader Bracket 89 Removing the TouchPad Board 90 Removing the RTC Battery 93 Removing the Bluetooth Board 94 Removing the USB Board 96 Removing the Power Saving Board 98 Removing the Mainboard 99 Removing the Kensington Lock...
... the Media Board 85 Removing the TouchPad Lock Board 87 Removing the Finger Print Reader Bracket 89 Removing the TouchPad Board 90 Removing the RTC Battery 93 Removing the Bluetooth Board 94 Removing the USB Board 96 Removing the Power Saving Board 98 Removing the Mainboard 99 Removing the Kensington Lock...
Acer Aspire 8940 Service Guide
Page 9
...of Contents Replacing the USB Board 156 Replacing the Bluetooth Board 158 Replacing the RTC Battery 160 Replacing the TouchPad Board 161 Replacing the Finger Print Reader Bracket 164 Replacing ... 186 Replacing the ODD Module 187 Replacing the Lower Covers 187 Replacing the SD Dummy Card 189 Replacing the Battery 189 Troubleshooting 191 Common Problems 191 Power On Issue 192 No Display Issue 193 Random Loss of BIOS Settings ...Check 209 BIOS Recovery by Crisis Disk 210 FRU (Field Replaceable Unit) List 211 Aspire 8940 Exploded Diagrams 212 Main Chassis 212 LCD Assembly 213...
...of Contents Replacing the USB Board 156 Replacing the Bluetooth Board 158 Replacing the RTC Battery 160 Replacing the TouchPad Board 161 Replacing the Finger Print Reader Bracket 164 Replacing ... 186 Replacing the ODD Module 187 Replacing the Lower Covers 187 Replacing the SD Dummy Card 189 Replacing the Battery 189 Troubleshooting 191 Common Problems 191 Power On Issue 192 No Display Issue 193 Random Loss of BIOS Settings ...Check 209 BIOS Recovery by Crisis Disk 210 FRU (Field Replaceable Unit) List 211 Aspire 8940 Exploded Diagrams 212 Main Chassis 212 LCD Assembly 213...
Acer Aspire 8940 Service Guide
Page 12
.../XD) • USB 2.0 jacks • IEEE 1394 port • HDMI™ port with 8-cell battery Communication • Acer Video Conference, featuring: • Integrated Acer Crystal Eye webcam* • Acer PureZone technology* • WLAN: Intel® Wireless WiFi Link 5100/5300* • WPAN: Bluetooth®...8226; BIOS user, supervisor, and HDD password control • Kensington Lock (7.5mm) Power subsystem • ACPI 3.0 • 71 W 4800 mAh battery • 3-pin 120 W AC adapter • ENERGY STAR®* Special keys and controls • 103-/104-/107-key keyboard • Touchpad...
.../XD) • USB 2.0 jacks • IEEE 1394 port • HDMI™ port with 8-cell battery Communication • Acer Video Conference, featuring: • Integrated Acer Crystal Eye webcam* • Acer PureZone technology* • WLAN: Intel® Wireless WiFi Link 5100/5300* • WPAN: Bluetooth®...8226; BIOS user, supervisor, and HDD password control • Kensington Lock (7.5mm) Power subsystem • ACPI 3.0 • 71 W 4800 mAh battery • 3-pin 120 W AC adapter • ENERGY STAR®* Special keys and controls • 103-/104-/107-key keyboard • Touchpad...
Acer Aspire 8940 Service Guide
Page 16
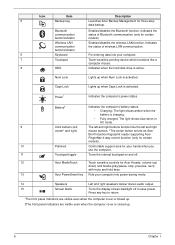
... Charging: The light shows amber when the battery is closed up when Caps Lock is active... speakers deliver stereo audio output. 15 Screen blank Turns the display screen backlight off . 12 Acer MediaTouch Touch sensitive controls for your computer. 7 Touchpad Touch-sensitive pointing device which functions like ... Bluetooth communication button/indicator Enables/disables the Bluetooth function. Icon Item Description 5 Backup key Launches Acer Backup Management for certain models) Wireless LAN communication button/indicator Enables/disables the wireless LAN function. ...
... Charging: The light shows amber when the battery is closed up when Caps Lock is active... speakers deliver stereo audio output. 15 Screen blank Turns the display screen backlight off . 12 Acer MediaTouch Touch sensitive controls for your computer. 7 Touchpad Touch-sensitive pointing device which functions like ... Bluetooth communication button/indicator Enables/disables the Bluetooth function. Icon Item Description 5 Backup key Launches Acer Backup Management for certain models) Wireless LAN communication button/indicator Enables/disables the wireless LAN function. ...

Acer Aspire 8940 Service Guide
Page 20
... prolonged cooling fan use. Note: Do not cover or obstruct the opening of the fan. 10 Chapter 1 Bottom View 1 7 2 3 6 5 4 Icon Item 1 Battery bay Description Houses the computer's battery pack. 2 Battery release latch Releases the battery for certain models only). 5 Hard disk bay-Main Houses the computer's hard disk (secured with screws) Secondary (for removal...
... prolonged cooling fan use. Note: Do not cover or obstruct the opening of the fan. 10 Chapter 1 Bottom View 1 7 2 3 6 5 4 Icon Item 1 Battery bay Description Houses the computer's battery pack. 2 Battery release latch Releases the battery for certain models only). 5 Hard disk bay-Main Houses the computer's hard disk (secured with screws) Secondary (for removal...
Acer Aspire 8940 Service Guide
Page 39
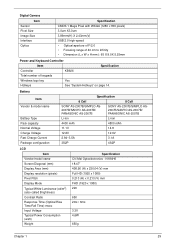
....96 (H) x 230.04 (V) mm Full HD (1920 x 1080) 0.213 (H) x 0.213 (V) mm FHD (1920 x 1080) 220 650 2ms / 6ms 3.3V 4.6W 650g Chapter 1 29 Battery Item Vendor & model name Battery Type Pack capacity Normal Voltage Charge Voltage Fast Charge Current Package configuration Specification 6 Cell 8 Cell SONY AS-2007B/SIMPLO AS2007B/SANYO AS-2007B...
....96 (H) x 230.04 (V) mm Full HD (1920 x 1080) 0.213 (H) x 0.213 (V) mm FHD (1920 x 1080) 220 650 2ms / 6ms 3.3V 4.6W 650g Chapter 1 29 Battery Item Vendor & model name Battery Type Pack capacity Normal Voltage Charge Voltage Fast Charge Current Package configuration Specification 6 Cell 8 Cell SONY AS-2007B/SIMPLO AS2007B/SANYO AS-2007B...
Acer Aspire 8940 Service Guide
Page 49
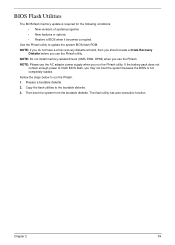
... supply when you use the Phlash. Fellow the steps below to the bootable diskette. 3. Copy the flash utilities to run the Phlash utility. If the battery pack does not contain enough power to update the system BIOS flash ROM. Then boot the system from the bootable diskette. Prepare a bootable diskette. 2. Use...
... supply when you use the Phlash. Fellow the steps below to the bootable diskette. 3. Copy the flash utilities to run the Phlash utility. If the battery pack does not contain enough power to update the system BIOS flash ROM. Then boot the system from the bootable diskette. Prepare a bootable diskette. 2. Use...
Acer Aspire 8940 Service Guide
Page 60
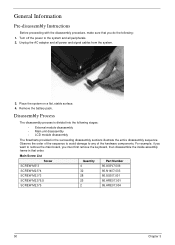
Turn off the power to the system and all power and signal cables from the system. 3. Remove the battery pack. Disassembly Process The disassembly process is divided into the following : 1. Unplug the AC adapter and all peripherals. 2. Place the system on a flat, stable surface. 4. ...
Turn off the power to the system and all power and signal cables from the system. 3. Remove the battery pack. Disassembly Process The disassembly process is divided into the following : 1. Unplug the AC adapter and all peripherals. 2. Place the system on a flat, stable surface. 4. ...
Acer Aspire 8940 Service Guide
Page 61
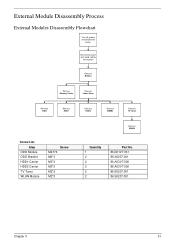
External Module Disassembly Process External Modules Disassembly Flowchart Turn off system and peripherals power Disconnect power and signal cables from system Rem ove Battery Rem ove Dummy Cards Rem ove Lower Door Rem ove ODD Rem ove HDD1 Rem ove HDD2 Rem ove DIMMs Rem ove TV Tuner Screw List Step ODD Module ODD Bracket HDD1 Carrier HDD2 Carrier TV Tuner WLAN Module Screw M2.5*4 M2*3 M3*3 M3*3 M2*3 M2*3 Rem ove WLAN Quantity 1 2 2 2 2 2 Part No. 86.D01V7.001 86.S0207.001 86.A03V7.006 86.A03V7.006 86.S0207.001 86.S0207.001 Chapter 3 51
External Module Disassembly Process External Modules Disassembly Flowchart Turn off system and peripherals power Disconnect power and signal cables from system Rem ove Battery Rem ove Dummy Cards Rem ove Lower Door Rem ove ODD Rem ove HDD1 Rem ove HDD2 Rem ove DIMMs Rem ove TV Tuner Screw List Step ODD Module ODD Bracket HDD1 Carrier HDD2 Carrier TV Tuner WLAN Module Screw M2.5*4 M2*3 M3*3 M3*3 M2*3 M2*3 Rem ove WLAN Quantity 1 2 2 2 2 2 Part No. 86.D01V7.001 86.S0207.001 86.A03V7.006 86.A03V7.006 86.S0207.001 86.S0207.001 Chapter 3 51
Acer Aspire 8940 Service Guide
Page 62
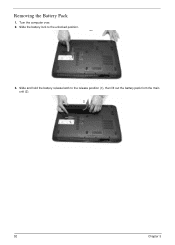
Removing the Battery Pack 1. Slide the battery lock to the release position (1), then lift out the battery pack from the main unit (2). 2 1 52 Chapter 3 Slide and hold the battery release latch to the unlocked position. 3. Turn the computer over. 2.
Removing the Battery Pack 1. Slide the battery lock to the release position (1), then lift out the battery pack from the main unit (2). 2 1 52 Chapter 3 Slide and hold the battery release latch to the unlocked position. 3. Turn the computer over. 2.
Acer Aspire 8940 Service Guide
Page 65
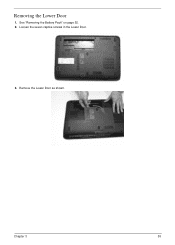
Loosen the seven captive screws in the Lower Door. 3. See "Removing the Battery Pack" on page 52. 2. Removing the Lower Door 1. Chapter 3 55 Remove the Lower Door as shown.
Loosen the seven captive screws in the Lower Door. 3. See "Removing the Battery Pack" on page 52. 2. Removing the Lower Door 1. Chapter 3 55 Remove the Lower Door as shown.
Acer Aspire 8940 Service Guide
Page 78
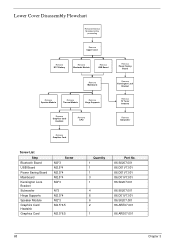
Lower Cover Disassembly Flowchart Remove External Modules before proceeding Rem ove Upper Cover Rem ove RTC Battery Rem ove Bluetooth Module Rem ove USB Board Rem ove Power Saving Board Rem ove Mainboard Rem ove Kensington Lock Bracket Rem ove Speaker Module ...
Lower Cover Disassembly Flowchart Remove External Modules before proceeding Rem ove Upper Cover Rem ove RTC Battery Rem ove Bluetooth Module Rem ove USB Board Rem ove Power Saving Board Rem ove Mainboard Rem ove Kensington Lock Bracket Rem ove Speaker Module ...

Acer Aspire 8940 Service Guide
Page 79
IMPORTANT: Do not remove the Keyboard from the Upper Cover. 3. Turn the Keyboard over and place it on page 52. 2. Chapter 3 69 Press the six securing clips inward to expose the FFC cables. Lift the centre of Keyboard up as shown. the Keyboard FFCs are still connected. 4. See "Removing the Battery Pack" on the TouchPad area to release the Keyboard from the computer; Removing the Keyboard 1.
IMPORTANT: Do not remove the Keyboard from the Upper Cover. 3. Turn the Keyboard over and place it on page 52. 2. Chapter 3 69 Press the six securing clips inward to expose the FFC cables. Lift the centre of Keyboard up as shown. the Keyboard FFCs are still connected. 4. See "Removing the Battery Pack" on the TouchPad area to release the Keyboard from the computer; Removing the Keyboard 1.
Acer Aspire 8940 Service Guide
Page 81
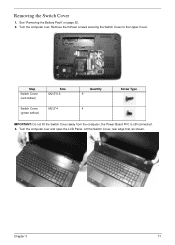
Turn the computer over and open the LCD Panel. Step Switch Cover (red callout) Switch Cover (green callout) Size M2.5*6.5 M2.5*4 Quantity 9 4 Screw Type IMPORTANT: Do not lift the Switch Cover away from the computer; the Power Board FFC is still connected. 3. Chapter 3 71 Removing the Switch Cover 1. Remove the thirteen screws securing the Switch Cover to the Upper Cover. Lift the Switch Cover, rear edge first, as shown. See "Removing the Battery Pack" on page 52. 2. Turn the computer over .
Turn the computer over and open the LCD Panel. Step Switch Cover (red callout) Switch Cover (green callout) Size M2.5*6.5 M2.5*4 Quantity 9 4 Screw Type IMPORTANT: Do not lift the Switch Cover away from the computer; the Power Board FFC is still connected. 3. Chapter 3 71 Removing the Switch Cover 1. Remove the thirteen screws securing the Switch Cover to the Upper Cover. Lift the Switch Cover, rear edge first, as shown. See "Removing the Battery Pack" on page 52. 2. Turn the computer over .
Acer Aspire 8940 Service Guide
Page 103
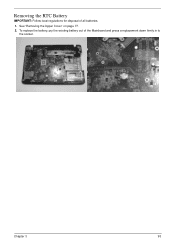
Removing the RTC Battery IMPORTANT: Follow local regulations for disposal of the Mainboard and press a replacement down firmly in to the socket. To replace the battery, pry the existing battery out of all batteries. 1. See "Removing the Upper Cover" on page 77. 2. Chapter 3 93
Removing the RTC Battery IMPORTANT: Follow local regulations for disposal of the Mainboard and press a replacement down firmly in to the socket. To replace the battery, pry the existing battery out of all batteries. 1. See "Removing the Upper Cover" on page 77. 2. Chapter 3 93
Acer Aspire 8940 Service Guide
Page 170
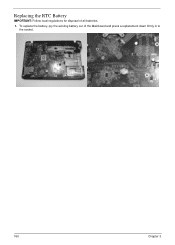
To replace the battery, pry the existing battery out of all batteries. 1. Replacing the RTC Battery IMPORTANT: Follow local regulations for disposal of the Mainboard and press a replacement down firmly in to the socket. 160 Chapter 3
To replace the battery, pry the existing battery out of all batteries. 1. Replacing the RTC Battery IMPORTANT: Follow local regulations for disposal of the Mainboard and press a replacement down firmly in to the socket. 160 Chapter 3
Acer Aspire 8940 Service Guide
Page 199
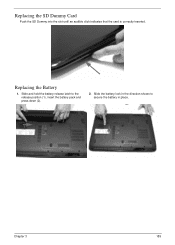
Replacing the Battery 1. Replacing the SD Dummy Card Push the SD Dummy into the slot until an audible click indicates that the card is correctly inserted. Slide the battery lock in the direction shown to the release position (1), insert the battery pack and press down (2). 2. Slide and hold the battery release latch to secure the battery in place. 2 1 Chapter 3 189
Replacing the Battery 1. Replacing the SD Dummy Card Push the SD Dummy into the slot until an audible click indicates that the card is correctly inserted. Slide the battery lock in the direction shown to the release position (1), insert the battery pack and press down (2). 2. Slide and hold the battery release latch to secure the battery in place. 2 1 Chapter 3 189

Acer Aspire 8940 Service Guide
Page 202
... any extension cables between the computer and the electrical outlet. Do not replace non-defective FRUs: Start OK Check AC/Battery Power on OK Check Daughter/B & FFC Whether OK Swap AC /Battery to NG try OK Swap Daughter/B NG Re-plug PWR FFC Swap M/B Computer Shuts down Intermittently If the system powers...
... any extension cables between the computer and the electrical outlet. Do not replace non-defective FRUs: Start OK Check AC/Battery Power on OK Check Daughter/B & FFC Whether OK Swap AC /Battery to NG try OK Swap Daughter/B NG Re-plug PWR FFC Swap M/B Computer Shuts down Intermittently If the system powers...
Acer Aspire 8940 Service Guide
Page 203
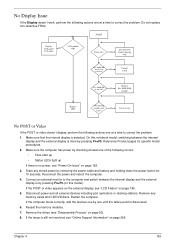
... drives (see "LCD Failure" on this notebook model, switching between the internal display and the external display is done by removing the power cable and battery and holding down the power button for specific model procedures. 2. Do not replace non-defective FRUs: START Replace LCD panel/ No LCD cable LCD module...
... drives (see "LCD Failure" on this notebook model, switching between the internal display and the external display is done by removing the power cable and battery and holding down the power button for specific model procedures. 2. Do not replace non-defective FRUs: START Replace LCD panel/ No LCD cable LCD module...


