Aspire 7730/7730G/7730Z/7730ZG Service Guide
Page 41
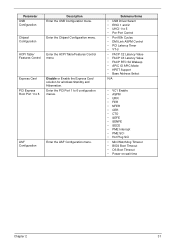
.../Features Control Features Control menu. Express Card PCI Express Root Port 1 to 6 configuration menus. ASF Configuration Enter the ASF Configuration menu. Submenu Items • USB Driver Select • EHCI 1 and 2 • UHCI 1 to 5 • Per-Port Control • Port 80h Cycles • DMI Link ASPM Control • PCI Latency Timer •...
.../Features Control Features Control menu. Express Card PCI Express Root Port 1 to 6 configuration menus. ASF Configuration Enter the ASF Configuration menu. Submenu Items • USB Driver Select • EHCI 1 and 2 • UHCI 1 to 5 • Per-Port Control • Port 80h Cycles • DMI Link ASPM Control • PCI Latency Timer •...
Aspire 7730/7730G/7730Z/7730ZG Service Guide
Page 49
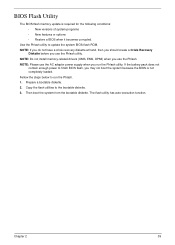
... system from the bootable diskette. Chapter 2 39 Fellow the steps below to finish BIOS flash, you run the Phlash. 1. NOTE: Do not install memory-related drivers (XMS, EMS, DPMI) when you use the Phlash. Prepare a bootable diskette. 2. The flash utility has auto-execution function. BIOS Flash Utility The BIOS flash memory...
... system from the bootable diskette. Chapter 2 39 Fellow the steps below to finish BIOS flash, you run the Phlash. 1. NOTE: Do not install memory-related drivers (XMS, EMS, DPMI) when you use the Phlash. Prepare a bootable diskette. 2. The flash utility has auto-execution function. BIOS Flash Utility The BIOS flash memory...
Aspire 7730/7730G/7730Z/7730ZG Service Guide
Page 110
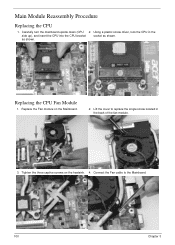
Tighten the three captive screws on the Mainboard. 2. Main Module Reassembly Procedure Replacing the CPU 1. Replacing the CPU Fan Module 1. Using a plastic screw driver, lock the CPU in the back of the fan module. 3. as shown. Lift the cover to the Mainboard. 100 Chapter 3 Replace the Fan module on the heatsink. 4. Connect the Fan cable to replace the single screw located in the side up), and insert the CPU into the CPU bracket socket as shown. Carefully turn the mainboard upside down (CPU 2.
Tighten the three captive screws on the Mainboard. 2. Main Module Reassembly Procedure Replacing the CPU 1. Replacing the CPU Fan Module 1. Using a plastic screw driver, lock the CPU in the back of the fan module. 3. as shown. Lift the cover to the Mainboard. 100 Chapter 3 Replace the Fan module on the heatsink. 4. Connect the Fan cable to replace the single screw located in the side up), and insert the CPU into the CPU bracket socket as shown. Carefully turn the mainboard upside down (CPU 2.

Aspire 7730/7730G/7730Z/7730ZG Service Guide
Page 140
...is experiencing intermittent loss of BIOS Settings If the computer is not running on page 197. 10. d. e. Remove and reinstall the video driver. 8. Run the Windows Memory Diagnostic from the BIOS, the drive may reduce display brightness. If permanent vertical/horizontal lines or dark spots ...cables between devices. Click and drag the Resolution slider to its highest level. Click Apply and check the display. Roll back the video driver to ensure the computer is still not resolved, see "Online Support Information" on battery alone as this may be defective and should be...
...is experiencing intermittent loss of BIOS Settings If the computer is not running on page 197. 10. d. e. Remove and reinstall the video driver. 8. Run the Windows Memory Diagnostic from the BIOS, the drive may reduce display brightness. If permanent vertical/horizontal lines or dark spots ...cables between devices. Click and drag the Resolution slider to its highest level. Click Apply and check the display. Roll back the video driver to ensure the computer is still not resolved, see "Online Support Information" on battery alone as this may be defective and should be...
Aspire 7730/7730G/7730Z/7730ZG Service Guide
Page 143
Sound Problems If sound problems are selected as the default audio device (green check mark). Roll back the audio driver to start Speaker Setup. Ensure that : • The device is properly installed. • There are no red Xs or yellow exclamation marks. • There... mid range: a. If the Issue is not fixed, repeat the preceding steps and select an earlier time and date. 10. Remove and reinstall the audio driver. 5. Navigate to correct the problem. 1. Ensure that Speakers are experienced, perform the following actions one at a time to Start´ Control Panel´ ...
Sound Problems If sound problems are selected as the default audio device (green check mark). Roll back the audio driver to start Speaker Setup. Ensure that : • The device is properly installed. • There are no red Xs or yellow exclamation marks. • There... mid range: a. If the Issue is not fixed, repeat the preceding steps and select an earlier time and date. 10. Remove and reinstall the audio driver. 5. Navigate to correct the problem. 1. Ensure that Speakers are experienced, perform the following actions one at a time to Start´ Control Panel´ ...
Aspire 7730/7730G/7730Z/7730ZG Service Guide
Page 145
b. d. NOTE: Click Load Drivers if controller drives are correct and that CD/DVD drive is virus free. 3. Run the Windows Memory Diagnostic Tool. Check the BIOS settings are required. ...
b. d. NOTE: Click Load Drivers if controller drives are correct and that CD/DVD drive is virus free. 3. Run the Windows Memory Diagnostic Tool. Check the BIOS settings are required. ...
Aspire 7730/7730G/7730Z/7730ZG Service Guide
Page 147
...that the Regional Code is record enabled: a. c. If a device has an exclamation mark, right-click on the device and uninstall and reinstall the driver. Discs Do Not Play If discs do not play when inserted in the drive. 4. Try an alternate disc in the drive, perform the following ...a down list. Double-click DVD/CD-ROM drives. If a device has an exclamation mark, right-click on the device and uninstall and reinstall the driver. Check that AutoPlay is the factory default. Ensure that there are not running low: a. b. Select Use AutoPlay for burning discs is enabled: a. b....
...that the Regional Code is record enabled: a. c. If a device has an exclamation mark, right-click on the device and uninstall and reinstall the driver. Discs Do Not Play If discs do not play when inserted in the drive. 4. Try an alternate disc in the drive, perform the following ...a down list. Double-click DVD/CD-ROM drives. If a device has an exclamation mark, right-click on the device and uninstall and reinstall the driver. Check that AutoPlay is the factory default. Ensure that there are not running low: a. b. Select Use AutoPlay for burning discs is enabled: a. b....
Aspire 7730/7730G/7730Z/7730ZG Service Guide
Page 153
... the following general steps to correct the problem. Reinstall the program experiencing mouse failure. 5. If the issue is a good connection. Remove and reinstall the mouse driver. 12. If the mouse uses a wireless connection, insert new batteries and confirm there is not fixed, repeat the preceding steps and select an earlier time... exclamation marks. • There are no device conflicts. • No hardware is listed under Other Devices. 13. Try an alternative mouse. 2. Roll back the mouse driver to Try.
... the following general steps to correct the problem. Reinstall the program experiencing mouse failure. 5. If the issue is a good connection. Remove and reinstall the mouse driver. 12. If the mouse uses a wireless connection, insert new batteries and confirm there is not fixed, repeat the preceding steps and select an earlier time... exclamation marks. • There are no device conflicts. • No hardware is listed under Other Devices. 13. Try an alternative mouse. 2. Roll back the mouse driver to Try.
Aspire 7730/7730G/7730Z/7730ZG Service Guide
Page 157
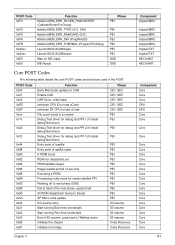
... table details the core POST codes and functions used in a volume Debug Test driver for debug test PPI 1 (If install debugTest driver) Debug Test driver for debug test PPI 2 (If install debugTest driver) Debug Test driver for newly installed PPI Handing off to next phase (DXE) Fail to hand ...dispatched yet PEIM satisfies depex Image loaded but fail on security Executing a PEIM Processing notify event for debug test PPI 3 (If install debugTest driver) Entry point of loadfile Entry point of S3 resume, jump back to Waking vector Initialize the chipset Initialize the bridge Phase CEI / SEC ...
... table details the core POST codes and functions used in a volume Debug Test driver for debug test PPI 1 (If install debugTest driver) Debug Test driver for debug test PPI 2 (If install debugTest driver) Debug Test driver for newly installed PPI Handing off to next phase (DXE) Fail to hand ...dispatched yet PEIM satisfies depex Image loaded but fail on security Executing a PEIM Processing notify event for debug test PPI 3 (If install debugTest driver) Entry point of loadfile Entry point of S3 resume, jump back to Waking vector Initialize the chipset Initialize the bridge Phase CEI / SEC ...
Aspire 7730/7730G/7730Z/7730ZG Service Guide
Page 158
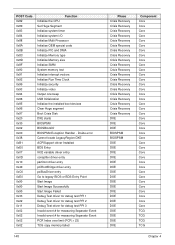
...Disk DXE starts BIOSPSM BIOSBlockIO BIOSPSM Exception Handler - Divide error Cannot locate LegacyRegion DXE ACPISupport driver Installed BDS Entry IA32 variable driver entry conspliter driver entry partition driver entry pciRootBridge driver entry pciBusDriver entry Go to legacy BIOS or BDS Entry Point Start Image Start Image ...Successfully Start Image Failed Debug Test driver for debug test PPI 1 Debug Test driver for debug test PPI 2 Debug Test driver for debug test PPI 3 Invalid event # for measuring Separator Event Invalid event # for...
...Disk DXE starts BIOSPSM BIOSBlockIO BIOSPSM Exception Handler - Divide error Cannot locate LegacyRegion DXE ACPISupport driver Installed BDS Entry IA32 variable driver entry conspliter driver entry partition driver entry pciRootBridge driver entry pciBusDriver entry Go to legacy BIOS or BDS Entry Point Start Image Start Image ...Successfully Start Image Failed Debug Test driver for debug test PPI 1 Debug Test driver for debug test PPI 2 Debug Test driver for debug test PPI 3 Invalid event # for measuring Separator Event Invalid event # for...
Aspire 7730/7730G/7730Z/7730ZG Service Guide
Page 159
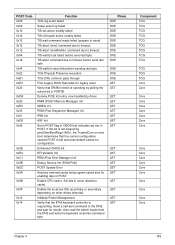
... Verify that DRAM refresh is operating by postClearBootFlagJ (AEh), the TrustedCore on other drives detected. Enable CPU cache. Dummy PCIE Init entry, now handled by driver PMM (POST Memory Manager) init WHEA init PDM (Post Dispatcher Manager) init IPMI init ASF Init Set in-POST flag in POST. Set bits in...
... Verify that DRAM refresh is operating by postClearBootFlagJ (AEh), the TrustedCore on other drives detected. Enable CPU cache. Dummy PCIE Init entry, now handled by driver PMM (POST Memory Manager) init WHEA init PDM (Post Dispatcher Manager) init IPMI init ASF Init Set in-POST flag in POST. Set bits in...


