
Aspire 7730 Series Quick Guide
Page 5
... text with setting up your new computer. Follow the instructions on AcerSystem User's Guide. Follow these steps to access it contains warranty information and the general regulations and safety notices for meeting your computer can help you use Adobe Reader, access the Help and Support menu. This guide contains detailed information on such subjects as Acer's Empowering Technology, using the keyboard, audio, etc. It covers basic topics...
... text with setting up your new computer. Follow the instructions on AcerSystem User's Guide. Follow these steps to access it contains warranty information and the general regulations and safety notices for meeting your computer can help you use Adobe Reader, access the Help and Support menu. This guide contains detailed information on such subjects as Acer's Empowering Technology, using the keyboard, audio, etc. It covers basic topics...
Aspire 7730 Series Quick Guide
Page 13
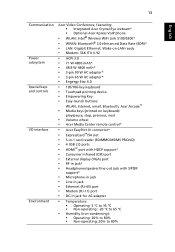
...-key keyboard • Touchpad pointing device • Empowering Key • Easy-launch buttons: WLAN, Internet, email, Bluetooth, Acer Arcade™ • Media keys (printed on keyboard): play/pause, stop, previous, next • Volume wheel • Acer Media Center remote control* • Acer EasyPort IV connector* • ExpressCard™/54 slot • 5-in-1 card reader (SD/MMC/MS/MS PRO/xD) • 4 USB 2.0 ports • HDMI™ port with HDCP support* • Consumer infrared (CIR) port • External display (VGA) port...
...-key keyboard • Touchpad pointing device • Empowering Key • Easy-launch buttons: WLAN, Internet, email, Bluetooth, Acer Arcade™ • Media keys (printed on keyboard): play/pause, stop, previous, next • Volume wheel • Acer Media Center remote control* • Acer EasyPort IV connector* • ExpressCard™/54 slot • 5-in-1 card reader (SD/MMC/MS/MS PRO/xD) • 4 USB 2.0 ports • HDMI™ port with HDCP support* • Consumer infrared (CIR) port • External display (VGA) port...
Aspire 7730/7730G/7730Z/7730ZG Service Guide
Page 7
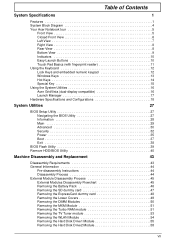
... 9 Indicators 10 Easy-Launch Buttons 10 Touch Pad Basics (with fingerprint reader 11 Using the Keyboard 12 Lock Keys and embedded numeric keypad 12 Windows Keys 13 Hot Keys 14 Special Key 15 Using the System Utilities 16 Acer GridVista (dual-display compatible 16 Launch Manager 17 Hardware Specifications and Configurations 18 System Utilities 27 BIOS Setup Utility 27 Navigating the BIOS Utility 27 Information 28 Main 29 Advanced 30 Security 32 Power 35 Boot 37 Exit 38 BIOS Flash Utility 39 Remove HDD/BIOS Utility 40...
... 9 Indicators 10 Easy-Launch Buttons 10 Touch Pad Basics (with fingerprint reader 11 Using the Keyboard 12 Lock Keys and embedded numeric keypad 12 Windows Keys 13 Hot Keys 14 Special Key 15 Using the System Utilities 16 Acer GridVista (dual-display compatible 16 Launch Manager 17 Hardware Specifications and Configurations 18 System Utilities 27 BIOS Setup Utility 27 Navigating the BIOS Utility 27 Information 28 Main 29 Advanced 30 Security 32 Power 35 Boot 37 Exit 38 BIOS Flash Utility 39 Remove HDD/BIOS Utility 40...
Aspire 7730/7730G/7730Z/7730ZG Service Guide
Page 9
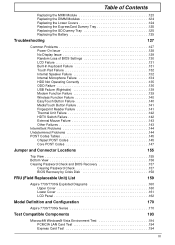
... POST Codes 147 Jumper and Connector Locations 155 Top View 155 Bottom View 156 Clearing Password Check and BIOS Recovery 157 Clearing Password Check 157 BIOS Recovery by Crisis Disk 158 FRU (Field Replaceable Unit) List 159 Aspire 7730/7730G Exploded Diagrams 160 Upper Cover 160 Lower Cover 161 LCD Panel 162 Model Definition and Configuration 170 Aspire 7730/7730G Series 170 Test Compatible Components 193 Microsoft® Windows® Vista Environment Test 194 PCMCIA LAN Card...
... POST Codes 147 Jumper and Connector Locations 155 Top View 155 Bottom View 156 Clearing Password Check and BIOS Recovery 157 Clearing Password Check 157 BIOS Recovery by Crisis Disk 158 FRU (Field Replaceable Unit) List 159 Aspire 7730/7730G Exploded Diagrams 160 Upper Cover 160 Lower Cover 161 LCD Panel 162 Model Definition and Configuration 170 Aspire 7730/7730G Series 170 Test Compatible Components 193 Microsoft® Windows® Vista Environment Test 194 PCMCIA LAN Card...
Aspire 7730/7730G/7730Z/7730ZG Service Guide
Page 20
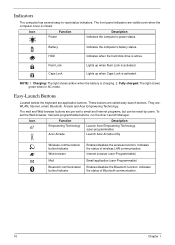
...email and Internet programs, but can be reset by users. The front panel indicators are : WLAN, Internet, email, Bluetooth, Arcade and Acer Empowering Technology. NOTE: 1. These buttons are application buttons. They are visible even when the computer cover is charging. 2. Indicates the status of Bluetooth communication. 10 Chapter 1 Battery Indicates the computer's battery status. HDD Num Lock Caps Lock Indicates when the hard disk drive is active. Internet browser (user-Programmable) Email application (user-Programmable) Enables/disables the Bluetooth function.
...email and Internet programs, but can be reset by users. The front panel indicators are : WLAN, Internet, email, Bluetooth, Arcade and Acer Empowering Technology. NOTE: 1. These buttons are application buttons. They are visible even when the computer cover is charging. 2. Indicates the status of Bluetooth communication. 10 Chapter 1 Battery Indicates the computer's battery status. HDD Num Lock Caps Lock Indicates when the hard disk drive is active. Internet browser (user-Programmable) Email application (user-Programmable) Enables/disables the Bluetooth function.
Aspire 7730/7730G/7730Z/7730ZG Service Guide
Page 24
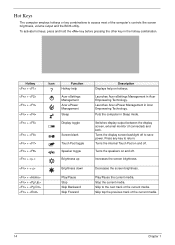
... in the hotkey combination. Switches display output between the display screen, external monitor (if connected) and both. Press any key to save power. Decreases the screen brightness. Skip to the next track of the computer's controls like screen brightness, volume output and the BIOS utility. Turns the speakers on and off to return. Hotkey + + + + + Icon Function Hotkey help Acer eSettings Management Acer ePower Management Sleep Display toggle + + + + < > + < > + + + + Screen blank Touch Pad toggle Speaker toggle Brightness up Brightness down Play...
... in the hotkey combination. Switches display output between the display screen, external monitor (if connected) and both. Press any key to save power. Decreases the screen brightness. Skip to the next track of the computer's controls like screen brightness, volume output and the BIOS utility. Turns the speakers on and off to return. Hotkey + + + + + Icon Function Hotkey help Acer eSettings Management Acer ePower Management Sleep Display toggle + + + + < > + < > + + + + Screen blank Touch Pad toggle Speaker toggle Brightness up Brightness down Play...
Aspire 7730/7730G/7730Z/7730ZG Service Guide
Page 33
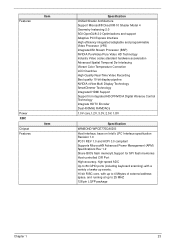
... Multi Display Technology SmartDimmer Technology Integrated HDMI Support Support for integrated HDCPNVIDIA Digital Vibrance Control Technology Integrate HDTV Encoder Dual 400MHz RAMDACs 1.0V core,1.2V, 3.3V, 2.5V, 1.8V Specification WINBOND WPCE775CA0DG Host interface, base on Intel's LPC Interface specification Revision 1.0 PC01 REV 1.0 and ACPI 3.0 compliant Supports Microsoft® Advanced Power Management (APM) Specifications Rev 1.2 Share BIOS flash memory5.Support for SPI flash memories Host-controlled CIR Port High...
... Multi Display Technology SmartDimmer Technology Integrated HDMI Support Support for integrated HDCPNVIDIA Digital Vibrance Control Technology Integrate HDTV Encoder Dual 400MHz RAMDACs 1.0V core,1.2V, 3.3V, 2.5V, 1.8V Specification WINBOND WPCE775CA0DG Host interface, base on Intel's LPC Interface specification Revision 1.0 PC01 REV 1.0 and ACPI 3.0 compliant Supports Microsoft® Advanced Power Management (APM) Specifications Rev 1.2 Share BIOS flash memory5.Support for SPI flash memories Host-controlled CIR Port High...

Aspire 7730/7730G/7730Z/7730ZG Service Guide
Page 35
... keypads Windows logo key Internal & external keyboard work simultaneously MDC Card Chipset Features Item Camera Type Item Finger Print Board Item Features Battery Item Vendor & model name Battery Type Pack capacity Number of battery cell Package configuration Chapter 1 Specification FOXCON T60H928.11 Bluetooth miniUSB module Internal Mini USB solution with antenna Bluetooth 2.0+EDR Bluetooth control for BT optical mouse Specification Aspire series: New Acer Non-Ergo Keyboard 88-/89-/93-key Yes Plug USB keyboard to the USB port directly: Yes Specification Intel® Wireless WiFi Link...
... keypads Windows logo key Internal & external keyboard work simultaneously MDC Card Chipset Features Item Camera Type Item Finger Print Board Item Features Battery Item Vendor & model name Battery Type Pack capacity Number of battery cell Package configuration Chapter 1 Specification FOXCON T60H928.11 Bluetooth miniUSB module Internal Mini USB solution with antenna Bluetooth 2.0+EDR Bluetooth control for BT optical mouse Specification Aspire series: New Acer Non-Ergo Keyboard 88-/89-/93-key Yes Plug USB keyboard to the USB port directly: Yes Specification Intel® Wireless WiFi Link...
Aspire 7730/7730G/7730Z/7730ZG Service Guide
Page 38
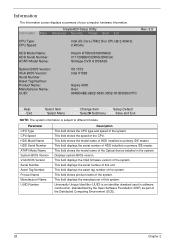
... Optical device installed in software construction, standardized by the Open Software Foundation (OSF) as part of HDD installed on primary IDE master. Universally Unique Identifier (UUID) is subject to different models. InsydeH20 Setup Utility Information Main Advanced Security Power Boot Exit Rev. 3.5 CPU Type: CPU Speed: Intel (R) Core (TM)2 Duo CPU @ 2.40GHz 2.40GHz HDD Model Name: HDD Serial Number: ATAPI Model Name: Hitachi HTS543516K9SA00 071129BB0C02WGHDKKGC Slimtype DVD A DS8A2S System BIOS Version: VGA BIOS Version: Serial Number: Asset Tag Number...
... Optical device installed in software construction, standardized by the Open Software Foundation (OSF) as part of HDD installed on primary IDE master. Universally Unique Identifier (UUID) is subject to different models. InsydeH20 Setup Utility Information Main Advanced Security Power Boot Exit Rev. 3.5 CPU Type: CPU Speed: Intel (R) Core (TM)2 Duo CPU @ 2.40GHz 2.40GHz HDD Model Name: HDD Serial Number: ATAPI Model Name: Hitachi HTS543516K9SA00 071129BB0C02WGHDKKGC Slimtype DVD A DS8A2S System BIOS Version: VGA BIOS Version: Serial Number: Asset Tag Number...
Aspire 7730/7730G/7730Z/7730ZG Service Guide
Page 43
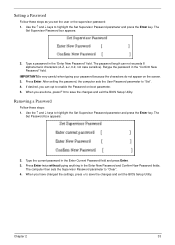
... BIOS Setup Utility. Type the current password in the "Enter New Password" field. When you set the user or the supervisor password: 1. Use the ↑ and ↓ keys to highlight the Set Supervisor Password parameter and press the Enter key. The Set Password box appears: 2. Chapter 2 33 Use the ↑ and ↓ keys to highlight the Set Supervisor Password parameter and press the Enter key. Removing a Password Follow these steps as you have changed the settings, press u to enable the Password...
... BIOS Setup Utility. Type the current password in the "Enter New Password" field. When you set the user or the supervisor password: 1. Use the ↑ and ↓ keys to highlight the Set Supervisor Password parameter and press the Enter key. The Set Password box appears: 2. Chapter 2 33 Use the ↑ and ↓ keys to highlight the Set Supervisor Password parameter and press the Enter key. Removing a Password Follow these steps as you have changed the settings, press u to enable the Password...
Aspire 7730/7730G/7730Z/7730ZG Service Guide
Page 44
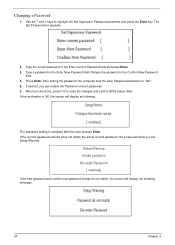
... the user presses Enter. If the current password entered does not match the actual current password, the screen will display the following . Use the ↑ and ↓ keys to "Set". 5. Press Enter. Changing a Password 1. Retype the password in the Enter New Password field. When you can enable the Password on boot parameter. 6. If desired, you are done, press F10 to save the changes and exit the BIOS Setup Utility. Type the current password in the Enter Current Password...
... the user presses Enter. If the current password entered does not match the actual current password, the screen will display the following . Use the ↑ and ↓ keys to "Set". 5. Press Enter. Changing a Password 1. Retype the password in the Enter New Password field. When you can enable the Password on boot parameter. 6. If desired, you are done, press F10 to save the changes and exit the BIOS Setup Utility. Type the current password in the Enter Current Password...
Aspire 7730/7730G/7730Z/7730ZG Service Guide
Page 137
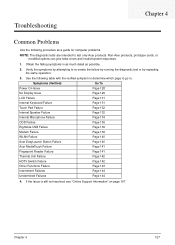
Use the following procedure as possible. 2. Symptoms (Verified) Go To Power On Issue Page 128 No Display Issue Page 129 LCD Failure Page 131 Internal Keyboard Failure Page 131 Touch Pad Failure Page 132 Internal Speaker Failure Page 132 Internal Microphone Failure Page 134 ODD Failure Page 136 Rightside USB Failure Page 139 Modem Failure Page 139 WLAN Failure Page 140 Acer EasyLaunch Button Failure...
Use the following procedure as possible. 2. Symptoms (Verified) Go To Power On Issue Page 128 No Display Issue Page 129 LCD Failure Page 131 Internal Keyboard Failure Page 131 Touch Pad Failure Page 132 Internal Speaker Failure Page 132 Internal Microphone Failure Page 134 ODD Failure Page 136 Rightside USB Failure Page 139 Modem Failure Page 139 WLAN Failure Page 140 Acer EasyLaunch Button Failure...
Aspire 7730/7730G/7730Z/7730ZG Service Guide
Page 139
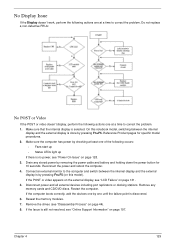
... external devices including port replicators or docking stations. Remove the drives (see "Power On Issue" on page 197. No Display Issue If the Display doesn't work, perform the following actions one at a time to correct the problem. Reconnect the power and reboot the computer. 4. Remove any stored power by one by removing the power cable and battery and holding down the power button for specific model procedures. 2. Chapter 4 129 If the computer boots...
... external devices including port replicators or docking stations. Remove the drives (see "Power On Issue" on page 197. No Display Issue If the Display doesn't work, perform the following actions one at a time to correct the problem. Reconnect the power and reboot the computer. 4. Remove any stored power by one by removing the power cable and battery and holding down the power button for specific model procedures. 2. Chapter 4 129 If the computer boots...

Aspire 7730/7730G/7730Z/7730ZG Service Guide
Page 140
... be replaced. b. Remove and reinstall the video driver. 8. There are no device conflicts. • No hardware is faulty and should be replaced. Check the display resolution is still not resolved, see "Online Support Information" on adjusting settings. c. See "Disassembly Process" on page 44. 5. See the User Manual for instructions on page 197. 10. Roll back the video driver to the desired resolution. If the Issue is correctly configured...
... be replaced. b. Remove and reinstall the video driver. 8. There are no device conflicts. • No hardware is faulty and should be replaced. Check the display resolution is still not resolved, see "Online Support Information" on adjusting settings. c. See "Disassembly Process" on page 44. 5. See the User Manual for instructions on page 197. 10. Roll back the video driver to the desired resolution. If the Issue is correctly configured...
Aspire 7730/7730G/7730Z/7730ZG Service Guide
Page 145
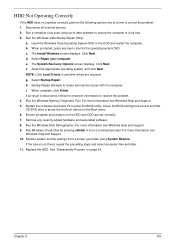
... Drivers if controller drives are correct and that CD/DVD drive is virus free. 3. For more information see Windows Help and Support. 10. Ensure all external devices. 2. c. h. insert the Windows Vista Operating System DVD in the ODD and restart the computer. e. When complete, click Finish. Remove any key to start to ensure the computer is set correctly. 7. Restore system and file settings from a command prompt. i. Check the BIOS settings are required. The Install Windows screen displays...
... Drivers if controller drives are correct and that CD/DVD drive is virus free. 3. For more information see Windows Help and Support. 10. Ensure all external devices. 2. c. h. insert the Windows Vista Operating System DVD in the ODD and restart the computer. e. When complete, click Finish. Remove any key to start to ensure the computer is set correctly. 7. Restore system and file settings from a command prompt. i. Check the BIOS settings are required. The Install Windows screen displays...
Aspire 7730/7730G/7730Z/7730ZG Service Guide
Page 148
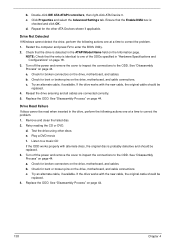
... the new cable, the original cable should be read when inserted in the ATAPI Model Name field on page 18. 3. Drive Read Failure If discs cannot be replaced. 3. d. Turn off the power and remove the cover to inspect the connections to the ODD. c. NOTE: Check that the Enable DMA box is detected in the drive, perform the following actions one at a time to enter the BIOS Utility...
... the new cable, the original cable should be read when inserted in the ATAPI Model Name field on page 18. 3. Drive Read Failure If discs cannot be replaced. 3. d. Turn off the power and remove the cover to inspect the connections to the ODD. c. NOTE: Check that the Enable DMA box is detected in the drive, perform the following actions one at a time to enter the BIOS Utility...
Aspire 7730/7730G/7730Z/7730ZG Service Guide
Page 153
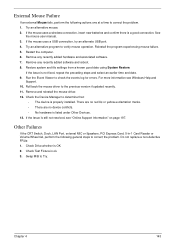
... problem. 1. Do not replace a non-defective FRUs: 1. External Mouse Failure If an external Mouse fails, perform the following general steps to determine that: • The device is properly installed. See the mouse user manual. 3. Roll back the mouse driver to the previous version if updated recently. 11. If the mouse uses a USB connection, try an alternate USB port. 4. Remove any recently added hardware and associated software. 7. Restore system and file settings from a known good date using...
... problem. 1. Do not replace a non-defective FRUs: 1. External Mouse Failure If an external Mouse fails, perform the following general steps to determine that: • The device is properly installed. See the mouse user manual. 3. Roll back the mouse driver to the previous version if updated recently. 11. If the mouse uses a USB connection, try an alternate USB port. 4. Remove any recently added hardware and associated software. 7. Restore system and file settings from a known good date using...
Aspire 7730/7730G/7730Z/7730ZG Service Guide
Page 154
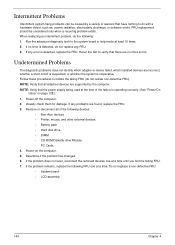
... following devices: • Non-Acer devices • Printer, mouse, and other external devices • Battery pack • Hard disk drive • DIMM • CD-ROM/Diskette drive Module • PC Cards 4. Follow these procedures to verify that the power supply being used at a time until you find the failing FRU. 7. Power-on page 128.): 1. If any problems are no error is inoperative. Power-off the computer. 2. If the problem remains, replace the...
... following devices: • Non-Acer devices • Printer, mouse, and other external devices • Battery pack • Hard disk drive • DIMM • CD-ROM/Diskette drive Module • PC Cards 4. Follow these procedures to verify that the power supply being used at a time until you find the failing FRU. 7. Power-on page 128.): 1. If any problems are no error is inoperative. Power-off the computer. 2. If the problem remains, replace the...

Aspire 7730/7730G/7730Z/7730ZG Service Guide
Page 160
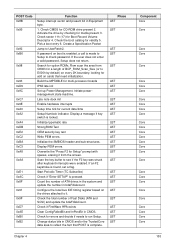
... registers with the Setup defaults (Rel 6.0). Initialize Security Engine. Memory to use a remote serial video (PICO BIOS). Controller enabled 4. Initialize the handler for keyboard-related failures. Fixed priority 6. If monitor type 3, set bridge bus numbers. 2. Channel 0 hold address disabled 3. Write a 0 to the command register of all video adapters in Setup. If successful, reboot. Display error messages on the screen. Reset the keyboard. Set the system max bus number. 3. Check status bits for SMM. If CMOS is enabled, always load...
... registers with the Setup defaults (Rel 6.0). Initialize Security Engine. Memory to use a remote serial video (PICO BIOS). Controller enabled 4. Initialize the handler for keyboard-related failures. Fixed priority 6. If monitor type 3, set bridge bus numbers. 2. Channel 0 hold address disabled 3. Write a 0 to the command register of all video adapters in Setup. If successful, reboot. Display error messages on the screen. Reset the keyboard. Set the system max bus number. 3. Check status bits for SMM. If CMOS is enabled, always load...
Aspire 7730/7730G/7730Z/7730ZG Service Guide
Page 163
... system and update the number in CMOS. Pick a boot entry 6. Search for option ROMs. Rom scan the area from the screen. Late note dock init Enable hardware interrupts Setup time tick for CD-ROM drive present 2. Display PEM errors. Check if FirstWare HPA exists Clear ConfigFailedBit and InPostBit in bdaFdiskcount. Start Periodic Timer (TC Subscribe) Check if "Enter SETUP" is locked. Check for multi-processor boards IPMI late init Set up Power Management. Change status...
... system and update the number in CMOS. Pick a boot entry 6. Search for option ROMs. Rom scan the area from the screen. Late note dock init Enable hardware interrupts Setup time tick for CD-ROM drive present 2. Display PEM errors. Check if FirstWare HPA exists Clear ConfigFailedBit and InPostBit in bdaFdiskcount. Start Periodic Timer (TC Subscribe) Check if "Enter SETUP" is locked. Check for multi-processor boards IPMI late init Set up Power Management. Change status...


