Aspire 7560, 7560G Service Guide
Page 9
CHAPTER 5 Jumper and Connector Locations Mainboard Top 5-3 Mainboard Bottom 5-4 Clearing Password and BIOS Recovery 5-5 Clearing Password 5-5 BIOS Recovery by Crisis Disk 5-6 CHAPTER 6 Field Replaceable Unit List Exploded Diagrams 6-4 Main Assembly 6-4 LCD Assembly 6-6 Lower Cover 6-8 FRU List 6-9 Screw List 6-20 CHAPTER 7 Model Definition and Configuration Aspire 7560 7-3 Aspire 7560G 7-13 CHAPTER 8 Test Compatible Components Microsoft® Windows® 7 Environment Test 8-4 Aspire 7560/7560G 8-4 CHAPTER 9 Online Support Information Information 9-3 ix
CHAPTER 5 Jumper and Connector Locations Mainboard Top 5-3 Mainboard Bottom 5-4 Clearing Password and BIOS Recovery 5-5 Clearing Password 5-5 BIOS Recovery by Crisis Disk 5-6 CHAPTER 6 Field Replaceable Unit List Exploded Diagrams 6-4 Main Assembly 6-4 LCD Assembly 6-6 Lower Cover 6-8 FRU List 6-9 Screw List 6-20 CHAPTER 7 Model Definition and Configuration Aspire 7560 7-3 Aspire 7560G 7-13 CHAPTER 8 Test Compatible Components Microsoft® Windows® 7 Environment Test 8-4 Aspire 7560/7560G 8-4 CHAPTER 9 Online Support Information Information 9-3 ix
Aspire 7560, 7560G Service Guide
Page 66
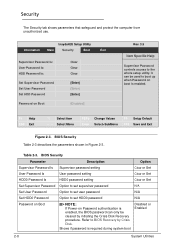
... Clear Clear Clear [Enter] [Enter] [Enter] [Disabled] Rev. 3.5 Item Specific Help Supervisor Password controls access to BIOS Recovery by initiating the Crisis Disk Recovery procedure. Table 2-3. It can only be used to set user password N/A Set HDD0 Password Option to boot up when Password on...F9 Setup Default F10 Save and Exit Figure 2-3. Shows if password is enabled, the BIOS password can be cleared by Crisis Disk. InsydeH20 Setup Utility Information Main Security Boot Exit Supervisor Password Is: User Password Is: HDD Password Is: Set Supervisor Password Set...
... Clear Clear Clear [Enter] [Enter] [Enter] [Disabled] Rev. 3.5 Item Specific Help Supervisor Password controls access to BIOS Recovery by initiating the Crisis Disk Recovery procedure. Table 2-3. It can only be used to set user password N/A Set HDD0 Password Option to boot up when Password on...F9 Setup Default F10 Save and Exit Figure 2-3. Shows if password is enabled, the BIOS password can be cleared by Crisis Disk. InsydeH20 Setup Utility Information Main Security Boot Exit Supervisor Password Is: User Password Is: HDD Password Is: Set Supervisor Password Set...
Aspire 7560, 7560G Service Guide
Page 73
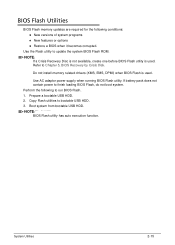
.... 1. Do not install memory related drivers (XMS, EMS, DPMI) when BIOS Flash is used . Copy Flash utilities to Chapter 5, BIOS Recovery by Crisis Disk. System Utilities 2-15 NOTE: NOTE: If a Crisis Recovery Disc is not available, create one before BIOS Flash utility is used . Refer to bootable USB HDD. 3. If battery pack does...
.... 1. Do not install memory related drivers (XMS, EMS, DPMI) when BIOS Flash is used . Copy Flash utilities to Chapter 5, BIOS Recovery by Crisis Disk. System Utilities 2-15 NOTE: NOTE: If a Crisis Recovery Disc is not available, create one before BIOS Flash utility is used . Refer to bootable USB HDD. 3. If battery pack does...
Aspire 7560, 7560G Service Guide
Page 79
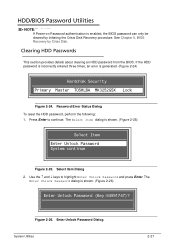
... following: 1. The Select Item dialog is enabled, the BIOS password can only be cleared by Crisis Disk. Figure 2-26. Press Enter to highlight Enter Unlock Password and press Enter. See Chapter 5, BIOS Recovery by initiating the Crisis Disk Recovery procedure. Use the and keys to continue. HDD/BIOS Password Utilities 0 NOTE...
... following: 1. The Select Item dialog is enabled, the BIOS password can only be cleared by Crisis Disk. Figure 2-26. Press Enter to highlight Enter Unlock Password and press Enter. See Chapter 5, BIOS Recovery by initiating the Crisis Disk Recovery procedure. Use the and keys to continue. HDD/BIOS Password Utilities 0 NOTE...
Aspire 7560, 7560G Service Guide
Page 179
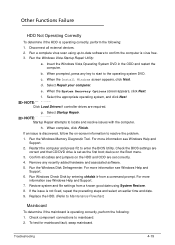
... information to resolve the problem. 1. Insert the Windows Vista Operating System DVD in the ODD and restart the computer. When the System Recovery Options screen appears, click Next. h. If an issue is operating correctly, perform the following : 1. Check the BIOS settings are correct... and that CD/DVD drive is operating correctly, perform the following : 1. Run the Windows Disk Defragmenter. For more information see Windows Help and Support. 2. Disconnect all cables and jumpers on the Boot menu. 3. When prompted, press any...
... information to resolve the problem. 1. Insert the Windows Vista Operating System DVD in the ODD and restart the computer. When the System Recovery Options screen appears, click Next. h. If an issue is operating correctly, perform the following : 1. Check the BIOS settings are correct... and that CD/DVD drive is operating correctly, perform the following : 1. Run the Windows Disk Defragmenter. For more information see Windows Help and Support. 2. Disconnect all cables and jumpers on the Boot menu. 3. When prompted, press any...
Aspire 7560, 7560G Service Guide
Page 196
Mainboard Top 5-3 Mainboard Bottom 5-4 Clearing Password and BIOS Recovery 5-5 Clearing Password 5-5 BIOS Recovery by Crisis Disk 5-6 5-2
Mainboard Top 5-3 Mainboard Bottom 5-4 Clearing Password and BIOS Recovery 5-5 Clearing Password 5-5 BIOS Recovery by Crisis Disk 5-6 5-2
Aspire 7560, 7560G Service Guide
Page 200
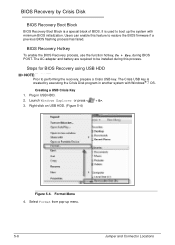
... E>. 3. The Crisis USB key is created by Crisis Disk 0 BIOS Recovery Boot Block 0 BIOS Recovery Boot Block is used to restore the BIOS firmware if a previous BIOS flashing process has failed. BIOS Recovery Hotkey 0 To enable the BIOS Recovery process, use the function hotkey, Fn + Esc, during...Key 0 1. It is a special block of BIOS. Format Menu 4. Steps for BIOS Recovery using USB HDD 0 NOTE: NOTE: Prior to be installed during BIOS POST. BIOS Recovery by executing the Crisis Disk program in USB HDD. 2. Right-click on USB HDD. (Figure 5-4) Figure 5-4. Select...
... E>. 3. The Crisis USB key is created by Crisis Disk 0 BIOS Recovery Boot Block 0 BIOS Recovery Boot Block is used to restore the BIOS firmware if a previous BIOS flashing process has failed. BIOS Recovery Hotkey 0 To enable the BIOS Recovery process, use the function hotkey, Fn + Esc, during...Key 0 1. It is a special block of BIOS. Format Menu 4. Steps for BIOS Recovery using USB HDD 0 NOTE: NOTE: Prior to be installed during BIOS POST. BIOS Recovery by executing the Crisis Disk program in USB HDD. 2. Right-click on USB HDD. (Figure 5-4) Figure 5-4. Select...


