User Manual
Page 2
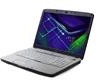
... the model number, serial number, purchase date and place of Acer Incorporated. The serial number and model number are used herein for a particular purpose. Aspire 7720Z/7720/7320 Series Notebook PC Model number Serial number Date of purchase Place of purchase Acer and the Acer logo are registered trademarks of purchase information in this manual or...
... the model number, serial number, purchase date and place of Acer Incorporated. The serial number and model number are used herein for a particular purpose. Aspire 7720Z/7720/7320 Series Notebook PC Model number Serial number Date of purchase Place of purchase Acer and the Acer logo are registered trademarks of purchase information in this manual or...
User Manual
Page 5
... not attempt to service this product from unexpected noise produced by other risks. If the battery leaks and you need for safe battery usage This notebook uses a Lithium-ion battery. Do not use it in a pressurized container, and do not expose it to temperatures over 60°C (140°F). If you...
... not attempt to service this product from unexpected noise produced by other risks. If the battery leaks and you need for safe battery usage This notebook uses a Lithium-ion battery. Do not use it in a pressurized container, and do not expose it to temperatures over 60°C (140°F). If you...
User Manual
Page 6
...potentially explosive atmosphere and obey all signs and instructions. Use only Acer approved batteries, and recharge your product. Battery performance is fully charged. Dispose of used batteries. Replacing the battery pack The notebook uses lithium batteries. Wireless devices may not work temporarily, even ...especially limited in fire. Sparks in fuel depots, storage and distribution areas; They include below freezing. Do not switch the notebook on the use is damaged. Warning! Batteries may cause interference or danger. Keep them in temperatures well below deck on the...
...potentially explosive atmosphere and obey all signs and instructions. Use only Acer approved batteries, and recharge your product. Battery performance is fully charged. Dispose of used batteries. Replacing the battery pack The notebook uses lithium batteries. Wireless devices may not work temporarily, even ...especially limited in fire. Sparks in fuel depots, storage and distribution areas; They include below freezing. Do not switch the notebook on the use is damaged. Warning! Batteries may cause interference or danger. Keep them in temperatures well below deck on the...
User Manual
Page 13
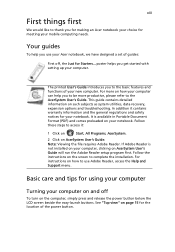
...program first. In addition it : 1 Click on Start, All Programs, AcerSystem. 2 Click on how your computer can help you for making an Acer notebook your choice for Starters... It is not installed on your computer, clicking on your mobile computing needs. Note: Viewing the file requires Adobe Reader....below the LCD screen beside the easy-launch buttons. For instructions on page 15 for your Acer notebook, we have designed a set of your computer. See "Top view" on how to use your notebook. poster helps you to the basic features and functions of guides: First off To turn...
...program first. In addition it : 1 Click on Start, All Programs, AcerSystem. 2 Click on how your computer can help you for making an Acer notebook your choice for Starters... It is not installed on your computer, clicking on your mobile computing needs. Note: Viewing the file requires Adobe Reader....below the LCD screen beside the easy-launch buttons. For instructions on page 15 for your Acer notebook, we have designed a set of your computer. See "Top view" on how to use your notebook. poster helps you to the basic features and functions of guides: First off To turn...
User Manual
Page 16
... care of your battery pack xv Cleaning and servicing xv Acer Empowering Technology 1 Empowering Technology password 1 Acer eNet Management 2 Acer ePower Management 4 Acer eAudio Management 6 Acer ePresentation Management 7 Acer eDataSecurity Management (for selected models) 8 Acer eLock Management 9 Acer eRecovery Management 11 Acer eSettings Management 13 Windows Mobility Center 14 Your Acer notebook tour 15 Top view 15 Closed front view 17...
... care of your battery pack xv Cleaning and servicing xv Acer Empowering Technology 1 Empowering Technology password 1 Acer eNet Management 2 Acer ePower Management 4 Acer eAudio Management 6 Acer ePresentation Management 7 Acer eDataSecurity Management (for selected models) 8 Acer eLock Management 9 Acer eRecovery Management 11 Acer eSettings Management 13 Windows Mobility Center 14 Your Acer notebook tour 15 Top view 15 Closed front view 17...
User Manual
Page 18
...61 Program guide 61 Find program 61 TV settings 61 Using TeleText functions 62 Acer Arcade Deluxe (for selected models) 64 64 Remote control (for selected models) 65 Remote functions 66 Starting Acer Arcade Deluxe 67 VideoMagician 67 TV Joy (selected models only) 67 SportsCap (...selected models only) 67 DV Wizard 68 DVDivine 68 Taking your notebook PC with you 69 Disconnecting from the desktop 69 Moving around...
...61 Program guide 61 Find program 61 TV settings 61 Using TeleText functions 62 Acer Arcade Deluxe (for selected models) 64 64 Remote control (for selected models) 65 Remote functions 66 Starting Acer Arcade Deluxe 67 VideoMagician 67 TV Joy (selected models only) 67 SportsCap (...selected models only) 67 DV Wizard 68 DVDivine 68 Taking your notebook PC with you 69 Disconnecting from the desktop 69 Moving around...
User Manual
Page 35
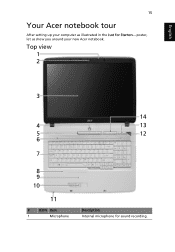
English 15 Your Acer notebook tour After setting up your new Acer notebook. Top view 1 2 3 14 4 13 5 12 6 6 7 8 9 10 11 # ICON Item 1 Microphone Description Internal microphone for Starters... poster, let us show you around your computer as illustrated in the Just for sound recording.
English 15 Your Acer notebook tour After setting up your new Acer notebook. Top view 1 2 3 14 4 13 5 12 6 6 7 8 9 10 11 # ICON Item 1 Microphone Description Internal microphone for Starters... poster, let us show you around your computer as illustrated in the Just for sound recording.
User Manual
Page 57
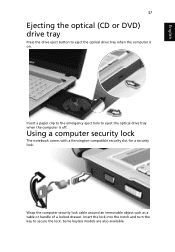
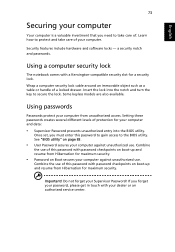
Wrap the computer security lock cable around an immovable object such as a table or handle of a locked drawer. Using a computer security lock The notebook comes with a Kensington-compatible security slot for a security lock. Insert the lock into the notch and turn the key to secure the lock. Some keyless models are also available. Insert a paper clip to the emergency eject hole to eject the optical drive tray when the computer is on. English 37 Ejecting the optical (CD or DVD) drive tray Press the drive eject button to eject the optical drive tray when the computer is off.
Wrap the computer security lock cable around an immovable object such as a table or handle of a locked drawer. Using a computer security lock The notebook comes with a Kensington-compatible security slot for a security lock. Insert the lock into the notch and turn the key to secure the lock. Some keyless models are also available. Insert a paper clip to the emergency eject hole to eject the optical drive tray when the computer is on. English 37 Ejecting the optical (CD or DVD) drive tray Press the drive eject button to eject the optical drive tray when the computer is off.
User Manual
Page 59
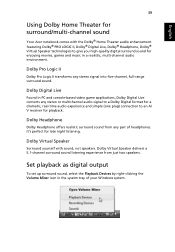
... by right-clicking the Volume Mixer icon in the sysetm tray of headphones. English 39 Using Dolby Home Theater for surround/multi-channel sound Your Acer notebook comes with sound, not speakers. Dolby Digital Live Found in a realistic, multi-channel audio environment. Dolby Pro Logic II Dolby Pro Logic II transforms any...
... by right-clicking the Volume Mixer icon in the sysetm tray of headphones. English 39 Using Dolby Home Theater for surround/multi-channel sound Your Acer notebook comes with sound, not speakers. Dolby Digital Live Found in a realistic, multi-channel audio environment. Dolby Pro Logic II Dolby Pro Logic II transforms any...
User Manual
Page 61
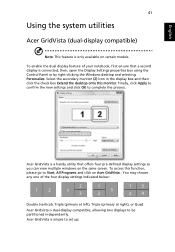
...All Programs and click on Acer GridVista. You may choose any one of your notebook, first ensure that offers four pre-defined display settings so you can view multiple windows on certain models. Acer GridVista is only available on the same screen. Acer GridVista is connected, then...Settings properties box using the Control Panel or by right-clicking the Windows desktop and selecting Personalize. English 41 Using the system utilities Acer GridVista (dual-display compatible) Note: This feature is a handy utility that a second display is simple to be partitioned independently. ...
...All Programs and click on Acer GridVista. You may choose any one of your notebook, first ensure that offers four pre-defined display settings so you can view multiple windows on certain models. Acer GridVista is only available on the same screen. Acer GridVista is connected, then...Settings properties box using the Control Panel or by right-clicking the Windows desktop and selecting Personalize. English 41 Using the system utilities Acer GridVista (dual-display compatible) Note: This feature is a handy utility that a second display is simple to be partitioned independently. ...
User Manual
Page 65
... the following: • Make sure that the printer is connected to a power outlet and that it is set up, you need to set up your notebook, that the printer cable is connected securely to a USB port on the computer, the internal speakers automatically turn off.
... the following: • Make sure that the printer is connected to a power outlet and that it is set up, you need to set up your notebook, that the printer cable is connected securely to a USB port on the computer, the internal speakers automatically turn off.
User Manual
Page 66
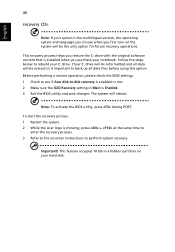
..., the operating system and language you choose when you purchase your hard disk. To start the recovery process: 1 Restart the system. 2 While the Acer logo is showing, press + at the same time to enter the recovery process. 3 Refer to the onscreen instructions to rebuild your system is installed ...when you first turn on your notebook. Follow the steps below to perform system recovery. English 46 recovery CDs. Note: To activate the BIOS utility, press during POST.
..., the operating system and language you choose when you purchase your hard disk. To start the recovery process: 1 Restart the system. 2 While the Acer logo is showing, press + at the same time to enter the recovery process. 3 Refer to the onscreen instructions to rebuild your system is installed ...when you first turn on your notebook. Follow the steps below to perform system recovery. English 46 recovery CDs. Note: To activate the BIOS utility, press during POST.
User Manual
Page 89
... computer: Click on Start, Turn Off Computer, then click on Turn Off (Windows XP). then press and release the power button. English 69 Taking your notebook PC with your computer. You can put the computer in Sleep mode. then press and release the power button. Then close and latch the display...
... computer: Click on Start, Turn Off Computer, then click on Turn Off (Windows XP). then press and release the power button. English 69 Taking your notebook PC with your computer. You can put the computer in Sleep mode. then press and release the power button. Then close and latch the display...
User Manual
Page 93
... authorized service center. Do not forget your computer against unauthorized use of protection for maximum security. a security notch and passwords. Using a computer security lock The notebook comes with your password, please get in touch with a Kensington-compatible security slot for maximum security. • Password on boot-up and resume from Hibernation...
... authorized service center. Do not forget your computer against unauthorized use of protection for maximum security. a security notch and passwords. Using a computer security lock The notebook comes with your password, please get in touch with a Kensington-compatible security slot for maximum security. • Password on boot-up and resume from Hibernation...
User Manual
Page 95
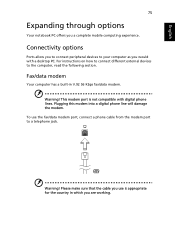
... use is not compatible with a desktop PC. Plugging this modem into a digital phone line will damage the modem. Warning! English 75 Expanding through options Your notebook PC offers you are working.
... use is not compatible with a desktop PC. Plugging this modem into a digital phone line will damage the modem. Warning! English 75 Expanding through options Your notebook PC offers you are working.
User Manual
Page 100
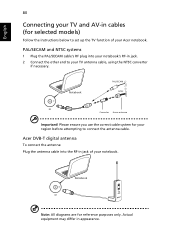
...SECAM and NTSC systems 1 Plug the PAL/SECAM cable's RF plug into the RF-in jack of your Acer notebook. Acer DVB-T digital antenna To connect the antenna: Plug the antenna cable into your notebook's RF-in jack. 2 Connect the other end to set up the TV function of your region before ...attempting to connect the antenna cable. Actual equipment may differ in appearance. Notebook PAL/SECAM or NTSC RF Converter Home antenna Important! English 80 Connecting your TV and AV-in cables (for selected models) Follow the instructions...
...SECAM and NTSC systems 1 Plug the PAL/SECAM cable's RF plug into the RF-in jack of your Acer notebook. Acer DVB-T digital antenna To connect the antenna: Plug the antenna cable into your notebook's RF-in jack. 2 Connect the other end to set up the TV function of your region before ...attempting to connect the antenna cable. Actual equipment may differ in appearance. Notebook PAL/SECAM or NTSC RF Converter Home antenna Important! English 80 Connecting your TV and AV-in cables (for selected models) Follow the instructions...
User Manual
Page 101
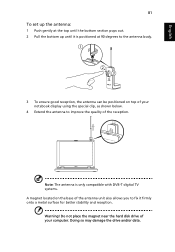
Do not place the magnet near the hard disk drive of your notebook display using the special clip, as shown below. 4 Extend the antenna to fix it is only compatible with DVB-T digital TV systems. A magnet located on ...
Do not place the magnet near the hard disk drive of your notebook display using the special clip, as shown below. 4 Extend the antenna to fix it is only compatible with DVB-T digital TV systems. A magnet located on ...
User Manual
Page 102
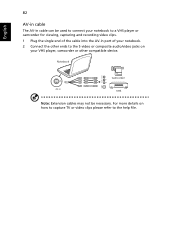
English S RWY S RWY S RWY Audio Video R L 82 AV-in cable The AV-in port of your notebook. 2 Connect the other compatible device. For more details on your notebook to the help file. Notebook AV-in AV-in Camcorder VHS Note: Extension cables may not be used to connect your VHS player, camcorder or other ends to the S-video or composite audio/video jacks on how to capture TV or video clips please refer to a VHS player or camcorder for viewing, capturing and recording video clips. 1 Plug the single end of the cable into the AV-in cable can be necessary.
English S RWY S RWY S RWY Audio Video R L 82 AV-in cable The AV-in port of your notebook. 2 Connect the other compatible device. For more details on your notebook to the help file. Notebook AV-in AV-in Camcorder VHS Note: Extension cables may not be used to connect your VHS player, camcorder or other ends to the S-video or composite audio/video jacks on how to capture TV or video clips please refer to a VHS player or camcorder for viewing, capturing and recording video clips. 1 Plug the single end of the cable into the AV-in cable can be necessary.
User Manual
Page 103
while the notebook PC logo is a hardware configuration program built into your computer's BIOS. Enable disk-to-disk recovery To enable disk-to-disk recovery (hard disk recovery), ...
while the notebook PC logo is a hardware configuration program built into your computer's BIOS. Enable disk-to-disk recovery To enable disk-to-disk recovery (hard disk recovery), ...
User Manual
Page 108
... attempt to more serious problems require opening up the computer. See "Requesting service" on page 47. Solutions to open the computer yourself; Troubleshooting tips This notebook PC incorporates an advanced design that delivers onscreen error message reports to reboot. If the problem cannot be resolved, contact your dealer or an authorized...
... attempt to more serious problems require opening up the computer. See "Requesting service" on page 47. Solutions to open the computer yourself; Troubleshooting tips This notebook PC incorporates an advanced design that delivers onscreen error message reports to reboot. If the problem cannot be resolved, contact your dealer or an authorized...


