Aspire 6530/6530G Quick Guide
Page 7
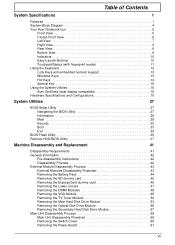
... Touchpad Basics (with fingerprint reader 11 Using the Keyboard 12 Lock Keys and embedded numeric keypad 12 Windows Keys 13 Hot Keys 14 Special Key 15 Using the System Utilities 16 Acer GridVista (dual-display compatible 16 Hardware Specifications and Configurations 18 System Utilities 27 BIOS Setup Utility 27 Navigating the BIOS Utility 27 Information 28 Main 29 Security 30 Boot 33 Exit 34 BIOS Flash Utility 35 Remove HDD/BIOS Utility 37 Machine Disassembly and Replacement 41 Disassembly Requirements 41 General Information 42 Pre-disassembly Instructions...
... Touchpad Basics (with fingerprint reader 11 Using the Keyboard 12 Lock Keys and embedded numeric keypad 12 Windows Keys 13 Hot Keys 14 Special Key 15 Using the System Utilities 16 Acer GridVista (dual-display compatible 16 Hardware Specifications and Configurations 18 System Utilities 27 BIOS Setup Utility 27 Navigating the BIOS Utility 27 Information 28 Main 29 Security 30 Boot 33 Exit 34 BIOS Flash Utility 35 Remove HDD/BIOS Utility 37 Machine Disassembly and Replacement 41 Disassembly Requirements 41 General Information 42 Pre-disassembly Instructions...

Aspire 6530/6530G Quick Guide
Page 8
... Keyboard 107 Replacing the Power Board 108 Replacing the Switch Cover 109 Replacing the Second Hard Disk Drive Module 111 Replacing the ODD Module 111 Replacing the Main Hard Disk Drive Module 112 Replacing the WLAN Module 113 Replacing the TV Tuner Module 114 Replacing the VGA Module 114 Replacing the DIMM Modules 115 Replacing the Lower Covers 115 Replacing the ExpressCard and SD Card Dummy Trays 116 Troubleshooting 117 Common Problems 117 Power On Issue 118 No Display Issue 119 Random Loss of BIOS Settings 120 LCD...
... Keyboard 107 Replacing the Power Board 108 Replacing the Switch Cover 109 Replacing the Second Hard Disk Drive Module 111 Replacing the ODD Module 111 Replacing the Main Hard Disk Drive Module 112 Replacing the WLAN Module 113 Replacing the TV Tuner Module 114 Replacing the VGA Module 114 Replacing the DIMM Modules 115 Replacing the Lower Covers 115 Replacing the ExpressCard and SD Card Dummy Trays 116 Troubleshooting 117 Common Problems 117 Power On Issue 118 No Display Issue 119 Random Loss of BIOS Settings 120 LCD...
Aspire 6530/6530G Quick Guide
Page 20
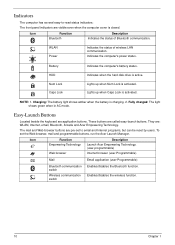
...-launch buttons. Indicates when the hard disk drive is charging. 2. Easy-Launch Buttons Located beside the keyboard are pre-set the Web browser, mail and programmable buttons, run the Acer Launch Manager. To set to -read status indicators: The front panel indicators are visible even when the computer cover is activated. WLAN Power Indicates the status of Bluetooth communication. Charging: The battery light shows amber when the battery is active. Fully charged: The light shows green when in AC mode...
...-launch buttons. Indicates when the hard disk drive is charging. 2. Easy-Launch Buttons Located beside the keyboard are pre-set the Web browser, mail and programmable buttons, run the Acer Launch Manager. To set to -read status indicators: The front panel indicators are visible even when the computer cover is activated. WLAN Power Indicates the status of Bluetooth communication. Charging: The battery light shows amber when the battery is active. Fully charged: The light shows green when in AC mode...
Aspire 6530/6530G Quick Guide
Page 38
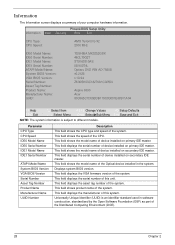
... Change Values Enter SelectXSub-Menu NOTE: The system information is an identifier standard used in the system. This field displays the manufacturer of this unit. This field shows the model name of the Optical device installed in software construction, standardized by the Open Software Foundation (OSF) as part of this system. F9 Setup Defaults F10 Save and Exit Parameter CPU Type CPU Speed IDE0 Model Name IDE0 Serial Number IDE1 Model...
... Change Values Enter SelectXSub-Menu NOTE: The system information is an identifier standard used in the system. This field displays the manufacturer of this unit. This field shows the model name of the Optical device installed in software construction, standardized by the Open Software Foundation (OSF) as part of this system. F9 Setup Defaults F10 Save and Exit Parameter CPU Type CPU Speed IDE0 Model Name IDE0 Serial Number IDE1 Model...
Aspire 6530/6530G Quick Guide
Page 41
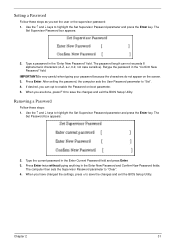
... enable the Password on the screen. 3. The Set Password box appears: 2. Use the ↑ and ↓ keys to "Set". 4. The Set Supervisor Password box appears: 2. Removing a Password Follow these steps as you can not exceeds 8 alphanumeric characters (A-Z, a-z, 0-9, not case sensitive). Type the current password in the "Enter New Password" field. Chapter 2 31 After setting the password, the computer sets the User Password parameter to highlight the Set Supervisor Password parameter and press the Enter key. Press Enter...
... enable the Password on the screen. 3. The Set Password box appears: 2. Use the ↑ and ↓ keys to "Set". 4. The Set Supervisor Password box appears: 2. Removing a Password Follow these steps as you can not exceeds 8 alphanumeric characters (A-Z, a-z, 0-9, not case sensitive). Type the current password in the "Enter New Password" field. Chapter 2 31 After setting the password, the computer sets the User Password parameter to highlight the Set Supervisor Password parameter and press the Enter key. Press Enter...
Aspire 6530/6530G Quick Guide
Page 42
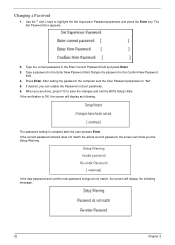
... sets the User Password parameter to highlight the Set Supervisor Password parameter and press the Enter key. Type the current password in the Confirm New Password field. 4. Press Enter. If the current password entered does not match the actual current password, the screen will show you are done, press F10 to save the changes and exit the BIOS Setup Utility. If the new password and confirm new password strings do not match, the screen will display...
... sets the User Password parameter to highlight the Set Supervisor Password parameter and press the Enter key. Type the current password in the Confirm New Password field. 4. Press Enter. If the current password entered does not match the actual current password, the screen will show you are done, press F10 to save the changes and exit the BIOS Setup Utility. If the new password and confirm new password strings do not match, the screen will display...
Aspire 6530/6530G Quick Guide
Page 44
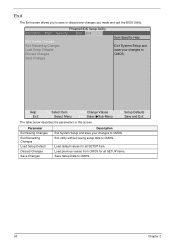
... values from CMOS for all SETUP items. Save Setup Data to CMOS. 34 Chapter 2 PhoenixBIOS Setup Utility Information Main Security Boot Exit Exit Saving Changes Exit Discarding Changes Load Setup Defaults Discard Changes Save Changes Item Specific Help Exit System Setup and save or discard any changes you to CMOS. F1 Help ESC Exit ↑↓ Select Item ←→ Select Menu F5/F6 Change Values Enter SelectXSub-Menu F9 Setup Defaults F10...
... values from CMOS for all SETUP items. Save Setup Data to CMOS. 34 Chapter 2 PhoenixBIOS Setup Utility Information Main Security Boot Exit Exit Saving Changes Exit Discarding Changes Load Setup Defaults Discard Changes Save Changes Item Specific Help Exit System Setup and save or discard any changes you to CMOS. F1 Help ESC Exit ↑↓ Select Item ←→ Select Menu F5/F6 Change Values Enter SelectXSub-Menu F9 Setup Defaults F10...
Aspire 6530/6530G Quick Guide
Page 45
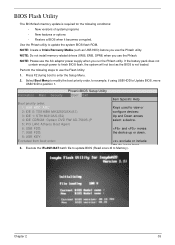
... LAN: Atheros Boot Agent 6: USB FDD: and moves 7: USB FDD: the device up or down. 8: USB KEY: Excluded from boot order: exclude or include the de ice to position 1. Chapter 2 35 Select Boot Menu to modify the boot priority order, for the following steps to enter the Setup Menu. 2. Use the Phlash utility to Memory). NOTE: Create a Crisis Recovery Media (such as the BIOS is required for example, if using USB HDD to Update BIOS, move USB HDD to boot 3. BIOS Flash Utility The BIOS flash memory update...
... LAN: Atheros Boot Agent 6: USB FDD: and moves 7: USB FDD: the device up or down. 8: USB KEY: Excluded from boot order: exclude or include the de ice to position 1. Chapter 2 35 Select Boot Menu to modify the boot priority order, for the following steps to enter the Setup Menu. 2. Use the Phlash utility to Memory). NOTE: Create a Crisis Recovery Media (such as the BIOS is required for example, if using USB HDD to Update BIOS, move USB HDD to boot 3. BIOS Flash Utility The BIOS flash memory update...
Aspire 6530/6530G Quick Guide
Page 127
... tests are intended to test only Acer products. Symptoms (Verified) Go To Power On Issue Page 118 No Display Issue Page 119 LCD Failure Page 121 Internal Keyboard Failure Page 121 Touchpad Failure Page 122 Internal Speaker Failure Page 122 Internal Microphone Failure Page 124 Rightside USB Failure Page 128 Modem Failure Page 128 Other Functions Failure Page 129 Intermittent Failures Page...
... tests are intended to test only Acer products. Symptoms (Verified) Go To Power On Issue Page 118 No Display Issue Page 119 LCD Failure Page 121 Internal Keyboard Failure Page 121 Touchpad Failure Page 122 Internal Speaker Failure Page 122 Internal Microphone Failure Page 124 Rightside USB Failure Page 128 Modem Failure Page 128 Other Functions Failure Page 129 Intermittent Failures Page...
Aspire 6530/6530G Quick Guide
Page 129
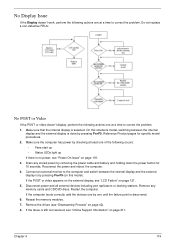
... removing the power cable and battery and holding down the power button for specific model procedures. 2. On this model). If the POST or video appears on the external display, see "Power On Issue" on this notebook model, switching between the internal display and the external display is no power, see "LCD Failure" on page 211. If the computer boots correctly, add the devices one by one of the following occurs: • Fans start up • Status LEDs light...
... removing the power cable and battery and holding down the power button for specific model procedures. 2. On this model). If the POST or video appears on the external display, see "Power On Issue" on this notebook model, switching between the internal display and the external display is no power, see "LCD Failure" on page 211. If the computer boots correctly, add the devices one by one of the following occurs: • Fans start up • Status LEDs light...

Aspire 6530/6530G Quick Guide
Page 130
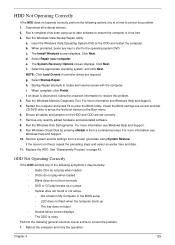
... the computer is experiencing HDD or ODD BIOS information loss, disconnect and reconnect the power and data cables between devices. If the computer is more than one year old, replace the CMOS battery. 2. e. Remove and reinstall the video driver. 8. If the Issue is faulty and should be replaced. If the display is too dim at the highest brightness setting, the LCD is still not resolved, see...
... the computer is experiencing HDD or ODD BIOS information loss, disconnect and reconnect the power and data cables between devices. If the computer is more than one year old, replace the CMOS battery. 2. e. Remove and reinstall the video driver. 8. If the Issue is faulty and should be replaced. If the display is too dim at the highest brightness setting, the LCD is still not resolved, see...
Aspire 6530/6530G Quick Guide
Page 135
... set correctly. 7. ODD Not Operating Correctly If the ODD exhibits any recently added hardware and associated software. 8. Run a complete virus scan using System Restore. e. Select Startup Repair. h. Chapter 4 125 For more information see Windows Help and Support. 5. c. Ensure all external devices. 2. insert the Windows Vista Operating System DVD in My Computer or the BIOS setup • LED does not flash when the computer starts up -to-date software to enter the BIOS Utility. The System Recovery Options screen displays...
... set correctly. 7. ODD Not Operating Correctly If the ODD exhibits any recently added hardware and associated software. 8. Run a complete virus scan using System Restore. e. Select Startup Repair. h. Chapter 4 125 For more information see Windows Help and Support. 5. c. Ensure all external devices. 2. insert the Windows Vista Operating System DVD in My Computer or the BIOS setup • LED does not flash when the computer starts up -to-date software to enter the BIOS Utility. The System Recovery Options screen displays...

Aspire 6530/6530G Quick Guide
Page 137
... drive is set to correct the problem. 1. a. Replace the ODD. Turn off the power and remove the cover to inspect the connections to the ODD. b. Navigate to enter the BIOS Utility. 2. b. c. Ensure that the ODD controller transfer mode is detected in "Hardware Specifications and Configurations" on the Information page. Restart the computer and press F2 to Start´ Control Panel´ System and Maintenance´ System´ Device Manager. Turn off the power and remove the cover...
... drive is set to correct the problem. 1. a. Replace the ODD. Turn off the power and remove the cover to inspect the connections to the ODD. b. Navigate to enter the BIOS Utility. 2. b. c. Ensure that the ODD controller transfer mode is detected in "Hardware Specifications and Configurations" on the Information page. Restart the computer and press F2 to Start´ Control Panel´ System and Maintenance´ System´ Device Manager. Turn off the power and remove the cover...

Aspire 6530/6530G Quick Guide
Page 139
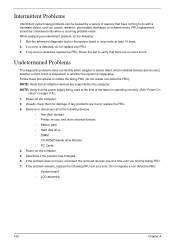
... Switch, Dock, LAN Port, external MIC or Speakers, PCI Express Card, 5-in-1 Card Reader or Volume Wheel fail, perform the following actions one at a time to determine that: • The device is properly installed. Swap M/B to correct the problem. Roll back the mouse driver to the previous version if updated recently. 11. Remove any recently added software and reboot. 8. Remove any recently added hardware and associated software. 7. If the mouse uses a wireless connection, insert new batteries...
... Switch, Dock, LAN Port, external MIC or Speakers, PCI Express Card, 5-in-1 Card Reader or Volume Wheel fail, perform the following actions one at a time to determine that: • The device is properly installed. Swap M/B to correct the problem. Roll back the mouse driver to the previous version if updated recently. 11. Remove any recently added software and reboot. 8. Remove any recently added hardware and associated software. 7. If the mouse uses a wireless connection, insert new batteries...
Aspire 6530/6530G Quick Guide
Page 140
..., mouse, and other external devices • Battery pack • Hard disk drive • DIMM • CD-ROM/Diskette drive Module • PC Cards 4. Determine if the problem has changed. 6. Visually check them for the system board in loop mode at the time of reasons that all of the following : 1. NOTE: Verify that there are found, replace the FRU. 3. FRU replacement should be caused by the computer. Remove or...
..., mouse, and other external devices • Battery pack • Hard disk drive • DIMM • CD-ROM/Diskette drive Module • PC Cards 4. Determine if the problem has changed. 6. Visually check them for the system board in loop mode at the time of reasons that all of the following : 1. NOTE: Verify that there are found, replace the FRU. 3. FRU replacement should be caused by the computer. Remove or...
Aspire 6530/6530G Quick Guide
Page 142
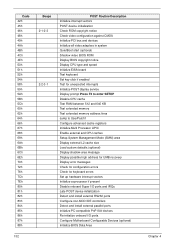
... vectors POST device initialization Check ROM copyright notice Check video configuration against CMOS Initialize PCI bus and devices Initialize all video adapters in system QuietBoot start (optional) Shadow video BIOS ROM Display BIOS copyright notice Display CPU type and speed Initialize EISA board Test keyboard Set key click if enabled Test for unexpected interrupts Initialize POST display service Display prompt Press F2 to enter SETUP Disable CPU cache Test RAM between 512 and 640 KB Test extended memory Test extended memory address lines...
... vectors POST device initialization Check ROM copyright notice Check video configuration against CMOS Initialize PCI bus and devices Initialize all video adapters in system QuietBoot start (optional) Shadow video BIOS ROM Display BIOS copyright notice Display CPU type and speed Initialize EISA board Test keyboard Set key click if enabled Test for unexpected interrupts Initialize POST display service Display prompt Press F2 to enter SETUP Disable CPU cache Test RAM between 512 and 640 KB Test extended memory Test extended memory address lines...
Aspire 6530/6530G Quick Guide
Page 144
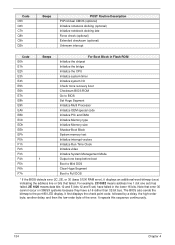
... in Flash ROM Initialize the chipset Initialize the bridge Initialize the CPU Initialize system timer Initialize system I/O Check force recovery boot Checksum BIOS ROM Go to BIOS Set Huge Segment Initialize Multi Processor Initialize OEM special code Initialize PIC and DMA Initialize Memory type Initialize Memory size Shadow Boot Block System memory test Initialize interrupt vectors Initialize Run Time Clock Initialize video Initialize System Management Mode Output one set...
... in Flash ROM Initialize the chipset Initialize the bridge Initialize the CPU Initialize system timer Initialize system I/O Check force recovery boot Checksum BIOS ROM Go to BIOS Set Huge Segment Initialize Multi Processor Initialize OEM special code Initialize PIC and DMA Initialize Memory type Initialize Memory size Shadow Boot Block System memory test Initialize interrupt vectors Initialize Run Time Clock Initialize video Initialize System Management Mode Output one set...

Aspire 6530/6530G Quick Guide
Page 150
... Auto Configuration is bad, load Custom Defaults from flash into CMOS. Initialize Extended BIOS Data Area and initialize the mouse. Initialize keystroke clicker if enabled in system Shadow video BIOS ROM if specified by Setup, and CMOS is 1 or 2 set the video switch to m Initialize BIOS stack Setup E820h and WAD memory map Set segment-register addressability to 4 GB Redirect Int 10h to enable target board to CGA. Display error messages on the screen...
... Auto Configuration is bad, load Custom Defaults from flash into CMOS. Initialize Extended BIOS Data Area and initialize the mouse. Initialize keystroke clicker if enabled in system Shadow video BIOS ROM if specified by Setup, and CMOS is 1 or 2 set the video switch to m Initialize BIOS stack Setup E820h and WAD memory map Set segment-register addressability to 4 GB Redirect Int 10h to enable target board to CGA. Display error messages on the screen...
Aspire 6530/6530G Quick Guide
Page 152
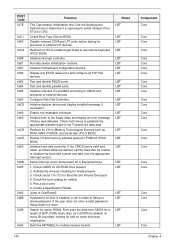
... password, Setup does not return. Check Boot Type (Server BIOS) Disable onboard COM and LPT ports before testing for a length of external devices. Check both of external I /O and memory address space for Boot Record Volume Descriptor 4. Pick a boot entry 6. Enable non-maskable interrupts. Initialize hard-disk controller. Setup interrupt vector and present bit in the TrustedCore data area Redirect Int 13h to use remote keyboard (PICO BIOS). Check CMOS for media present 3. Activate the drive by default...
... password, Setup does not return. Check Boot Type (Server BIOS) Disable onboard COM and LPT ports before testing for a length of external devices. Check both of external I /O and memory address space for Boot Record Volume Descriptor 4. Pick a boot entry 6. Enable non-maskable interrupts. Initialize hard-disk controller. Setup interrupt vector and present bit in the TrustedCore data area Redirect Int 13h to use remote keyboard (PICO BIOS). Check CMOS for media present 3. Activate the drive by default...
Aspire 6530/6530G Quick Guide
Page 153
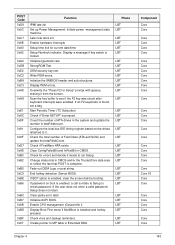
... hotkey detection (Server BIOS) If BCP option is made to Setup to MP table in CMOS. Configure the local bus IDE timing register based on boot is enabled, a call is enabled, clear the screen before booting. If password on the drives attached to see if the F2 key was struck after keyboard interrupts were enabled. If the user does not enter a valid password, Setup does not return. Clear parity-error latch Initialize ACPI BIOS. Create...
... hotkey detection (Server BIOS) If BCP option is made to Setup to MP table in CMOS. Configure the local bus IDE timing register based on boot is enabled, a call is enabled, clear the screen before booting. If password on the drives attached to see if the F2 key was struck after keyboard interrupts were enabled. If the user does not enter a valid password, Setup does not return. Clear parity-error latch Initialize ACPI BIOS. Create...


