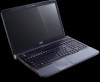

Acer Aspire 6530 Notebook Series Start Guide
Page 11
.../1.73 inches) • 3.50 kg (7.71 lbs.) with 2 HDDs and 8-cell battery pack • 3.40 kg (7.49 lbs.) with 2 HDDs and 6-cell battery pack • Acer Bio-Protection fingerprint solution* • BIOS user, supervisor, HDD passwords • Kensington lock slot • ACPI 3.0 • ...Dimensions and weight Privacy control Power subsystem Special keys and controls Acer Video Conference, featuring: • Integrated Acer Crystal Eye webcam* • Acer PureZone technology* • Optional Acer Xpress VoIP phone* • WLAN: Acer InviLink™ Nplify™ 802.11b/g/Draft-N* •...
.../1.73 inches) • 3.50 kg (7.71 lbs.) with 2 HDDs and 8-cell battery pack • 3.40 kg (7.49 lbs.) with 2 HDDs and 6-cell battery pack • Acer Bio-Protection fingerprint solution* • BIOS user, supervisor, HDD passwords • Kensington lock slot • ACPI 3.0 • ...Dimensions and weight Privacy control Power subsystem Special keys and controls Acer Video Conference, featuring: • Integrated Acer Crystal Eye webcam* • Acer PureZone technology* • Optional Acer Xpress VoIP phone* • WLAN: Acer InviLink™ Nplify™ 802.11b/g/Draft-N* •...
Aspire 6530/6530G Quick Guide
Page 7
...12 Lock Keys and embedded numeric keypad 12 Windows Keys 13 Hot Keys 14 Special Key 15 Using the System Utilities 16 Acer GridVista (dual-display compatible 16 Hardware Specifications and Configurations 18 System Utilities 27 BIOS Setup Utility 27 Navigating the BIOS Utility 27... Information 28 Main 29 Security 30 Boot 33 Exit 34 BIOS Flash Utility 35 Remove HDD/BIOS Utility 37 Machine Disassembly and Replacement 41 Disassembly Requirements 41 General Information 42 Pre-disassembly Instructions 42 Disassembly Process 42 ...
...12 Lock Keys and embedded numeric keypad 12 Windows Keys 13 Hot Keys 14 Special Key 15 Using the System Utilities 16 Acer GridVista (dual-display compatible 16 Hardware Specifications and Configurations 18 System Utilities 27 BIOS Setup Utility 27 Navigating the BIOS Utility 27... Information 28 Main 29 Security 30 Boot 33 Exit 34 BIOS Flash Utility 35 Remove HDD/BIOS Utility 37 Machine Disassembly and Replacement 41 Disassembly Requirements 41 General Information 42 Pre-disassembly Instructions 42 Disassembly Process 42 ...
Aspire 6530/6530G Quick Guide
Page 9
Table of Contents HDD Not Operating Correctly 125 USB Failure (Rightside 128 Modem Failure 128 External Mouse Failure 129 Other Failures 129 Intermittent Problems 130 Undetermined Problems 130 POST ... Password Check 147 BIOS Recovery by Crisis Disk 148 FRU (Field Replaceable Unit) List 149 Aspire 6530 Exploded Diagrams 150 Main Module 150 LCD Module 151 Aspire 6530 FRU List 152 Screw List 161 Model Definition and Configuration 164 Aspire 6530 Series 164 Test Compatible Components 201 Microsoft® Windows® Vista Environment Test 202 Peripheral...
Table of Contents HDD Not Operating Correctly 125 USB Failure (Rightside 128 Modem Failure 128 External Mouse Failure 129 Other Failures 129 Intermittent Problems 130 Undetermined Problems 130 POST ... Password Check 147 BIOS Recovery by Crisis Disk 148 FRU (Field Replaceable Unit) List 149 Aspire 6530 Exploded Diagrams 150 Main Module 150 LCD Module 151 Aspire 6530 FRU List 152 Screw List 161 Model Definition and Configuration 164 Aspire 6530 Series 164 Test Compatible Components 201 Microsoft® Windows® Vista Environment Test 202 Peripheral...
Aspire 6530/6530G Quick Guide
Page 12
... and one subwoofer* supporting low-frequency effects True5.1-channel surround sound output High-definition audio support S/PDIF (Sony/Philips Digital Interface) support for digital speakers Acer PureZone technology with 1 HDD and 6-cell battery pack Privacy control • Acer Bio-Protection fingerprint solution* • BIOS user, supervisor...
... and one subwoofer* supporting low-frequency effects True5.1-channel surround sound output High-definition audio support S/PDIF (Sony/Philips Digital Interface) support for digital speakers Acer PureZone technology with 1 HDD and 6-cell battery pack Privacy control • Acer Bio-Protection fingerprint solution* • BIOS user, supervisor...
Aspire 6530/6530G Quick Guide
Page 20
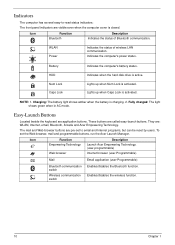
... beside the keyboard are called easy-launch buttons. Charging: The battery light shows amber when the battery is active. Battery HDD Num Lock Caps Lock Indicates the computer's battery status. NOTE: 1. These buttons are application buttons. To set to ... is closed. They are visible even when the computer cover is activated. Icon Function Empowering Technology Web browser Description Launch Acer Empowering Technology. (user-programmable) Internet browser (user-Programmable) Mail Email application (user-Programmable) Bluetooth communication switch Wireless communication...
... beside the keyboard are called easy-launch buttons. Charging: The battery light shows amber when the battery is active. Battery HDD Num Lock Caps Lock Indicates the computer's battery status. NOTE: 1. These buttons are application buttons. To set to ... is closed. They are visible even when the computer cover is activated. Icon Function Empowering Technology Web browser Description Launch Acer Empowering Technology. (user-programmable) Internet browser (user-Programmable) Mail Email application (user-Programmable) Bluetooth communication switch Wireless communication...
Aspire 6530/6530G Quick Guide
Page 40
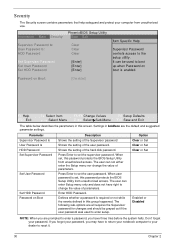
...and suggested parameter settings. Don't forget your password. Information Main Security Supervisor Password Is: User Password Is: HDD Password Set Supervisor Password Set User Password Set HDD Password PhoenixBIOS Setup Utility Boot Exit Clear Clear Clear [Enter] [Enter] [Enter] Item Specific Help Supervisor ... password for changes and should be used to the setup utility. Parameter Supervisor Password Is User Password Is HDD Password Set Supervisor Password Set User Password Set HDD Password Password on Boot: [Disabled] F1 Help ESC Exit ↑↓ Select Item ←→...
...and suggested parameter settings. Don't forget your password. Information Main Security Supervisor Password Is: User Password Is: HDD Password Set Supervisor Password Set User Password Set HDD Password PhoenixBIOS Setup Utility Boot Exit Clear Clear Clear [Enter] [Enter] [Enter] Item Specific Help Supervisor ... password for changes and should be used to the setup utility. Parameter Supervisor Password Is User Password Is HDD Password Set Supervisor Password Set User Password Set HDD Password Password on Boot: [Disabled] F1 Help ESC Exit ↑↓ Select Item ←→...
Aspire 6530/6530G Quick Guide
Page 43
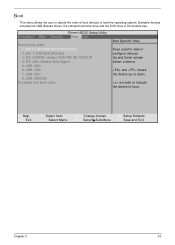
... Boot Exit Boot priority order: 1: IDE 0: TOSHIBA MK3252GSX-(S1) 2: IDE 1: ST9160310AS-(S2) 3: IDE CDROM: Optiarc DVD RW AD-7560S-(P 4: PCI LAN: Atheros Boot Agent 5: USB HDD: 6: USB FDD: 7: USB KEY: 8: USB CDROM: Excluded from boot order: Item Specific Help Keys used to view or configure devices: Up and Down arrows select...
... Boot Exit Boot priority order: 1: IDE 0: TOSHIBA MK3252GSX-(S1) 2: IDE 1: ST9160310AS-(S2) 3: IDE CDROM: Optiarc DVD RW AD-7560S-(P 4: PCI LAN: Atheros Boot Agent 5: USB HDD: 6: USB FDD: 7: USB KEY: 8: USB CDROM: Excluded from boot order: Item Specific Help Keys used to view or configure devices: Up and Down arrows select...
Aspire 6530/6530G Quick Guide
Page 45
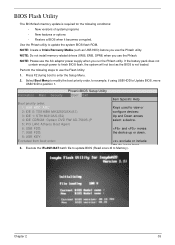
...(XMS, EMS, DPMI) when you run the Phlash utility. PhoenixBIOS Setup Utility Information Main Security Boot Exit Item Specific Help Boot priority order: 1: USB HDD: ABC Keys used to view or 2: IDE 0: TOSHIBA MK3252GSX-(S1) configure devices: 3: IDE 1: ST9160310AS-(S2) Up and Down arrows 4: IDE CDROM.... 8: USB KEY: Excluded from boot order: exclude or include the de ice to finish BIOS flash, the system will not boot as USB HDD) before you use the Flash Utility: 1. Perform the following conditions: • New versions of system programs • New features or options •...
...(XMS, EMS, DPMI) when you run the Phlash utility. PhoenixBIOS Setup Utility Information Main Security Boot Exit Item Specific Help Boot priority order: 1: USB HDD: ABC Keys used to view or 2: IDE 0: TOSHIBA MK3252GSX-(S1) configure devices: 3: IDE 1: ST9160310AS-(S2) Up and Down arrows 4: IDE CDROM.... 8: USB KEY: Excluded from boot order: exclude or include the de ice to finish BIOS flash, the system will not boot as USB HDD) before you use the Flash Utility: 1. Perform the following conditions: • New versions of system programs • New features or options •...
Aspire 6530/6530G Quick Guide
Page 47
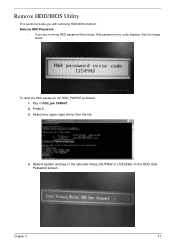
Key in wrong HDD password three times, Hdd password error code displays. Chapter 2 37 Remove HDD/BIOS Utility This section provide you with removing HDD/BIOS method: Remove HDD Password: • If you key in hdd_pw 15494 0 2. Press 2. 3. Select one upper-case string from the list. 4. To reset the HDD password, run HDD_PW.EXE as follows: 1. Reboot system and key in the selected string (0KJFN42 or UVEIQ96) on the HDD User Password screen. See the image below.
Key in wrong HDD password three times, Hdd password error code displays. Chapter 2 37 Remove HDD/BIOS Utility This section provide you with removing HDD/BIOS method: Remove HDD Password: • If you key in hdd_pw 15494 0 2. Press 2. 3. Select one upper-case string from the list. 4. To reset the HDD password, run HDD_PW.EXE as follows: 1. Reboot system and key in the selected string (0KJFN42 or UVEIQ96) on the HDD User Password screen. See the image below.

Aspire 6530/6530G Quick Guide
Page 53
... Rem ove SD Dummy Rem ove NewCard Dummy Rem ove Lower Covers Rem ove DIMMs Rem ove VGA Module Rem ove TV Tuner Rem ove HDD Rem ove ODD Rem ove HDD2 Rem ove WLAN Screw List Step VGA Module TV Tuner WLAN Module Main... HDD Carrier ODD Module ODD Bracket HDD2 Module HDD2 Carrier Screw M2.5*8-I BNI NYLOK M2.0*3.0-I (BKAG) (NYLOK) IRON M2.0*3.0-I-NI-NYLOK M3*0.5+3.5I M2.5*6.5-I (BZN(NYLOK-...
... Rem ove SD Dummy Rem ove NewCard Dummy Rem ove Lower Covers Rem ove DIMMs Rem ove VGA Module Rem ove TV Tuner Rem ove HDD Rem ove ODD Rem ove HDD2 Rem ove WLAN Screw List Step VGA Module TV Tuner WLAN Module Main... HDD Carrier ODD Module ODD Bracket HDD2 Module HDD2 Carrier Screw M2.5*8-I BNI NYLOK M2.0*3.0-I (BKAG) (NYLOK) IRON M2.0*3.0-I-NI-NYLOK M3*0.5+3.5I M2.5*6.5-I (BZN(NYLOK-...

Aspire 6530/6530G Quick Guide
Page 63
Removing the Main Hard Disk Drive Module 1. See "Removing the Lower Covers" on top of it. 4. Step HDD Carrier Size M3*0.5+3.5I Quantity 4 Screw Type Chapter 3 53 Remove the Lower Cover. NOTE: To prevent damage to HDD, avoid pressing down on it or placing heavy objects on page 47. 3. Remove the four screws securing the HDD to remove. Hold the Pull Tab and slide the HDD away from the connector. Pull the HDD up as shown to the carrier. See "Removing the Battery Pack" on page 44. 2.
Removing the Main Hard Disk Drive Module 1. See "Removing the Lower Covers" on top of it. 4. Step HDD Carrier Size M3*0.5+3.5I Quantity 4 Screw Type Chapter 3 53 Remove the Lower Cover. NOTE: To prevent damage to HDD, avoid pressing down on it or placing heavy objects on page 47. 3. Remove the four screws securing the HDD to remove. Hold the Pull Tab and slide the HDD away from the connector. Pull the HDD up as shown to the carrier. See "Removing the Battery Pack" on page 44. 2.

Aspire 6530/6530G Quick Guide
Page 64
Lift the HDD carrier to remove. 54 Chapter 3 Grasp the HDD connector and pull firmly to remove. 6. 5.
Lift the HDD carrier to remove. 54 Chapter 3 Grasp the HDD connector and pull firmly to remove. 6. 5.

Aspire 6530/6530G Quick Guide
Page 67
Remove the HDD2 Cover. Screw Type Chapter 3 57 Remove the Battery. Remove the two securing screws from the HDD. See "Removing the Battery Pack" on page 47. 3. Step HDD2 Carrier Size M2.0*3.0-I (BKAG) (NYLOK) IRON Quantity 2 4. Grasp the Pull Tab and pull the HDD out of the bay as shown. See "Removing the Lower Covers" on page 44. 2. Removing the Secondary Hard Disk Drive Module 1.
Remove the HDD2 Cover. Screw Type Chapter 3 57 Remove the Battery. Remove the two securing screws from the HDD. See "Removing the Battery Pack" on page 47. 3. Step HDD2 Carrier Size M2.0*3.0-I (BKAG) (NYLOK) IRON Quantity 2 4. Grasp the Pull Tab and pull the HDD out of the bay as shown. See "Removing the Lower Covers" on page 44. 2. Removing the Secondary Hard Disk Drive Module 1.

Aspire 6530/6530G Quick Guide
Page 68
Lift the HDD carrier to the carrier. Step HDD2 Carrier Size M3*0.5+3.5I 6. Remove the four screws securing the HDD to remove. Quantity 4 Screw Type 58 Chapter 3 5.
Lift the HDD carrier to the carrier. Step HDD2 Carrier Size M3*0.5+3.5I 6. Remove the four screws securing the HDD to remove. Quantity 4 Screw Type 58 Chapter 3 5.

Aspire 6530/6530G Quick Guide
Page 121
Replace the HDD and slide to the right to secure the carrier. 3. Replacing the ODD Module 1. Turn the ODD over and replace the ODD bracket. Replace the two securing screws as shown. ODD cover on the ODD Module. Place the HDD in the eject position, replace the 2. Replace the four screws to connect 4. With the ODD tray in the HDD carrier. 2. the HDD interface. Chapter 3 111 Replacing the Second Hard Disk Drive Module 1.
Replace the HDD and slide to the right to secure the carrier. 3. Replacing the ODD Module 1. Turn the ODD over and replace the ODD bracket. Replace the two securing screws as shown. ODD cover on the ODD Module. Place the HDD in the eject position, replace the 2. Replace the four screws to connect 4. With the ODD tray in the HDD carrier. 2. the HDD interface. Chapter 3 111 Replacing the Second Hard Disk Drive Module 1.

Aspire 6530/6530G Quick Guide
Page 122
Replacing the Main Hard Disk Drive Module 1. Place the HDD in place. Replace the four screws to connect the HDD interface. 112 Chapter 3 Push down to secure the carrier. 4. module is flush with the chassis. Insert the back first and angle the HDD in the HDD carrier. 3. Replace the HDD connector. 2. 3. Replace the single securing screw as shown. Slide the module in to the chassis and press until 4.
Replacing the Main Hard Disk Drive Module 1. Place the HDD in place. Replace the four screws to connect the HDD interface. 112 Chapter 3 Push down to secure the carrier. 4. module is flush with the chassis. Insert the back first and angle the HDD in the HDD carrier. 3. Replace the HDD connector. 2. 3. Replace the single securing screw as shown. Slide the module in to the chassis and press until 4.

Aspire 6530/6530G Quick Guide
Page 130
... the BIOS settings are no device conflicts. • No hardware is missing from the operating system DVD and follow the onscreen prompts. 11. If HDD information is listed under Other Devices. 9. See "Disassembly Process" on page 211. 10. c. If the Issue is only abnormal in an application... 1. If display size is still not resolved, see "Online Support Information" on page 42. 3. Check the display resolution is experiencing HDD or ODD BIOS information loss, disconnect and reconnect the power and data cables between devices. Run the Windows Memory Diagnostic from the BIOS...
... the BIOS settings are no device conflicts. • No hardware is missing from the operating system DVD and follow the onscreen prompts. 11. If HDD information is listed under Other Devices. 9. See "Disassembly Process" on page 211. 10. c. If the Issue is only abnormal in an application... 1. If display size is still not resolved, see "Online Support Information" on page 42. 3. Check the display resolution is experiencing HDD or ODD BIOS information loss, disconnect and reconnect the power and data cables between devices. Run the Windows Memory Diagnostic from the BIOS...
Aspire 6530/6530G Quick Guide
Page 135
... more information see Windows Help and Support. 9. Reboot the computer and retry the operation. Disconnect all cables and jumpers on the HDD and ODD are set as the first boot device on page 42. Click Next. When complete, click Finish. Replace the..., press any recently added hardware and associated software. 8. h. Select Startup Repair. For more information see Windows Help and Support. 5. HDD Not Operating Correctly If the HDD does not operate correctly, perform the following general solutions one at a time to enter the BIOS Utility. Run a complete virus scan using...
... more information see Windows Help and Support. 9. Reboot the computer and retry the operation. Disconnect all cables and jumpers on the HDD and ODD are set as the first boot device on page 42. Click Next. When complete, click Finish. Replace the..., press any recently added hardware and associated software. 8. h. Select Startup Repair. For more information see Windows Help and Support. 5. HDD Not Operating Correctly If the HDD does not operate correctly, perform the following general solutions one at a time to enter the BIOS Utility. Run a complete virus scan using...
Aspire 6530/6530G Quick Guide
Page 157
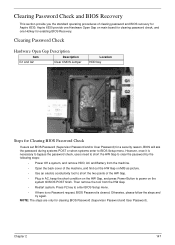
... the HW Gap on main board for clearing password check, and one Hotkey for Aspire 6530. Chapter 2 147 Clearing Password Check Hardware Open Gap Description Item G1 and G2 Description Clear CMOS Jumper Location HDD bay Steps for Clearing BIOS Password Check If users set BIOS Password (Supervisor Password ...clearing password and BIOS recovery for enabling BIOS Recovery. However, once it is cleared. Otherwise, please follow the steps and try again. Aspire 6530 provide one Hardware Open Gap on M/B as picture. • Use an electric conductivity tool to BIOS Setup menu.
... the HW Gap on main board for clearing password check, and one Hotkey for Aspire 6530. Chapter 2 147 Clearing Password Check Hardware Open Gap Description Item G1 and G2 Description Clear CMOS Jumper Location HDD bay Steps for Clearing BIOS Password Check If users set BIOS Password (Supervisor Password ...clearing password and BIOS recovery for enabling BIOS Recovery. However, once it is cleared. Otherwise, please follow the steps and try again. Aspire 6530 provide one Hardware Open Gap on M/B as picture. • Use an electric conductivity tool to BIOS Setup menu.

Aspire 6530/6530G Quick Guide
Page 166
Category HDD Description Acer Part No. HDD SEAGATE 2.5" 5400rpm 120GB ST9120817AS Corsair SATA LF F/W:3.AAA HDD TOSHIBA 2.5" 5400rpm 120GB MK1252GSX Virgo BS SATA LF F/W:LV010J HDD HGST 2.5" 5400rpm 120GB HTS543212L9A300 Falcon-B SATA LF F/W:C40C HDD SEAGATE 2.5" 5400rpm 160GB ST9160310AS Crockett SATA LF F/W:0303 HDD TOSHIBA 2.5" 5400rpm 160GB MK1652GSX Virgo BS SATA LF F/W:LV010J HDD HGST 2.5" 5400rpm 160GB HTS543216L9A300 Falcon...
Category HDD Description Acer Part No. HDD SEAGATE 2.5" 5400rpm 120GB ST9120817AS Corsair SATA LF F/W:3.AAA HDD TOSHIBA 2.5" 5400rpm 120GB MK1252GSX Virgo BS SATA LF F/W:LV010J HDD HGST 2.5" 5400rpm 120GB HTS543212L9A300 Falcon-B SATA LF F/W:C40C HDD SEAGATE 2.5" 5400rpm 160GB ST9160310AS Crockett SATA LF F/W:0303 HDD TOSHIBA 2.5" 5400rpm 160GB MK1652GSX Virgo BS SATA LF F/W:LV010J HDD HGST 2.5" 5400rpm 160GB HTS543216L9A300 Falcon...

