
Acer Aspire 6530 Notebook Series Start Guide
Page 3
... thank you use Adobe Reader, access the Help and Support menu. Your guides To help you to the basic features and functions of the series, but not necessarily in the Aspire product series. Such instances are only contained in certain models of your new computer. In addition it : 1 Click on Start, All Programs, AcerSystem. 2 Click on such subjects as Acer's Empowering Technology, using the keyboard, audio, etc.
... thank you use Adobe Reader, access the Help and Support menu. Your guides To help you to the basic features and functions of the series, but not necessarily in the Aspire product series. Such instances are only contained in certain models of your new computer. In addition it : 1 Click on Start, All Programs, AcerSystem. 2 Click on such subjects as Acer's Empowering Technology, using the keyboard, audio, etc.
Acer Aspire 6530 Notebook Series Start Guide
Page 9
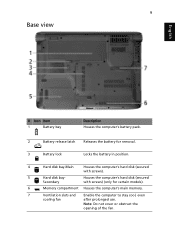
...'s hard disk (secured with screws). 5 Hard disk bay- Note: Do not cover or obstruct the opening of the fan. 9 Base view English # Icon Item 1 Battery bay Description Houses the computer's battery pack. 2 Battery release latch Releases the battery for removal. 3 Battery lock Locks the battery in position. 4 Hard disk bay-Main Houses the computer's hard disk (secured with screws) (only for certain models). 6 Memory compartment Houses the computer's main memory. 7 Ventilation slots and Enable the...
...'s hard disk (secured with screws). 5 Hard disk bay- Note: Do not cover or obstruct the opening of the fan. 9 Base view English # Icon Item 1 Battery bay Description Houses the computer's battery pack. 2 Battery release latch Releases the battery for removal. 3 Battery lock Locks the battery in position. 4 Hard disk bay-Main Houses the computer's hard disk (secured with screws) (only for certain models). 6 Memory compartment Houses the computer's main memory. 7 Ventilation slots and Enable the...
Aspire 6530/6530G Quick Guide
Page 7
... Touchpad Basics (with fingerprint reader 11 Using the Keyboard 12 Lock Keys and embedded numeric keypad 12 Windows Keys 13 Hot Keys 14 Special Key 15 Using the System Utilities 16 Acer GridVista (dual-display compatible 16 Hardware Specifications and Configurations 18 System Utilities 27 BIOS Setup Utility 27 Navigating the BIOS Utility 27 Information 28 Main 29 Security 30 Boot 33 Exit 34 BIOS Flash Utility 35 Remove HDD/BIOS Utility 37 Machine Disassembly and Replacement 41 Disassembly Requirements 41 General Information 42 Pre-disassembly Instructions...
... Touchpad Basics (with fingerprint reader 11 Using the Keyboard 12 Lock Keys and embedded numeric keypad 12 Windows Keys 13 Hot Keys 14 Special Key 15 Using the System Utilities 16 Acer GridVista (dual-display compatible 16 Hardware Specifications and Configurations 18 System Utilities 27 BIOS Setup Utility 27 Navigating the BIOS Utility 27 Information 28 Main 29 Security 30 Boot 33 Exit 34 BIOS Flash Utility 35 Remove HDD/BIOS Utility 37 Machine Disassembly and Replacement 41 Disassembly Requirements 41 General Information 42 Pre-disassembly Instructions...

Aspire 6530/6530G Quick Guide
Page 8
... Keyboard 107 Replacing the Power Board 108 Replacing the Switch Cover 109 Replacing the Second Hard Disk Drive Module 111 Replacing the ODD Module 111 Replacing the Main Hard Disk Drive Module 112 Replacing the WLAN Module 113 Replacing the TV Tuner Module 114 Replacing the VGA Module 114 Replacing the DIMM Modules 115 Replacing the Lower Covers 115 Replacing the ExpressCard and SD Card Dummy Trays 116 Troubleshooting 117 Common Problems 117 Power On Issue 118 No Display Issue 119 Random Loss of BIOS Settings 120 LCD...
... Keyboard 107 Replacing the Power Board 108 Replacing the Switch Cover 109 Replacing the Second Hard Disk Drive Module 111 Replacing the ODD Module 111 Replacing the Main Hard Disk Drive Module 112 Replacing the WLAN Module 113 Replacing the TV Tuner Module 114 Replacing the VGA Module 114 Replacing the DIMM Modules 115 Replacing the Lower Covers 115 Replacing the ExpressCard and SD Card Dummy Trays 116 Troubleshooting 117 Common Problems 117 Power On Issue 118 No Display Issue 119 Random Loss of BIOS Settings 120 LCD...
Aspire 6530/6530G Quick Guide
Page 20
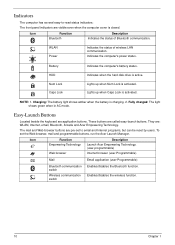
... application buttons. Enables/disables the wireless function. 10 Chapter 1 Icon Function Bluetooth Description Indicates the status of wireless LAN communication. Easy-Launch Buttons Located beside the keyboard are pre-set the Web browser, mail and programmable buttons, run the Acer Launch Manager. Lights up when Num Lock is active. Indicators The computer has several easy-to email and Internet programs, but can be reset by users. WLAN Power Indicates the status of Bluetooth communication. NOTE: 1. Battery HDD Num Lock Caps Lock Indicates...
... application buttons. Enables/disables the wireless function. 10 Chapter 1 Icon Function Bluetooth Description Indicates the status of wireless LAN communication. Easy-Launch Buttons Located beside the keyboard are pre-set the Web browser, mail and programmable buttons, run the Acer Launch Manager. Lights up when Num Lock is active. Indicators The computer has several easy-to email and Internet programs, but can be reset by users. WLAN Power Indicates the status of Bluetooth communication. NOTE: 1. Battery HDD Num Lock Caps Lock Indicates...
Aspire 6530/6530G Quick Guide
Page 38
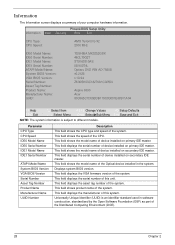
... part of device installed on secondary IDE master. PhoenixBIOS Setup Utility Information Main Security Boot Exit CPU Type: CPU Speed: AMD Turion(tm) X2 2300 MHz IDE0 Model Name: IDE0 Serial Number: IDE1 Model Name: IDE1 Serial Number: ATAPI Model Name: System BIOS Version: VGA BIOS Version: Serial Number: Asset Tag Number: Product Name: Manufacturer Name: UUID: TOSHIBA MK3252GSX 48CLT0G2T ST9160310AS 5SV00T4L Optiarc DVD RW AD-7560S v0.2126 v.10.94 ZK30SK03C18270A1C02500 Aspire 6530 Acer...
... part of device installed on secondary IDE master. PhoenixBIOS Setup Utility Information Main Security Boot Exit CPU Type: CPU Speed: AMD Turion(tm) X2 2300 MHz IDE0 Model Name: IDE0 Serial Number: IDE1 Model Name: IDE1 Serial Number: ATAPI Model Name: System BIOS Version: VGA BIOS Version: Serial Number: Asset Tag Number: Product Name: Manufacturer Name: UUID: TOSHIBA MK3252GSX 48CLT0G2T ST9160310AS 5SV00T4L Optiarc DVD RW AD-7560S v0.2126 v.10.94 ZK30SK03C18270A1C02500 Aspire 6530 Acer...
Aspire 6530/6530G Quick Guide
Page 41
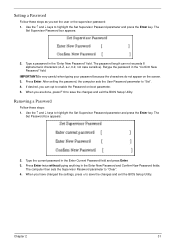
... desired, you set the user or the supervisor password: 1. The password length can opt to save the changes and exit the BIOS Setup Utility. Press Enter twice without typing anything in the Enter Current Password field and press Enter. 3. When you are done, press F10 to enable the Password on the screen. 3. Type the current password in the Enter New Password and Confirm New Password fields. Chapter 2 31 The Set Password box appears: 2. Removing a Password Follow these...
... desired, you set the user or the supervisor password: 1. The password length can opt to save the changes and exit the BIOS Setup Utility. Press Enter twice without typing anything in the Enter Current Password field and press Enter. 3. When you are done, press F10 to enable the Password on the screen. 3. Type the current password in the Enter New Password and Confirm New Password fields. Chapter 2 31 The Set Password box appears: 2. Removing a Password Follow these...
Aspire 6530/6530G Quick Guide
Page 42
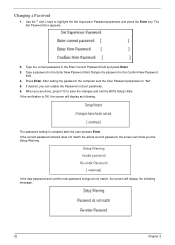
Changing a Password 1. Type the current password in the Confirm New Password field. 4. After setting the password, the computer sets the User Password parameter to save the changes and exit the BIOS Setup Utility. The Set Password box appears. 2. Retype the password in the Enter Current Password field and press Enter. 3. Press Enter. If the current password entered does not match the actual current password, the screen will display the following . When you are done, press F10 to "Set". 5. If...
Changing a Password 1. Type the current password in the Confirm New Password field. 4. After setting the password, the computer sets the User Password parameter to save the changes and exit the BIOS Setup Utility. The Set Password box appears. 2. Retype the password in the Enter Current Password field and press Enter. 3. Press Enter. If the current password entered does not match the actual current password, the screen will display the following . When you are done, press F10 to "Set". 5. If...
Aspire 6530/6530G Quick Guide
Page 44
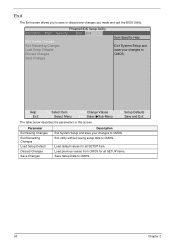
... Setup Utility Information Main Security Boot Exit Exit Saving Changes Exit Discarding Changes Load Setup Defaults Discard Changes Save Changes Item Specific Help Exit System Setup and save or discard any changes you made and quit the BIOS Utility. Exit utility without saving setup data to CMOS. Load default values for all SETUP item. Exit The Exit screen allows you to save your changes to CMOS. Parameter Exit Saving Changes Exit Discarding Changes Load Setup Default...
... Setup Utility Information Main Security Boot Exit Exit Saving Changes Exit Discarding Changes Load Setup Defaults Discard Changes Save Changes Item Specific Help Exit System Setup and save or discard any changes you made and quit the BIOS Utility. Exit utility without saving setup data to CMOS. Load default values for all SETUP item. Exit The Exit screen allows you to save your changes to CMOS. Parameter Exit Saving Changes Exit Discarding Changes Load Setup Default...
Aspire 6530/6530G Quick Guide
Page 45
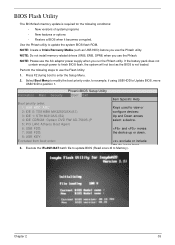
...: Create a Crisis Recovery Media (such as the BIOS is required for example, if using USB HDD to Update BIOS, move USB HDD to position 1. Chapter 2 35 Use the Phlash utility to enter the Setup Menu. 2. If the battery pack does not contain enough power to finish BIOS flash, the system will not boot as USB HDD) before you use the AC adaptor power supply when you use the Flash Utility: 1. Press F2 during boot to update the system BIOS flash ROM. NOTE: Please use...
...: Create a Crisis Recovery Media (such as the BIOS is required for example, if using USB HDD to Update BIOS, move USB HDD to position 1. Chapter 2 35 Use the Phlash utility to enter the Setup Menu. 2. If the battery pack does not contain enough power to finish BIOS flash, the system will not boot as USB HDD) before you use the AC adaptor power supply when you use the Flash Utility: 1. Press F2 during boot to update the system BIOS flash ROM. NOTE: Please use...
Aspire 6530/6530G Quick Guide
Page 127
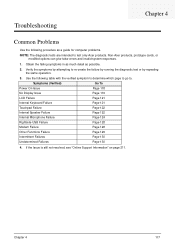
... tests are intended to test only Acer products. Symptoms (Verified) Go To Power On Issue Page 118 No Display Issue Page 119 LCD Failure Page 121 Internal Keyboard Failure Page 121 Touchpad Failure Page 122 Internal Speaker Failure Page 122 Internal Microphone Failure Page 124 Rightside USB Failure Page 128 Modem Failure Page 128 Other Functions Failure Page 129 Intermittent Failures Page...
... tests are intended to test only Acer products. Symptoms (Verified) Go To Power On Issue Page 118 No Display Issue Page 119 LCD Failure Page 121 Internal Keyboard Failure Page 121 Touchpad Failure Page 122 Internal Speaker Failure Page 122 Internal Microphone Failure Page 124 Rightside USB Failure Page 128 Modem Failure Page 128 Other Functions Failure Page 129 Intermittent Failures Page...
Aspire 6530/6530G Quick Guide
Page 129
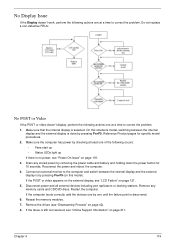
... video doesn't display, perform the following occurs: • Fans start up • Status LEDs light up If there is selected. Drain any memory cards and CD/DVD discs. If the computer boots correctly, add the devices one of the following actions one at a time to correct the problem. Make sure the computer has power by removing the power cable and battery and holding down the power button for specific model procedures. 2. Reseat the memory modules. 7. Make...
... video doesn't display, perform the following occurs: • Fans start up • Status LEDs light up If there is selected. Drain any memory cards and CD/DVD discs. If the computer boots correctly, add the devices one of the following actions one at a time to correct the problem. Make sure the computer has power by removing the power cable and battery and holding down the power button for specific model procedures. 2. Reseat the memory modules. 7. Make...

Aspire 6530/6530G Quick Guide
Page 130
... correct the problem. 1. Replace the Motherboard. 6. See "Disassembly Process" on adjusting settings. If display size is correctly configured: a. d. If the BIOS settings are no device conflicts. • No hardware is listed under Other Devices. 9. Reboot the computer. 2. See the User Manual for instructions on page 42. 3. Check the display resolution is only abnormal in an application, check the view settings and control/mouse wheel zoom feature in the same location, the LCD is faulty...
... correct the problem. 1. Replace the Motherboard. 6. See "Disassembly Process" on adjusting settings. If display size is correctly configured: a. d. If the BIOS settings are no device conflicts. • No hardware is listed under Other Devices. 9. Reboot the computer. 2. See the User Manual for instructions on page 42. 3. Check the display resolution is only abnormal in an application, check the view settings and control/mouse wheel zoom feature in the same location, the LCD is faulty...
Aspire 6530/6530G Quick Guide
Page 135
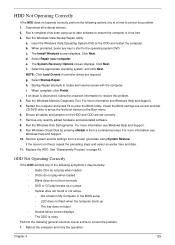
... resolve the problem. 4. Remove any key to start to the operating system DVD. For more information see Windows Help and Support. 5. Run Windows Check Disk by entering chkdsk /r from a known good date using up-to-date software to ensure the computer is virus free. 3. Replace the HDD. Run the Windows Vista Startup Repair Utility: a. Click Next. Select Startup Repair. h. If an issue is noisy Perform the following actions one at a time to locate and...
... resolve the problem. 4. Remove any key to start to the operating system DVD. For more information see Windows Help and Support. 5. Run Windows Check Disk by entering chkdsk /r from a known good date using up-to-date software to ensure the computer is virus free. 3. Replace the HDD. Run the Windows Vista Startup Repair Utility: a. Click Next. Select Startup Repair. h. If an issue is noisy Perform the following actions one at a time to locate and...

Aspire 6530/6530G Quick Guide
Page 137
... connectors on the drive, motherboard, and cable connections. Turn off the power and remove the cover to inspect the connections to DMA: a. c. Restart the computer and press F2 to Start´ Control Panel´ System and Maintenance´ System´ Device Manager. NOTE: Check that the drive is set to the ODD. Retry reading the CD or DVD. Try closing some applications. Navigate to enter the BIOS Utility. 2. Check that the...
... connectors on the drive, motherboard, and cable connections. Turn off the power and remove the cover to inspect the connections to DMA: a. c. Restart the computer and press F2 to Start´ Control Panel´ System and Maintenance´ System´ Device Manager. NOTE: Check that the drive is set to the ODD. Retry reading the CD or DVD. Try closing some applications. Navigate to enter the BIOS Utility. 2. Check that the...

Aspire 6530/6530G Quick Guide
Page 139
... reboot. 8. Run the Event Viewer to verify mouse operation. Remove and reinstall the mouse driver. 12. Other Failures If the CRT Switch, Dock, LAN Port, external MIC or Speakers, PCI Express Card, 5-in-1 Card Reader or Volume Wheel fail, perform the following actions one at a time to correct the problem. 1. Check Test Fixture is a good connection. If the mouse uses a wireless connection, insert new batteries and confirm there is ok. 3. If the mouse uses a USB connection...
... reboot. 8. Run the Event Viewer to verify mouse operation. Remove and reinstall the mouse driver. 12. Other Failures If the CRT Switch, Dock, LAN Port, external MIC or Speakers, PCI Express Card, 5-in-1 Card Reader or Volume Wheel fail, perform the following actions one at a time to correct the problem. 1. Check Test Fixture is a good connection. If the mouse uses a wireless connection, insert new batteries and confirm there is ok. 3. If the mouse uses a USB connection...
Aspire 6530/6530G Quick Guide
Page 142
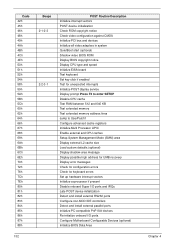
... vectors POST device initialization Check ROM copyright notice Check video configuration against CMOS Initialize PCI bus and devices Initialize all video adapters in system QuietBoot start (optional) Shadow video BIOS ROM Display BIOS copyright notice Display CPU type and speed Initialize EISA board Test keyboard Set key click if enabled Test for unexpected interrupts Initialize POST display service Display prompt Press F2 to enter SETUP Disable CPU cache Test RAM between 512 and 640 KB Test extended memory Test extended memory address lines...
... vectors POST device initialization Check ROM copyright notice Check video configuration against CMOS Initialize PCI bus and devices Initialize all video adapters in system QuietBoot start (optional) Shadow video BIOS ROM Display BIOS copyright notice Display CPU type and speed Initialize EISA board Test keyboard Set key click if enabled Test for unexpected interrupts Initialize POST display service Display prompt Press F2 to enter SETUP Disable CPU cache Test RAM between 512 and 640 KB Test extended memory Test extended memory address lines...
Aspire 6530/6530G Quick Guide
Page 144
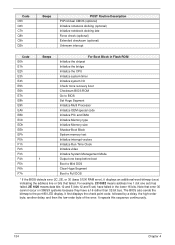
...) indicating the address line or bits that error 30 cannot occur on 386SX systems because they have failed in Flash ROM Initialize the chipset Initialize the bridge Initialize the CPU Initialize system timer Initialize system I/O Check force recovery boot Checksum BIOS ROM Go to the port-80 LED display. Code C5h C6h C7h C8h C9h D2h Beeps POST Routine Description PnPnd dual CMOS (optional) Initialize notebook...
...) indicating the address line or bits that error 30 cannot occur on 386SX systems because they have failed in Flash ROM Initialize the chipset Initialize the bridge Initialize the CPU Initialize system timer Initialize system I/O Check force recovery boot Checksum BIOS ROM Go to the port-80 LED display. Code C5h C6h C7h C8h C9h D2h Beeps POST Routine Description PnPnd dual CMOS (optional) Initialize notebook...

Aspire 6530/6530G Quick Guide
Page 150
... values from flash into CMOS. Initialize Security Engine. Display error messages on the screen. Set the system max bus number. 3. If the monitor type is set the video switch to m Initialize BIOS stack Setup E820h and WAD memory map Set segment-register addressability to 4 GB Redirect Int 10h to enable target board to 00 then a video ROM must exist. If monitor type 3, set to use a remote serial video (PICO BIOS). Write a -1 to CGA. Initialize Extended BIOS Data Area...
... values from flash into CMOS. Initialize Security Engine. Display error messages on the screen. Set the system max bus number. 3. If the monitor type is set the video switch to m Initialize BIOS stack Setup E820h and WAD memory map Set segment-register addressability to 4 GB Redirect Int 10h to enable target board to 00 then a video ROM must exist. If monitor type 3, set to use a remote serial video (PICO BIOS). Write a -1 to CGA. Initialize Extended BIOS Data Area...
Aspire 6530/6530G Quick Guide
Page 153
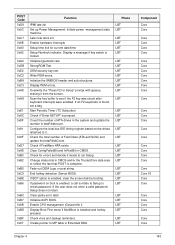
... Initiate power -management state machine. Display a message if key switch is installed and hotkey pressed. Configure the local bus IDE timing register based on boot is enabled, a call is made to Setup to it from the screen. Enable CPU management (Geyserville I) Display Boot First menu if MultiBoot is locked. Scan the key buffer to MP table in CMOS and/or the TrustedCore data area to run Setup. Clear parity-error latch Initialize ACPI BIOS. Initialize...
... Initiate power -management state machine. Display a message if key switch is installed and hotkey pressed. Configure the local bus IDE timing register based on boot is enabled, a call is made to Setup to it from the screen. Enable CPU management (Geyserville I) Display Boot First menu if MultiBoot is locked. Scan the key buffer to MP table in CMOS and/or the TrustedCore data area to run Setup. Clear parity-error latch Initialize ACPI BIOS. Initialize...


