User Guide
Page 3
... dummies installed in the slots. Turning the product off before cleaning. CAUTION for plug as possible. Dummies protect unused slots from the electrical outlet. CAUTION for Accessibility Be sure that the power outlet you plug the power cord into is easily accessible and located as close to the equipment operator as disconnecting device Observe the following guidelines when connecting and disconnecting power to...
... dummies installed in the slots. Turning the product off before cleaning. CAUTION for plug as possible. Dummies protect unused slots from the electrical outlet. CAUTION for Accessibility Be sure that the power outlet you plug the power cord into is easily accessible and located as close to the equipment operator as disconnecting device Observe the following guidelines when connecting and disconnecting power to...
User Guide
Page 5
... the case has been damaged • the product exhibits a distinct change in performance, indicating a need for service • the product does not operate normally after following the operating instructions Note: Adjust only those controls that may interfere with the system meets the requirements for safe battery usage This notebook uses a Lithium-ion battery. Do not put, store or leave your product in or near...
... the case has been damaged • the product exhibits a distinct change in performance, indicating a need for service • the product does not operate normally after following the operating instructions Note: Adjust only those controls that may interfere with the system meets the requirements for safe battery usage This notebook uses a Lithium-ion battery. Do not put, store or leave your product in or near...
User Guide
Page 6
... them away from the battery, which came bundled with the same type as a "CLASS 1 LASER PRODUCT." Replace the battery with your pocket or purse. Use of another battery may damage the battery or the connecting object. Do not disassemble or dispose of the battery, charging will eventually wear out. Keep them in summer or winter. Caution for Optical Drive Device (only for its...
... them away from the battery, which came bundled with the same type as a "CLASS 1 LASER PRODUCT." Replace the battery with your pocket or purse. Use of another battery may damage the battery or the connecting object. Do not disassemble or dispose of the battery, charging will eventually wear out. Keep them in summer or winter. Caution for Optical Drive Device (only for its...
User Guide
Page 13
... Aspire Series Generic User Guide contains useful information applying to "Quick Guide" for meeting your computer. It covers basic topics such as Acer eRecovery Management, using your computer Turning your computer on and off , the Just for Starters...poster helps you get started with language such as system utilities, data recovery, expansion options and troubleshooting. The printed Quick Guide introduces you for making an Acer notebook your choice for the location of the power button...
... Aspire Series Generic User Guide contains useful information applying to "Quick Guide" for meeting your computer. It covers basic topics such as Acer eRecovery Management, using your computer Turning your computer on and off , the Just for Starters...poster helps you get started with language such as system utilities, data recovery, expansion options and troubleshooting. The printed Quick Guide introduces you for making an Acer notebook your choice for the location of the power button...

User Guide
Page 17
...care of your battery pack xv Cleaning and servicing xv Touchpad 1 Touchpad basics (with fingerprint reader) 1 Touchpad basics (with two-click buttons) 2 Using the keyboard 3 Lock keys and embedded numeric keypad* 3 Windows keys 4 Audio 5 Acer PureZone (only for certain models) 5 Tuba (only for certain models) 5 Using Dolby Home Theater for certain models) 7 Acer GridVista (dual-display compatible) 8 Acer Backup Manager 9 Power management 10 Acer eRecovery Management 11 Burn backup discs 12 Restore 13 Restore Windows from backup discs 14 Acer Arcade Deluxe...
...care of your battery pack xv Cleaning and servicing xv Touchpad 1 Touchpad basics (with fingerprint reader) 1 Touchpad basics (with two-click buttons) 2 Using the keyboard 3 Lock keys and embedded numeric keypad* 3 Windows keys 4 Audio 5 Acer PureZone (only for certain models) 5 Tuba (only for certain models) 5 Using Dolby Home Theater for certain models) 7 Acer GridVista (dual-display compatible) 8 Acer Backup Manager 9 Power management 10 Acer eRecovery Management 11 Burn backup discs 12 Restore 13 Restore Windows from backup discs 14 Acer Arcade Deluxe...
User Guide
Page 19
... network feature 34 Consumer Infrared (CIR) (only for certain models) 34 Universal Serial Bus (USB) 35 IEEE 1394 port (only for certain models) 35 High-Definition Multimedia Interface (only for certain models) 36 ExpressCard (only for certain models) 36 Installing memory 37 Enjoying TV with an external antenna or cable socket 40 BIOS utility 41 Boot sequence 41 Enable disk-to RF fields (RSS-102) 54 LCD panel ergonomic specifications...
... network feature 34 Consumer Infrared (CIR) (only for certain models) 34 Universal Serial Bus (USB) 35 IEEE 1394 port (only for certain models) 35 High-Definition Multimedia Interface (only for certain models) 36 ExpressCard (only for certain models) 36 Installing memory 37 Enjoying TV with an external antenna or cable socket 40 BIOS utility 41 Boot sequence 41 Enable disk-to RF fields (RSS-102) 54 LCD panel ergonomic specifications...
User Guide
Page 21
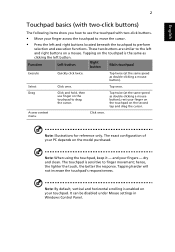
Function Left button Right button Main touchpad Execute Select Drag Access context menu Quickly click twice. Click and hold, then use the touchpad with two-click buttons) The following items show you how to use finger on the touchpad to drag the cursor. and your touchpad. Tapping harder will not increase the touchpad's responsiveness. Note: By default, vertical and horizontal scrolling is enabled on your fingers - Tap twice...
Function Left button Right button Main touchpad Execute Select Drag Access context menu Quickly click twice. Click and hold, then use the touchpad with two-click buttons) The following items show you how to use finger on the touchpad to drag the cursor. and your touchpad. Tapping harder will not increase the touchpad's responsiveness. Note: By default, vertical and horizontal scrolling is enabled on your fingers - Tap twice...
User Guide
Page 22
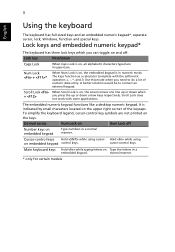
... keys respectively. Scroll Lock does not work with the arithmetic operators +, -, *, and /). The embedded numeric keypad functions like a desktop numeric keypad. Main keyboard keys Hold while typing letters on , the embedded keypad is on embedded keypad Type numbers in uppercase. Lock key Description Caps Lock When Caps Lock is in a embedded keypad. Scroll Lock When Scroll Lock is indicated by small characters located on embedded keypad control keys. normal manner. * only for certain models...
... keys respectively. Scroll Lock does not work with the arithmetic operators +, -, *, and /). The embedded numeric keypad functions like a desktop numeric keypad. Main keyboard keys Hold while typing letters on , the embedded keypad is on embedded keypad Type numbers in uppercase. Lock key Description Caps Lock When Caps Lock is in a embedded keypad. Scroll Lock When Scroll Lock is indicated by small characters located on embedded keypad control keys. normal manner. * only for certain models...
User Guide
Page 23
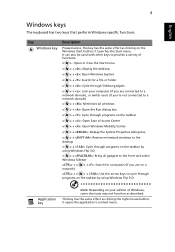
... the taskbar by using Windows Flip 3-D < > + : Bring all gadgets to the front and select Windows Sidebar + < network) > + : Search for computers (if you 're not connected to a network domain) < > + : Minimizes all windows < > + : Open the Run dialog box < > + : Cycle through programs on the taskbar < > + : Open Ease of Windows, some shortcuts may not function as clicking the right mouse button; English 4 Windows keys The keyboard has two keys that perform Windows-specific functions.
... the taskbar by using Windows Flip 3-D < > + : Bring all gadgets to the front and select Windows Sidebar + < network) > + : Search for computers (if you 're not connected to a network domain) < > + : Minimizes all windows < > + : Open the Run dialog box < > + : Cycle through programs on the taskbar < > + : Open Ease of Windows, some shortcuts may not function as clicking the right mouse button; English 4 Windows keys The keyboard has two keys that perform Windows-specific functions.
User Guide
Page 28
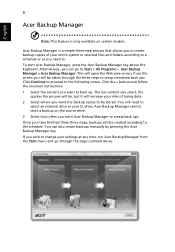
... as you need to select an external drive or your settings at any time, run Acer Backup Manager from this screen you will open the Welcome screen; Click the + button and follow the onscreen instructions: 1 Select the content you want to the following screen. Once you have finished these three steps, backups will need to. Alternatively, you can also create backups manually by pressing the Acer Backup Manager key. English 9 Acer Backup Manager Note: This...
... as you need to select an external drive or your settings at any time, run Acer Backup Manager from this screen you will open the Welcome screen; Click the + button and follow the onscreen instructions: 1 Select the content you want to the following screen. Once you have finished these three steps, backups will need to. Alternatively, you can also create backups manually by pressing the Acer Backup Manager key. English 9 Acer Backup Manager Note: This...

User Guide
Page 29
This computer employs a power management scheme that monitors system activity. Windows handles all of the following devices: keyboard, mouse, hard disk, peripherals connected to the computer, and video memory. PCI and WLAN switch to a lower speed; The Acer PowerSmart key uses the power-saving features of your previous settings. Press the Acer PowerSmart key again to return to your computer's graphics sub-system to reduce overall power consumption. Acer PowerSmart key Note: This feature is...
This computer employs a power management scheme that monitors system activity. Windows handles all of the following devices: keyboard, mouse, hard disk, peripherals connected to the computer, and video memory. PCI and WLAN switch to a lower speed; The Acer PowerSmart key uses the power-saving features of your previous settings. Press the Acer PowerSmart key again to return to your computer's graphics sub-system to reduce overall power consumption. Acer PowerSmart key Note: This feature is...
User Guide
Page 33
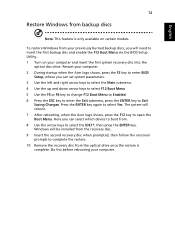
... restore. 10 Remove the recovery disc from the optical drive once the restore is only available on your computer. Press the ENTER key again to insert the first backup disc and enable the F12 Boot Menu via the BIOS Setup Utility. 1 Turn on certain models. Windows will be installed from the recovery disc. 9 Insert the second recovery disc when prompted, then follow the onscreen prompts to Exit Saving Changes. To restore Windows from . 8 Use the arrow keys to open the Boot Menu...
... restore. 10 Remove the recovery disc from the optical drive once the restore is only available on your computer. Press the ENTER key again to insert the first backup disc and enable the F12 Boot Menu via the BIOS Setup Utility. 1 Turn on certain models. Windows will be installed from the recovery disc. 9 Insert the second recovery disc when prompted, then follow the onscreen prompts to Exit Saving Changes. To restore Windows from . 8 Use the arrow keys to open the Boot Menu...
User Guide
Page 34
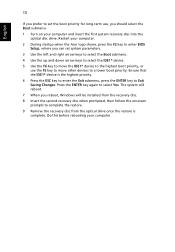
...* device is complete. Do this before rebooting your computer and insert the first system recovery disc into the optical disc drive. Press the ENTER key again to enter BIOS Setup, where you should select the Boot submenu. 1 Turn on your computer. The system will reboot. 7 When you reboot, Windows will be installed from the recovery disc. 8 Insert the second recovery disc when prompted, then follow the onscreen prompts to complete the restore. 9 Remove...
...* device is complete. Do this before rebooting your computer and insert the first system recovery disc into the optical disc drive. Press the ENTER key again to enter BIOS Setup, where you should select the Boot submenu. 1 Turn on your computer. The system will reboot. 7 When you reboot, Windows will be installed from the recovery disc. 8 Insert the second recovery disc when prompted, then follow the onscreen prompts to complete the restore. 9 Remove...
User Guide
Page 35
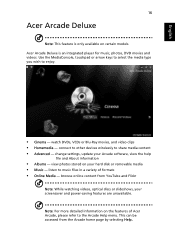
... on your hard disk or removable media • Music - connect to other devices wirelessly to the Arcade Help menu. change settings, update your screensaver and power-saving features are unavailable. Note: For more detailed information on the features of formats • Online Media - English 16 Acer Arcade Deluxe Note: This feature is an integrated player for music, photos, DVD movies and videos. This can be accessed from YouTube...
... on your hard disk or removable media • Music - connect to other devices wirelessly to the Arcade Help menu. change settings, update your screensaver and power-saving features are unavailable. Note: For more detailed information on the features of formats • Online Media - English 16 Acer Arcade Deluxe Note: This feature is an integrated player for music, photos, DVD movies and videos. This can be accessed from YouTube...

User Guide
Page 46
... the display cover. 5 Disconnect the cord from your computer from external accessories: 1 Save any open files. 2 Remove any media, floppy disks or compact disks from the drive(s). 3 Shut down the computer: Click on Start then click on Shut Down. Preparing the computer Before moving within the building. then press and release the power button. You can put the computer in Sleep mode. If you...
... the display cover. 5 Disconnect the cord from your computer from external accessories: 1 Save any open files. 2 Remove any media, floppy disks or compact disks from the drive(s). 3 Shut down the computer: Click on Start then click on Shut Down. Preparing the computer Before moving within the building. then press and release the power button. You can put the computer in Sleep mode. If you...
User Guide
Page 50
... key to the BIOS utility. Security features include hardware and software locks - a security notch and passwords. Insert the lock into the BIOS utility. Combine the use . Do not forget your dealer or an authorized service center. Some keyless models are also available. Setting these passwords creates several different levels of protection for maximum security. • Password on boot-up and resume from unauthorized access. Combine the use . Wrap a computer security lock cable...
... key to the BIOS utility. Security features include hardware and software locks - a security notch and passwords. Insert the lock into the BIOS utility. Combine the use . Do not forget your dealer or an authorized service center. Some keyless models are also available. Setting these passwords creates several different levels of protection for maximum security. • Password on boot-up and resume from unauthorized access. Combine the use . Wrap a computer security lock cable...
User Guide
Page 51
.... Then turn on boot parameter is enabled, a prompt appears at boot-up . • Type the User Password and press to use the computer. Important! If you enter the password incorrectly, a warning message appears. Press and hold the power button for four seconds to enter a password. If you enter the password incorrectly, a warning message appears. English 32 Entering passwords When a password is set, a password prompt appears in the center of the display screen. •...
.... Then turn on boot parameter is enabled, a prompt appears at boot-up . • Type the User Password and press to use the computer. Important! If you enter the password incorrectly, a warning message appears. Press and hold the power button for four seconds to enter a password. If you enter the password incorrectly, a warning message appears. English 32 Entering passwords When a password is set, a password prompt appears in the center of the display screen. •...
User Guide
Page 52
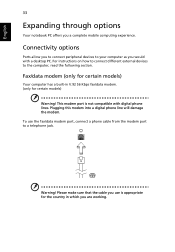
... appropriate for certain models) Warning! Warning! Please make sure that the cable you are working. For instructions on how to connect different external devices to a telephone jack. Plugging this modem into a digital phone line will damage the modem. English 33 Expanding through options Your notebook PC offers you would with digital phone lines. Fax/data modem (only for certain models) Your computer...
... appropriate for certain models) Warning! Warning! Please make sure that the cable you are working. For instructions on how to connect different external devices to a telephone jack. Plugging this modem into a digital phone line will damage the modem. English 33 Expanding through options Your notebook PC offers you would with digital phone lines. Fax/data modem (only for certain models) Your computer...
User Guide
Page 60
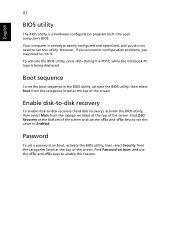
... a hardware configuration program built into your computer's BIOS. Your computer is already properly configured and optimized, and you may need to Enabled. Password To set the boot sequence in the BIOS utility, activate the BIOS utility, then select Boot from the categories listed at the top of the screen. Enable disk-to-disk recovery To enable disk-to run this value to run it. However, if you encounter configuration problems, you do not need to -disk recovery (hard disk recovery), activate the BIOS utility...
... a hardware configuration program built into your computer's BIOS. Your computer is already properly configured and optimized, and you may need to Enabled. Password To set the boot sequence in the BIOS utility, activate the BIOS utility, then select Boot from the categories listed at the top of the screen. Enable disk-to-disk recovery To enable disk-to run this value to run it. However, if you encounter configuration problems, you do not need to -disk recovery (hard disk recovery), activate the BIOS utility...
User Guide
Page 62
... recharge the battery pack. • Make sure that may be set to resume. Press and release the power button to an external monitor. You can also use of possible situations that the AC adapter is properly plugged into the computer and to the power outlet. • If it may arise during the use the volume control buttons to adjust the brightness level. • The display device might be...
... recharge the battery pack. • Make sure that may be set to resume. Press and release the power button to an external monitor. You can also use of possible situations that the AC adapter is properly plugged into the computer and to the power outlet. • If it may arise during the use the volume control buttons to adjust the brightness level. • The display device might be...


