
Aspire 5755, 5755G Service Guide
Page 6
... Specification 1-40 System IO Address Map 1-41 System I/O Address Specifications 1-42 CHAPTER 2 System Utilities BIOS Setup Utility 2-3 Navigating the BIOS Utility 2-3 BIOS 2-4 Information 2-4 Main 2-6 Security 2-8 Boot 2-12 Exit 2-13 BIOS Flash Utilities 2-14 DOS Flash Utility 2-15 WinFlash Utility 2-17 Remove HDD/BIOS Password Utilities 2-20 Removing BIOS Passwords 2-22 Miscellaneous...
... Specification 1-40 System IO Address Map 1-41 System I/O Address Specifications 1-42 CHAPTER 2 System Utilities BIOS Setup Utility 2-3 Navigating the BIOS Utility 2-3 BIOS 2-4 Information 2-4 Main 2-6 Security 2-8 Boot 2-12 Exit 2-13 BIOS Flash Utilities 2-14 DOS Flash Utility 2-15 WinFlash Utility 2-17 Remove HDD/BIOS Password Utilities 2-20 Removing BIOS Passwords 2-22 Miscellaneous...

Aspire 5755, 5755G Service Guide
Page 37
... Version BIOS ROM type BIOS ROM size Features Specification Insyde 1.11 SPI 4MB Insyde code base Flash ROM 4 MB Support Acer UI Support multi-boot Suspend to RAM (S3)/Disk (S4) Various hot-keys for system control Support SMBIOS 2.3 ,PCI2.2. DMI utility for BIOS... the left side Supports 10/100/1000 Keyboard Item Type Total number of keypads Windows logo key Internal & external keyboard work simultaneously Features Specification New Acer AC7T flat keyboard 103-US/104-UK /107-JP keys Yes Plug USB keyboard to...
... Version BIOS ROM type BIOS ROM size Features Specification Insyde 1.11 SPI 4MB Insyde code base Flash ROM 4 MB Support Acer UI Support multi-boot Suspend to RAM (S3)/Disk (S4) Various hot-keys for system control Support SMBIOS 2.3 ,PCI2.2. DMI utility for BIOS... the left side Supports 10/100/1000 Keyboard Item Type Total number of keypads Windows logo key Internal & external keyboard work simultaneously Features Specification New Acer AC7T flat keyboard 103-US/104-UK /107-JP keys Yes Plug USB keyboard to...

Aspire 5755, 5755G Service Guide
Page 54
BIOS Setup Utility 2-3 Navigating the BIOS Utility 2-3 BIOS 2-4 Information 2-4 Main 2-6 Security 2-8 Boot 2-12 Exit 2-13 BIOS Flash Utilities 2-14 DOS Flash Utility 2-15 WinFlash Utility 2-17 Remove HDD/BIOS Password Utilities 2-20 Removing BIOS Passwords 2-22 Miscellaneous Tools 2-23 2-2
BIOS Setup Utility 2-3 Navigating the BIOS Utility 2-3 BIOS 2-4 Information 2-4 Main 2-6 Security 2-8 Boot 2-12 Exit 2-13 BIOS Flash Utilities 2-14 DOS Flash Utility 2-15 WinFlash Utility 2-17 Remove HDD/BIOS Password Utilities 2-20 Removing BIOS Passwords 2-22 Miscellaneous Tools 2-23 2-2
Aspire 5755, 5755G Service Guide
Page 55
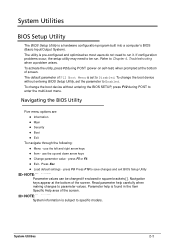
...- press F9. Navigating the BIOS Utility 0 Five menu options are: Information Main Security Boot Exit To navigate through the following: Menu - System Utilities BIOS Setup Utility 0 The BIOS Setup Utility is set ...built into a computer's BIOS (Basic Input/Output System). Refer to specific models. The default parameter of the screen. To change the boot device without entering the BIOS SETUP, press F12 during POST (power-on self-test) when prompted at the bottom of screen. use ...
...- press F9. Navigating the BIOS Utility 0 Five menu options are: Information Main Security Boot Exit To navigate through the following: Menu - System Utilities BIOS Setup Utility 0 The BIOS Setup Utility is set ...built into a computer's BIOS (Basic Input/Output System). Refer to specific models. The default parameter of the screen. To change the boot device without entering the BIOS SETUP, press F12 during POST (power-on self-test) when prompted at the bottom of screen. use ...
Aspire 5755, 5755G Service Guide
Page 56
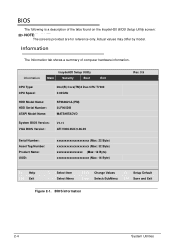
... are for reference only. BIOS 0 The following is a description of computer hardware information. Actual values may differ by model. InsydeH20 Setup Utility Information Main Security Boot Exit CPU Type: CPU Speed: Intel(R) Core(TM)2 Duo CPU T7300 2.00GHz HDD Model Name: HDD Serial Number: ATAPI Model Name: ST960821A-(PM) 3LF005DB MATSHITADVD...
... are for reference only. BIOS 0 The following is a description of computer hardware information. Actual values may differ by model. InsydeH20 Setup Utility Information Main Security Boot Exit CPU Type: CPU Speed: Intel(R) Core(TM)2 Duo CPU T7300 2.00GHz HDD Model Name: HDD Serial Number: ATAPI Model Name: ST960821A-(PM) 3LF005DB MATSHITADVD...

Aspire 5755, 5755G Service Guide
Page 58
... Date [09:00:00] [01/01/2003] Rev. 3.5 Item Specific Help , , or selects field Total Memory: Video Memory: xxxx MB [xMB] Graphic mode Quiet Boot Network Boot F12 Boot Menu D2D Recovery SATA Mode [Switchable] [Enabled] [Enabled] [Disabled] [Enabled] [AHCI Mode] F1 Help ESC Exit Select Item Select Menu...) Format MM/DD/YYYY (month/day/year) N/A N/A 2-6 System Utilities Main 0 The Main tab allows the user to set system time and date, enable or disable boot option and enable or disable recovery.
... Date [09:00:00] [01/01/2003] Rev. 3.5 Item Specific Help , , or selects field Total Memory: Video Memory: xxxx MB [xMB] Graphic mode Quiet Boot Network Boot F12 Boot Menu D2D Recovery SATA Mode [Switchable] [Enabled] [Enabled] [Disabled] [Enabled] [AHCI Mode] F1 Help ESC Exit Select Item Select Menu...) Format MM/DD/YYYY (month/day/year) N/A N/A 2-6 System Utilities Main 0 The Main tab allows the user to set system time and date, enable or disable boot option and enable or disable recovery.

Aspire 5755, 5755G Service Guide
Page 59
... switch from text mode to graphics mode Quiet Boot Shows OEM (original equipment manufacturer) screen during system boot instead of traditional POST screen Option: Enabled or Disabled Network Boot Option to boot system from LAN (local area network) Option: Enabled or Disabled F12 Boot Menu Option to use boot menu during POST Option: Enabled or Disabled...
... switch from text mode to graphics mode Quiet Boot Shows OEM (original equipment manufacturer) screen during system boot instead of traditional POST screen Option: Enabled or Disabled Network Boot Option to boot system from LAN (local area network) Option: Enabled or Disabled F12 Boot Menu Option to use boot menu during POST Option: Enabled or Disabled...
Aspire 5755, 5755G Service Guide
Page 60
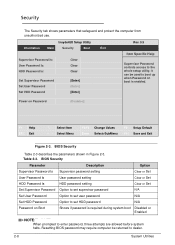
...] Rev. 3.5 Item Specific Help Supervisor Password controls access to dealer. 2-8 System Utilities Power on Boot Shows if password is enabled. Resetting BIOS password may require computer be used to boot up when Password on boot is required during system boot Disabled or Enabled NOTE: NOTE: When prompted to set user password N/A Set HDD Password...
...] Rev. 3.5 Item Specific Help Supervisor Password controls access to dealer. 2-8 System Utilities Power on Boot Shows if password is enabled. Resetting BIOS password may require computer be used to boot up when Password on boot is required during system boot Disabled or Enabled NOTE: NOTE: When prompted to set user password N/A Set HDD Password...

Aspire 5755, 5755G Service Guide
Page 61
... the screen. 3. Set Supervisor Password 2. Period , Comma ; System Utilities 2-9 Press F10 to Set. Dash = Equal Sign [ Left Bracket ] Right Bracket . Characters do not appear on Boot must not exceed 12 characters. Retype the password in the Enter New Password field. NOTE: NOTE: The following to set to Enabled to activate password...
... the screen. 3. Set Supervisor Password 2. Period , Comma ; System Utilities 2-9 Press F10 to Set. Dash = Equal Sign [ Left Bracket ] Right Bracket . Characters do not appear on Boot must not exceed 12 characters. Retype the password in the Enter New Password field. NOTE: NOTE: The following to set to Enabled to activate password...

Aspire 5755, 5755G Service Guide
Page 64
... to move it up the list. USB FDD: 4. HDD0: 2. Network Boot: 5. HDD1: 3. USB HDD: 6. Press to load the operating system. Boot 0 The Boot tab allows changes to the order of boot devices used to escape the menu. InsydeH20 Setup Utility Information Main Security Boot Exit Boot priority order: 1. F1 Help ESC Exit Select Item...
... to move it up the list. USB FDD: 4. HDD0: 2. Network Boot: 5. HDD1: 3. USB HDD: 6. Press to load the operating system. Boot 0 The Boot tab allows changes to the order of boot devices used to escape the menu. InsydeH20 Setup Utility Information Main Security Boot Exit Boot priority order: 1. F1 Help ESC Exit Select Item...

Aspire 5755, 5755G Service Guide
Page 65
... Description Exit Saving Changes Exit BIOS utility and save setup item changes to save your changes. System Utilities 2-13 InsydeH20 Setup Utility Information Main Security Boot Exit Exit Saving Changes Exit Discard Changes Load Setup Defaults Discard Changes Save Changes Rev. 3.5 Item Specific Help Exit System Setup and save or discard...
... Description Exit Saving Changes Exit BIOS utility and save setup item changes to save your changes. System Utilities 2-13 InsydeH20 Setup Utility Information Main Security Boot Exit Exit Saving Changes Exit Discard Changes Load Setup Defaults Discard Changes Save Changes Rev. 3.5 Item Specific Help Exit System Setup and save or discard...

Aspire 5755, 5755G Service Guide
Page 66
... contain power to update the system BIOS Flash ROM. Prepare a bootable USB HDD. 2. Use the Flash utility to finish loading BIOS Flash, do not boot system. Boot system from bootable USB HDD. Refer to Chapter 5, BIOS Recovery by Crisis Disk. BIOS Flash Utilities 0 BIOS Flash memory updates are required for the following...
... contain power to update the system BIOS Flash ROM. Prepare a bootable USB HDD. 2. Use the Flash utility to finish loading BIOS Flash, do not boot system. Boot system from bootable USB HDD. Refer to Chapter 5, BIOS Recovery by Crisis Disk. BIOS Flash Utilities 0 BIOS Flash memory updates are required for the following...

Aspire 5755, 5755G Service Guide
Page 67
...Change Values Select>SubMenu F9 Setup Default F10 Save and Exit Figure 2-12. Execute FLASH.BAT to Boot menu) InsydeH20 Setup Utility Information Main Security Boot Exit Boot priority order: 1. DOS Flash Utility 0 Perform the following to escape the menu. Press to use... the DOS Flash Utility: 1. Changing BIOS Boot Priority Order 4. USB HDD: xxxx USB 6. Network Boot: LEGACY PCI DEVICE 5. Insert USB HDD and reboot computer. 6. USB FDD: 4. Press F2 during boot to modify boot priority order. 3. Select Boot Menu to enter Setup Menu. 2. ATAPI CDROM...
...Change Values Select>SubMenu F9 Setup Default F10 Save and Exit Figure 2-12. Execute FLASH.BAT to Boot menu) InsydeH20 Setup Utility Information Main Security Boot Exit Boot priority order: 1. DOS Flash Utility 0 Perform the following to escape the menu. Press to use... the DOS Flash Utility: 1. Changing BIOS Boot Priority Order 4. USB HDD: xxxx USB 6. Network Boot: LEGACY PCI DEVICE 5. Insert USB HDD and reboot computer. 6. USB FDD: 4. Press F2 during boot to modify boot priority order. 3. Select Boot Menu to enter Setup Menu. 2. ATAPI CDROM...

Aspire 5755, 5755G Service Guide
Page 69
Open Winflash folder. (Figure 2-16) Figure 2-16. Double click the WinFlash executable. 4. Winflash Program Folder NOTE: NOTE: Flashing of 2) System Utilities 2-17 Make sure AC adapter is connecting to begin the update. (Figure 2-17) Figure 2-17. Click OK to device before executing program. 3. Executing Winflash Program (1 of system BIOS cannot be performed on battery power. Boot to use the WinFlash Utility: 1. WinFlash Utility 0 Perform the following to OS. 2.
Open Winflash folder. (Figure 2-16) Figure 2-16. Double click the WinFlash executable. 4. Winflash Program Folder NOTE: NOTE: Flashing of 2) System Utilities 2-17 Make sure AC adapter is connecting to begin the update. (Figure 2-17) Figure 2-17. Click OK to device before executing program. 3. Executing Winflash Program (1 of system BIOS cannot be performed on battery power. Boot to use the WinFlash Utility: 1. WinFlash Utility 0 Perform the following to OS. 2.

Aspire 5755, 5755G Service Guide
Page 72
... and keys to DOS. 2-20 System Utilities The Enter Unlock Password dialog box appears. (Figure 2-24) Figure 2-24. On separate, compatible device, boot to highlight Enter Unlock Password and press Enter. Enter Unlock Password NOTE: NOTE: A key code is shown. (Figure 2-23) Figure 2-23. Press Enter to continue...
... and keys to DOS. 2-20 System Utilities The Enter Unlock Password dialog box appears. (Figure 2-24) Figure 2-24. On separate, compatible device, boot to highlight Enter Unlock Password and press Enter. Enter Unlock Password NOTE: NOTE: A key code is shown. (Figure 2-23) Figure 2-23. Press Enter to continue...

Aspire 5755, 5755G Service Guide
Page 75
At a DOS prompt, enter bs and a boot sequence ID number. Boot Sequence Selector Example: bs , selects the boot sequence of HDD | CD ROM | LAN | Floppy. To use the Boot Sequence Selector, perform the following: 1. System Utilities 2-23 Usage: BS [ 1 | 2 | 3 | 4 ] BS 1: [Floppy] => [HardDisk] => [...> Figure 2-28. A boot sequence ID is a digit from 1 to be changed without accessing the BIOS Setup Utility. Miscellaneous Tools 0 Using Boot Sequence Selector 0 The Boot Sequence Selector allows the boot order to 4. (Figure 2-28) D:\BOOTSEQd>bs *** Boot Sequence Selector Version 0.03 ...
At a DOS prompt, enter bs and a boot sequence ID number. Boot Sequence Selector Example: bs , selects the boot sequence of HDD | CD ROM | LAN | Floppy. To use the Boot Sequence Selector, perform the following: 1. System Utilities 2-23 Usage: BS [ 1 | 2 | 3 | 4 ] BS 1: [Floppy] => [HardDisk] => [...> Figure 2-28. A boot sequence ID is a digit from 1 to be changed without accessing the BIOS Setup Utility. Miscellaneous Tools 0 Using Boot Sequence Selector 0 The Boot Sequence Selector allows the boot order to 4. (Figure 2-28) D:\BOOTSEQd>bs *** Boot Sequence Selector Version 0.03 ...

Aspire 5755, 5755G Service Guide
Page 76
... screen. (refer to highlight the boot device. 4. Boot Manager Dialog 3. When prompted, press F12 during POST procedure. Use the and keys to Main) To use the Boot Manager, perform the following steps: 1. NOTE: NOTE: The F12 Boot Menu option must be changed without ...accessing the BIOS. Start the computer. 2. The Boot Manager dialog is shown. (Figure 2-29) Figure 2-29.
... screen. (refer to highlight the boot device. 4. Boot Manager Dialog 3. When prompted, press F12 during POST procedure. Use the and keys to Main) To use the Boot Manager, perform the following steps: 1. NOTE: NOTE: The F12 Boot Menu option must be changed without ...accessing the BIOS. Start the computer. 2. The Boot Manager dialog is shown. (Figure 2-29) Figure 2-29.

Aspire 5755, 5755G Service Guide
Page 77
...the corresponding output information: Read DMI Information from Memory Input: 0 dmitools /r Output: 0 Manufacturer (Type1, Offset04h): Acer Product Name (Type1, Offset05h): Aspire xxxxx Serial Number (Type1, Offset07h): 01234567890123456789 UUID String (Type1, Offset08h): xxxxxxxx-xxxx-xxxx-xxxx-xxxxxxxxxxxx Asset Tag (Type3, Offset04h... management. When the BIOS shows Verifying DMI pool data, it to EEPROM Input: dmitools /wa Acer Asstag System Utilities 0 2-25 Boot to EEPROM. Using DMITools 0 The DMI (Desktop Management Interface) Tool copies BIOS information to DOS. 2.
...the corresponding output information: Read DMI Information from Memory Input: 0 dmitools /r Output: 0 Manufacturer (Type1, Offset04h): Acer Product Name (Type1, Offset05h): Aspire xxxxx Serial Number (Type1, Offset07h): 01234567890123456789 UUID String (Type1, Offset08h): xxxxxxxx-xxxx-xxxx-xxxx-xxxxxxxxxxxx Asset Tag (Type3, Offset04h... management. When the BIOS shows Verifying DMI pool data, it to EEPROM Input: dmitools /wa Acer Asstag System Utilities 0 2-25 Boot to EEPROM. Using DMITools 0 The DMI (Desktop Management Interface) Tool copies BIOS information to DOS. 2.

Aspire 5755, 5755G Service Guide
Page 78
Enter LAN MAC Tools folder. 5. Reboot computer when process has completed. 2-26 System Utilities Insert USB HDD and boot device. 4. Using the LAN MAC EEPROM Utility 0 1. Use a text editor to EEPROM. 6. At DOS prompt, enter JV51.BAT to write MAC values to edit MACADDR.TXT with the correct MAC address. 3. Extract and copy the contents of LAN MAC Tools.zip to a bootable USB HDD device. 2.
Enter LAN MAC Tools folder. 5. Reboot computer when process has completed. 2-26 System Utilities Insert USB HDD and boot device. 4. Using the LAN MAC EEPROM Utility 0 1. Use a text editor to EEPROM. 6. At DOS prompt, enter JV51.BAT to write MAC values to edit MACADDR.TXT with the correct MAC address. 3. Extract and copy the contents of LAN MAC Tools.zip to a bootable USB HDD device. 2.
Aspire 5755, 5755G Service Guide
Page 146
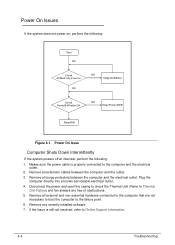
... to the computer that are free of obstructions. 5. If the Issue is properly connected to Thermal Unit Failure) and fan airways are not necessary to boot the computer to Online Support Information. 4-4 Troubleshooting Makes sure the power cable is still not resolved, refer to the failure point. 6. Disconnect the power and...
... to the computer that are free of obstructions. 5. If the Issue is properly connected to Thermal Unit Failure) and fan airways are not necessary to boot the computer to Online Support Information. 4-4 Troubleshooting Makes sure the power cable is still not resolved, refer to the failure point. 6. Disconnect the power and...

