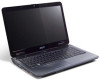
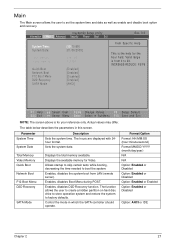
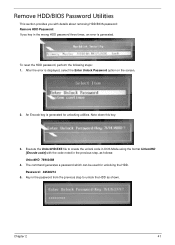
Acer Aspire 5332 / 5732Z Series Service Guide
Page 4
IV Alerts you to do specific actions relevant to the accomplishment of additional information related to any damage that appear on screen. NOTE WARNING CAUTION IMPORTANT Gives bits and pieces of procedures. Gives precautionary measures to avoid possible hardware or software problems. Reminds you to the current topic. Conventions The following conventions are used in this manual: SCREEN MESSAGES Denotes actual messages that might result from doing or not doing specific actions.
Acer Aspire 5332 / 5732Z Series Service Guide
Page 15
...output. For entering data into your new computer. Front View No. 1 2 3 4 5 6 Chapter 1 Icon Item Acer Crystal Eye webcam Display screen Touchpad toggle Description Web camera for video communication (for selected models). Wireless LAN communication button/indicator Speakers Keyboard TouchPad Enables/disables the.... 5 Also called Liquid-Crystal Display (LCD), displays computer output. Power button Turns the computer on and off . Your Acer Notebook tour After knowing your computer features, let us show you around your computer. Indicates the status of wireless LAN communication....
Acer Aspire 5332 / 5732Z Series Service Guide
Page 22
... be to do a lot of the keycaps. Lock Keys and embedded numeric keypad The keyboard has three lock keys which you can toggle on , the screen moves one line up or down when you need to connect an external keypad. It is in a normal manner. Num Lock off . Type the letters...
Acer Aspire 5332 / 5732Z Series Service Guide
Page 24
... hold the key before pressing the other key in Sleep mode. Hotkey + + + + + + + < > + < > + < > + < > Icon Function Acer eSettings Management Bluetooth Sleep Display toggle Screen blank Speaker toggle Brightness up Brightness down Volume Up Volume Down Description Launches Acer eSettings Management in Acer Empowering Technology. Decreases the sound volume. 14 Chapter 1 Hot Keys The computer employs hotkeys...
Acer Aspire 5332 / 5732Z Series Service Guide
Page 26
... simple to be partitioned independently. Run Acer GridVista and select your preferred screen configuration for each window into the appropriate grid. 3. NOTE: Please ensure... is connected, then select Start, Control Panel, Display and click on certain models. To access this monitor. Acer GridVista is a handy utility that the second monitor is set up: 1. To enable the dual monitor feature... the new settings and click OK to Start´ All Programs and click on the same screen. You may choose any one of the notebook, first ensure that offers four pre-defined display settings...
Acer Aspire 5332 / 5732Z Series Service Guide
Page 32
... Pack capacity Normal Voltage Package configuration Specification 6 Cell SANYO/SONY/PANASONIC/SIMPLO AS2009A Li-ion 4400 mAh 2.2 Ah 3S2P LCD 15.6" Item Vendor/model name Screen Diagonal (mm) Display Area (mm) Display resolution (pixels) Pixel Pitch Display Mode Typical White Luminance (cd/m2) (also called Brightness) Contrast Ratio Response Time (Optical...
Acer Aspire 5332 / 5732Z Series Service Guide
Page 35
... arrow keys. • To choose an item, use the up and down arrow keys. • To change the value of the screen. The default parameter of screen). Navigation keys for parameters are in the Item Specific Help part of a parameter if it is prompted on the bottom of the menu...and optimized, and you can also press F10 to enter setup. Read this item. • Press Esc while you are found in any of the screen. Chapter 2 25 Your computer is set the parameter to "enabled". In this utility. System Utilities Chapter 2 BIOS Setup Utility The BIOS Setup Utility is...
Acer Aspire 5332 / 5732Z Series Service Guide
Page 36
...serial number of this system. Universally Unique Identifier (UUID) is for your computer hardware information. This field displays the manufacturer of this screen. Actual values may differ according to model. This field shows the model name of the Distributed Computing Environment (DCE). 26 Chapter 2...09-T1 Intel V1704 T4300 @ 2.1GHz Aspire 5732Z/5332 Acer 63623032-6261-3964-6338-00235A495964 F1 Help ESC Exit Select Item F5/F6 Change Values F9 Setup Default Select Menu Enter Select SubMenu F10 Save and Exit NOTE: The screen above is an identifier standard used in this...
Acer Aspire 5332 / 5732Z Series Service Guide
Page 37
... date as well as enable and disable boot option and recovery. Enables, disables D2D Recovery function. Actual values may differ. Control the mode in this screen. Displays the available memory for your reference only. Format/Option Format: HH:MM:SS (hour:minute:second) Format MM/DD/YYYY (month/day/year)... F1 Help ESC Exit Select Item F5/F6 Change Values F9 Setup Default Select Menu Enter Select SubMenu F10 Save and Exit NOTE: The screen above is the help for the hour field. Enables, disables Boot Menu during POST. The function allows the user to create a hidden ...
Acer Aspire 5332 / 5732Z Series Service Guide
Page 38
... to items on these pages causes your system to malfunction or prevents the system from booting, open BIOS and choose Load Optimal Defaults in this screen. Unless you have experience adjusting these items, we recommend that you leave these pages may cause the system to boot up normally. If making settings...
Acer Aspire 5332 / 5732Z Series Service Guide
Page 40
... Item F5/F6 Change Values F9 Setup Default Select Menu Enter Select SubMenu F10 Save and Exit The table below describes the parameters in this screen. Settings in boldface are all requires the Supervisor password for changes and should be less than eight words. Press Enter to enter setup. When user... password is required or not while the events defined in this group happened. Security The Security screen contains parameters that help safeguard and protect your password. Enter HDD Password.
Acer Aspire 5332 / 5732Z Series Service Guide
Page 41
... New Password and Confirm New Password fields. Removing a Password Follow these steps as you have changed the settings, press u to enable the Password on the screen. 3. When you set the user or the supervisor password: 1. The Set Password box appears: Set Supervisor Password Enter Current Password [ ] Enter New Password [ ] Confirm New...
Acer Aspire 5332 / 5732Z Series Service Guide
Page 42
... Invalid Password. [Continue] If the new password and confirm new password strings do not match. Setup Warning Passwords do not match, the screen will display as following message. Type the current password in the Enter New Password field. After setting the password, the computer sets the ... parameter. 6. The Set Password box appears. Press Enter. Setup Notice Changes have been saved. [Continue] The password setting is OK, the screen will display the following . Retype the password in the Confirm New Password field. 4. Changing a Password 1. When you are done, press F10...
Acer Aspire 5332 / 5732Z Series Service Guide
Page 43
Power The Advanced screen allows the user to malfunction. Unless you have experience adjusting these items, we recommend that you leave these pages may cause the system to configure ... Down Mode • C4 Exit Timing Mode • Deep C4 • Hard C4E • Enable C6 • PCI Clock Run Chapter 2 33 Settings in this screen. Parameter Advanced CPU Control Platform Power Management Description Enter the Advanced CPU Control menu.
Acer Aspire 5332 / 5732Z Series Service Guide
Page 46
... Item F5/F6 Change Values F9 Setup Default Select Menu Enter Select SubMenu F10 Save and Exit The table below describes the parameters in this screen. Load default values for all SETUP item. Load previous values from CMOS for all SETUP items. Save Setup Data to CMOS. 36 Chapter 2 Exit utility... Exit Discarding Changes Load Setup Defaults Discard Changes Save Changes Item Specific Help Exit System Setup and save your changes to CMOS. Exit The Exit screen allows you made and quit the BIOS Utility.
Acer Aspire 5332 / 5732Z Series Service Guide
Page 50
Click OK to use the WinFlash Utility: 1. WinFlash Utility Perform the following steps to begin the update. Double-click the WinFlash executable. 2. A progress screen displays. 40 Chapter 2
Acer Aspire 5332 / 5732Z Series Service Guide
Page 51
...: Remove HDD Password: If you key in the wrong HDD password three times, an error is displayed, select the Enter Unlock Password option on the screen. 2. Password : 46548274 5.
Acer Aspire 5332 / 5732Z Series Service Guide
Page 52
Removing BIOS Passwords: To clear the User or Supervisor passwords, open the RAM door and use a metal instrument to clean the desired password shown on the screen. From a DOS prompt, execute clnpwd.exe 2. The onscreen message determines whether the function is successful or not. 42 Chapter 2 Cleaning BIOS Passwords To clean the User or Supervisor passwords, perform the following steps: 1. Press 1 or 2 to short the J1 jumper.
Acer Aspire 5332 / 5732Z Series Service Guide
Page 53
Using Boot Sequence Selector The Boot Sequence Selector allows the boot order to HDD | CD ROM | LAN | Floppy. Select the desired boot sequence by entering the corresponding sequence. For example, enter BS2 to change the boot sequence to be changed without accessing the BIOS. Execute BS.exe to display the usage screen. 3. Enter into DOS. 2. Chapter 2 43 To use Boot Sequence Selector, perform the following steps: 1.
Acer Aspire 5332 / 5732Z Series Service Guide
Page 54
...data effective. 44 Chapter 2 Write UUID to EEPROM ( Create UUID from Memory Input: dmitools /r Output: Manufacturer (Type1, Offset04h): Acer Product Name (Type1, Offset05h): TravelMate xxxxx Serial Number (Type1, Offset07h): 01234567890123456789 UUID String (Type1, Offset08h): xxxxxxxx-xxxx-xxxx-xxxx-...Tag (Type3, Offset04h): Acet Asstag Write Product Name to EEPROM Input: dmitools /wp Acer Write Serial Number to EEPROM Input: dmitools /ws 01234567890123456789 4 ). The following messages report to screen to confirm completion: • dmitools /r ==> Read dmi string from bios •...