Quick Start Guide
Page 4
© 2010 All Rights Reserved. Acer Notebook Quick Guide Original Issue: 03/2010 Model number Serial number Date of purchase Place of purchase
© 2010 All Rights Reserved. Acer Notebook Quick Guide Original Issue: 03/2010 Model number Serial number Date of purchase Place of purchase
Quick Start Guide
Page 5
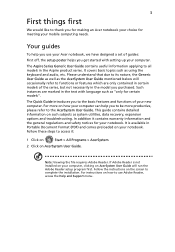
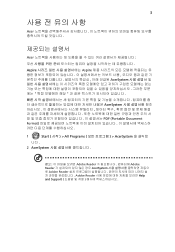
...instructions on such subjects as using the keyboard and audio, etc. Your guides To help you to be more productive, please refer to use your Acer notebook, we have designed a set of guides: First off, the setup poster helps you use Adobe Reader, access the Help and Support menu.... guide contains detailed information on the screen to functions or features which are marked in the model you for making an Acer notebook your choice for your notebook. If Adobe Reader is available in the Aspire product series. It is not installed on your computer, clicking on your notebook. The...
...instructions on such subjects as using the keyboard and audio, etc. Your guides To help you to be more productive, please refer to use your Acer notebook, we have designed a set of guides: First off, the setup poster helps you use Adobe Reader, access the Help and Support menu.... guide contains detailed information on the screen to functions or features which are marked in the model you for making an Acer notebook your choice for your notebook. If Adobe Reader is available in the Aspire product series. It is not installed on your computer, clicking on your notebook. The...
Quick Start Guide
Page 6
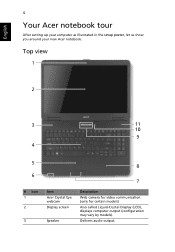
Delivers audio output. Top view 1 2 3 11 10 9 4 5 6 # Icon 1 2 3 Item Acer Crystal Eye webcam Display screen Speaker 8 7 Description Web camera for video communication. (only for certain models) Also called Liquid-Crystal Display (LCD), displays computer output (configuration may vary by models). English 4 Your Acer notebook tour After setting up your computer as illustrated in the setup poster, let us show you around your new Acer notebook.
Delivers audio output. Top view 1 2 3 11 10 9 4 5 6 # Icon 1 2 3 Item Acer Crystal Eye webcam Display screen Speaker 8 7 Description Web camera for video communication. (only for certain models) Also called Liquid-Crystal Display (LCD), displays computer output (configuration may vary by models). English 4 Your Acer notebook tour After setting up your computer as illustrated in the setup poster, let us show you around your new Acer notebook.

Quick Start Guide
Page 7
Battery indicator1 Indicates the computer's battery status. 1. Charging: The light shows amber when the battery is closed up. The front panel indicators are visible even when the computer cover is charging. 2. Indicates the computer's power status. Communication key Enables/disables the computer's communication devices. (Communication devices may vary by configuration.) 10 HDD indicator Indicates when the hard disk drive is active. 11 Microphone Internal microphone for your computer. 5 English # Icon 4 5 6 Item Keyboard Touchpad Power indicator1 Description For ...
Battery indicator1 Indicates the computer's battery status. 1. Charging: The light shows amber when the battery is closed up. The front panel indicators are visible even when the computer cover is charging. 2. Indicates the computer's power status. Communication key Enables/disables the computer's communication devices. (Communication devices may vary by configuration.) 10 HDD indicator Indicates when the hard disk drive is active. 11 Microphone Internal microphone for your computer. 5 English # Icon 4 5 6 Item Keyboard Touchpad Power indicator1 Description For ...

Quick Start Guide
Page 8
Increases the sound volume. Volume down Volume up Increases the screen brightness. + < > + < > + < > Brightness down Decreases the sound volume. Touchpad toggle Turns the internal touchpad on and off . Jump to return. Press any key to the next media file. Speaker toggle Turns the speakers on and off . + + + + + < > Play/Pause Play or pause a selected media file. Stop Stop playing the selected media file. English 6 Hotkeys The computer employs hotkeys or key combinations to save power. Screen blank Turns the display screen backlight off to access ...
Increases the sound volume. Volume down Volume up Increases the screen brightness. + < > + < > + < > Brightness down Decreases the sound volume. Touchpad toggle Turns the internal touchpad on and off . Jump to return. Press any key to the next media file. Speaker toggle Turns the speakers on and off . + + + + + < > Play/Pause Play or pause a selected media file. Stop Stop playing the selected media file. English 6 Hotkeys The computer employs hotkeys or key combinations to save power. Screen blank Turns the display screen backlight off to access ...

Quick Start Guide
Page 9
Left view # Icon 1 2 3 4 5 12 3 Item DC-in jack Accepts inputs from external microphones. USB 2.0 ports Connect to a display device port (e.g., external monitor, LCD projector). Microphone-in jack 4 5 Description Connects to remove/install the card. External display (VGA) Connects to USB 2.0 devices (e.g., USB mouse, USB camera). 7 Closed front view English # Icon 1 Item Description Multi-in-1 card reader Accepts Secure Digital (SD), MultiMediaCard (MMC), Memory Stick (MS), Memory Stick PRO (MS PRO), xDPicture Card (xD). Ethernet (RJ-45) port Connects to ...
Left view # Icon 1 2 3 4 5 12 3 Item DC-in jack Accepts inputs from external microphones. USB 2.0 ports Connect to a display device port (e.g., external monitor, LCD projector). Microphone-in jack 4 5 Description Connects to remove/install the card. External display (VGA) Connects to USB 2.0 devices (e.g., USB mouse, USB camera). 7 Closed front view English # Icon 1 Item Description Multi-in-1 card reader Accepts Secure Digital (SD), MultiMediaCard (MMC), Memory Stick (MS), Memory Stick PRO (MS PRO), xDPicture Card (xD). Ethernet (RJ-45) port Connects to ...

Quick Start Guide
Page 10
Optical drive eject button Ejects the optical disk from the drive. Note: Wrap the computer security lock cable around an immovable object such as a table or handle of a locked drawer. Insert the lock into the notch and turn the key to a Kensington-compatible computer security lock. Note: Insert a paper clip to the emergency eject hole to eject the optical drive tray when the computer is off . Some keyless models are also available. Kensington lock slot Connects to secure the lock. accepts CDs or DVDs. 8 Right view English # Icon 1 2 3 4 5 1 234 5 Item Description...
Optical drive eject button Ejects the optical disk from the drive. Note: Wrap the computer security lock cable around an immovable object such as a table or handle of a locked drawer. Insert the lock into the notch and turn the key to a Kensington-compatible computer security lock. Note: Insert a paper clip to the emergency eject hole to eject the optical drive tray when the computer is off . Some keyless models are also available. Kensington lock slot Connects to secure the lock. accepts CDs or DVDs. 8 Right view English # Icon 1 2 3 4 5 1 234 5 Item Description...
Quick Start Guide
Page 11
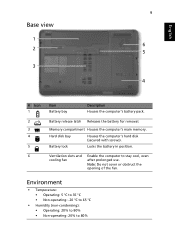
English 9 Base view 1 6 2 5 3 4 # Icon 1 2 3 4 5 6 Item Battery bay Description Houses the computer's battery pack. Hard disk bay Houses the computer's hard disk (secured with screws). Environment • Temperature: • Operating: 5 °C to 35 °C • Non-operating: -20 °C to 65 °C • Humidity (non-condensing): • Operating: 20% to 80% • Non-operating: 20% to stay cool, even after prolonged use. Memory compartment Houses the computer's main memory. Battery lock Locks the battery in position. Note: Do not cover or obstruct the ...
English 9 Base view 1 6 2 5 3 4 # Icon 1 2 3 4 5 6 Item Battery bay Description Houses the computer's battery pack. Hard disk bay Houses the computer's hard disk (secured with screws). Environment • Temperature: • Operating: 5 °C to 35 °C • Non-operating: -20 °C to 65 °C • Humidity (non-condensing): • Operating: 20% to 80% • Non-operating: 20% to stay cool, even after prolonged use. Memory compartment Houses the computer's main memory. Battery lock Locks the battery in position. Note: Do not cover or obstruct the ...
Quick Start Guide
Page 260
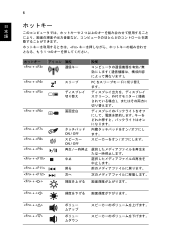
6 日 本 2 語 Fn 1 + 通信キー 説明 + + + + + + + + スリープ PC 画面空白 ON / OFF ます。 ON / OFF 中止 戻る + 次へ + < > + < > + < > + < >
6 日 本 2 語 Fn 1 + 通信キー 説明 + + + + + + + + スリープ PC 画面空白 ON / OFF ます。 ON / OFF 中止 戻る + 次へ + < > + < > + < > + < >

Quick Start Guide
Page 266
© 2010 All Rights Reserved. Acer 03/2010 Acer 및 Acer 로고는 Acer Incorporated
© 2010 All Rights Reserved. Acer 03/2010 Acer 및 Acer 로고는 Acer Incorporated
Quick Start Guide
Page 267
3 Acer Acer Aspire Aspire AcerSystem AcerSystem PDF (Portable Document Format 1 Start All Programs AcerSystem 니다 . 2 AcerSystem Adobe Reader Adobe Reader AcerSystem Adobe Reader Adobe Reader Help and Support
3 Acer Acer Aspire Aspire AcerSystem AcerSystem PDF (Portable Document Format 1 Start All Programs AcerSystem 니다 . 2 AcerSystem Adobe Reader Adobe Reader AcerSystem Adobe Reader Adobe Reader Help and Support
Quick Start Guide
Page 268
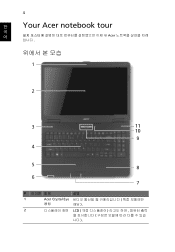
4 한 Your Acer notebook tour 국 어 Acer 입니다 . 1 2 3 11 10 9 4 5 8 6 7 설명 1 Acer Crystal Eye 웹캠 해당 ). 2 LCD 니다 ).
4 한 Your Acer notebook tour 국 어 Acer 입니다 . 1 2 3 11 10 9 4 5 8 6 7 설명 1 Acer Crystal Eye 웹캠 해당 ). 2 LCD 니다 ).

Service Guide
Page 1
Aspire 5334/5734Z Series Service Guide Service guide files and updates are available on the ACER/CSD web; for more information, please refer to http://csd.acer.com.tw PRINTED IN TAIWAN
Aspire 5334/5734Z Series Service Guide Service guide files and updates are available on the ACER/CSD web; for more information, please refer to http://csd.acer.com.tw PRINTED IN TAIWAN

Service Guide
Page 2
Revision History Please refer to the table below for the updates made on Aspire 5334 Series service guides. Date Chapter Updates II
Revision History Please refer to the table below for the updates made on Aspire 5334 Series service guides. Date Chapter Updates II
Service Guide
Page 3
...the contents hereof and specifically disclaims any warranties of merchantability or fitness for any particular purpose. No part of Acer Incorporated. Acer Incorporated makes no representations or warranties, either expressed or implied, with respect to change without the prior written ...transcribed, stored in a retrieval system, or translated into any language or computer language, in this guide is ". Acer is a registered trademark of Acer Corporation. Disclaimer The information in the software. Should the programs prove defective following their respective holders. III All rights ...
...the contents hereof and specifically disclaims any warranties of merchantability or fitness for any particular purpose. No part of Acer Incorporated. Acer Incorporated makes no representations or warranties, either expressed or implied, with respect to change without the prior written ...transcribed, stored in a retrieval system, or translated into any language or computer language, in this guide is ". Acer is a registered trademark of Acer Corporation. Disclaimer The information in the software. Should the programs prove defective following their respective holders. III All rights ...
Service Guide
Page 4
NOTE WARNING CAUTION IMPORTANT Gives bits and pieces of procedures. IV Alerts you to do specific actions relevant to the accomplishment of additional information related to any damage that appear on screen. Gives precautionary measures to avoid possible hardware or software problems. Reminds you to the current topic. Conventions The following conventions are used in this manual: SCREEN MESSAGES Denotes actual messages that might result from doing or not doing specific actions.
NOTE WARNING CAUTION IMPORTANT Gives bits and pieces of procedures. IV Alerts you to do specific actions relevant to the accomplishment of additional information related to any damage that appear on screen. Gives precautionary measures to avoid possible hardware or software problems. Reminds you to the current topic. Conventions The following conventions are used in this manual: SCREEN MESSAGES Denotes actual messages that might result from doing or not doing specific actions.
Service Guide
Page 5
... by your regional offices or the responsible personnel/channel to extend the functionality of customer machines. For ACER-AUTHORIZED SERVICE PROVIDERS, your regional web or channel. V add-on your Acer office may have decided to provide you with further technical details. 2. These LOCALIZED FEATURES will not ... information and the product it supports, please read the following general information. 1. In such cases, please contact your regional Acer office to the BASIC CONFIGURATION decided for Acer's "global" product offering. Preface Before using this generic service guide.
... by your regional offices or the responsible personnel/channel to extend the functionality of customer machines. For ACER-AUTHORIZED SERVICE PROVIDERS, your regional web or channel. V add-on your Acer office may have decided to provide you with further technical details. 2. These LOCALIZED FEATURES will not ... information and the product it supports, please read the following general information. 1. In such cases, please contact your regional Acer office to the BASIC CONFIGURATION decided for Acer's "global" product offering. Preface Before using this generic service guide.
Service Guide
Page 7
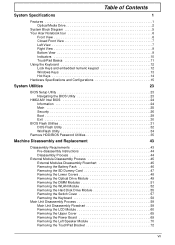
Table of Contents System Specifications 1 Features 1 Optical Media Drive 2 System Block Diagram 5 Your Acer Notebook tour 6 Front View 6 Closed Front View 7 Left View 7 Right View 9 Bottom View 9 Indicators 10 TouchPad Basics 11 Using the Keyboard 12 Lock Keys and ...
Table of Contents System Specifications 1 Features 1 Optical Media Drive 2 System Block Diagram 5 Your Acer Notebook tour 6 Front View 6 Closed Front View 7 Left View 7 Right View 9 Bottom View 9 Indicators 10 TouchPad Basics 11 Using the Keyboard 12 Lock Keys and ...
Service Guide
Page 8
Table of Contents Removing the Mainboard 74 Removing the RTC Battery 75 Removing the Thermal Module 76 Removing the CPU Fan 78 Removing the CPU 79 LCD Module Disassembly Process 80 LCD Module Disassembly Flowchart 80 Removing the LCD Bezel 81 Removing the Camera Module 82 Removing the Inverter Board 83 Removing the LCD Panel 84 Removing the LCD Brackets and FPC Cable 85 Removing the Antennas 87 LCD Module Reassembly Procedure 90 Replacing the Antennas 90 Replacing the LCD Panel 93 Replacing the Camera Module 94 Replacing the Inverter Board 95 Replacing the LCD Bezel 96 Main...
Table of Contents Removing the Mainboard 74 Removing the RTC Battery 75 Removing the Thermal Module 76 Removing the CPU Fan 78 Removing the CPU 79 LCD Module Disassembly Process 80 LCD Module Disassembly Flowchart 80 Removing the LCD Bezel 81 Removing the Camera Module 82 Removing the Inverter Board 83 Removing the LCD Panel 84 Removing the LCD Brackets and FPC Cable 85 Removing the Antennas 87 LCD Module Reassembly Procedure 90 Replacing the Antennas 90 Replacing the LCD Panel 93 Replacing the Camera Module 94 Replacing the Inverter Board 95 Replacing the LCD Bezel 96 Main...
Service Guide
Page 9
Table of Contents Undetermined Problems 136 Post Codes 137 Jumper and Connector Locations 145 Top View 145 Bottom View 146 Power Board 147 Clearing Password Check and BIOS Recovery 148 Clearing Password Check 148 Clear CMOS Jumper 149 BIOS Recovery by Crisis Disk 150 FRU (Field Replaceable Unit) List 151 JE50_MV Exploded Diagrams 152 Main Assembly 152 Rear Assembly 153 LCD Assembly 154 JE50_MV FRU List 155 Screw List 163 Model Definition and Configuration 164 Test Compatible Components 219 Microsoft® Windows® 7 Environment Test 220 Online Support ...
Table of Contents Undetermined Problems 136 Post Codes 137 Jumper and Connector Locations 145 Top View 145 Bottom View 146 Power Board 147 Clearing Password Check and BIOS Recovery 148 Clearing Password Check 148 Clear CMOS Jumper 149 BIOS Recovery by Crisis Disk 150 FRU (Field Replaceable Unit) List 151 JE50_MV Exploded Diagrams 152 Main Assembly 152 Rear Assembly 153 LCD Assembly 154 JE50_MV FRU List 155 Screw List 163 Model Definition and Configuration 164 Test Compatible Components 219 Microsoft® Windows® 7 Environment Test 220 Online Support ...
