Service Guide
Page 8
... CPU Fan 78 Removing the CPU 79 LCD Module Disassembly Process 80 LCD Module Disassembly Flowchart 80 Removing the LCD Bezel 81 Removing the Camera Module 82 Removing the Inverter Board 83 Removing the LCD Panel 84 Removing the LCD Brackets and FPC Cable 85 Removing the Antennas 87 LCD Module Reassembly Procedure 90 Replacing the Antennas...
... CPU Fan 78 Removing the CPU 79 LCD Module Disassembly Process 80 LCD Module Disassembly Flowchart 80 Removing the LCD Bezel 81 Removing the Camera Module 82 Removing the Inverter Board 83 Removing the LCD Panel 84 Removing the LCD Brackets and FPC Cable 85 Removing the Antennas 87 LCD Module Reassembly Procedure 90 Replacing the Antennas...

Service Guide
Page 93
Screw Type Chapter 3 83 Remove one (1) screw from the inverter board. Step Inverter Board Size M2.5*6 Quantity 1 4. Removing the Inverter Board 1. Lift the LCD Panel clear of the module. Disconnect two (2) cables on page 81. 2. See "Removing the LCD Bezel" on the inverter board. 3.
Screw Type Chapter 3 83 Remove one (1) screw from the inverter board. Step Inverter Board Size M2.5*6 Quantity 1 4. Removing the Inverter Board 1. Lift the LCD Panel clear of the module. Disconnect two (2) cables on page 81. 2. See "Removing the LCD Bezel" on the inverter board. 3.

Service Guide
Page 95
Removing the LCD Brackets and FPC Cable 1. Remove the LCD brackets by pulling away from the LCD Panel brackets. Screw Type Chapter 3 85 See "Removing the Inverter Board" on each side) from the LCD Panel. Step LCD Brackets Size M2*3 Quantity 6 3. Remove the six (6) securing screws (three on page 83. 2.
Removing the LCD Brackets and FPC Cable 1. Remove the LCD brackets by pulling away from the LCD Panel brackets. Screw Type Chapter 3 85 See "Removing the Inverter Board" on each side) from the LCD Panel. Step LCD Brackets Size M2*3 Quantity 6 3. Remove the six (6) securing screws (three on page 83. 2.

Service Guide
Page 97
See "Removing the Inverter Board" on page 83. 2. Remove the cable from all cable clips and adhesive strips. 4. Chapter 3 87 Remove the adhesive tape securing the left antenna cable in place. Ensure that the cable is free from obstructions. 3. Removing the Antennas 1. Remove the adhesive strips holding the left Antenna to the LCD Module. Ensure the cable is free from the cable channel.
See "Removing the Inverter Board" on page 83. 2. Remove the cable from all cable clips and adhesive strips. 4. Chapter 3 87 Remove the adhesive tape securing the left antenna cable in place. Ensure that the cable is free from obstructions. 3. Removing the Antennas 1. Remove the adhesive strips holding the left Antenna to the LCD Module. Ensure the cable is free from the cable channel.

Service Guide
Page 105
Step LCD Panel Size Quantity 1 3. Replacing the Inverter Board 1. Place the inverter board in the LCD cover. 2. Screw Type Chapter 3 95 Replace one (1) screw on the inverter board. Replace two (2) cables on the inverter board.
Step LCD Panel Size Quantity 1 3. Replacing the Inverter Board 1. Place the inverter board in the LCD cover. 2. Screw Type Chapter 3 95 Replace one (1) screw on the inverter board. Replace two (2) cables on the inverter board.

Service Guide
Page 164
LCD Assembly 1 2 3 6 7 8 4 9 5 No. Description 1 LCD Bezel 2 Antenna (Main) Antenna (Aux) 3 LCD Brackets 4 LCD Cable 5 LCD Cover 6 Hinge 7 LCD Sponge 8 Camera 0.3M 9 Inverter Acer P/N 60.NAF02.005 50.NAF02.002 50.NAF02.003 33.NAF02.005 50.NAF02.004 60.NAF02.004 N/A N/A 57.NAE02.001 19.NAF02.001 154 Chapter 6
LCD Assembly 1 2 3 6 7 8 4 9 5 No. Description 1 LCD Bezel 2 Antenna (Main) Antenna (Aux) 3 LCD Brackets 4 LCD Cable 5 LCD Cover 6 Hinge 7 LCD Sponge 8 Camera 0.3M 9 Inverter Acer P/N 60.NAF02.005 50.NAF02.002 50.NAF02.003 33.NAF02.005 50.NAF02.004 60.NAF02.004 N/A N/A 57.NAE02.001 19.NAF02.001 154 Chapter 6
Service Guide
Page 171
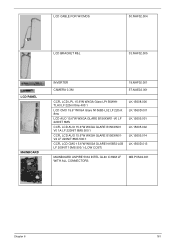
... W/CMOS 50.NAF02.004 LCD BRACKET R&L 33.NAF02.005 LCD PANEL MAINBOARD INVERTER CAMERA 0.3M 19.NAF02.001 57.NAE02.001 CCFL LCD LPL 15.6"W WXGA Glare LP156WH1TLA3 LF 220nit 8ms 400:1 LCD CMO 15.6" WXGA Glare N156B3-L02 LF 220nit 8ms LCD AUO 15.6"W WXGA GLARE B156XW01-V0 LF 220NIT 8MS CCFL LCD AUO 15.6"W WXGA... 15.6"W WXGA GLARE B156XW01V2 LF 220NIT 8MS 500:1 CCFL LCD CMO 15.6"W WXGA GLARE N156B3-L0B LF 200NIT 10MS 500:1 (LOW COST) LK.15608.006 LK.1560D.001 LK.15605.001 LK.15605.002 LK.15605.014 LK.1560D.013 MAINBOARD ASPIRE 5334 INTEL GL40 ICH9M LF WITH ALL CONNECTORS MB.PVS02.001...
... W/CMOS 50.NAF02.004 LCD BRACKET R&L 33.NAF02.005 LCD PANEL MAINBOARD INVERTER CAMERA 0.3M 19.NAF02.001 57.NAE02.001 CCFL LCD LPL 15.6"W WXGA Glare LP156WH1TLA3 LF 220nit 8ms 400:1 LCD CMO 15.6" WXGA Glare N156B3-L02 LF 220nit 8ms LCD AUO 15.6"W WXGA GLARE B156XW01-V0 LF 220NIT 8MS CCFL LCD AUO 15.6"W WXGA... 15.6"W WXGA GLARE B156XW01V2 LF 220NIT 8MS 500:1 CCFL LCD CMO 15.6"W WXGA GLARE N156B3-L0B LF 200NIT 10MS 500:1 (LOW COST) LK.15608.006 LK.1560D.001 LK.15605.001 LK.15605.002 LK.15605.014 LK.1560D.013 MAINBOARD ASPIRE 5334 INTEL GL40 ICH9M LF WITH ALL CONNECTORS MB.PVS02.001...


