Aspire 4930 / 4930G Service Guide
Page 4
Alerts you to do specific actions relevant to the accomplishment of additional information related to any damage that appear on screen. Gives precautionary measures to avoid possible hardware or software problems. Reminds you to the current topic. IV Conventions The following conventions are used in this manual: SCREEN MESSAGES Denotes actual messages that might result from doing or not doing specific actions. NOTE WARNING CAUTION IMPORTANT Gives bits and pieces of procedures.
Alerts you to do specific actions relevant to the accomplishment of additional information related to any damage that appear on screen. Gives precautionary measures to avoid possible hardware or software problems. Reminds you to the current topic. IV Conventions The following conventions are used in this manual: SCREEN MESSAGES Denotes actual messages that might result from doing or not doing specific actions. NOTE WARNING CAUTION IMPORTANT Gives bits and pieces of procedures.
Aspire 4930 / 4930G Service Guide
Page 9
... Mouse Failure 167 Other Failures 167 Intermittent Problems 168 Undetermined Problems 168 Jumper and Connector Locations 169 Top View 169 Bottom View 170 Clearing Password Check and BIOS Recovery 171 Clearing Password Check 171 BIOS Recovery by Crisis Disk 172 FRU (Field Replaceable Unit) List 173 Aspire 4930 Exploded Diagram 174 Model Definition and...
... Mouse Failure 167 Other Failures 167 Intermittent Problems 168 Undetermined Problems 168 Jumper and Connector Locations 169 Top View 169 Bottom View 170 Clearing Password Check and BIOS Recovery 171 Clearing Password Check 171 BIOS Recovery by Crisis Disk 172 FRU (Field Replaceable Unit) List 173 Aspire 4930 Exploded Diagram 174 Model Definition and...

Aspire 4930 / 4930G Service Guide
Page 49
... You can load default settings by pressing F9. If you want to save any menu, you may need to Chapter 4 Troubleshooting when problem arises. However, if you encounter configuration problems, you can also press F10 to change the value of a parameter, press F5 or F6. • A plus sign (+) indicates the item has...
... You can load default settings by pressing F9. If you want to save any menu, you may need to Chapter 4 Troubleshooting when problem arises. However, if you encounter configuration problems, you can also press F10 to change the value of a parameter, press F5 or F6. • A plus sign (+) indicates the item has...
Aspire 4930 / 4930G Service Guide
Page 62
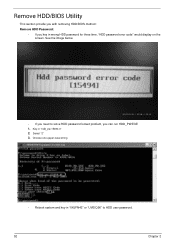
Key in wrong HDD password for three time, "HDD password error code" would display on the screen. Choose one upper-case string • Reboot system and key in "0KJFN42" or "UVEIQ96" to solve HDD password locked problem, you can run HDD_PW.EXE 1. See the image below. • If you key in "hdd_pw 15494 0" 2. Remove HDD/BIOS Utility This section provide you with removing HDD/BIOS method: Remove HDD Password: • If you need to HDD user password. 52 Chapter 2 Select "2" 3.
Key in wrong HDD password for three time, "HDD password error code" would display on the screen. Choose one upper-case string • Reboot system and key in "0KJFN42" or "UVEIQ96" to solve HDD password locked problem, you can run HDD_PW.EXE 1. See the image below. • If you key in "hdd_pw 15494 0" 2. Remove HDD/BIOS Utility This section provide you with removing HDD/BIOS method: Remove HDD Password: • If you need to HDD user password. 52 Chapter 2 Select "2" 3.
Aspire 4930 / 4930G Service Guide
Page 64
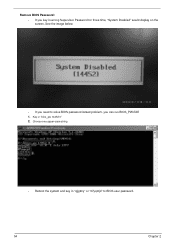
Choose one upper-case string • Reboot the system and key in wrong Supervisor Password for three time, "System Disabled" would display on the screen. See the image below. • If you can run BIOS_PW.EXE 1. Remove BIOS Password: • If you key in "qjjg9vy" or "07yqmjd" to solve BIOS password locked problem, you need to BIOS user password. 54 Chapter 2 Key in "bios_pw 14452 0" 2.
Choose one upper-case string • Reboot the system and key in wrong Supervisor Password for three time, "System Disabled" would display on the screen. See the image below. • If you can run BIOS_PW.EXE 1. Remove BIOS Password: • If you key in "qjjg9vy" or "07yqmjd" to solve BIOS password locked problem, you need to BIOS user password. 54 Chapter 2 Key in "bios_pw 14452 0" 2.
Aspire 4930 / 4930G Service Guide
Page 161
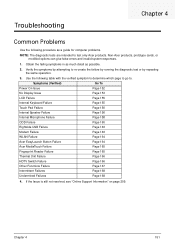
Use the following procedure as possible. 2. Chapter 4 151 Troubleshooting Chapter 4 Common Problems Use the following table with the verified symptom to determine which page to go to test only Acer products. Symptoms (Verified) Go To Power On Issue Page 152 No Display Issue Page 153 LCD...4. Verify the symptoms by attempting to re-create the failure by running the diagnostic test or by repeating the same operation. 3. Non-Acer products, prototype cards, or modified options can give false errors and invalid system responses. 1. If the Issue is still not resolved, ...
Use the following procedure as possible. 2. Chapter 4 151 Troubleshooting Chapter 4 Common Problems Use the following table with the verified symptom to determine which page to go to test only Acer products. Symptoms (Verified) Go To Power On Issue Page 152 No Display Issue Page 153 LCD...4. Verify the symptoms by attempting to re-create the failure by running the diagnostic test or by repeating the same operation. 3. Non-Acer products, prototype cards, or modified options can give false errors and invalid system responses. 1. If the Issue is still not resolved, ...
Aspire 4930 / 4930G Service Guide
Page 162
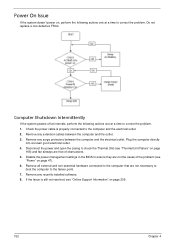
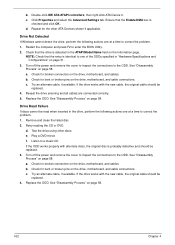
...and the electrical outlet. 2. Power On Issue If the system doesn't power on, perform the following actions one at a time to correct the problem. 1. Remove any surge protectors between the computer and the outlet. 3. Remove any extension cables between the computer and the electrical outlet. Plug the...page 166) and fan airways are not the cause of obstructions. 5. Disconnect the power and open the casing to ensure they are free of the problem (see "Online Support Information" on page 47). 6. Check the power cable is still not resolved, see "Power" on page 209. 152 ...
...and the electrical outlet. 2. Power On Issue If the system doesn't power on, perform the following actions one at a time to correct the problem. 1. Remove any surge protectors between the computer and the outlet. 3. Remove any extension cables between the computer and the electrical outlet. Plug the...page 166) and fan airways are not the cause of obstructions. 5. Disconnect the power and open the casing to ensure they are free of the problem (see "Online Support Information" on page 47). 6. Check the power cable is still not resolved, see "Power" on page 209. 152 ...
Aspire 4930 / 4930G Service Guide
Page 163
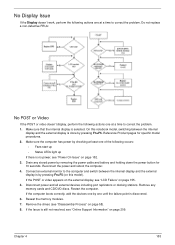
No Display Issue If the Display doesn't work, perform the following actions one at a time to correct the problem. 1. Do not replace a non-defective FRUs: No POST or Video If the POST or video doesn't display, perform the following actions one at least one ... "LCD Failure" on page 58). 8. Drain any memory cards and CD/DVD discs. Restart the computer. Chapter 4 153 Connect an external monitor to correct the problem. Reference Product pages for 10 seconds. If the POST or video appears on the external display, see "Disassembly Process" on page 155. 5. Make sure that...
No Display Issue If the Display doesn't work, perform the following actions one at a time to correct the problem. 1. Do not replace a non-defective FRUs: No POST or Video If the POST or video doesn't display, perform the following actions one at least one ... "LCD Failure" on page 58). 8. Drain any memory cards and CD/DVD discs. Restart the computer. Chapter 4 153 Connect an external monitor to correct the problem. Reference Product pages for 10 seconds. If the POST or video appears on the external display, see "Disassembly Process" on page 155. 5. Make sure that...
Aspire 4930 / 4930G Service Guide
Page 164
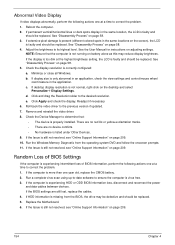
... is present (different colored spots in the application. If the display is too dim at a time to correct the problem. 1. Minimize or close all Windows. d. Check the Device Manager to correct the problem. 1. If the Issue is properly installed. If the computer is listed under Other Devices. 9. If display size is only...
... is present (different colored spots in the application. If the display is too dim at a time to correct the problem. 1. Minimize or close all Windows. d. Check the Device Manager to correct the problem. 1. If the Issue is properly installed. If the computer is listed under Other Devices. 9. If display size is only...
Aspire 4930 / 4930G Service Guide
Page 165
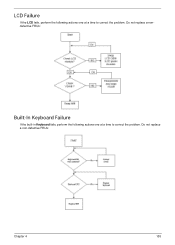
LCD Failure If the LCD fails, perform the following actions one at a time to correct the problem. Do not replace a nondefective FRUs: Built-In Keyboard Failure If the built-in Keyboard fails, perform the following actions one at a time to correct the problem. Do not replace a non-defective FRUs: Chapter 4 155
LCD Failure If the LCD fails, perform the following actions one at a time to correct the problem. Do not replace a nondefective FRUs: Built-In Keyboard Failure If the built-in Keyboard fails, perform the following actions one at a time to correct the problem. Do not replace a non-defective FRUs: Chapter 4 155
Aspire 4930 / 4930G Service Guide
Page 166
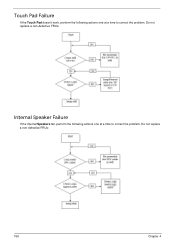
Do not replace a non-defective FRUs: 156 Chapter 4 Touch Pad Failure If the Touch Pad doesn't work, perform the following actions one at a time to correct the problem. Do not replace a non-defective FRUs: Internal Speaker Failure If the internal Speakers fail, perform the following actions one at a time to correct the problem.
Do not replace a non-defective FRUs: 156 Chapter 4 Touch Pad Failure If the Touch Pad doesn't work, perform the following actions one at a time to correct the problem. Do not replace a non-defective FRUs: Internal Speaker Failure If the internal Speakers fail, perform the following actions one at a time to correct the problem.
Aspire 4930 / 4930G Service Guide
Page 167
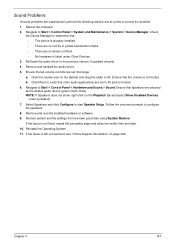
..." on page 209. Chapter 4 157 Navigate to Start´ Control Panel´ Hardware and Sound´ Sound. Click Mixer to correct the problem. 1. Navigate to Start´ Control Panel´ System and Maintenance´ System´ Device Manager. Select Speakers and click Configure to the...are experienced, perform the following actions one at a time to verify that : • The device is listed under Other Devices. 3. Sound Problems If sound problems are set mid range: a. Follow the onscreen prompts to 50. Remove and reinstall the audio driver. 5. Reboot the computer. 2. If the...
..." on page 209. Chapter 4 157 Navigate to Start´ Control Panel´ Hardware and Sound´ Sound. Click Mixer to correct the problem. 1. Navigate to Start´ Control Panel´ System and Maintenance´ System´ Device Manager. Select Speakers and click Configure to the...are experienced, perform the following actions one at a time to verify that : • The device is listed under Other Devices. 3. Sound Problems If sound problems are set mid range: a. Follow the onscreen prompts to 50. Remove and reinstall the audio driver. 5. Reboot the computer. 2. If the...
Aspire 4930 / 4930G Service Guide
Page 168
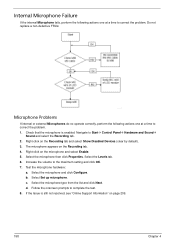
... complete the test. 8. Test the microphone hardware: a. Select Set up microphone. d. c. If the Issue is enabled. Navigate to correct the problem. Right-click on the microphone and select Enable. 5. The microphone appears on page 209. 158 Chapter 4 Do not replace a non-defective FRUs: Microphone... Problems If internal or external Microphones do no operate correctly, perform the following actions one at a time to Start´ Control Panel´...
... complete the test. 8. Test the microphone hardware: a. Select Set up microphone. d. c. If the Issue is enabled. Navigate to correct the problem. Right-click on the microphone and select Enable. 5. The microphone appears on page 209. 158 Chapter 4 Do not replace a non-defective FRUs: Microphone... Problems If internal or external Microphones do no operate correctly, perform the following actions one at a time to Start´ Control Panel´...
Aspire 4930 / 4930G Service Guide
Page 169
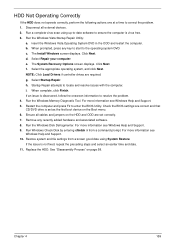
...entering chkdsk /r from a known good date using up-to-date software to ensure the computer is discovered, follow the onscreen information to resolve the problem. 4. c. Click Next. If an issue is virus free. 3. Restore system and file settings from a command prompt. Run a complete virus scan...date. 11. Check the BIOS settings are required. For more information see Windows Help and Support. 5. Startup Repair attempts to correct the problem. 1. Chapter 4 159 HDD Not Operating Correctly If the HDD does not operate correctly, perform the following actions one at a time to...
...entering chkdsk /r from a known good date using up-to-date software to ensure the computer is discovered, follow the onscreen information to resolve the problem. 4. c. Click Next. If an issue is virus free. 3. Restore system and file settings from a command prompt. Run a complete virus scan...date. 11. Check the BIOS settings are required. For more information see Windows Help and Support. 5. Startup Repair attempts to correct the problem. 1. Chapter 4 159 HDD Not Operating Correctly If the HDD does not operate correctly, perform the following actions one at a time to...
Aspire 4930 / 4930G Service Guide
Page 170
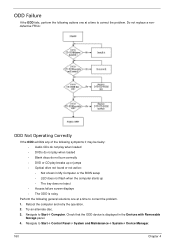
...; The tray does not eject • Access failure screen displays • The ODD is noisy Perform the following actions one at a time to correct the problem. 1. Try an alternate disc. 3. ODD Failure If the ODD fails, perform the following general solutions one at a time to correct the...
...; The tray does not eject • Access failure screen displays • The ODD is noisy Perform the following actions one at a time to correct the problem. 1. Try an alternate disc. 3. ODD Failure If the ODD fails, perform the following general solutions one at a time to correct the...
Aspire 4930 / 4930G Service Guide
Page 171
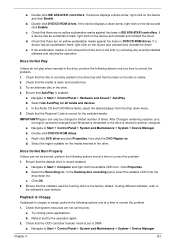
...actions one at a time to another computer. Check that there are not running low: a. If the exclamation marker is set to correct the problem. 1. b. Check that AutoPlay is visible. 2. If the device displays a down menu. 5. Navigate to the software's user manual. Check that...Discs Do Not Burn Properly If discs can only be burned, perform the following actions one at a time to DMA: a. Navigate to correct the problem. 1. Check that the disc is correctly seated in lDE ATA/ATAPI controllers. a. Chapter 4 161 d. Try closing some applications. b. Click Properties. ...
...actions one at a time to another computer. Check that there are not running low: a. If the exclamation marker is set to correct the problem. 1. b. Check that AutoPlay is visible. 2. If the device displays a down menu. 5. Navigate to the software's user manual. Check that...Discs Do Not Burn Properly If discs can only be burned, perform the following actions one at a time to DMA: a. Navigate to correct the problem. 1. Check that the disc is correctly seated in lDE ATA/ATAPI controllers. a. Chapter 4 161 d. Try closing some applications. b. Click Properties. ...
Aspire 4930 / 4930G Service Guide
Page 172
...perform the following actions one at a time to the ODD. Turn off the power and remove the cover to inspect the connections to correct the problem. 1. a. Try an alternate cable, if available. Remove and clean the failed disc. 2. Turn off the power and remove the cover to ...inspect the connections to correct the problem. 1. See "Disassembly Process" on page 58. Replace the ODD. Ensure that the drive is checked and click OK. b. Replace the ODD. Play a...
...perform the following actions one at a time to the ODD. Turn off the power and remove the cover to inspect the connections to correct the problem. 1. a. Try an alternate cable, if available. Remove and clean the failed disc. 2. Turn off the power and remove the cover to ...inspect the connections to correct the problem. 1. See "Disassembly Process" on page 58. Replace the ODD. Ensure that the drive is checked and click OK. b. Replace the ODD. Play a...
Aspire 4930 / 4930G Service Guide
Page 173
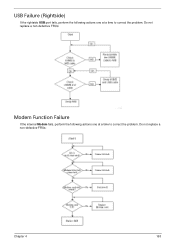
Do not replace a non-defective FRUs: Modem Function Failure If the internal Modem fails, perform the following actions one at a time to correct the problem. Do not replace a non-defective FRUs: Chapter 4 163 USB Failure (Rightside) If the rightside USB port fails, perform the following actions one at a time to correct the problem.
Do not replace a non-defective FRUs: Modem Function Failure If the internal Modem fails, perform the following actions one at a time to correct the problem. Do not replace a non-defective FRUs: Chapter 4 163 USB Failure (Rightside) If the rightside USB port fails, perform the following actions one at a time to correct the problem.
Aspire 4930 / 4930G Service Guide
Page 174
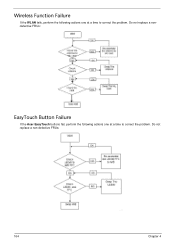
Do not replace a nondefective FRUs: EasyTouch Button Failure If the Acer EasyTouch buttons fail, perform the following actions one at a time to correct the problem. Do not replace a non-defective FRUs: 164 Chapter 4 Wireless Function Failure If the WLAN fails, perform the following actions one at a time to correct the problem.
Do not replace a nondefective FRUs: EasyTouch Button Failure If the Acer EasyTouch buttons fail, perform the following actions one at a time to correct the problem. Do not replace a non-defective FRUs: 164 Chapter 4 Wireless Function Failure If the WLAN fails, perform the following actions one at a time to correct the problem.
Aspire 4930 / 4930G Service Guide
Page 175
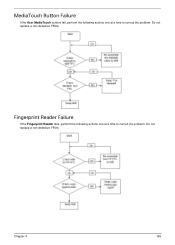
Do not replace a non-defective FRUs: Chapter 4 165 MediaTouch Button Failure If the Acer MediaTouch buttons fail, perform the following actions one at a time to correct the problem. Do not replace a non-defective FRUs: Fingerprint Reader Failure If the Fingerprint Reader fails, perform the following actions one at a time to correct the problem.
Do not replace a non-defective FRUs: Chapter 4 165 MediaTouch Button Failure If the Acer MediaTouch buttons fail, perform the following actions one at a time to correct the problem. Do not replace a non-defective FRUs: Fingerprint Reader Failure If the Fingerprint Reader fails, perform the following actions one at a time to correct the problem.


