
Aspire 4930 / 4930G Service Guide
Page 37
... off , external display settings, display orientation and synchronization status. To launch Windows Mobility Center: • Use the shortcut key < > + • Start Windows Mobility Center from the Control panel • Start Windows Mobility Center from the Accessories program group in one easy-to-find place,... so you change locations, networks or activities. Windows Mobility Center also includes Acer-specific settings like Bluetooth Add Device (if applicable), sharing folders overview/sharing service on /off , and a ...
... off , external display settings, display orientation and synchronization status. To launch Windows Mobility Center: • Use the shortcut key < > + • Start Windows Mobility Center from the Control panel • Start Windows Mobility Center from the Accessories program group in one easy-to-find place,... so you change locations, networks or activities. Windows Mobility Center also includes Acer-specific settings like Bluetooth Add Device (if applicable), sharing folders overview/sharing service on /off , and a ...
Aspire 4930 / 4930G Service Guide
Page 53
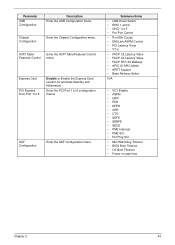
Submenu Items • USB Driver Select • EHCI 1 and 2 • UHCI 1 to 6 configuration menus. ACPI Table/ Enter the ACPI Table/Features Control Features Control menu. Enter the PCI Port 1 to 5 &#... ASF Configuration menu. Chipset Configuration Enter the Chipset Configuration menu. Express Card PCI Express Root Port 1 to 6 Disable or Enable the Express Card solution for windows Standby and Hibernation. Parameter USB Configuration Description Enter the USB Configuration menu.
Submenu Items • USB Driver Select • EHCI 1 and 2 • UHCI 1 to 6 configuration menus. ACPI Table/ Enter the ACPI Table/Features Control Features Control menu. Enter the PCI Port 1 to 5 &#... ASF Configuration menu. Chipset Configuration Enter the Chipset Configuration menu. Express Card PCI Express Root Port 1 to 6 Disable or Enable the Express Card solution for windows Standby and Hibernation. Parameter USB Configuration Description Enter the USB Configuration menu.
Aspire 4930 / 4930G Service Guide
Page 164
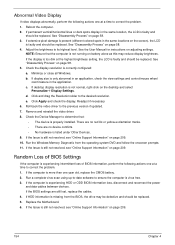
...select Personalize´ Display Settings. If desktop display resolution is not normal, right-click on page 209. e. Remove and reinstall the video driver. 8. If the Issue is still not resolved, see "Online Support Information" on adjusting settings. Random Loss of BIOS Settings If the computer...to correct the problem. 1. See "Disassembly Process" on page 58. 4. See "Disassembly Process" on page 58. 3. Minimize or close all Windows. If display size is faulty and should be replaced. If permanent vertical/horizontal lines or dark spots display in the same location, the LCD is...
...select Personalize´ Display Settings. If desktop display resolution is not normal, right-click on page 209. e. Remove and reinstall the video driver. 8. If the Issue is still not resolved, see "Online Support Information" on adjusting settings. Random Loss of BIOS Settings If the computer...to correct the problem. 1. See "Disassembly Process" on page 58. 4. See "Disassembly Process" on page 58. 3. Minimize or close all Windows. If display size is faulty and should be replaced. If permanent vertical/horizontal lines or dark spots display in the same location, the LCD is...

Aspire 4930 / 4930G Service Guide
Page 169
...the operating system DVD. Restore system and file settings from a command prompt. See "Disassembly Process" on page 58. NOTE: Click Load Drivers if controller drives are correct and that CD/DVD drive is not fixed, repeat the preceding steps and select an earlier time and date.... 11. Replace the HDD. Run the Windows Disk Defragmenter. b. The Install Windows screen displays. Chapter 4 159 Run Windows Check Disk by entering chkdsk /r from a known good date using up-to-date software to resolve the problem....
...the operating system DVD. Restore system and file settings from a command prompt. See "Disassembly Process" on page 58. NOTE: Click Load Drivers if controller drives are correct and that CD/DVD drive is not fixed, repeat the preceding steps and select an earlier time and date.... 11. Replace the HDD. Run the Windows Disk Defragmenter. b. The Install Windows screen displays. Chapter 4 159 Run Windows Check Disk by entering chkdsk /r from a known good date using up-to-date software to resolve the problem....
Aspire 4930 / 4930G Service Guide
Page 171
... CD and DVD Movie fields, select the desired player from the drop down arrow, right-click on the device and uninstall and reinstall the driver. Check that the ODD controller transfer mode is correct for burning discs is moved to correct the problem. 1. After Changes remaining reaches zero,... the region cannot be changed even Windows is reinstalled or the drive is the factory default. Right-click DVD drive and click Properties, then click the DVD Region tab. Select the...
... CD and DVD Movie fields, select the desired player from the drop down arrow, right-click on the device and uninstall and reinstall the driver. Check that the ODD controller transfer mode is correct for burning discs is moved to correct the problem. 1. After Changes remaining reaches zero,... the region cannot be changed even Windows is reinstalled or the drive is the factory default. Right-click DVD drive and click Properties, then click the DVD Region tab. Select the...
Aspire 4930 / 4930G Service Guide
Page 177
...to Try. See the mouse user manual. 3. Restore system and file settings from a known good date using System Restore. Roll back the mouse driver to correct the problem. 1. Check Test Fixture is not fixed, repeat the preceding steps and select an earlier time and date. 9. Try .... Run the Event Viewer to check the events log for errors. Remove and reinstall the mouse driver. 12. Reinstall the program experiencing mouse failure. 5. Check Drive whether is still not resolved, see Windows Help and Support. 10. For more information see "Online Support Information" on page 209. Remove...
...to Try. See the mouse user manual. 3. Restore system and file settings from a known good date using System Restore. Roll back the mouse driver to correct the problem. 1. Check Test Fixture is not fixed, repeat the preceding steps and select an earlier time and date. 9. Try .... Run the Event Viewer to check the events log for errors. Remove and reinstall the mouse driver. 12. Reinstall the program experiencing mouse failure. 5. Check Drive whether is still not resolved, see Windows Help and Support. 10. For more information see "Online Support Information" on page 209. Remove...


