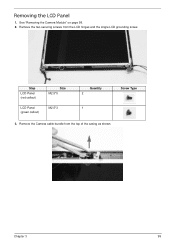
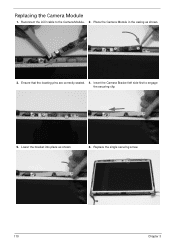
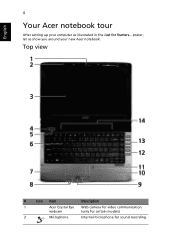
Acer Aspire 4336 Notebook Series Service Guide
Page 8
... Module 92 Removing the CPU 94 LCD Module Disassembly Process 95 LCD Module Disassembly Flowchart 95 Removing the LCD Bezel 96 Removing the Camera Module 98 Removing the LCD Panel 99 Removing the LCD Brackets and FPC Cable 101 Removing the Antennas 102 Removing the MIC Module ...103 LCD Module Reassembly Procedure 104 Replacing the MIC Module 104 Replacing the Antennas 105 Replacing the LCD Panel 108 Replacing the Camera Module 110 Replacing the LCD Bezel 111 Main Module Reassembly Procedure 112 Replacing the CPU 112 Replacing the Thermal Module 113 Replacing the ...
Acer Aspire 4336 Notebook Series Service Guide
Page 15
Display screen Power button Also called Liquid-Crystal Display (LCD), displays computer output (Configuration may vary by models). Turns the computer on and off. Internal microphone for certain models). Chapter 1 5 Front View No. 1 2 3 4 Icon Item Acer Crystal Eye webcam Microphone Description Web camera for video communication (only for sound recording. Your Acer Notebook tour After knowing your computer features, let us show you around your new computer.
Acer Aspire 4336 Notebook Series Service Guide
Page 17
USB mouse, USB camera). Left View No. 1 2 3 4 5 6 7 Icon HDMI Item DC in devices (e.g., audio CD player, stereo walkman, mp3 player). Connect to a display device (e.g. Connects to USB 2.0 devices (e.g. Line-...
Acer Aspire 4336 Notebook Series Service Guide
Page 18
... Ejects the optical disk from the drive. accepts CDs or DVDs. Modem (RJ-11) port Connects to a Kensington-compatible computer security lock. USB mouse, USB camera). Optical disk access Lights up when the optical drive is turned off . button Emergency eject hole Ejects the optical drive tray when the computer is...
Acer Aspire 4336 Notebook Series Service Guide
Page 108
Step Camera Module Size M2.5*3 Quantity 1 3. Remove the single screw from the Module. 5. Lift the Camera Bracket, right side first, clear of the casing and disconnect the cable from the Camera Bracket as shown. Screw Type 4. Remove the Camera Module. 98 Chapter 3 Removing the Camera Module 1. Lift the Camera Module clear of the casing. See "Removing the LCD Bezel" on page 96. 2.
Acer Aspire 4336 Notebook Series Service Guide
Page 109
Step LCD Panel (red callout) LCD Panel (green callout) Size M2.5*5 M2.5*3 Quantity 2 1 Screw Type 3. Remove the Camera cable bundle from the LCD hinges and the single LCD grounding screw. Remove the two securing screws from the top of the casing as shown. See "Removing the Camera Module" on page 98. 2. Removing the LCD Panel 1. Chapter 3 99
Acer Aspire 4336 Notebook Series Service Guide
Page 119
Chapter 3 109 IMPORTANT:When replacing the screws in the casing as shown. 8. Replace the three screws to secure the panel and grounding within the LCD module. Replace the Camera Module cable bundle in the LCD brackets (red callout) do not use the screw holes marked with 'X'. 7. These slots are reserved for the Bezel securing screws.
Acer Aspire 4336 Notebook Series Service Guide
Page 120
Replacing the Camera Module 1. Place the Camera Module in the casing as shown 6. Lower the bracket into place as shown. 3. Reconnect the LCD cable to engage the securing clip. 5. Replace the single securing screw. 110 Chapter 3 Insert the Camera Bracket left side first to the Camera Module. 2. Ensure that the locating pins are correctly seated. 4.
Acer Aspire 4336 Notebook Series Service Guide
Page 188
... TIME VENDER 9999995 ONE TIME VENDER Battery 10001063 SONY 60001535 PANASONIC 60002162 SIMPLO 60002162 SIMPLO 60001921 SANYO 60002162 SIMPLO Bluetooth 9999995 ONE TIME VENDER Camera 9999995 ONE TIME VENDER Card Reader 9999995 ONE TIME VENDER CPU 10001067 INTEL Type 65W 65W 65W 90W 90W 90W ALC268 ALC888S 6CELL2.2 6CELL2...SANYO 6 cell 4400mAh Main COMMON Normal Type Battery SIMPLO AS-2007A Li-Ion 3S2P SAMSUNG 6 cell 4400mAh Main COMMON SDI 2.2mAh F type Foxconn FOX_BRM_2.0 Suyin Camera 1.0M DV Tulip 6 in 1-Build in MS, MS Pro, SD, SC, XD, SDIO (For all) CPU Intel Core2Dual P9500 PGA 2.53G 6M 1066...
Acer Aspire 4336 Notebook Series Service Guide
Page 195
... 38 Navigating 29 Power 35 Save and Exit 38 Security 32 System Security 38 Bluetooth module 87 Board Layout Top View 163 brightness hotkeys 14 C Camera Module 98 caps lock on indicator 10 Common Problems 140 computer on indicator 10 CPU 94 D DIMM Module 57 Display 4 display hotkeys 14 E EasyTouch Failure...
Quick Start Guide
Page 4
webcam (only for certain models) 2 Microphone Internal microphone for video communication. Top view # Icon Item Description 1 Acer Crystal Eye Web camera for sound recording. poster, let us show you around your computer as illustrated in the Just for Starters... English 4 Your Acer notebook tour After setting up your new Acer notebook.
Quick Start Guide
Page 8
...-in jack Connects to audio line-out devices (e.g., speakers, headphones). Connects to a display device (e.g., external monitor, LCD projector). Connects to USB 2.0 devices (e.g., USB mouse, USB camera). Connects to an AC adapter. 8 Left view English # Icon 1 2 3 4 5 HDMI 6 7 Item DC-in jack Description Connects to USB 2.0 devices (e.g., USB mouse, USB...
Quick Start Guide
Page 9
... eject hole to a phone line. Ejects the optical drive tray when the computer is active. Kensington lock slot Connects to USB 2.0 devices (e.g., USB mouse, USB camera). 9 Right view English # Icon 1 2 3 4 5 6 7 Item USB 2.0 port Optical drive Optical disk access indicator Optical drive eject button Emergency eject hole Modem (RJ-11) port Description...