User Manual
Page 4
... power button below the LCD screen beside the easy-launch buttons. Note: Viewing the file requires Adobe Reader. The printed User's Guide introduces you to complete the installation. Follow the instructions on and off , the Just for Starters... Basic care and tips for your notebook. poster helps you get started with setting up your computer can help you use Adobe Reader, access the Help and Support menu. For instructions...
... power button below the LCD screen beside the easy-launch buttons. Note: Viewing the file requires Adobe Reader. The printed User's Guide introduces you to complete the installation. Follow the instructions on and off , the Just for Starters... Basic care and tips for your notebook. poster helps you get started with setting up your computer can help you use Adobe Reader, access the Help and Support menu. For instructions...

User Manual
Page 9
... security lock 40 Using passwords 40 Entering passwords 41 Setting passwords 41 Expanding through options 42 Connectivity options 42 Fax/data modem 42 Built-in network feature 43 Universal Serial Bus (USB) 43 PC Card slot 44 Installing memory 45 BIOS utility 45 Boot sequence 45 Enable disk-to-disk recovery 46 Password 46 Using software 46 Playing DVD movies 46 Power management 47 Acer eRecovery 47 Create backup 48 Restore from backup 48 Create factory default image CD 48 Re-install bundled software without CD 49 Change password 49 Troubleshooting...
... security lock 40 Using passwords 40 Entering passwords 41 Setting passwords 41 Expanding through options 42 Connectivity options 42 Fax/data modem 42 Built-in network feature 43 Universal Serial Bus (USB) 43 PC Card slot 44 Installing memory 45 BIOS utility 45 Boot sequence 45 Enable disk-to-disk recovery 46 Password 46 Using software 46 Playing DVD movies 46 Power management 47 Acer eRecovery 47 Create backup 48 Restore from backup 48 Create factory default image CD 48 Re-install bundled software without CD 49 Change password 49 Troubleshooting...

User Manual
Page 12
poster, let us show you use the computer. Front view # Item Description 1 Display screen Also called Liquid-Crystal Display (LCD), displays computer output. 2 Microphone Internal microphone for sound recording. 3 Keyboard For entering data into your computer. 4 Palmrest Comfortable support area for your hands when you around your computer as illustrated in the Just for Starters... English 1 An Aspire tour After setting up your new Aspire computer.
poster, let us show you use the computer. Front view # Item Description 1 Display screen Also called Liquid-Crystal Display (LCD), displays computer output. 2 Microphone Internal microphone for sound recording. 3 Keyboard For entering data into your computer. 4 Palmrest Comfortable support area for your hands when you around your computer as illustrated in the Just for Starters... English 1 An Aspire tour After setting up your new Aspire computer.
User Manual
Page 15
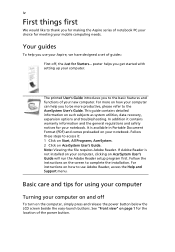
... Connect to a Kensington-compatible computer security lock. Connects to USB 2.0 devices (e.g., USB mouse, USB camera). 4 Right view English # Icon 1 2 Item PC Card slot eject button PC Card slot Description Ejects the PC Card from the slot. Connects to a display device (e.g., external monitor, LCD projector). Connects to an Ethernet 10/100-based network. Enable the computer to stay cool, even after prolonged use. # Icon Item 1 DC-in jack 2 External display (VGA) port 3 Security keylock Description Connects to a phone line. Connects to an AC adapter...
... Connect to a Kensington-compatible computer security lock. Connects to USB 2.0 devices (e.g., USB mouse, USB camera). 4 Right view English # Icon 1 2 Item PC Card slot eject button PC Card slot Description Ejects the PC Card from the slot. Connects to a display device (e.g., external monitor, LCD projector). Connects to an Ethernet 10/100-based network. Enable the computer to stay cool, even after prolonged use. # Icon Item 1 DC-in jack 2 External display (VGA) port 3 Security keylock Description Connects to a phone line. Connects to an AC adapter...

User Manual
Page 17
... LCD and CRT display support • Dual independent display • "Automatic LCD dim" feature that automatically deciding the best settings for your display and conserves power Connectivity • Integrated 10/100 Mbps Fast Ethernet connection • Built-in 56Kbps fax/data modem • Three Universal Serial Bus (USB) 2.0 ports • InviLink™ 802.11b/g or 802.11a/b/g dual-band tri-mode Wireless LAN (for selected models) • Bluetooth...
... LCD and CRT display support • Dual independent display • "Automatic LCD dim" feature that automatically deciding the best settings for your display and conserves power Connectivity • Integrated 10/100 Mbps Fast Ethernet connection • Built-in 56Kbps fax/data modem • Three Universal Serial Bus (USB) 2.0 ports • InviLink™ 802.11b/g or 802.11a/b/g dual-band tri-mode Wireless LAN (for selected models) • Bluetooth...

User Manual
Page 20
... Bluetooth communication. Num Lock Lights up when Caps Lock is activated. English 9 Indicators The computer has Three easy-to-read status indicators on the upper-right above the keyboard, and four on . Media activity Indicates when the hard disk or optical drive is closed. The power, battery and wireless communication status indicators are visible even when the LCD display is active. Fully charged: The light shows green when in AC mode. Icon Function Caps Lock Description Lights...
... Bluetooth communication. Num Lock Lights up when Caps Lock is activated. English 9 Indicators The computer has Three easy-to-read status indicators on the upper-right above the keyboard, and four on . Media activity Indicates when the hard disk or optical drive is closed. The power, battery and wireless communication status indicators are visible even when the LCD display is active. Fully charged: The light shows green when in AC mode. Icon Function Caps Lock Description Lights...
User Manual
Page 24
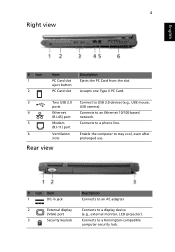
... Num Lock is indicated by small characters located on embedded keypad cursor-control keys. Use this mode when you need to connect an external keypad. It is on embedded keypad Type numbers in numeric mode. A better solution would be to do a lot of the keycaps. Hold while using on the upper right corner of numeric data entry. When Scroll Lock is on, all alphabetic characters typed are...
... Num Lock is indicated by small characters located on embedded keypad cursor-control keys. Use this mode when you need to connect an external keypad. It is on embedded keypad Type numbers in numeric mode. A better solution would be to do a lot of the keycaps. Hold while using on the upper right corner of numeric data entry. When Scroll Lock is on, all alphabetic characters typed are...
User Manual
Page 25
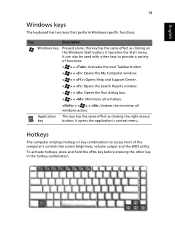
English 14 Windows keys The keyboard has two keys that perform Windows-specific functions. It can also be used with other key in the hotkey combination. Application This key has the same effect as clicking on the Windows Start button; Hotkeys The computer employs hotkeys or key combinations to provide a variety of the computer's controls like screen brightness, volume output and the BIOS utility. it opens the application's context menu. To activate hotkeys, press and hold the key before...
English 14 Windows keys The keyboard has two keys that perform Windows-specific functions. It can also be used with other key in the hotkey combination. Application This key has the same effect as clicking on the Windows Start button; Hotkeys The computer employs hotkeys or key combinations to provide a variety of the computer's controls like screen brightness, volume output and the BIOS utility. it opens the application's context menu. To activate hotkeys, press and hold the key before...

User Manual
Page 26
.... Press any key to save power. Speaker toggle Turns the speakers on page 19. See "Acer eManager" on and off . Touchpad toggle Turns the internal touchpad on page 19. Decreases the screen brightness. Display toggle Screen blank Switches display output between the display screen, external monitor (if connected) and both. 15 English Hotkey Icon Function + Hotkey help Description Displays help on hotkeys. + + + + + + + + + Acer eSettings Launches Acer eSettings in Sleep mode. Increases the sound volume. + Volume down Increases...
.... Press any key to save power. Speaker toggle Turns the speakers on page 19. See "Acer eManager" on and off . Touchpad toggle Turns the internal touchpad on page 19. Decreases the screen brightness. Display toggle Screen blank Switches display output between the display screen, external monitor (if connected) and both. 15 English Hotkey Icon Function + Hotkey help Description Displays help on hotkeys. + + + + + + + + + Acer eSettings Launches Acer eSettings in Sleep mode. Increases the sound volume. + Volume down Increases...

User Manual
Page 30
... Using the system utilities Note: The system utilities work under Microsoft Windows XP only. Acer ePresentation Simplifies resolution settings when connecting to control all your PC's power schemes and maximize battery life. Acer eSettings Makes managing system settings and security easy. To set the < > key, see "Easy-launch buttons" on page 10. Acer ePowerManagement (for selected models) Provides a central location from which features the following main settings: Acer ePowerManagement, Acer eNetManagement, Acer ePresentation, Acer eRecovery and Acer...
... Using the system utilities Note: The system utilities work under Microsoft Windows XP only. Acer ePresentation Simplifies resolution settings when connecting to control all your PC's power schemes and maximize battery life. Acer eSettings Makes managing system settings and security easy. To set the < > key, see "Easy-launch buttons" on page 10. Acer ePowerManagement (for selected models) Provides a central location from which features the following main settings: Acer ePowerManagement, Acer eNetManagement, Acer ePresentation, Acer eRecovery and Acer...
User Manual
Page 31
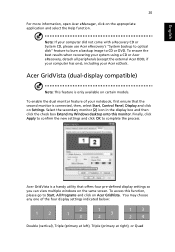
... peripherals (except the external Acer ODD, if your computer did not come with a Recovery CD or System CD, please use Acer eRecovery's "System backup to optical disk" feature to burn a backup image to CD or DVD. Note: If your computer has one of your Acer ezDock. To access this monitor. Acer GridVista (dual-display compatible) Note: This feature is connected, then, select Start, Control Panel, Display and click on...
... peripherals (except the external Acer ODD, if your computer did not come with a Recovery CD or System CD, please use Acer eRecovery's "System backup to optical disk" feature to burn a backup image to CD or DVD. Note: If your computer has one of your Acer ezDock. To access this monitor. Acer GridVista (dual-display compatible) Note: This feature is connected, then, select Start, Control Panel, Display and click on...

User Manual
Page 34
Remove or replace it may arise during the use of possible situations that may be low and unable to power the computer. Press + (increase) to adjust the brightness level. • The display device might be set to an external monitor. Press the display toggle hotkey + to toggle the display back to the computer. • If the Sleep indicator is lit, the computer is in the external USB floppy drive? Image...
Remove or replace it may arise during the use of possible situations that may be low and unable to power the computer. Press + (increase) to adjust the brightness level. • The display device might be set to an external monitor. Press the display toggle hotkey + to toggle the display back to the computer. • If the Sleep indicator is lit, the computer is in the external USB floppy drive? Image...
User Manual
Page 36
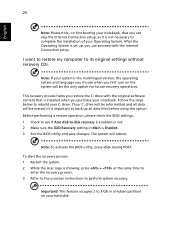
... to enter the recovery process. 3 Refer to the onscreen instructions to complete the installation of your Operating System. Before performing a restore operation, please check the BIOS settings. 1 Check to see if Acer disk-to rebuild your C: drive. (Your C: drive will be erased.) It is important to back up , you can skip the Internet Connection setup, as it is not necessary to perform system recovery. To start the recovery process...
... to enter the recovery process. 3 Refer to the onscreen instructions to complete the installation of your Operating System. Before performing a restore operation, please check the BIOS settings. 1 Check to see if Acer disk-to rebuild your C: drive. (Your C: drive will be erased.) It is important to back up , you can skip the Internet Connection setup, as it is not necessary to perform system recovery. To start the recovery process...
User Manual
Page 42
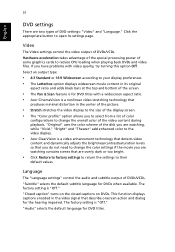
... bright. • Click Restore to factory settings to return the settings to their default values. Click the appropriate button to change the color settings if the movie you do not need to change the overall color of the screen. • The Pan & Scan feature is a nonlinear video stretching technology that produces minimal distortion in its settings page. Video The Video settings control the video output of DVD settings: "Video" and "Language." This function displays...
... bright. • Click Restore to factory settings to return the settings to their default values. Click the appropriate button to change the color settings if the movie you do not need to change the overall color of the screen. • The Pan & Scan feature is a nonlinear video stretching technology that produces minimal distortion in its settings page. Video The Video settings control the video output of DVD settings: "Video" and "Language." This function displays...
User Manual
Page 47
... display cover to place it in Sleep mode by pressing + . Or: You can now safely take the computer anywhere you go within short distances, for example, from the AC adapter. 6 Disconnect the keyboard, pointing device, printer, external monitor and other external devices. 7 Disconnect the Kensington lock ... press and release the power button. To bring the computer out of Sleep mode, open files. 2 Remove any media, floppy disks or compact disks from the drive(s). 3 Shut down the computer: Click on Start, Turn Off Computer, then click on Turn Off (Windows XP). Preparing the computer...
... display cover to place it in Sleep mode by pressing + . Or: You can now safely take the computer anywhere you go within short distances, for example, from the AC adapter. 6 Disconnect the keyboard, pointing device, printer, external monitor and other external devices. 7 Disconnect the Kensington lock ... press and release the power button. To bring the computer out of Sleep mode, open files. 2 Remove any media, floppy disks or compact disks from the drive(s). 3 Shut down the computer: Click on Start, Turn Off Computer, then click on Turn Off (Windows XP). Preparing the computer...
User Manual
Page 52
... the power button for four seconds to enter a password. Setting passwords You can set passwords using the BIOS utility. Try again and press . • When the User Password is set and the password on the computer again, and try again. Then turn on boot parameter is set, a prompt appears when you press to enter the BIOS utility at boot-up . • Type the Supervisor Password and press to access the BIOS utility. If you fail to enter the password...
... the power button for four seconds to enter a password. Setting passwords You can set passwords using the BIOS utility. Try again and press . • When the User Password is set and the password on the computer again, and try again. Then turn on boot parameter is set, a prompt appears when you press to enter the BIOS utility at boot-up . • Type the Supervisor Password and press to access the BIOS utility. If you fail to enter the password...
User Manual
Page 53
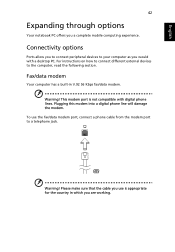
For instructions on how to connect different external devices to a telephone jack. This modem port is appropriate for the country in V.92 56 Kbps fax/data modem. Warning! Please make sure that the cable you use the fax/data modem port, connect a phone cable from the modem port to the computer, read the following section. Connectivity options Ports allow you to connect peripheral devices to your computer as you...
For instructions on how to connect different external devices to a telephone jack. This modem port is appropriate for the country in V.92 56 Kbps fax/data modem. Warning! Please make sure that the cable you use the fax/data modem port, connect a phone cable from the modem port to the computer, read the following section. Connectivity options Ports allow you to connect peripheral devices to your computer as you...
User Manual
Page 57
... boot: and use the and keys to set this feature. English 46 Enable disk-to-disk recovery To enable disk-to-disk recovery (hard disk recovery), activate the BIOS utility, then select Main from the categories listed at the top of times the region code has been set. then close the DVD tray. Recovering your hard disk does not reset the number of the screen. Using software Playing DVD movies When the DVD drive module is set to enable this value to Enabled. Password To set a password on your DVD drive is installed...
... boot: and use the and keys to set this feature. English 46 Enable disk-to-disk recovery To enable disk-to-disk recovery (hard disk recovery), activate the BIOS utility, then select Main from the categories listed at the top of times the region code has been set. then close the DVD tray. Recovering your hard disk does not reset the number of the screen. Using software Playing DVD movies When the DVD drive module is set to enable this value to Enabled. Password To set a password on your DVD drive is installed...
User Manual
Page 67
... slots as opening or removing covers may be a detachable type: UL listed/CSA certified, type SPT-2, rated 7 A 125 V minimum, VDE approved or its equivalent. f If the product exhibits a distinct change in damage and will often require extensive work by the operating instructions, since improper adjustment of other controls may explode if not handled properly. Use of another battery may touch dangerous voltage points or short-out parts...
... slots as opening or removing covers may be a detachable type: UL listed/CSA certified, type SPT-2, rated 7 A 125 V minimum, VDE approved or its equivalent. f If the product exhibits a distinct change in damage and will often require extensive work by the operating instructions, since improper adjustment of other controls may explode if not handled properly. Use of another battery may touch dangerous voltage points or short-out parts...
User Manual
Page 74
... mode hotkey 15 hotkeys 14 I indicator lights 9 K keyboard 13 embedded numeric keypad 13 hotkeys 14 lock keys 13 troubleshooting 24 Windows keys 14 L LEDs 9 left view 2 M media access on local trips 38 troubleshooting 50 turning off v connections network 43 D display hotkeys 15 troubleshooting 23 DVD 46 DVD movies playing 46 E error messages 50 Euro 16 F FAQ. English 63 Index A AC adapter caring for v audio 18 adjusting the volume 18 troubleshooting 24 B battery pack caring for vi BIOS utility 45 brightness hotkeys 15 C caps lock 13 on indicator...
... mode hotkey 15 hotkeys 14 I indicator lights 9 K keyboard 13 embedded numeric keypad 13 hotkeys 14 lock keys 13 troubleshooting 24 Windows keys 14 L LEDs 9 left view 2 M media access on local trips 38 troubleshooting 50 turning off v connections network 43 D display hotkeys 15 troubleshooting 23 DVD 46 DVD movies playing 46 E error messages 50 Euro 16 F FAQ. English 63 Index A AC adapter caring for v audio 18 adjusting the volume 18 troubleshooting 24 B battery pack caring for vi BIOS utility 45 brightness hotkeys 15 C caps lock 13 on indicator...


