User Manual
Page 1
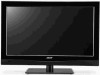
Acer LCD TV Contents AT2618MF AT3218MF AT2628ML AT3228ML AT4028ML User Guide Important safety instructions 3 Disposal instructions 4 Your LCD TV overview 5 Front and side panels 5 Rear panel view 6 Side AV label view 7 Remote control 8 General keys 8 Teletext and Multimedia 9 Basic connections 10 Connecting the power cord 10 Setting up the remote control 10 Enjoying analog and digital TV 10 Connecting an antenna/cable 10 Getting started watching your TV 11 Wall mount preparation / removing the base 12 Connecting external audio/video devices 13 Connecting a DVD, VCR, STB or ...
Acer LCD TV Contents AT2618MF AT3218MF AT2628ML AT3228ML AT4028ML User Guide Important safety instructions 3 Disposal instructions 4 Your LCD TV overview 5 Front and side panels 5 Rear panel view 6 Side AV label view 7 Remote control 8 General keys 8 Teletext and Multimedia 9 Basic connections 10 Connecting the power cord 10 Setting up the remote control 10 Enjoying analog and digital TV 10 Connecting an antenna/cable 10 Getting started watching your TV 11 Wall mount preparation / removing the base 12 Connecting external audio/video devices 13 Connecting a DVD, VCR, STB or ...
User Manual
Page 4
... a safety feature. Watching a big-screen TV too close can cause eyestrain. 23. This TV is designed for this unit. f. Use only the proper type of power supply cord set (provided in performance, indicating a need for grounding. This plug only fits into the product. If you are viewing content to avoid harming your electrician to http://global.acer.com/about/environmental.htm Compliant...
... a safety feature. Watching a big-screen TV too close can cause eyestrain. 23. This TV is designed for this unit. f. Use only the proper type of power supply cord set (provided in performance, indicating a need for grounding. This plug only fits into the product. If you are viewing content to avoid harming your electrician to http://global.acer.com/about/environmental.htm Compliant...
User Manual
Page 8
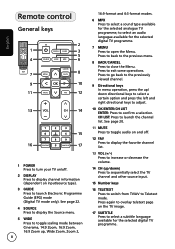
... TV image. 17 SUBTITLE Press to select a subtitle language available for the selected digital TV programme. 7 MENU Press to open the Menu. Press to go back to the previously viewed channel. 9 Directional keys In menu operation, press the up/ down ) Press to sequentially select the TV channel and other source input. 15 Number keys 16 TELETEXT Press to switch from TV/AV to Teletext mode. English Remote control General keys 1 4 7 9 11 DISPLAY GUIDE SOURCE...
... TV image. 17 SUBTITLE Press to select a subtitle language available for the selected digital TV programme. 7 MENU Press to open the Menu. Press to go back to the previously viewed channel. 9 Directional keys In menu operation, press the up/ down ) Press to sequentially select the TV channel and other source input. 15 Number keys 16 TELETEXT Press to switch from TV/AV to Teletext mode. English Remote control General keys 1 4 7 9 11 DISPLAY GUIDE SOURCE...
User Manual
Page 10
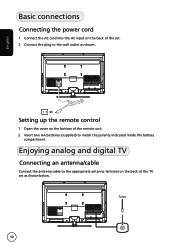
Enjoying analog and digital TV Connecting an antenna/cable Connect the antenna cable to match the polarity indicated inside the battery compartment. Setting up the remote control 1 Open the cover on the bottom of the remote unit. 2 Insert two AA batteries (supplied) to the appropriate antenna terminal on the back of the TV set . 2 Connect the plug to the wall outlet as shown below. Tuner 10 English Basic connections Connecting the power cord 1 Connect the AC cord into the AC input on the back of the set as shown.
Enjoying analog and digital TV Connecting an antenna/cable Connect the antenna cable to match the polarity indicated inside the battery compartment. Setting up the remote control 1 Open the cover on the bottom of the remote unit. 2 Insert two AA batteries (supplied) to the appropriate antenna terminal on the back of the TV set . 2 Connect the plug to the wall outlet as shown below. Tuner 10 English Basic connections Connecting the power cord 1 Connect the AC cord into the AC input on the back of the set as shown.
User Manual
Page 11
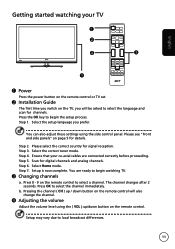
... 1 2 4 3 English 1 1 Power Press the power button on the remote control or TV set. 2 Installation Guide The first time you switch on the remote control. Step 4. Setup is now complete. Step 1. You are connected correctly before proceeding. Please see "Front and side panels" on the remote control to begin the setup process. The channel changes after 2 seconds. Press 0 - 9 on page 5 for signal reception. Press the OK key to select the language and scan for digital channels and analog channels. Scan...
... 1 2 4 3 English 1 1 Power Press the power button on the remote control or TV set. 2 Installation Guide The first time you switch on the remote control. Step 4. Setup is now complete. Step 1. You are connected correctly before proceeding. Please see "Front and side panels" on the remote control to begin the setup process. The channel changes after 2 seconds. Press 0 - 9 on page 5 for signal reception. Press the OK key to select the language and scan for digital channels and analog channels. Scan...
User Manual
Page 13
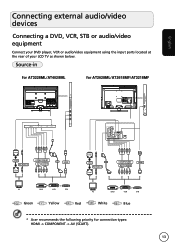
English Connecting external audio/video devices Connecting a DVD, VCR, STB or audio/video equipment Connect your DVD player, VCR or audio/video equipment using the input ports located at the rear of your LCD TV as shown below. Source-in for AT3228ML/AT4028ML for AT2628ML/AT2618MF/AT3218MF SPDIF OUT COMMON INTERFACE HDMI1 HDMI2 HDMI3 USB PR PB Y R COMPONENT L PC AUDIO IN SCART ANT/RF D-SUB D-Sub VGA PC-Audio in D-Sub RBGRW COMPONENT AV AUDIO G BRR W SCART HDMI Y PB PR SPDIF...
English Connecting external audio/video devices Connecting a DVD, VCR, STB or audio/video equipment Connect your DVD player, VCR or audio/video equipment using the input ports located at the rear of your LCD TV as shown below. Source-in for AT3228ML/AT4028ML for AT2628ML/AT2618MF/AT3218MF SPDIF OUT COMMON INTERFACE HDMI1 HDMI2 HDMI3 USB PR PB Y R COMPONENT L PC AUDIO IN SCART ANT/RF D-SUB D-Sub VGA PC-Audio in D-Sub RBGRW COMPONENT AV AUDIO G BRR W SCART HDMI Y PB PR SPDIF...
User Manual
Page 16
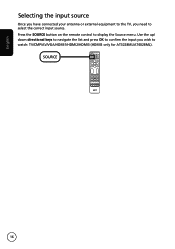
Use the up/ down directional keys to navigate the list and press OK to confirm the input you need to select the correct input source. English Selecting the input source Once you have connected your antenna or external equipment to the TV, you wish to watch: TV/CMP/AV/VGA/HDMI1/HDMI2/HDMI3 (HDMI3 only for AT3228ML/AT4028ML). Press the SOURCE button on the remote control to display the Source menu. SOURCE 16
Use the up/ down directional keys to navigate the list and press OK to confirm the input you need to select the correct input source. English Selecting the input source Once you have connected your antenna or external equipment to the TV, you wish to watch: TV/CMP/AV/VGA/HDMI1/HDMI2/HDMI3 (HDMI3 only for AT3228ML/AT4028ML). Press the SOURCE button on the remote control to display the Source menu. SOURCE 16
User Manual
Page 17
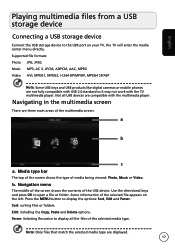
... files that match the selected media type are three main areas of the multimedia screen: a b c a. English Playing multimedia files from a USB storage device Connecting a USB storage device Connect the USB storage device to display all USB devices are not fully compatible with USB 2.0 standard so it may not work with the multimedia player. Sort: sorting files or folders. Navigation menu The middle of the screen shows the contents of the selected media type. Supported file formats...
... files that match the selected media type are three main areas of the multimedia screen: a b c a. English Playing multimedia files from a USB storage device Connecting a USB storage device Connect the USB storage device to display all USB devices are not fully compatible with USB 2.0 standard so it may not work with the multimedia player. Sort: sorting files or folders. Navigation menu The middle of the screen shows the contents of the selected media type. Supported file formats...
User Manual
Page 19
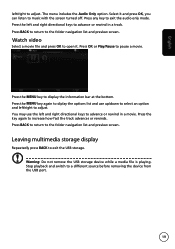
... folder navigation list and preview screen. Leaving multimedia storage display Repeatedly press BACK to exit the audio only mode. Press any key to exit the USB storage. Press the left /right to adjust. Press the key again to music with the screen turned off. English left and right directional keys to advance or rewind in a track. The menu includes the Audio Only option...
... folder navigation list and preview screen. Leaving multimedia storage display Repeatedly press BACK to exit the audio only mode. Press any key to exit the USB storage. Press the left /right to adjust. Press the key again to music with the screen turned off. English left and right directional keys to advance or rewind in a track. The menu includes the Audio Only option...

User Manual
Page 24
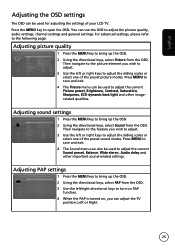
... settings and adjustments are available through the menu options, while 3 left /right directional keys to switch between the eight menus. 2 Press OK to exit. 24 There are : Picture, Sound, PAP, Options, USB, Timer, Lock and Setup. Use the following method to navigate these menus. 1 MENU Press the MENU button on the remote control or the MENU button on page 5 for example, in the example screenshot below. Select your desired menu by using...
... settings and adjustments are available through the menu options, while 3 left /right directional keys to switch between the eight menus. 2 Press OK to exit. 24 There are : Picture, Sound, PAP, Options, USB, Timer, Lock and Setup. Use the following method to navigate these menus. 1 MENU Press the MENU button on the remote control or the MENU button on page 5 for example, in the example screenshot below. Select your desired menu by using...
User Manual
Page 25
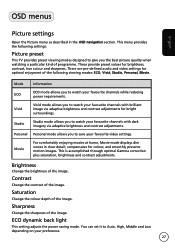
... Sound menu can use the OSD to adjust the picture quality, audio settings, channel settings and general settings. English Adjusting the OSD settings The OSD can be used to adjust the current Picture preset, Brightness, Contrast, Saturation, Sharpness, ECO dynamic back light and other important sound-related settings. related qualities. For advanced settings, please refer to the following page: Adjusting picture quality Picture Picture preset Brightness Contrast Saturation Sharpness ECO dynamic back light Color temperature Screen mode Auto format Advanced video...
... Sound menu can use the OSD to adjust the picture quality, audio settings, channel settings and general settings. English Adjusting the OSD settings The OSD can be used to adjust the current Picture preset, Brightness, Contrast, Saturation, Sharpness, ECO dynamic back light and other important sound-related settings. related qualities. For advanced settings, please refer to the following page: Adjusting picture quality Picture Picture preset Brightness Contrast Saturation Sharpness ECO dynamic back light Color temperature Screen mode Auto format Advanced video...

User Manual
Page 26
... used to adjust the screen Subtitle, Decoding page language, Digital teletext language and other important settings. Then navigate to the feature you wish to adjust. 3 The Setup menu can be available with an analog signal and vice versa. 26 Then navigate to the feature you wish to adjust. 3 The Lock menu can be used to adjust the Channel lock, Parental rating, Input block, Front panel lock and other important settings. English Adjusting options settings 1 Press the Menu...
... used to adjust the screen Subtitle, Decoding page language, Digital teletext language and other important settings. Then navigate to the feature you wish to adjust. 3 The Setup menu can be available with an analog signal and vice versa. 26 Then navigate to the feature you wish to adjust. 3 The Lock menu can be used to adjust the Channel lock, Parental rating, Input block, Front panel lock and other important settings. English Adjusting options settings 1 Press the Menu...
User Manual
Page 27
... audio and video settings for brightness, contrast, hue colour and sharpness. Saturation Change the colour depth of the image. Mode Information ECO ECO mode allows you to watch your favourite channels while reducing power requirements. Contrast Change the contrast of the following settings: Picture preset This TV provides preset viewing modes designed to watch your favourite channels with dark imagery via adaptive brightness and contrast adjustments...
... audio and video settings for brightness, contrast, hue colour and sharpness. Saturation Change the colour depth of the image. Mode Information ECO ECO mode allows you to watch your favourite channels while reducing power requirements. Contrast Change the contrast of the following settings: Picture preset This TV provides preset viewing modes designed to watch your favourite channels with dark imagery via adaptive brightness and contrast adjustments...
User Manual
Page 28
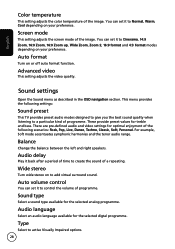
... of time to control the volume of a repeating. English Color temperature This setting adjusts the color temperature of the following settings: Sound preset This TV provides preset audio modes designed to give you the best sound quality when listening to Cinerama, 14:9 Zoom, 16:9 Zoom, 16:9 Zoom up, Wide Zoom, Zoom 2, 16:9 format and 4:3 format modes depending on or off auto format function. Audio delay Play it to create the sound of...
... of time to control the volume of a repeating. English Color temperature This setting adjusts the color temperature of the following settings: Sound preset This TV provides preset audio modes designed to give you the best sound quality when listening to Cinerama, 14:9 Zoom, 16:9 Zoom, 16:9 Zoom up, Wide Zoom, Zoom 2, 16:9 format and 4:3 format modes depending on or off auto format function. Audio delay Play it to create the sound of...

User Manual
Page 29
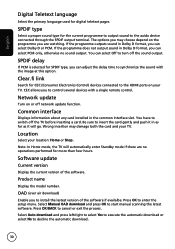
... the focus window by side. Digital subtitle language 2nd Select a language as your secondary subtitle language. Decoding page language Select the type of language used for AV inputs. This menu provides the following settings: Subtitle Use these are available. This menu provides the following settings: PAP Turn the PAP function on or off . English Visually impaired Set overall volume and if Visually Impaired mode uses speakers, headphones or both. Note that one...
... the focus window by side. Digital subtitle language 2nd Select a language as your secondary subtitle language. Decoding page language Select the type of language used for AV inputs. This menu provides the following settings: Subtitle Use these are available. This menu provides the following settings: PAP Turn the PAP function on or off . English Visually impaired Set overall volume and if Visually Impaired mode uses speakers, headphones or both. Note that one...
User Manual
Page 30
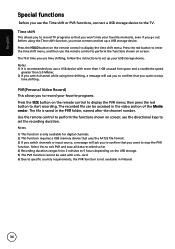
... manual scanning the latest software. Network update Turn on or off the sound output. OAD (over air download) Enable you can select Off to the auido device connected through the SPDIF output terminal. Select Auto download and press left/right to select Yes to execute the automatic download or select No to install the lastest version of the software. SPDIF delay If PCM is selected for digital teletext pages. Product name Display the model number...
... manual scanning the latest software. Network update Turn on or off the sound output. OAD (over air download) Enable you can select Off to the auido device connected through the SPDIF output terminal. Select Auto download and press left/right to select Yes to execute the automatic download or select No to install the lastest version of the software. SPDIF delay If PCM is selected for digital teletext pages. Product name Display the model number...

User Manual
Page 32
... list of your TV, all available channels are using the parental controls, then we recommend you change the default password to a 4-digit code of input sources (AV, HDMI, etc.). If you completed the setup wizard the first time you live in the OSD navigation section. During the scanning process, press MENU or BACK to abort halfway with all parental settings to scan for the correct signals. Country Select the country you turned...
... list of your TV, all available channels are using the parental controls, then we recommend you change the default password to a 4-digit code of input sources (AV, HDMI, etc.). If you completed the setup wizard the first time you live in the OSD navigation section. During the scanning process, press MENU or BACK to abort halfway with all parental settings to scan for the correct signals. Country Select the country you turned...

User Manual
Page 33
... skip channels, change a channels' number and name or sort channels. You have to enter a correct password to decode. Organiser You can manually clean all settings. Time shift Turn the Time shift feature on or off. Diagnostics Display signal information about the current digital channel. Clean channel list You can use these settings to factory default settings. After resetting the initial setup menu will appear. 33 English Analog manual scan You can manually add a channel by adjusting the settings here. Reset shop Allow you set here. Input settings Select a type...
... skip channels, change a channels' number and name or sort channels. You have to enter a correct password to decode. Organiser You can manually clean all settings. Time shift Turn the Time shift feature on or off. Diagnostics Display signal information about the current digital channel. Clean channel list You can use these settings to factory default settings. After resetting the initial setup menu will appear. 33 English Analog manual scan You can manually add a channel by adjusting the settings here. Reset shop Allow you set here. Input settings Select a type...
User Manual
Page 34
... the channel number. Select Yes to exit PVR and save all data recorded so far. 4) Recording duration ranges from 2 minutes to display the PVR menu; Time shift This allows you to record TV programs so that you want to display the time shift menu. The file is only available for digital channels. 2) This function requires a USB memory device that uses the FAT32 file format. 3) If you switch channels or input...
... the channel number. Select Yes to exit PVR and save all data recorded so far. 4) Recording duration ranges from 2 minutes to display the PVR menu; Time shift This allows you to record TV programs so that you want to display the time shift menu. The file is only available for digital channels. 2) This function requires a USB memory device that uses the FAT32 file format. 3) If you switch channels or input...
User Manual
Page 35
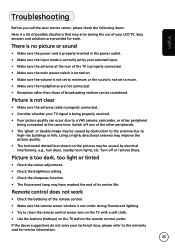
... the input mode is correctly set by your TV signal is being connected at the rear of the TV is properly connected. • Make sure the main power switch is turned on the TV before the remote control works. Picture is not clear • Make sure the antenna cable is properly connected. • Consider whether your selected input. • Make sure the antenna at the same time. Switch off or remove these. Picture is...
... the input mode is correctly set by your TV signal is being connected at the rear of the TV is properly connected. • Make sure the main power switch is turned on the TV before the remote control works. Picture is not clear • Make sure the antenna cable is properly connected. • Consider whether your selected input. • Make sure the antenna at the same time. Switch off or remove these. Picture is...


