
AT2001 Service Guide
Page 7
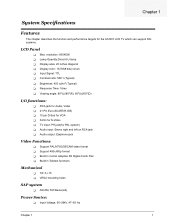
... Chapter 1 1 resolution: 800X600 T Lamp Quantity:Direct 6 U-lamp T Display area: 20 inches diagonal T Display color: 16.7M(8 bits) colors T Input Signal: TTL T Contrast ratio: 500:1 (Typical) T Brightness: 450 cd/m2 (Typical) T Response TIme: 16ms T Viewing angle: 80o(L)/80o(R), 60o(U)/60o(D) I/O functions: T RCA jack for Audio, Video T 21 Pin Euro-SCART(R.G.B) T 15 pin D-Sub for VGA T S-Din for S-Video T TV input: PH jack(for the AT2001 LCD TV which can support PAL systems. LCD Panel T Max.
... Chapter 1 1 resolution: 800X600 T Lamp Quantity:Direct 6 U-lamp T Display area: 20 inches diagonal T Display color: 16.7M(8 bits) colors T Input Signal: TTL T Contrast ratio: 500:1 (Typical) T Brightness: 450 cd/m2 (Typical) T Response TIme: 16ms T Viewing angle: 80o(L)/80o(R), 60o(U)/60o(D) I/O functions: T RCA jack for Audio, Video T 21 Pin Euro-SCART(R.G.B) T 15 pin D-Sub for VGA T S-Din for S-Video T TV input: PH jack(for the AT2001 LCD TV which can support PAL systems. LCD Panel T Max.
AT2001 Service Guide
Page 12
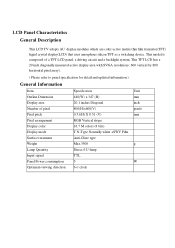
... Item Outline Dimension Display area Number of a TFT LCD panel, a driving circuit and a backlight system. LCD Panel Characteristics General Description This LCD TV adopts AU display modules which are color active matrix thin film transistor(TFT) liquid crystal display(LCD) that uses amorphous silicon TFT as a switching device. This model is composed of pixel Pixel pitch Pixel arrangement Display color Display mode Surface treatment Weight Lamp Quantity Input signal Panel Power consumption Optimum viewing direction Specification 448(W) x 347...
... Item Outline Dimension Display area Number of a TFT LCD panel, a driving circuit and a backlight system. LCD Panel Characteristics General Description This LCD TV adopts AU display modules which are color active matrix thin film transistor(TFT) liquid crystal display(LCD) that uses amorphous silicon TFT as a switching device. This model is composed of pixel Pixel pitch Pixel arrangement Display color Display mode Surface treatment Weight Lamp Quantity Input signal Panel Power consumption Optimum viewing direction Specification 448(W) x 347...

AT2001 Service Guide
Page 17
.... Video input CVBS Input Signal Type : Analog Polarity : Positive Level : 1Vp-p ( with Sync.) Impedance : 75 ± 5% Interface : RCA jack, Yellow color S Video Input Signal Type : Analog Polarity : Positive Level : Y : 1Vp-p ( with Sync.) C : 0.286Vp-p Impedance : 75 ± 5% Interface : DIN jack SCART ( R.G.B ) Input Signal Type : Analog Polarity : Positive Impedance : 75 ± 5% Interface : 21 Pin Euro-SCART Audio input, output and Speaker Audio input Level : 500mVrms Type : Stereo R/L Channels Impedance : More than 22k Jack : RCA jack , Right channel : Red...
.... Video input CVBS Input Signal Type : Analog Polarity : Positive Level : 1Vp-p ( with Sync.) Impedance : 75 ± 5% Interface : RCA jack, Yellow color S Video Input Signal Type : Analog Polarity : Positive Level : Y : 1Vp-p ( with Sync.) C : 0.286Vp-p Impedance : 75 ± 5% Interface : DIN jack SCART ( R.G.B ) Input Signal Type : Analog Polarity : Positive Impedance : 75 ± 5% Interface : 21 Pin Euro-SCART Audio input, output and Speaker Audio input Level : 500mVrms Type : Stereo R/L Channels Impedance : More than 22k Jack : RCA jack , Right channel : Red...

AT2001 Service Guide
Page 18
... : Type : Impedance : Jack : 500mVrms Stereo R/L Channels More than 22k 3.5mm Stereo jack , Black color Headphone output: Level: Type: Jack: 0.5W rms/per Channel(typ.) for 16 ohm earphone Stereo R/L Channels 3.5mm Stereo Built-in Speaker Max. Max. Audio output ( at 10% THD max. ) at 1.0Vp-p / 1kHZ input : 2W + 2W Sound Distortion at Max. Jack: 3.5 m/m stereo jack. Hum at 250mW/1kHZ : 1% THD max. Audio Line out Output level: 400Vrms. Type: stereo R / L channels. Volume : 500uW Max. Speaker...
... : Type : Impedance : Jack : 500mVrms Stereo R/L Channels More than 22k 3.5mm Stereo jack , Black color Headphone output: Level: Type: Jack: 0.5W rms/per Channel(typ.) for 16 ohm earphone Stereo R/L Channels 3.5mm Stereo Built-in Speaker Max. Max. Audio output ( at 10% THD max. ) at 1.0Vp-p / 1kHZ input : 2W + 2W Sound Distortion at Max. Jack: 3.5 m/m stereo jack. Hum at 250mW/1kHZ : 1% THD max. Audio Line out Output level: 400Vrms. Type: stereo R / L channels. Volume : 500uW Max. Speaker...
AT2001 Service Guide
Page 22
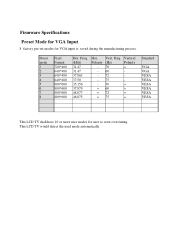
... used mode automatically. Preset mode 1 2 3 4 5 6 7 8 Pixel Format 720*400 640*480 640*480 640*480 800*600 800*600 800*600 800*600 Hor. Polarity (Hz) - 70 - 60 - 72 - 75 - 56 + 60 + 72 + 75 Vertical Polarity + + + + + Standard VGA VGA VESA VESA VESA VESA VESA VESA This LCD TV shall have 10 or more user modes for VGA input is saved during the manufacturing process. Firmware Specifications Preset Mode for VGA Input 8 factory pre-set modes...
... used mode automatically. Preset mode 1 2 3 4 5 6 7 8 Pixel Format 720*400 640*480 640*480 640*480 800*600 800*600 800*600 800*600 Hor. Polarity (Hz) - 70 - 60 - 72 - 75 - 56 + 60 + 72 + 75 Vertical Polarity + + + + + Standard VGA VGA VESA VESA VESA VESA VESA VESA This LCD TV shall have 10 or more user modes for VGA input is saved during the manufacturing process. Firmware Specifications Preset Mode for VGA Input 8 factory pre-set modes...
AT2001 Service Guide
Page 23
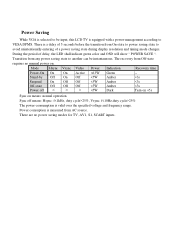
... state to another can be instantaneous. The recovery from any power saving state to avoid unintentionally entering of delay, the LED shall indicate green color and OSD will show " POWER SAVE ". Transition from Off-state requires no manual power on. During the period of a power saving state during display resolution and timing mode changes. Mode Hsync Vsync Video Power Indication Recovery time Power-On On On Active
... state to another can be instantaneous. The recovery from any power saving state to avoid unintentionally entering of delay, the LED shall indicate green color and OSD will show " POWER SAVE ". Transition from Off-state requires no manual power on. During the period of a power saving state during display resolution and timing mode changes. Mode Hsync Vsync Video Power Indication Recovery time Power-On On On Active

AT2001 Service Guide
Page 24
... the manufacture name code QCI, product code, date of protection provided that the power-on Default State is that disabling writing. EDID memory must contain a unique identifying numbers among units of the same model. Password protection, use of an unpublished enable register, or use of direct electrical connection is detected by the display, the display shall switch to be transmitted using Display Data Channel. In addition, the...
... the manufacture name code QCI, product code, date of protection provided that the power-on Default State is that disabling writing. EDID memory must contain a unique identifying numbers among units of the same model. Password protection, use of an unpublished enable register, or use of direct electrical connection is detected by the display, the display shall switch to be transmitted using Display Data Channel. In addition, the...
AT2001 Service Guide
Page 27
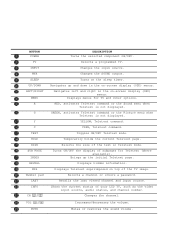
... sound volume. Turns on -screen display (OSD) menus. Displays menus for Teletext (where available). Changes the channel. Navigates left and right in Teletext mode. Shows the current status of subpages for TV and other options. BUTTON POWER TV INPUT MPX SLEEP UP/DOWN LEFT/RIGHT MENU R G Y C TEXT HOLD SIZE SUB PAGE INDEX REVEAL MIX Number pad LAST INFO CH VOL MUTE DESCRIPTION Turns the selected component ON/OFF. Selects a programmed TV. Changes...
... sound volume. Turns on -screen display (OSD) menus. Displays menus for Teletext (where available). Changes the channel. Navigates left and right in Teletext mode. Shows the current status of subpages for TV and other options. BUTTON POWER TV INPUT MPX SLEEP UP/DOWN LEFT/RIGHT MENU R G Y C TEXT HOLD SIZE SUB PAGE INDEX REVEAL MIX Number pad LAST INFO CH VOL MUTE DESCRIPTION Turns the selected component ON/OFF. Selects a programmed TV. Changes...

AT2001 Service Guide
Page 29
... mono sound, stereo sound and Secondary Audio Programs (SAP). The SAP feature allows a TV station to broadcast other than the main audio for the program. In this case, sound is called Multi-channel Television Sound (MTS). Sound Systems The System has a feature that allows reception of sound other information, which could be audio ( mono ) in either in the input mode does not change the type of sound. MAIN sound: The normal program...
... mono sound, stereo sound and Secondary Audio Programs (SAP). The SAP feature allows a TV station to broadcast other than the main audio for the program. In this case, sound is called Multi-channel Television Sound (MTS). Sound Systems The System has a feature that allows reception of sound other information, which could be audio ( mono ) in either in the input mode does not change the type of sound. MAIN sound: The normal program...

AT2001 Service Guide
Page 32
... in any visible image anomalies such as image movement, changes in light output, nor changes in image stability or quality. Inverter Brightness : The brightness should exceed 300 Cd/m2 while set both of line voltage shall be : AC 90volts to 264volts, 47HZ to 63HZ Power comsuption shall be 450 Cd/m2 ). Power Supply Electrical Specifications The power supply for this product is selected. ( Typical value...
... in any visible image anomalies such as image movement, changes in light output, nor changes in image stability or quality. Inverter Brightness : The brightness should exceed 300 Cd/m2 while set both of line voltage shall be : AC 90volts to 264volts, 47HZ to 63HZ Power comsuption shall be 450 Cd/m2 ). Power Supply Electrical Specifications The power supply for this product is selected. ( Typical value...

AT2001 Service Guide
Page 46
Open the cable clamp on the bracket. 2. Disassembly the Main Unit Removing the Rear cover 1. Disconnect the button board cable and IV board cable from the mainboard.(from the Mainboard. 3. Disconnect the speaker cable from left to right) 4. Disconnecting the Cables 1. Remove the ten screws securing the rear cover and remove it. Disconnect the cables from the IV board. 40 Chapter 3
Open the cable clamp on the bracket. 2. Disassembly the Main Unit Removing the Rear cover 1. Disconnect the button board cable and IV board cable from the mainboard.(from the Mainboard. 3. Disconnect the speaker cable from left to right) 4. Disconnecting the Cables 1. Remove the ten screws securing the rear cover and remove it. Disconnect the cables from the IV board. 40 Chapter 3

AT2001 Service Guide
Page 47
Remove the four screws securing the left and right speakers. 2. Disconnect the button cable from the front bezel. 2. Removing the Wall Mount Assembly 1. Remove the eight screws securing the wall mount bracket. 2. Remove the three screws securing the button board and remove the botton board from the button board. Remove the speakers from the panel and remove the wall mount bracket. Chapter 3 41 Lift the wall mount bracket and disconnect the FPC cable from the front bezel. Removing the Speaker 1. Removing the button board 1.
Remove the four screws securing the left and right speakers. 2. Disconnect the button cable from the front bezel. 2. Removing the Wall Mount Assembly 1. Remove the eight screws securing the wall mount bracket. 2. Remove the three screws securing the button board and remove the botton board from the button board. Remove the speakers from the panel and remove the wall mount bracket. Chapter 3 41 Lift the wall mount bracket and disconnect the FPC cable from the front bezel. Removing the Speaker 1. Removing the button board 1.
AT2001 User's Guide
Page 3
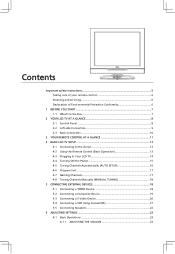
... BASIC LCD TV SETUP 13 4-1 Connecting to the Aerial 13 4-2 Using the Remote Control (Basic Operation 13 4-3 Plugging In Your LCD TV 14 4-4 Turning ON the Power 15 4-5 Tuning Channels Automatically (AUTO SETUP 16 4-6 Program Sort 17 4-7 Naming Channels 17 4-8 Tuning Channels Manually (MANUAL TUNING 18 5 CONNECTING EXTERNAL DEVICES 18 5-1 Connecting a YPBPR Device 18 5-2 Connecting a Composite Device 19 5-3 Connecting a S-Video Device 20 5-4 Connecting a VCR Using Coaxial (RF 21 5-5 Connecting Speakers 22 6 ADJUSTING SETTINGS 23 6-1 Basic Operations 23 6-1-1 ADJUSTING THE VOLUME...
... BASIC LCD TV SETUP 13 4-1 Connecting to the Aerial 13 4-2 Using the Remote Control (Basic Operation 13 4-3 Plugging In Your LCD TV 14 4-4 Turning ON the Power 15 4-5 Tuning Channels Automatically (AUTO SETUP 16 4-6 Program Sort 17 4-7 Naming Channels 17 4-8 Tuning Channels Manually (MANUAL TUNING 18 5 CONNECTING EXTERNAL DEVICES 18 5-1 Connecting a YPBPR Device 18 5-2 Connecting a Composite Device 19 5-3 Connecting a S-Video Device 20 5-4 Connecting a VCR Using Coaxial (RF 21 5-5 Connecting Speakers 22 6 ADJUSTING SETTINGS 23 6-1 Basic Operations 23 6-1-1 ADJUSTING THE VOLUME...

AT2001 User's Guide
Page 4
6-1-2 SELECTING PROGRAMS 25 6-2 Using the On-Screen Display (OSD 26 6-2-1 MAKING ADJUSTMENTS 26 6-3 OSD Menus and Options 27 6-3-1 With Source Input Set to TV 30 7 ADVANCED SETTINGS 31 7-1 Setting the Sleep Timer 31 7-2 Displaying Teletext 32 7-2-1 TO TURN ON/OFF TELETEXT MODE 32 TROUBLESHOOTING AND SUPPORT 32 PRODUCT SPECIFICATIONS 34
6-1-2 SELECTING PROGRAMS 25 6-2 Using the On-Screen Display (OSD 26 6-2-1 MAKING ADJUSTMENTS 26 6-3 OSD Menus and Options 27 6-3-1 With Source Input Set to TV 30 7 ADVANCED SETTINGS 31 7-1 Setting the Sleep Timer 31 7-2 Displaying Teletext 32 7-2-1 TO TURN ON/OFF TELETEXT MODE 32 TROUBLESHOOTING AND SUPPORT 32 PRODUCT SPECIFICATIONS 34

AT2001 User's Guide
Page 12
... the sound volume. Changes the audio output. Navigates up and down in the on the sleep timer. Select Multi Sound Turns on -screen display (OSD) menus. Shows last channel and video source Changes the channel. Navigates left and right in the on close caption function 12 Englis h BUTTON POWER TV INPUT MPX SLEEP UP/DOWN LEFT/RIGHT MENU RECALL CH VOL MUTE MTS CC DESCRIPTION Turns the selected component ON/OFF. Selects a programmed TV. Increases/decreases the volume. Turns on -screen display...
... the sound volume. Changes the audio output. Navigates up and down in the on the sleep timer. Select Multi Sound Turns on -screen display (OSD) menus. Shows last channel and video source Changes the channel. Navigates left and right in the on close caption function 12 Englis h BUTTON POWER TV INPUT MPX SLEEP UP/DOWN LEFT/RIGHT MENU RECALL CH VOL MUTE MTS CC DESCRIPTION Turns the selected component ON/OFF. Selects a programmed TV. Increases/decreases the volume. Turns on -screen display...
AT2001 User's Guide
Page 26
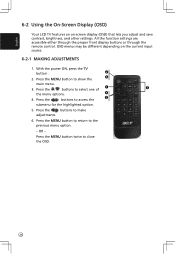
... h 6-2 Using the On-Screen Display (OSD) Your LCD TV features an on the current input source. 6-2-1 MAKING ADJUSTMENTS 1. Press the MENU button to close the OSD. 26 OSD menus may be different depending on -screen display (OSD) that lets you adjust and save contrast, brightness, and other settings. With the power ON, press the TV button . 2. Press the MENU button twice to show the main menu. 3. Press the / buttons...
... h 6-2 Using the On-Screen Display (OSD) Your LCD TV features an on the current input source. 6-2-1 MAKING ADJUSTMENTS 1. Press the MENU button to close the OSD. 26 OSD menus may be different depending on -screen display (OSD) that lets you adjust and save contrast, brightness, and other settings. With the power ON, press the TV button . 2. Press the MENU button twice to show the main menu. 3. Press the / buttons...

AT2001 User's Guide
Page 27
6-3 OSD Menus and Options You can use these OSD menus and options to adjust various settings for your LCD TV. 6-3-1 With Source Input Set to TV Main Menu Input Select Menu Use this menu to switch between available signal input sources. NOTE: AV shares the either S-video or CVBS (RCA phono). 27
6-3 OSD Menus and Options You can use these OSD menus and options to adjust various settings for your LCD TV. 6-3-1 With Source Input Set to TV Main Menu Input Select Menu Use this menu to switch between available signal input sources. NOTE: AV shares the either S-video or CVBS (RCA phono). 27

AT2001 User's Guide
Page 28
... level of the image. Contrast - Treble - Surround - Adjusts the contrast ratio. Sharpness - Adjusts the color temperature. Restore - Restore - Select ON to use factory default sound settings. Balance - Adjusts the sharpness of sounds between the left and right speakers. Color Temp - Adjusts the color saturation, making colors more or less intense. Select ON to use factory default image settings. Adjusts the luminance of the image. Adjusts the bass value to enhance high frequency sounds. Englis h Picture Menu Sound Menu Brightness - Turns ON/OFF surround...
... level of the image. Contrast - Treble - Surround - Adjusts the contrast ratio. Sharpness - Adjusts the color temperature. Restore - Restore - Select ON to use factory default sound settings. Balance - Adjusts the sharpness of sounds between the left and right speakers. Color Temp - Adjusts the color saturation, making colors more or less intense. Select ON to use factory default image settings. Adjusts the luminance of the image. Adjusts the bass value to enhance high frequency sounds. Englis h Picture Menu Sound Menu Brightness - Turns ON/OFF surround...
AT2001 User's Guide
Page 32
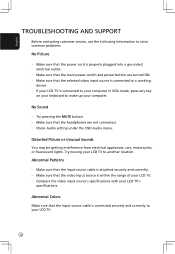
... and correctly. Try moving your LCD TV's specifications. Abnormal Patterns Make sure that the input source cable is connected securely and correctly to your computer. Make sure that the selected video input source is properly plugged into a grounded electrical outlet. Englis h TROUBLESHOOTING AND SUPPORT Before contacting customer service, use the following information to solve common problems. No Picture Make sure that the power cord is connected to a working device.
... and correctly. Try moving your LCD TV's specifications. Abnormal Patterns Make sure that the input source cable is connected securely and correctly to your computer. Make sure that the selected video input source is properly plugged into a grounded electrical outlet. Englis h TROUBLESHOOTING AND SUPPORT Before contacting customer service, use the following information to solve common problems. No Picture Make sure that the power cord is connected to a working device.

AT2001 User's Guide
Page 33
... under strong lighting. Dim Screen Video display devices experience degradation of brightness over the life of your LCD TV may not display correctly. Remote Control Not Working Make sure that your audio input source cables are using an extremely high level of product and do not constitute a defective product. Technical Support If this type of precision technology. Make sure the remote control sensor window is manufactured using VGA mode, make...
... under strong lighting. Dim Screen Video display devices experience degradation of brightness over the life of your LCD TV may not display correctly. Remote Control Not Working Make sure that your audio input source cables are using an extremely high level of product and do not constitute a defective product. Technical Support If this type of precision technology. Make sure the remote control sensor window is manufactured using VGA mode, make...


