
AL532 Monitor Service Guide
Page 3
...into the extension cord to the waplugged into outlet does not exceed 15 ampere. 12. If you are not a qualified monitor engineer.Contact the local dealer or the nearest Acer branch office if you need for cleaning. 5. Unplug this product,make sure that you are provided for this product near water... under the following conditions. f. Do not use a damp cloth for service. When the power cord or plug is inside the monitor so please do not expose monitor to any rain or any form of water.High voltage is damaged or frayed. Follow all servicing to ensure reliable operation of the...
...into the extension cord to the waplugged into outlet does not exceed 15 ampere. 12. If you are not a qualified monitor engineer.Contact the local dealer or the nearest Acer branch office if you need for cleaning. 5. Unplug this product,make sure that you are provided for this product near water... under the following conditions. f. Do not use a damp cloth for service. When the power cord or plug is inside the monitor so please do not expose monitor to any rain or any form of water.High voltage is damaged or frayed. Follow all servicing to ensure reliable operation of the...
AL532 Monitor Service Guide
Page 4
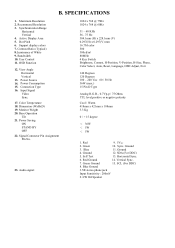
... < 5W 1. Sync. B. Color Temperature 18. Contrast Ratio (Typical) 8.Luminance of White 9. View Angle Horizontal Vertical 13. Input Signal Video Sync. 17. Dimension (WxHxD) 19. Monitor Weight 20. Signal Connector Pin Assignment Pin No. 23. Ground 4. Red Ground 14. SCL (For DDC) 8.
... < 5W 1. Sync. B. Color Temperature 18. Contrast Ratio (Typical) 8.Luminance of White 9. View Angle Horizontal Vertical 13. Input Signal Video Sync. 17. Dimension (WxHxD) 19. Monitor Weight 20. Signal Connector Pin Assignment Pin No. 23. Ground 4. Red Ground 14. SCL (For DDC) 8.

AL532 Monitor Service Guide
Page 12
...indicator light up orange. 4. Hold › key,then turn the power switch of the eight language you need. You can choose one of the monitor OFF. 2. Auto mode Check D ﹟PC or Pattern generator ﹫Crosshatch Pattern (1024x768/60Hz) 1. Move the OSD to the value shown... at below. Make sure the voltage of the monitor ON. 3. Unplug the signal cable into factory adjustment mode. Turn the power switch of the display image needs further adjustment White Balance Adjust E...
...indicator light up orange. 4. Hold › key,then turn the power switch of the eight language you need. You can choose one of the monitor OFF. 2. Auto mode Check D ﹟PC or Pattern generator ﹫Crosshatch Pattern (1024x768/60Hz) 1. Move the OSD to the value shown... at below. Make sure the voltage of the monitor ON. 3. Unplug the signal cable into factory adjustment mode. Turn the power switch of the display image needs further adjustment White Balance Adjust E...
AL532 User Guide
Page 1
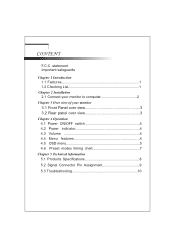
statement Important safeguards Chapter 1 Introduction 1.1 Features 1 1.2 Checking List 1 Chapter 2 Installation 2.1 Connect your monitor to computer 2 Chapter 3 Over view of your monitor 3.1 Front Panel over view 3 3.2 Rear panel over view 3 Chapter 4 Operation 4.1 Power ON/OFF switch 4 4.2 Power indicator 4 4.3 Volume 4 4.4 Menu features 4 4.5 OSD menu 5 4.6 Preset modes timing chart 7 Chapter 5 Technical information 5.1 Products Specifications 8 5.2 Signal Connector Pin Assignment 9 5.3 Troubleshooting 10 CONTENT F.C.C.
statement Important safeguards Chapter 1 Introduction 1.1 Features 1 1.2 Checking List 1 Chapter 2 Installation 2.1 Connect your monitor to computer 2 Chapter 3 Over view of your monitor 3.1 Front Panel over view 3 3.2 Rear panel over view 3 Chapter 4 Operation 4.1 Power ON/OFF switch 4 4.2 Power indicator 4 4.3 Volume 4 4.4 Menu features 4 4.5 OSD menu 5 4.6 Preset modes timing chart 7 Chapter 5 Technical information 5.1 Products Specifications 8 5.2 Signal Connector Pin Assignment 9 5.3 Troubleshooting 10 CONTENT F.C.C.
AL532 User Guide
Page 3
...be blocked or covered. Never spill liquid of these openings must not be placed in built-in a fire or electric shock. When the monitor exhibits a distinct change in a wet basement, or near water. When the power cord or plug is provided. 6.Do not allow anything... to the appliance. f. For example near a bathtub, washbowl, kitchen sink, or laundry tub, in performance this monitor from the wall outlet and refer servicing to rain or water. e. IMPORTANT SAFEGUARDS Warnings:: 1. Read all servicing to qualified service personnel. 9.Unplug this...
...be blocked or covered. Never spill liquid of these openings must not be placed in built-in a fire or electric shock. When the monitor exhibits a distinct change in a wet basement, or near water. When the power cord or plug is provided. 6.Do not allow anything... to the appliance. f. For example near a bathtub, washbowl, kitchen sink, or laundry tub, in performance this monitor from the wall outlet and refer servicing to rain or water. e. IMPORTANT SAFEGUARDS Warnings:: 1. Read all servicing to qualified service personnel. 9.Unplug this...
AL532 User Guide
Page 4
... frequencies of these items are included with your dealer for technical support and customer service. RUniversal power supply. Note: 1 RMicroprocessor based with your LCD monitor: RYour monitor RAC Adapter RAC Power cord RSignal cable Raudio cable If any of 56Hz to 75Hz. RCompatible with standard IBM VGA ,extended VGA,super VGA, IBM...
... frequencies of these items are included with your dealer for technical support and customer service. RUniversal power supply. Note: 1 RMicroprocessor based with your LCD monitor: RYour monitor RAC Adapter RAC Power cord RSignal cable Raudio cable If any of 56Hz to 75Hz. RCompatible with standard IBM VGA ,extended VGA,super VGA, IBM...

AL532 User Guide
Page 5
... video port on the back of your computer. 3. You must use the supplied adapter. 4. If the monitor does not display an image ,check all the connections. Connecting the monitor to computer 1. Plug the computer and monitor power cables into a nearby outlet. 5. Connect the signal cable to the DC adapter and connect the adapter...
... video port on the back of your computer. 3. You must use the supplied adapter. 4. If the monitor does not display an image ,check all the connections. Connecting the monitor to computer 1. Plug the computer and monitor power cables into a nearby outlet. 5. Connect the signal cable to the DC adapter and connect the adapter...
AL532 User Guide
Page 6
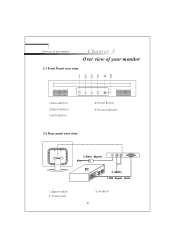
Signal cable 2. Audio in 3 Power jack 3. Over view of your monitor Chapter 3 Over view of your monitor 3.1 Front Panel over view 1 223 45 MENU 1.Menu Button 2.Select Button 3.Auto Button AUTO 4.Power Button 5.Power indicator 3.2 Rear panel over view 1.
Signal cable 2. Audio in 3 Power jack 3. Over view of your monitor Chapter 3 Over view of your monitor 3.1 Front Panel over view 1 223 45 MENU 1.Menu Button 2.Select Button 3.Auto Button AUTO 4.Power Button 5.Power indicator 3.2 Rear panel over view 1.

AL532 User Guide
Page 7
... Select Button < or Select Button > to scroll the highlight through 6 to go back main Menu. This indicator lights up green when the monitor op erates normally. The following features can select EXIT icon and press Menu Button again to make further adjustments. 4 Press and release Menu Button...will appear nearby main menu. Repeat step 2 through the main function list. Once are finished. When the desired function is used to turn the monitor on screen menu system. Press Menu Button and release again, the highlight of selection and adjust an item using your adjustment , press < or...
... Select Button < or Select Button > to scroll the highlight through 6 to go back main Menu. This indicator lights up green when the monitor op erates normally. The following features can select EXIT icon and press Menu Button again to make further adjustments. 4 Press and release Menu Button...will appear nearby main menu. Repeat step 2 through the main function list. Once are finished. When the desired function is used to turn the monitor on screen menu system. Press Menu Button and release again, the highlight of selection and adjust an item using your adjustment , press < or...
AL532 User Guide
Page 13
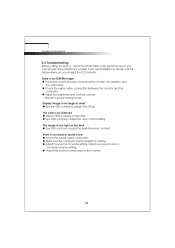
... sound cable connection u Make sure the computer sound program is securely connected the monitor, the adaptor, and the wall outlet. u Check the signal cable connection between the monitor and the computer. Monitor in this section to adjust the color control setting. Display image is too light...or computer volume setting. The colors are distored u Signal cable properly connected. u Use OSD controls to see if you purchased the LCD monitor. The image is too large or small u Use the OSD controls to adjust the brightness and contrast. Technical Information 5.3 Troubleshooting Before ...
... sound cable connection u Make sure the computer sound program is securely connected the monitor, the adaptor, and the wall outlet. u Check the signal cable connection between the monitor and the computer. Monitor in this section to adjust the color control setting. Display image is too light...or computer volume setting. The colors are distored u Signal cable properly connected. u Use OSD controls to see if you purchased the LCD monitor. The image is too large or small u Use the OSD controls to adjust the brightness and contrast. Technical Information 5.3 Troubleshooting Before ...


