
User Guide
Page 1
TABLE OF CONTENTS FOR YOUR SAFETY 1 SAFETY PRECAUTIONS 2 SPECIAL NOTES ON LCD MONITORS 3 BEFORE YOU OPERATE THE MONITOR 3 FEATURES 3 PACKING LIST 3 CONTROLS AND CONNECTORS 5 ADJUSTING THE VIEWING ANGLE 6 OPERATING INSTRUCTIONS 7 GENERAL INSTRUCTIONS 7 HOW TO ADJUST A SETTING 9 ADJUSTING THE PICTURE 10-11 PLUG AND ...-17 FACTORY PRESET TIMING TABLE 18 CONNECTOR PIN ASSIGNMENT 19 For more information and help in recycling, please visit the following websites: Worldwide: http://global.acer.com/about/sustainability.htm
TABLE OF CONTENTS FOR YOUR SAFETY 1 SAFETY PRECAUTIONS 2 SPECIAL NOTES ON LCD MONITORS 3 BEFORE YOU OPERATE THE MONITOR 3 FEATURES 3 PACKING LIST 3 CONTROLS AND CONNECTORS 5 ADJUSTING THE VIEWING ANGLE 6 OPERATING INSTRUCTIONS 7 GENERAL INSTRUCTIONS 7 HOW TO ADJUST A SETTING 9 ADJUSTING THE PICTURE 10-11 PLUG AND ...-17 FACTORY PRESET TIMING TABLE 18 CONNECTOR PIN ASSIGNMENT 19 For more information and help in recycling, please visit the following websites: Worldwide: http://global.acer.com/about/sustainability.htm

User Guide
Page 2
...manufacturer is no guarantee that this manual thoroughly. It is connected. 4. WARNING: To prevent fire or shock hazard, do not expose the monitor to provide reasonable protection against harmful interference in a particular installation. FCC Class B Radio Frequency Interference Statement WARNING: (FOR FCC CERTIFIED MODELS... of the user to radio communications. Do not open the cabinet. If this equipment. These limits are present inside the monitor. Shielded interface cables and AC power cord, if any, must be retained for any radio or TV interference caused by ...
...manufacturer is no guarantee that this manual thoroughly. It is connected. 4. WARNING: To prevent fire or shock hazard, do not expose the monitor to provide reasonable protection against harmful interference in a particular installation. FCC Class B Radio Frequency Interference Statement WARNING: (FOR FCC CERTIFIED MODELS... of the user to radio communications. Do not open the cabinet. If this equipment. These limits are present inside the monitor. Shielded interface cables and AC power cord, if any, must be retained for any radio or TV interference caused by ...

User Guide
Page 3
... z Never push any object into a grounded power outlet as a safety feature. Never spill liquids on the monitor cabinet. Please refer all servicing to service the monitor by yourself; z The monitor is provided. z Do not overload power strips and extension cords. z The wall socket shall be installed near... fire or electric shock. Use only a cart or stand recommended by the manufacturer and follow the kit instructions. If you mount the monitor on the label. Do not defeat the safety purpose of power supplied to protect it will not be easily accessible. 2 z Slots ...
... z Never push any object into a grounded power outlet as a safety feature. Never spill liquids on the monitor cabinet. Please refer all servicing to service the monitor by yourself; z The monitor is provided. z Do not overload power strips and extension cords. z The wall socket shall be installed near... fire or electric shock. Use only a cart or stand recommended by the manufacturer and follow the kit instructions. If you mount the monitor on the label. Do not defeat the safety purpose of power supplied to protect it will not be easily accessible. 2 z Slots ...

User Guide
Page 4
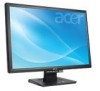
... the screen depending on the desktop pattern you use . In this case, the screen is displayed for hours. BEFORE YOU OPERATE THE MONITOR FEATURES • 55.87cm(22") TFT Color LCD Monitor • Crisp, Clear Display for hours. Owner's Manual 3. DVI Cable (Only dual-input model) 6. It may include blemishes of 0.01% or less...
... the screen depending on the desktop pattern you use . In this case, the screen is displayed for hours. BEFORE YOU OPERATE THE MONITOR FEATURES • 55.87cm(22") TFT Color LCD Monitor • Crisp, Clear Display for hours. Owner's Manual 3. DVI Cable (Only dual-input model) 6. It may include blemishes of 0.01% or less...

User Guide
Page 5
... be considered. The relevant national installation and/or equipment regulations shall be used . 4 The AC-power cord may be connected to be used with your LCD monitor's AC-power-input. Alternative a flexible cord be used . PIOVWELERBCAOSRED Power Source: 1. A certified power supply cord not lighter than ordinary polyvinyl chloride flexible ...60245 (designation H05RR-F 3G 0.75mm2) shall be of power cord supplied with this equipment. Make sure that allows operation in your area. 2. This LCD monitor has an External universal power supply that the power cord is required.) 3.
... be considered. The relevant national installation and/or equipment regulations shall be used . 4 The AC-power cord may be connected to be used with your LCD monitor's AC-power-input. Alternative a flexible cord be used . PIOVWELERBCAOSRED Power Source: 1. A certified power supply cord not lighter than ordinary polyvinyl chloride flexible ...60245 (designation H05RR-F 3G 0.75mm2) shall be of power cord supplied with this equipment. Make sure that allows operation in your area. 2. This LCD monitor has an External universal power supply that the power cord is required.) 3.

User Guide
Page 6
Turn on your monitor into the PC port. 2. Power Cable 2. Signal Cable 3. Plug the other end to the computer's DVI port. 4. CONTROLS AND CONNECTORS CABLE CONNECTIONS Turn off your ... a nearby outlet. DVI Cable(Only dual-input model) 5 Figure 1 Connecting Cables 1. Connect one end of the 15-pin VGA cable to the back of the monitor and connect the other end to the computer's D-Sub port. 3. (Only dual-input model)Connect one end of the 24-pin DVI cable to the...
Turn on your monitor into the PC port. 2. Power Cable 2. Signal Cable 3. Plug the other end to the computer's DVI port. 4. CONTROLS AND CONNECTORS CABLE CONNECTIONS Turn off your ... a nearby outlet. DVI Cable(Only dual-input model) 5 Figure 1 Connecting Cables 1. Connect one end of the 15-pin VGA cable to the back of the monitor and connect the other end to the computer's D-Sub port. 3. (Only dual-input model)Connect one end of the 24-pin DVI cable to the...
User Guide
Page 7
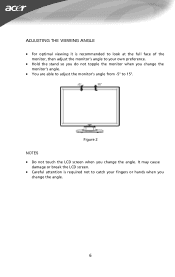
It may cause damage or break the LCD screen. • Careful attention is recommended to look at the full face of the monitor, then adjust the monitor's angle to your fingers or hands when you change the monitor's angle. • You are able to adjust the monitor's angle from -5° to catch your own preference. • Hold the stand so you do not topple the monitor when you change the angle. 6 ADJUSTING THE VIEWING ANGLE • For optimal viewing it is required not to 15°. Figure 2 NOTES • Do not touch the LCD screen when you change the angle.
It may cause damage or break the LCD screen. • Careful attention is recommended to look at the full face of the monitor, then adjust the monitor's angle to your fingers or hands when you change the monitor's angle. • You are able to adjust the monitor's angle from -5° to catch your own preference. • Hold the stand so you do not topple the monitor when you change the angle. 6 ADJUSTING THE VIEWING ANGLE • For optimal viewing it is required not to 15°. Figure 2 NOTES • Do not touch the LCD screen when you change the angle.

User Guide
Page 8
The power indicator will light up. Power Button 7 OPERATING INSTRUCTIONS GENERAL INSTRUCTIONS Press the power button to turn the monitor on the monitor position. Figure 3 External Control Button EXTERNAL CONTROLS 1. MENU / ENTER 5. By changing these settings, the picture can be adjusted to your... personal preferences. • The power cord should be connected. • Connect the video cable from the monitor to the video card. • Press the power button to turn on or off. Auto Config / Exit 2. < 3. > 4. Power Indicator 6....
The power indicator will light up. Power Button 7 OPERATING INSTRUCTIONS GENERAL INSTRUCTIONS Press the power button to turn the monitor on the monitor position. Figure 3 External Control Button EXTERNAL CONTROLS 1. MENU / ENTER 5. By changing these settings, the picture can be adjusted to your... personal preferences. • The power cord should be connected. • Connect the video cable from the monitor to the video card. • Press the power button to turn on or off. Auto Config / Exit 2. < 3. > 4. Power Indicator 6....

User Guide
Page 9
... or shock. • Save the original shipping carton and packing materials, as it was originally packed at the factory. • To keep the monitor looking new, periodically clean it . 8 Orange - Never use strong solvents such as EXIT-KEY (EXIT OSD menu). 2. FRONT PANEL CONTROL •...ON. • : navigate through adjustment icons when OSD is ON or adjust a function when function is used to ship your monitor. • For maximum protection, repackage your monitor as they will damage the cabinet. The Auto Adjustment function is activated. • Auto Adjust button / Exit: 1. As ...
... or shock. • Save the original shipping carton and packing materials, as it was originally packed at the factory. • To keep the monitor looking new, periodically clean it . 8 Orange - Never use strong solvents such as EXIT-KEY (EXIT OSD menu). 2. FRONT PANEL CONTROL •...ON. • : navigate through adjustment icons when OSD is ON or adjust a function when function is used to ship your monitor. • For maximum protection, repackage your monitor as they will damage the cabinet. The Auto Adjustment function is activated. • Auto Adjust button / Exit: 1. As ...
User Guide
Page 13
... restored by pressing a key on type connector body, rated 10A, 250V, having standard CEE-22 female configuration. The appearance is similar to a "Screen Saver" feature except the display is no video-input signal present. It allows the monitor to power outlet of its display capabilities. When there is completely off. Supplied with...
... restored by pressing a key on type connector body, rated 10A, 250V, having standard CEE-22 female configuration. The appearance is similar to a "Screen Saver" feature except the display is no video-input signal present. It allows the monitor to power outlet of its display capabilities. When there is completely off. Supplied with...

User Guide
Page 14
...not on the keyboard while observing the CAPS LOCK LED. The LED should be snugly seated in its slot *Make sure monitor's video cable is properly connected to the computer. *Inspect monitor's video cable and make sure that may cause pattern is Plug & Play compatible *Check if the D-15 plug pin of... compatible *Check if the Video Card is present in but there's no video or no the ON position. Missing one of the primary *Inspect the monitor's video cable and colors (RED, GREEN, or make sure none of the pins are BLUE) bent. 13 The power LED is fuzzy *Adjust the ...
...not on the keyboard while observing the CAPS LOCK LED. The LED should be snugly seated in its slot *Make sure monitor's video cable is properly connected to the computer. *Inspect monitor's video cable and make sure that may cause pattern is Plug & Play compatible *Check if the D-15 plug pin of... compatible *Check if the Video Card is present in but there's no video or no the ON position. Missing one of the primary *Inspect the monitor's video cable and colors (RED, GREEN, or make sure none of the pins are BLUE) bent. 13 The power LED is fuzzy *Adjust the ...


